Article Contents:
- Why rosette size is not a trifle, but architectural mathematics
- Formula for the ratio of rosette to room
- Influence of ceiling height
- Ratio of rosette to chandelier
- Ornament styles: how to choose a rosette that won't clash with the interior
- Classical rosettes with acanthus
- Geometric rosettes
- Baroque rosettes
- Art Nouveau rosettes
- Minimalist rosettes
- Material and quality: why polyurethane beats plaster
- Problems of plaster rosettes
- Advantages of polyurethane rosettes
- Detail quality and material density
- Color and painting: white, contrasting, patinated
- Monochromatic solutions
- Contrasting solutions
- Patination and gilding
- Installation: step-by-step technology without mistakes
- Preparing the ceiling
- Center Marking
- Wiring outlet
- Adhesive Application and Installation
- Sealing the joint and finishing
- Combining rosette with other ceiling elements
- Rosette and Ceiling Cornice
- Additional molding frames
- Multiple rosettes on one ceiling
- Common Mistakes and How to Avoid Them
- Mistake #1: rosette is too small
- Mistake #2: rosette is too large
- Mistake #3: style mismatch
- Mistake #4: incorrect centering
- Mistake #5: poor installation quality
- FAQ: Answers to Popular Questions
- Conclusion: from selection to implementation
Have you ever noticed how, upon entering some rooms, your gaze involuntarily drifts upward? Where an ordinary ceiling transforms into a composition of light and form, where the chandelier doesn't just hang from the ceiling but seems to bloom from an architectural frame? This effect is created bypolyurethane ceiling moldingunder the chandelier — an element that many underestimate, considering it a purely decorative whim.
In fact, a ceiling rosette is a powerful tool for the visual transformation of space. It can turn an unremarkable room into a hall with character, make a low ceiling appear visually higher, and a massive chandelier — lighter and more elegant. But there is a nuance: an incorrectly chosen rosette will produce the opposite effect. One that is too large will overwhelm, too small will get lost, and one that doesn't match the style will create visual dissonance.
So how to avoid mistakes? How to choose that perfect rosette that will become not just a beautiful detail, but an architectural solution for your interior? Let's figure it out — without generalities, with specific numbers, proportions, and practical advice from those who have been doing this professionally for decades.


Why rosette size is not a trifle, but architectural mathematics
Let's start with the main misconception: many choose a rosette intuitively, by eye, focusing only on the external beauty of the ornament. They bought one they liked, installed it — and were disappointed. It either gets lost against the background of the ceiling or, conversely, looks like a foreign spot that disrupts the harmony of the space.
The size of a rosette is not a matter of taste. It is a matter of proportions, mathematical relationships between the area of the ceiling, the height of the room, the size of the chandelier, and the diameter of the decorative element. There are time-tested formulas that work flawlessly.


Formula for the ratio of rosette to room
The basic rule is as follows: the diameter of the ceiling rosette should be from 1/5 to 1/3 of the shorter side of the room. What does this mean in practice?
Let's say you have a room 4 by 5 meters. The shorter side is 4 meters, that is 400 cm. Divide by 5 — we get 80 cm. Divide by 3 — we get 133 cm. The optimal rosette diameter for such a room is from 80 to 133 cm. You choose within this range, guided by the style and massiveness of the chandelier.
For a small room 3 by 3.5 meters, the calculation is different. The shorter side is 3 meters (300 cm). Range: from 60 cm to 100 cm. For a spacious living room 6 by 7 meters: from 120 cm to 200 cm.
This formula works for rooms of standard height (2.5-3 meters). If the ceilings are higher or lower, a correction factor is introduced.
Our factory also produces:


Influence of ceiling height
Ceiling height is critically important. A rosette that looks perfect in a room with a 3.2-meter ceiling will be overwhelming in a room with a height of 2.5 meters. And vice versa: a rosette suitable for a low ceiling will get lost in a space with a height of 4 meters.
Correction factors:
-
Ceiling 2.4-2.6 meters: reduce the calculated diameter by 15-20%
-
Ceiling 2.7-3.0 meters: use the basic calculation without changes
-
Ceiling 3.1-3.5 meters: increase the diameter by 10-15%
-
Ceiling above 3.5 meters: increase the diameter by 20-25%
Example: for a room 4×5 meters with a ceiling of 2.5 meters, the basic range of 80-133 cm needs to be adjusted. Reduce by 20%: we get 64-106 cm. The optimal choice is a rosette with a diameter of 70-90 cm.
Get Consultation
Ratio of rosette to chandelier
The second most important parameter is the size of the chandelier itself.Polyurethane rosette for chandeliersshould be 1.5-2.5 times larger than the diameter of the light fixture. Why exactly this ratio?
If the rosette is equal to or smaller than the chandelier, visually it is absorbed by the light fixture and loses its role as a frame. The effect of a compositional center disappears — all that remains is just a chandelier with an unclear spot around it.
If the rosette is 3 or more times larger than the chandelier, the opposite problem arises: the chandelier gets lost against the background of the rosette and looks like a small detail on a huge platter. The balance is disrupted in the other direction.
Ideal proportion: chandelier with a diameter of 60 cm — rosette 90-150 cm. Chandelier 40 cm — rosette 60-100 cm. Chandelier 80 cm — rosette 120-200 cm.
Ornament styles: how to choose a rosette that won't clash with the interior
Size is the foundation. But the appearance, ornament, and style of the rosette — that's what creates the emotional impression.ceiling rose made of polyurethanecan be incredibly beautiful on its own, but absolutely inappropriate in your interior.
Classical rosettes with acanthus
Acanthus is a stylized depiction of the leaves of a Mediterranean plant, one of the oldest ornamental motifs that has come to us from antiquity. Rosettes with acanthus are the standard of classical style, a symbol of traditional architectural beauty.
Such rosettes are ideal for interiors in the styles of classicism, empire, and English classic. They require appropriate surroundings: wall moldings,ceiling corniceswith ornamentation, furniture with carved elements, heavy drapes.
Mistake: installing an acanthus rosette in a minimalist interior with modern furniture. A stylistic conflict arises, destroying the integrity of the space. If you want a classic rosette in a modern interior, choose restrained options with minimal details.
Geometric rosettes
Geometry means concentric circles, radial rays, polygons, meanders. Such rosettes are stricter, more laconic, but no less expressive. They work excellently in Art Deco interiors, in modern classics, in eclectic spaces.
Geometric rosettes are more versatile than floral ones. They fit more easily into different styles and do not require such strict correspondence of surrounding decor. A round rosette with simple concentric rings looks equally good in both classic and modern interiors.
Baroque rosettes
Baroque is excess, opulence, theatricality. Baroque rosettes are the most complex multi-level compositions with many details, asymmetrical elements, and high relief. They create an effect of luxury but require very careful handling.
Such rosettes are appropriate only in spacious rooms with high ceilings (from 3.2 meters), in interiors where there is already a significant amount of decor. In a small room or minimalist space, a Baroque rosette will look like a museum exhibit that accidentally ended up in the wrong place.
Art Nouveau rosettes
Art Nouveau is flowing lines, stylized plants, asymmetry, a rejection of the strict geometry of classicism. Art Nouveau rosettes are recognizable by their characteristic curved shapes, plant motifs, and often asymmetrical composition.
They are ideal for eclectic interiors, for spaces where different eras and styles are mixed. An Art Nouveau rosette is less formal than a classic one but more decorative than a geometric one.
Minimalist rosettes
Modern interiors often require maximum restraint.Ceiling moldingIn such spaces, it is present but in an extremely laconic form. A minimalist rosette is a smooth circle or square with barely noticeable relief, creating a subtle play of light and shadow.
Such rosettes work not through ornamentation but through pure form and proportions. They are suitable for any modern interiors—from Scandinavian minimalism to industrial loft.
Material and quality: why polyurethane beats plaster
Traditionally, ceiling rosettes were made of plaster. This is a noble, centuries-tested material with excellent ability to hold the finest relief details. But plaster has serious drawbacks that make it increasingly less popular in modern construction.
Problems of plaster rosettes
First, weight. A large plaster rosette with a diameter of 80-100 cm weighs 15-25 kg. This creates serious installation problems: reinforced fastening is required, often a metal frame embedded in the ceiling. For stretch ceilings, plaster rosettes are practically inapplicable.
Second, fragility. Plaster chips easily upon impact, cracks from vibrations and building shrinkage. During transportation and installation, there is a high risk of damage, which is then difficult to restore.
Third, hygroscopicity. Plaster absorbs moisture, becomes heavier, can deform, and stains and mold appear on it. In rooms with high humidity, plaster rosettes quickly lose their appearance.
Fourth, complexity and cost of installation. Installing a plaster rosette requires professional skills, special fasteners, and often helpers due to the heavy weight. This increases the final cost by 2-3 times compared to the price of the product itself.
Advantages of polyurethane roses
Polyurethane solved all these problems. Modernceiling decorationsmade of high-density polyurethane are visually indistinguishable from plaster ones but weigh 6-8 times less.
A polyurethane rosette with a diameter of 80 cm weighs 2-3 kg compared to 15-20 kg for a plaster one. It can be easily lifted by one person and glued with ordinary polymer adhesive without additional fasteners. Installation takes 20-30 minutes instead of several hours.
Polyurethane is absolutely not afraid of moisture. The rosette can be installed in a bathroom, kitchen—it will not absorb a drop of water, will not deform, will not darken. It can be washed with any non-abrasive means.
The mechanical strength of polyurethane is higher than that of plaster. It does not crack from building shrinkage, does not chip from accidental impacts. If damage does occur, it is easily restored with putty and touch-up paint—the repair spot will be invisible.
Detail quality and material density
But not all polyurethane is the same. Cheap rosettes made of porous, low-density material have blurred relief, noticeable seams at element joints, and over time sag and yellow. High-quality products made of high-density polyurethane (density 250-300 kg/m³) are free of these drawbacks.
How to determine quality? Tap the rosette: the sound should be clear, not dull. Examine the relief: all details should be sharp, without smudged areas, bubbles, or cavities. Check the back side: it should be smooth, without large pores.
A high-quality polyurethane rosette is absolutely indistinguishable from a plaster one after painting, even upon close inspection. Yet it is several times lighter, easier to install, more durable, and more resistant to external influences.
Color and painting: white, contrasting, patinated
TraditionallyCeiling moldingIt is painted white. This is a classic, universal solution suitable for any interior. But does this mean other options are excluded? Not at all.
Monochromatic Solutions
The safest option is to paint the rosette the same color as the ceiling. Then it works solely through its relief, the play of light and shadow. This creates a subtle, sophisticated effect, especially with proper lighting.
For such a solution, it is important to choose a rosette with sufficiently deep relief. If the ornament is flat, it will almost disappear with a single-color paint. A relief depth of at least 10-15 mm is needed for the chiaroscuro play to be expressive.
Contrasting solutions
A bold step is a contrasting rosette. A dark ceiling (graphite, blue, green) and a white rosette. Or a white ceiling and a dark rosette (although this option works less well, as it darkens the center of the composition).
Contrast makes the rosette the main accent of the ceiling, dramatizing the composition. But it requires an appropriate setting: the rest of the interior should be sufficiently restrained so as not to compete with the ceiling.
A contrasting rosette is ideal for rooms with high ceilings (from 3 meters). In low rooms, this technique can create a feeling of pressure, visually further reducing the height.
Patination and gilding
To create an antique, aged effect, patination is used. The base color—usually ivory or light beige—is covered with a second layer of paint (gold, bronze, silver, dark brown), which is then partially wiped off, remaining only in the recesses of the relief.
This is a complex technique requiring professional execution. But the result is impressive: the rosette looks like an antique piece that has survived centuries. Patinated rosettes are ideal for high-end classic interiors, for spaces where every detail speaks of taste and affluence.
Full gilding of a rosette is the territory of palace interiors. In an ordinary apartment, a golden rosette may look excessive unless the entire interior is designed in a corresponding style. But for a formal living room, dining room, or study in a classic or Empire style—it is a quite appropriate solution.
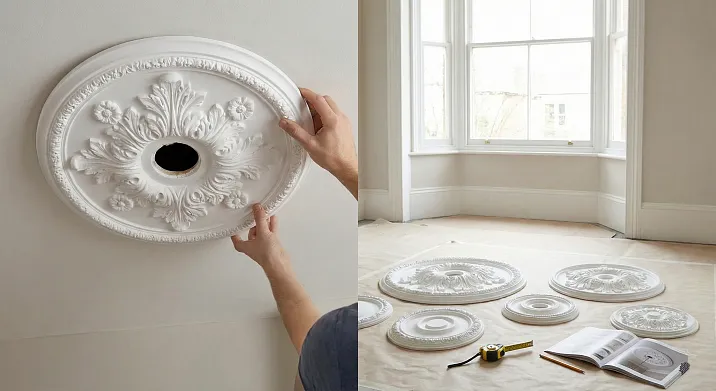
Installation: step-by-step technology without mistakes
You have chosen the perfect rosette. Now the main thing is to install it correctly. Mistakes at this stage can negate all the effort put into selecting the size and style.
Ceiling preparation
The ceiling must be level, clean, dry, and primed. Irregularities exceeding 2-3 mm over the rosette area are unacceptable—the rosette will not lie flat, voids will form underneath, and over time it may come unglued.
If the ceiling is painted with glossy paint, it needs to be sanded with sandpaper to create roughness—otherwise the adhesive won't bond. Whitewash must be completely removed—nothing will adhere to it.
Special attention should be paid to stretch ceilings. You cannot install an outlet on a standard stretch ceiling—the fabric will not support even a small weight. If you plan to have an outlet, a special embedded element is needed, installed before stretching the fabric. This must be planned in advance during ceiling installation.
Center marking
Critically important: the rosette must be perfectly centered. Even a deviation of 3-5 cm is immediately noticeable to the eye and creates a sense of imbalance.
The center of the ceiling is determined by the intersection of the diagonals. Two strings are stretched from corner to corner or lines are marked with a laser level. The intersection point is the geometric center of the ceiling.
An important nuance: the geometric center does not always coincide with the visual one. If the room has projections, niches, or bay windows, the center may be perceived as shifted. In such cases, rely on visual perception, not pure mathematics.
Mark the center with a pencil. Place the rosette against the ceiling, aligning its center with the mark. Trace the outline with a pencil—this will help when applying adhesive and positioning.
Wiring outlet
The chandelier is attached to the ceiling with a hook or mounting plate. This fastener must be installed before mounting the rosette and be exactly in the center of the ceiling (and, accordingly, the center of the rosette).
The wiring is routed through the central hole of the rosette. If the hole is too small for the wiring or the chandelier's fastener, it needs to be enlarged with a sharp knife or a hole saw of suitable diameter.
Important: the hook or plate for the chandelier must be long enough to pass through the thickness of the rosette (usually 3-5 cm) and still protrude 2-3 cm for attaching the light fixture. If the hook is short, replace it with a longer one before installing the rosette.
Applying Adhesive and Installation
For installation, use special polymer adhesive for polyurethane or universal construction adhesive like 'liquid nails.' Regular PVA is not suitable—it won't provide the necessary strength.
Apply adhesive to the back of the rosette with a notched trowel (4-6 mm notch) in an even layer over the entire surface. Don't skimp on adhesive, but don't overdo it either—excess will squeeze out at the edges and stain the ceiling.
Place the rosette against the ceiling, align it with the marked outline, and press evenly from the center to the edges. Press firmly but without fanaticism—don't press into the relief.
Excess adhesive that squeezes out at the edges should be immediately removed with a damp sponge. Once it starts to set, it will be difficult to remove.
The adhesive setting time is 12-24 hours depending on the type. During this time, the rosette cannot be loaded, and the chandelier cannot be installed. Allow the adhesive to dry completely.
Joint sealing and finishing
A small gap (1-2 mm) often forms between the edge of the ceiling medallion and the ceiling due to imperfect ceiling flatness. This gap should be filled with acrylic putty or sealant.
Apply putty in a thin layer, smooth it with a wet brush or finger. After drying (4-6 hours), sand the joint area with fine sandpaper until smooth.
Then the entire outlet is primed and painted. Usually, 2-3 coats of paint are required for even coverage. Use water-based or acrylic paint—it is odorless, dries quickly, and forms a durable coating.
Only after the paint has completely dried (24-48 hours) can you mount the chandelier.
Combining the medallion with other ceiling elements
A medallion rarely exists in a vacuum. Usually, the ceiling is designed comprehensively: a medallion plus cornices, possibly moldings, friezes, additional overlays. How to combine these elements so they work in unison?
Rose and ceiling cornice
A cornice around the perimeter of the ceiling is a classic addition to a central medallion. They work as a frame and a central medallion: the cornice frames the ceiling plane, the medallion accentuates its center.
The style of the cornice and medallion should match. If the medallion has acanthus, the cornice should also have a floral ornament. If the medallion is geometric, the cornice should have geometric motifs or be completely smooth.
Proportions are also important. The more massive the medallion, the more pronounced the cornice should be. A large medallion with a diameter of 100-120 cm requires a cornice at least 10-12 cm wide. A small medallion of 50-60 cm requires a cornice of 6-8 cm.
Additional molding frames
To enhance the composition, you can create an additional frame from moldings around the medallion. This is a square or rectangular frame at a distance of 30-50 cm from the edge of the medallion, as if framing it a second time.
This solution is suitable for large rooms where a single medallion seems insufficient to fill the ceiling plane. An additional frame creates a multi-level composition, increasing the visual richness of the ceiling.
Important: the moldings for the frame should be simpler and more concise than the medallion. The medallion is the main element, the frame is supportive. If both elements are equally complex and ornate, competition arises, and the composition falls apart.
Multiple medallions on one ceiling
In very large rooms (halls with an area of 40-50 sq.m or more), one medallion may not be enough. Then a composition of several medallions is created.
The classic scheme is three medallions in a row for an elongated room or four medallions at the corners of a square for a square hall. The central medallion is usually 20-30% larger than the side ones.
It is important to maintain equal distances between medallions and symmetry. Asymmetric placement of multiple medallions almost always looks chaotic, unless it is a composition specifically designed by a designer.
Typical mistakes and how to avoid them
Over years of practice, we have seen hundreds of unsuccessful examples of using ceiling medallions. Let's analyze the most common mistakes.
Mistake #1: medallion is too small
The most common problem. Choosing a medallion with a diameter of 40-50 cm for a 20 sq.m room—and it simply gets lost, looks like a small speck on a huge ceiling. There is no effect, money and time are wasted.
Solution: don't skimp on size. Better slightly larger than slightly smaller. A large medallion creates an effect, a small one gets lost.
Mistake #2: medallion is too large
The opposite problem, but less common. A huge medallion with a diameter of 100 cm in a 12 sq.m room with a 2.5-meter ceiling. It overwhelms the space, creates a feeling of tightness, and visually lowers the ceiling.
Solution: maintain proportions. Use the formulas from the beginning of the article, don't rely on intuition.
Mistake #3: style mismatch
A Baroque medallion with an abundance of curls in a minimalist Scandinavian interior. Or a geometric Art Nouveau medallion in a classic interior with antique furniture. Visual dissonance arises, destroying harmony.
Solution: choose a medallion in accordance with the style of the interior. If in doubt—choose a neutral geometric one, it is more universal.
Mistake #4: incorrect centering
The medallion is shifted 10-15 cm from the center of the ceiling. It may seem like a small thing, but the effect is catastrophic—the space looks disharmonious, the eye catches the asymmetry.
Solution: careful marking, using a laser level, checking diagonals. Don't rush, spend 15 minutes on precise marking — it will save years of irritation from crooked installation.
Mistake #5: poor installation quality
Visible seams between the rosette and the ceiling, uneven coloring, traces of glue. Even a perfectly matched rosette will look shabby with poor installation.
Solution: don't skimp on materials (glue, putty, paint), don't rush, follow the technology. If you're not confident in your abilities — invite a professional.
FAQ: Answers to popular questions
Can a rosette be installed on a stretch ceiling?
Yes, but with limitations. A special embedded element (a platform made of plywood or plastic) is needed, which is attached to the base ceiling before stretching the fabric. The rosette is then glued to this platform through the fabric. The fabric at the attachment point is reinforced with a special ring. This needs to be planned before installing the stretch ceiling.
What diameter rosette to choose for a chandelier with a diameter of 50 cm?
Use a coefficient of 1.5-2.5. For a 50 cm chandelier, the optimal rosette diameter is 75-125 cm. Choose within this range depending on the room area and ceiling height.
Can a polyurethane rosette be painted gold?
Yes, polyurethane paints excellently with any paints. For gilding, use acrylic gold paint or special metallic compounds. Important: prime the rosette beforehand for better paint adhesion.
How much does a polyurethane rosette with a diameter of 80 cm weigh?
A quality rosette of this diameter weighs 2-3.5 kg depending on the depth of the relief. This is 6-8 times lighter than a similar plaster one.
Can a rosette be installed in a bathroom?
Yes, polyurethane is not afraid of moisture. But use moisture-resistant glue and moisture-resistant paint. Ensure good ventilation to prevent constant condensation on the ceiling.
How to care for a ceiling rosette?
Every few months, wipe with a dry cloth or vacuum with a soft attachment to remove dust. For stains, you can wipe with a damp sponge with a mild detergent. Do not use abrasives — they can damage the paint.
Is special lighting needed for a rosette?
A rosette looks best with directional light that reveals the relief. A chandelier with shades pointing upwards is ideal — light glides over the ornament, creating a play of light and shadow.
Can a rosette be installed independently or are specialists needed?
Installing a polyurethane rosette is not difficult; it can be done independently with basic repair skills. You need: glue, a spatula, a level, a pencil. The main thing is precise marking and carefulness. But if in doubt — it's better to invite a master, redoing it will cost more.
Conclusion: from selection to implementation
We have gone from the theory of proportions to the practical details of installation. Now you know how to choose a ceiling rosette that won't be a mistake, but will become an architectural solution for your interior. Size, style, material, color, installation — every aspect is important, every detail matters.
The main thing to remember: a rosette is not a random decoration. It is an element of architectural composition, subject to the laws of proportions and stylistic conformity. Choose it consciously, with an understanding of these laws, and the result will exceed expectations.
To implement your ideas, quality materials are needed. The company STAVROS has been creating decorative elements for interiors for over two decades, offering European-level products at reasonable prices.
STAVROS Ceiling Rosettes— are made of high-density polyurethane of German production (density 280-300 kg/m³), guaranteeing the clarity of the smallest ornament details and geometric stability for decades. Each rosette undergoes multi-stage quality control, is supplied primed, ready for finishing.
The STAVROS catalog features over 150 rosette models with diameters from 25 cm to 200 cm, in styles from strict classics to modern minimalism. You will find the perfect option for any interior and any budget. Both individual rosettes and ready-made kits with stylistically matched cornices and moldings are available.
STAVROS professional consultants will help select elements considering your room parameters, provide recommendations for installation and finishing, and calculate the required amount of materials. Own warehouses in Moscow and St. Petersburg ensure availability of popular items and fast shipping. Delivery is carried out throughout Russia with a guarantee of product safety.
Visit STAVROS showrooms to see rosettes in person, evaluate the quality of the relief, and receive professional consultation. Or explore the catalog on the website — detailed photos, precise dimensions, style descriptions will help you make the right choice without leaving home.
Create ceilings that amaze. Turn ordinary rooms into spaces with character. Choose quality, tested by time. With STAVROS rosettes, your ceiling will gain that very missing detail that will tie the entire interior into a harmonious whole.
Your perfect ceiling medallion awaits. Start the transformation today.