


Article Contents:
- The Philosophy of DIY Furniture: From Kit to Masterpiece
- Difficulty Levels: Choose Your Starting Point
- Master's Toolkit: Essential Minimum
- Furniture Frames: Building a Table Base in a Few Hours
- Choosing a Table Base: Parameters and Compatibility
- Mounting a Tabletop on a Base: Three Methods
- Reinforcing the Structure: When It's Necessary
- Tabletops: The Heart of the Table
- Furniture Board: Ready-Made Solution
- DIY Tabletop Gluing
- Furniture Decor: Transforming Simple into Exquisite
- Choosing Carved Overlays: Style and Scale
- Installing Overlays: Technique and Mistakes
- Installation Errors
- Furniture Handles: The Detail That Changes Everything
- Types of Wooden Handles
- Handle installation: precision is critical
- Final finishing: protection and aesthetics
- Oil: Natural Protection
- Varnish: Durable Protection
- Wax: Classic Finish
- Step-by-Step Scenarios: From Concept to Result
- Project 1: Dining Table Over a Weekend
- Project 2: Decorated Dresser in Two Weeks
- Project 3: Shelf with Carved Brackets in a Day
- Frequently Asked Questions
- Conclusion: From Dream to Mastery
The Dreamcreate furniture with your own handsis no longer a fantasy accessible only to professional carpenters with workshops filled with expensive equipment. Today, anyone with basic manual skills, a minimal set of tools, and a desire to create can assemble a unique piece of furniture that surpasses in quality and aesthetics everything sold in mass-market stores. The secret is not in cutting everything from scratch, but in skillfully using high-quality ready-made components —Solid Wood Itemswhich are produced on professional equipment and ready for assembly. This guide is a step-by-step map for those ready to move from idea to implementation.


The Philosophy of DIY Furniture: From Kit to Masterpiece
Making furniture yourself isn't just about saving money, though the financial benefit is clear: material costs are 2-3 times lower than the retail price of finished furniture. It's a creative process where you control every detail—the size for your space, the color for your interior, the style for your taste. It's a tangible result that brings satisfaction unattainable through purchase.
The modern approach to DIY furniture is built on modularity. Instead of trying to carve a decorative leg or glue a tabletop from boards, you buy ready-made components—turned balusters, laminated panels, carved overlays, hardware—and assemble furniture from them like building blocks. But it's an intellectual construction set where every decision requires understanding the material, proportions, and technology.


Difficulty Levels: Choose Your Starting Point
Level 1: Assembly from Ready-Made Elements. A table base with four legs, a ready-made tabletop, and fasteners. In a day's work—a unique dining table. Minimal tools: drill, screwdriver, screwdriver, level. No woodworking—just assembly.
Level 2: Assembly with Decoration. Basic furniture (table, dresser, cabinet) is enhanced with carved overlays, hardware is changed, and a finish of your choice is applied. Skills in working with glue, sanding, and applying oil or varnish are required.
Level 3: Combined Production. Some elements are purchased ready-made (legs, overlays, hardware), some are made independently (frames, fronts, shelves from boards or panels). Skills in sawing, milling, and joinery are required.
Start with the first level. Success inspires, failure at the start demotivates. The first project should be simple, but the result—impressive.
Our factory also produces:


Master's Toolkit: Essential Minimum
For assembling furniture of the first difficulty level, a basic set that most home craftsmen have is needed:
Measuring tools:
-
5-meter construction tape measure
-
300x200 mm carpenter's square
-
600 mm construction level
-
Carpenter's pencil or marker
Power Tools:
-
Cordless screwdriver (12-18 volts, minimum torque 40 Nm)
-
Drill or drilling function of a screwdriver
-
Set of wood drill bits (2, 3, 4, 5, 6, 8, 10 mm)
-
Screwdriver bits for screws (cross-head PH2, PH3)
-
Random orbital sander (for finishing, optional)
Hand tools:
-
Clamps (minimum 4 pieces, length 300-600 mm)
-
Rubber mallet (dead blow hammer)
-
Set of flat chisels 6-12-20 mm
-
Wood saw (hand saw) (if trimming is needed)
-
Sandpaper of various grits (80, 120, 180, 240)
Consumables:
-
Wood screws (3x16, 3x25, 4x40, 5x50 mm)
-
PVA wood glue or construction adhesive
-
Wood filler (matching wood tone)
-
Brushes, rags, protective gloves
For the second and third levels, expansion will be needed: miter saw or jigsaw, handheld router, belt sander, larger clamps, tools for precise drilling.
Get Consultation
furniture frames: table base in a few hours
The fastest path to your own table is a ready-made table base. This is an already assembled or partially assembled structure of four legs connected by aprons and stretchers, ready to support a tabletop and its load. All you have to do is attach the tabletop and, if desired, add decorative elements.
Choosing a Table Base: Parameters and Compatibility
Height. The standard height of a dining table is 72-76 cm. The table base should be 4-6 cm lower to achieve the desired height after installing a 4-6 cm thick tabletop. For a desk — 74-78 cm, for a coffee table — 40-50 cm, for a bar table — 100-110 cm.
Width and Length. The table base should be 20-40 cm smaller than the tabletop on each side. For a 180x90 cm tabletop, a base of 140-160x50-70 cm is suitable. The tabletop overhang (distance from the tabletop edge to the leg) should be 20-30 cm — this ensures stability and comfort.
Leg Style. Turned balusters for classic style, straight tapered for neoclassical, simple rectangular for minimalism. The leg style should match the interior style and the tabletop.
Material. Oak — maximum strength, dark noble shade. Beech — slightly lighter, easy to stain. Ash — light, expressive grain. The choice depends on the overall interior palette.
Mounting the Tabletop to the Base: Three Methods
Method 1: Screws from Above. The simplest, but the tabletop will have visible holes (can be filled). The tabletop is placed on the base, aligned, attachment points are marked (2-3 per apron). Drill 4 mm holes in the tabletop, then countersink (widen) with an 8-10 mm drill bit to a depth of 5-7 mm to recess the screw head. 5x50 mm screws are driven through the tabletop into the apron. The holes are filled and sanded.
Method 2: Screws from Below. More aesthetic — fasteners are not visible. Holes are drilled in the aprons at a 15-20 degree angle to the tabletop. 4x40 mm screws are driven through the apron into the tabletop from below. Requires precision — a miss means the screw will come out through the tabletop. Use a template or jig for accurate drilling.
Method 3: Furniture Brackets. Metal L-shaped plates are attached with screws to the apron and to the tabletop. A universal method that does not require high precision. The brackets must be hidden under the tabletop. The downside — metal fasteners are less aesthetic than hidden screws, but for DIY projects it is quite acceptable.
Reinforcing the Structure: When It's Necessary
If the table will bear a heavy load (a dining table for 8-10 people, a desk with heavy equipment), a standard table base can be reinforced. Diagonal braces between legs and aprons, an additional central beam under the tabletop, glue joints in addition to screws — all this increases rigidity.
Glue is applied to the contact surfaces before assembly, parts are tightly joined, clamped for 24 hours. After the glue dries, the joint is stronger than the wood itself.
Tabletops: The Heart of the Table
The tabletop is the visible, functional, most important part of the table. It determines aesthetics, functionality, durability. Options — a ready-made glued tabletop (solid wood panel), which only needs a finish, or self-gluing from boards (requires equipment and skills).
Solid Wood Panel: A Ready-Made Solution
A solid wood panel is lamellas (narrow boards) of solid wood glued into a single plane. Lamella width 40-80 mm, panel thickness 18-40 mm. The panel is more stable than a solid board because the differently oriented grains of adjacent lamellas compensate for internal stresses, preventing warping.
Advantages: ready to use, only final finishing needed. Disadvantages: standard sizes (usually up to 200x60 cm), visible lamella joints (for some this is a plus — the structure of natural wood is visible, for others a minus).
When buying a panel, check: flatness (place on a flat surface, check for rocking), joints (should be tight, without gaps), moisture content (8-12% — optimal, higher — risk of drying and deformation after installation).
Self-Gluing a Tabletop
If you want a unique size or texture (e.g., with a live edge, alternating wood species, with contrasting inserts), you will have to glue it yourself. The process is labor-intensive, but the result is a completely unique product.
Step 1: Selecting Boards. Boards must be dry (moisture content 8-10%), without through cracks, rot, large knots in the gluing area. Thickness — 8-10 mm more than final (will be lost to sanding). Length — 5-10 cm more (will be trimmed after gluing).
Step 2: Layout. Lay the boards side by side, matching grain and color. Alternate the direction of the annual rings (one board with the arc up, the next down) — this prevents warping. Number the boards to avoid mixing up the order.
Step 3: Preparing Edges. The edges to be glued must be perfectly straight and perpendicular. Use a jointer (hand or electric) or a router with a straight bit and guide. Two boards placed edge to edge should have no gap.
Step 4: Gluing. Apply glue (PVA wood glue or polyurethane) in a thin, even layer to both edges. Join the boards, clamp with clamps every 30-40 cm. Pressure — enough for glue beads to appear, but not too strong (can deform boards). Place wooden pads under the clamps to avoid damaging the wood.
Step 5: Curing and Processing. Keep in clamps for 24 hours. Remove clamps, trim excess glue with a chisel, cut edges to final size with a circular or miter saw. Sand the surface — first with 80 grit (remove unevenness), then 120 (preparation), then 180 (final before coating).
Furniture decorTurning Simple into Exquisite
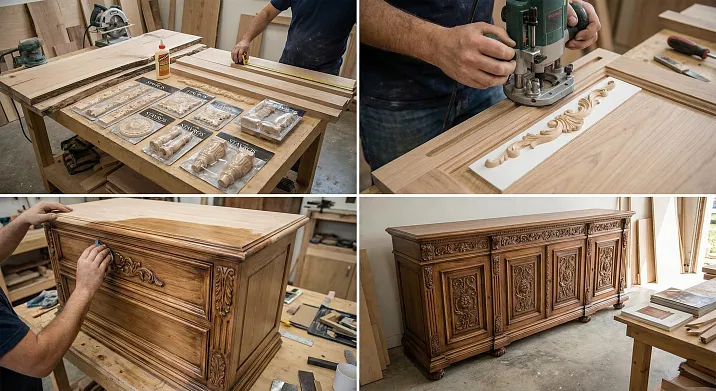
The most dramatic transformation of furniture is achieved by adding carved elements. A simple table with straight legs, complemented by carved corner overlays, a rosette in the center of the facade, immediately acquires classical stature. A simple chest of drawers, with carved frames glued to its fronts, looks like antique furniture.
Choosing Carved Overlays: Style and Scale
Carved overlays differ in:
-
Size: from small (10x10 cm) for corners and accents to large (50x70 cm) for panel centers
-
Style: Baroque (elaborate scrolls, shells), Classicism (symmetrical garlands, rosettes), Neoclassicism (simplified floral motifs)
-
Relief: Low (2-5 mm) for restrained decor, high (10-20 mm) for expressive decor
Scale rule: The overlay must match the furniture size. On a small 40x40 cm nightstand, a large 40x40 cm overlay will cover the entire front — excessive. A 15x15 cm overlay in the corner or 20x10 cm in the center — correct. On a large 120x80 cm dresser, a small overlay will get lost.
Overlay installation: technique and mistakes
Surface preparation. The front must be clean, dry, sanded. If it has an old finish (varnish, paint) — sand the area under the overlay down to bare wood, otherwise the adhesive won't bond.
Marking. Determine the overlay placement. For symmetrical compositions, measure precisely — a 1 cm difference is immediately noticeable. Use a pencil or painter's tape to mark the boundaries.
Applying adhesive. Use mounting adhesive (like liquid nails) or woodworking PVA. Apply in dots or thin strips to the back of the overlay. Do not cover the entire surface — excess will squeeze out and stain the front.
Pressing and fixing. Place the overlay, press lightly, remove and wait 3-5 minutes (open time method — adhesive becomes tackier). Reapply, press firmly for 10-30 seconds. Secure with painter's tape or a light weight on top. Hold for 24 hours until fully dry.
Additional fastening. For overlays weighing over 100 grams or in areas with vibration (cabinet doors) add 1-2 thin headless nails or pins. Drill holes with a thin drill (1.5 mm) through the overlay into the front, drive in the pin, countersink with a punch, fill with putty.
Installation errors
Excess adhesive. Squeezes out around the overlay edges, stains the wood, is difficult to remove, leaves marks. Solution: apply adhesive sparingly, remove excess immediately with a damp cloth.
Uneven adhesion. The overlay is skewed, one side lifts. Solution: use a level or ruler during initial pressing, secure with clamps using spacers.
Damage to carving. When clamped, fragile carved elements break. Solution: place soft material (foam, felt) between the clamp and the overlay.
Furniture Handles: the detail that changes everything
Replacing factory metal or plastic handles with carved wooden ones — the simplest way to transform furniture. An old IKEA dresser with handmade wooden handles looks like a vintage flea market find.
Types of wooden handles
Knobs. Round or oval, diameter 30-50 mm, attached with one screw. Suitable for small drawers, doors.
Pulls. U-shaped, attached with two screws, distance between mounting hole centers (center-to-center) 64, 96, 128, 160 mm. Suitable for pull-out drawers, wide doors.
Figural. Shapes of animals, plants, geometric figures. Decorative, create an accent, suitable for children's furniture, eclectic interiors.
Handle installation: precision is critical
Marking must be perfectly accurate. For a row of drawers, use a template — a piece of cardboard or plywood with holes drilled in the required places. Place the template on each front, mark through the holes — guarantees all handles are aligned.
Drill from the back of the front or place a board behind when drilling — this prevents tear-out when the drill exits. Hole diameter — 0.5 mm larger than the screw diameter for easy installation.
For heavy wooden handles, use reinforced fasteners — screws at least 30 mm long with washers. If the front is thin (10-15 mm) and the handle is heavy, glue a wooden reinforcing plate inside.
Finish: protection and aesthetics
Untreated wood is beautiful but vulnerable. Water leaves stains, dirt embeds in pores, ultraviolet light causes fading. A finish protects and enhances the grain.
Oil: natural protection
Oil penetrates the wood structure, fills pores, without creating a surface film. Wood after oiling looks moist, the grain becomes more contrasted, pleasant silky feel.
Types of oils:
-
Linseed — classic, inexpensive, dries slowly (24-48 hours), may yellow
-
Tung — more durable, doesn't yellow, more expensive, dries slowly
-
Danish — a blend of oil and varnish, creates a more durable finish
-
Oil-wax — with added wax, gives a matte silky finish
Applying oil:
-
Wood sanded to 180-240 grit, dust removed
-
Apply oil with a brush or cloth in a thin layer, rub along the grain
-
Let sit for 10-15 minutes, wipe off excess with a dry cloth (important — do not leave puddles, they become sticky)
-
Drying 24 hours
-
Repeat 2-3 coats for reliable protection
Maintenance: Refresh every 1-2 years — apply a new coat of oil without prior treatment.
Varnish: durable protection
Varnish creates a hard, transparent film on the surface. Wood under varnish is protected from water, scratches, and dirt. However, the tactile feel is lost — instead of wood, you feel plastic.
Types of varnish:
-
Polyurethane — the most durable, wear-resistant, for countertops, floors
-
Acrylic — water-based, safe, fast-drying, less durable
-
Alkyd — classic furniture varnish, medium durability, yellows wood
Varnish application:
-
Wood sanded, cleaned
-
First coat — primer, thinned varnish (10-20% solvent)
-
Drying 4-6 hours
-
Light sanding with 320 grit (remove raised fibers)
-
Second coat — undiluted varnish, thin, without runs
-
Drying 6-8 hours
-
Sanding 400 grit
-
Third coat — finish
-
Drying 24 hours
Maintenance: Wipe with a damp cloth. Refresh after 5-10 years — remove old varnish by sanding, apply new.
Wax: classic finish
Wax is a natural material (beeswax, carnauba) that is rubbed into wood, creating a matte soft sheen and pleasant tactile feel. Protection is weaker than oil or varnish, but the aesthetics are unique.
Wax is applied to an oiled surface (oil — primary protection, wax — final sheen). Rub in with circular motions using a soft cloth, polish to a shine. Refresh every 6-12 months.
Step-by-step scenarios: from idea to result
Project 1: Dining table over the weekend
Materials:
-
Table base with four turned legs, height 70 cm, apron frame size 140x80 cm
-
Tabletop (oak furniture panel) 180x90x4 cm
-
Screws 4x40 mm — 20 pieces
-
Furniture brackets — 8 pieces
-
Wood oil 0.5 liters
-
Sandpaper 180, 240
Tools: Screwdriver, drill, 4 and 8 mm drill bits, tape measure, pencil, level, brush
Process:
Day 1 (4 hours):
-
Unpacking, inspection of all parts (30 minutes)
-
Sanding the tabletop with 180 grit, then 240 grit (2 hours)
-
Dust removal, application of the first coat of oil (30 minutes)
-
Drying overnight
Day 2 (3 hours):
-
Application of the second coat of oil on the tabletop (30 minutes)
-
Assembly of the underframe: connecting legs to rails with screws (if not pre-assembled), checking with a square and level (1 hour)
-
Attaching the tabletop: marking, installing furniture brackets on the rails, screwing the tabletop through the brackets (1 hour)
-
Installation of leg pads (felt, plastic), final check (30 minutes)
Result: A solid oak table for 6-8 people, material cost 45-60 thousand rubles (a ready-made equivalent in a showroom — 150-200 thousand).
Project 2: Dresser with decoration in two weeks
Materials:
-
Ready-made dresser (IKEA or similar) with three drawers
-
Carved corner overlays (4 pieces) 15x15 cm
-
Carved central overlay (1 piece) 30x20 cm
-
Wooden knob handles (6 pieces) diameter 40 mm
-
Mounting adhesive
-
Paint or stain (if you want to change the color)
-
Matte acrylic varnish 0.5 liters
Process:
Week 1:
-
Disassembling the dresser, removing old handles, hardware (1 hour)
-
Sanding the fronts with 120 grit (remove old finish if present) (3 hours)
-
Applying stain or paint (if changing color), drying 24 hours (1 hour of work)
-
Marking locations for overlays (on the corners of the fronts, central on the top drawer) (1 hour)
-
Gluing the overlays, fixing, drying 24 hours (2 hours)
Week 2:
-
Applying the first coat of varnish to everything (2 hours)
-
Drying 6 hours, light sanding with 320 grit (1 hour)
-
Applying the second coat of varnish (2 hours)
-
Drying 24 hours
-
Installing new wooden handles (marking holes, drilling, screwing) (2 hours)
-
Assembling the dresser (1 hour)
Result: A unique dresser with classic decor that looks like an antique find, material cost 15-20 thousand rubles.
Project 3: Shelf with carved brackets in a day
Materials:
-
Board or furniture panel (shelf) 120x25x4 cm
-
Two carved brackets (can be ordered ready-made or cut from balusters)
-
Dowels and screws for wall mounting
-
Oil or varnish
Process (6 hours):
-
Sanding the shelf and brackets (1 hour)
-
Applying coating (oil or varnish), drying (1 hour work, 4 hours drying)
-
Marking on the wall, drilling holes, installing dowels (1 hour)
-
Attaching brackets to the wall (30 minutes)
-
Placing the shelf on the brackets, securing from below with screws (30 minutes)
Result: A decorative shelf with carved supports, cost 5-8 thousand rubles.
Frequently asked questions
Is carpentry experience needed for DIY furniture assembly?
For the first level (assembly from ready-made elements), no experience is needed. The ability to use a screwdriver, measure with a tape measure, and follow instructions is sufficient. For the second and third levels, basic experience or a willingness to learn through trial and error is desirable (start with inexpensive materials).
What is the best glue for attaching carved overlays?
Woodworking PVA - for non-critical joints, dries slowly (24 hours), water-soluble before drying. Construction adhesive (liquid nails) - sets faster (1-2 hours), holds stronger, suitable for heavy overlays. Polyurethane - maximum strength, water-resistant, but expensive and requires precision (expands when drying).
Can ready-made frames be used for non-standard furniture sizes?
Yes, but with limitations. The under-table frame can be cut along the length of the rails (if the design allows) or custom-made from the manufacturer. Balusters can be shortened (cut from the bottom, where there is usually a cylindrical section without threading). Tabletops are cut to the required size.
How much do materials for a simple table cost?
Oak under-table frame 140x80 cm - 15-25 thousand rubles. Tabletop 180x90x4 cm (oak furniture panel) - 20-30 thousand. Fasteners, oil, consumables - 2-3 thousand. Total: 37-58 thousand rubles. A ready-made equivalent in a store - 120-180 thousand.
How to protect a tabletop from heat and moisture?
Varnish provides the best protection from water and moderate heat (up to 80°C). Oil protects from short-term moisture, but hot dishes will leave stains. For maximum protection: polyurethane varnish in 3 coats. Or use trivets and coasters for hot items and napkins.
What mistakes do beginners most often make?
Inaccurate marking (handles at different levels), excess glue (stains on wood), rushing the finish coating (applying the next coat before the previous one dries), using unsuitable fasteners (screws that are too long pierce through the facade), ignoring sanding (rough surface after coating).
Should wood be primed before applying oil?
No, oil itself primes and impregnates. Primer is needed before varnish (the first diluted coat of varnish is the primer) or before paint (special wood primer).
How to fix an error when mounting a trim in the wrong place?
If the glue hasn't set yet (first 30 minutes), carefully remove the trim, clean off the glue with a solvent (white spirit for mounting adhesive), let it dry, and re-glue. If the glue has set, you'll have to remove it mechanically (with a chisel), which may damage the facade, then sand and restore it.
Where to buy quality blanks and components?
From specialized manufacturers of solid wood products. Construction hypermarkets sell mass-produced items of average quality. Furniture factories often sell components retail. Check wood moisture content, processing quality, and dimensional accuracy.
How long does it take on average to make a simple piece of furniture?
A table from a ready-made base and tabletop — 6-8 hours of pure work (plus drying time for finishes). A dresser with decoration — 15-20 hours of work over 1-2 weeks (including drying). A shelf — 4-6 hours in one day. Time extends due to technological pauses (drying of glue, varnish, oil).
Conclusion: From Dream to Mastery
create furniture with your own hands— is not an exotic hobby for the chosen few, but an accessible path for anyone willing to invest time and attention. Each completed project provides not only a unique interior item but also confidence, skills, and an understanding of the material. The first table will be imperfect — a gap here, an unevenness there. The second one will be significantly better. By the fifth project, your hands will know what to do without instruction prompts.
The key to success is quality components. You cannot create something beautiful from mediocre materials.Solid Wood Items— of noble species, professionally processed, with precise dimensions — that's 80% of success. The remaining 20% is your care, patience, and willingness to redo if something goes wrong.
Furniture decor, furniture frames, Furniture Handles— are not just parts; they are tools for creative self-expression, allowing you to create things that cannot be bought ready-made because they carry your taste, your vision, your story.
The company STAVROS has been producing components for DIY furniture making for over two decades — everything DIY enthusiasts need to implement projects of any complexity. Bases with turned balusters, ready-to-install tabletops, furniture panels made of oak and beech, carved trims in hundreds of shapes and sizes, wooden handles, brackets, supports — every STAVROS product is manufactured on high-precision equipment from selected solid wood, dried to 8-10% moisture content, ensuring stability and no deformation after assembly.
STAVROS understands the needs of home craftsmen: all parts have standardized dimensions and mounting points, installation instructions are available on the website, consultants help select compatible components and calculate material quantities. The STAVROS catalog features over 5000 items: from simple balusters to complex carved panels, from standard tabletops to exclusive live-edge slabs.
For finishing, STAVROS offers professional materials: natural plant-based oils without toxic solvents, polyurethane varnishes with high wear resistance, mounting adhesives that ensure reliable wood bonding. Everything is tested, everything is compatible, everything works.
With STAVROS, the path from idea to finished furniture becomes predictable and joyful. You don't wander searching for quality materials, you don't experiment with questionable components — you choose from a proven range, receive parts of perfect quality, and assemble furniture that lasts for decades and evokes pride every time you or your guests see it and ask: 'Where did you find such a thing?' And you smile and answer: 'Made it myself.' That feeling is priceless, and STAVROS makes it accessible.


