Article Contents:
- Why proper jointing is so important
- Visual perception: first impression
- Functional consequences of poor jointing
- Aesthetics after painting
- Durability of the structure
- Cost of correcting errors
- End preparation and marking
- Tools for precise end cutting
- Cutting technique for perfect joints
- Ends finishing after cutting
- Marking for straight joints
- Marking for corners: internal and external
- Part marking
- Adhesives, spackling compounds, and joint fillers
- Why end sealing is necessary
- Types of adhesive for joint sealing
- Technique for end sealing
- Joint filling: materials and techniques
- Sealant application technique
- Spackling compound application technique
- How to make joints invisible
- Color matching rule
- Joint geometry: concave vs convex
- Joint "melting" technique
- Working with light and shadow
- Multi-layer filling technique
- Quality check before painting
- Corner processing and final finishing
- Internal Angles: Step-by-Step Technology
- External Angles: Increased Complexity
- Complex Angles: Not 90 Degrees
- Molding Jointing
- Final Sanding
- Priming Before Painting
- Final Painting
- Angle Protection After Installation
- Conclusion: Mastery in Details
Repair is nearing completion. The molding has been cut, angles trimmed to 45 degrees, and it seems everything is ready for installation. But a week after installation, you discover with horror: gaps yawn in the corners, straight joints have shifted apart, and the white molding surface is marred by dark seam lines. What initially seemed like an ideal repair is ruined by poor jointing.
Professional masters know: the most difficult part of installing molding is not adhering it to the wall, but rather the jointing. You can buy the most expensive molding, use the best adhesive, but if the joints are poorly executed, the result will look cheap and unprofessional. Gaps in the corners, visible lines of connection, cracks in the putty — all of this immediately catches the eye and spoils the overall impression of the interior.
At the same time, proper jointing transforms a set of individual boards into a monolithic structure. Joints become invisible, corners align perfectly, and after painting, the molding looks like a single, precisely sized element made to fit your room. This is exactly the technology of flawless jointing we will discuss, breaking down each stage from end preparation to final finishing.


Why Proper Jointing Is So Important


Visual Perception: First Impression
The human eye is structured so that it notices even the slightest violations of symmetry and integrity. Even a microscopic gap of 0.5 mm in a room's corner is visible from a distance of 3-4 meters, especially under side lighting. The shadow from the gap creates a dark line that appears larger than it actually is.
Psychology of Interior Perception:
When a person enters a room, their gaze automatically scans the perimeter, pausing at the corners. It is precisely the corners — key points — where the brain evaluates the quality of finishing. Perfect molding corners create a subconscious sense of order, quality, and professionalism. Gaps and irregularities evoke the opposite feeling — carelessness, cost-cutting, unprofessionalism.
Interesting fact: research shows that poor molding joints reduce the overall perceived quality of the repair by 15-20%, even if everything else is done perfectly. The brain focuses on defects, ignoring the merits.
Our factory also produces:


Functional Consequences of Poor Jointing
Dust and Dirt Penetration:
Gaps in joints are open doors for dust, small debris, and moisture. In baseboard molding, dust from the floor, crumbs, and pet hair accumulate in the gaps. Cleaning these deposits is practically impossible — the gap is too narrow for any brush.
After several months of use, gaps darken from accumulated dirt, becoming even more noticeable. In ceiling molding, dust accumulates in the gaps, which spreads during cleaning, leaving gray streaks on the white molding.
Gap Expansion Over Time:
Polystyrene is subject to thermal expansion and contraction. When the temperature changes by 10-15°C, linear dimensions change by 0.1-0.2%. This means a two-meter board may lengthen or shorten by 2-4 mm.
If the initial joint was loose (gap of 0.5 mm), it may expand to 1-2 mm due to temperature fluctuations. After one or two years of use, small gaps become noticeable depressions requiring repair.
Detachment at Joints:
Poorly jointed parts create stress concentration points. When one board slightly moves (thermal expansion, vibration), and the other does not, mechanical stress arises at the joint. The adhesive in this area works against separation.
Result: molding joints are the most common places for detachment. This is especially critical for ceiling molding, where the adhesive works under weight.
Moisture Penetration:
In humid rooms (bathrooms, kitchens), water can penetrate through gaps in joints. Although polystyrene itself is not afraid of water, moisture creates conditions for mold and fungus growth on surfaces behind the molding. Black mold spots appearing from the gaps — a common problem with poor jointing in humid rooms.
Get Consultation
Aesthetics after painting
Defects revealed under paint:
Amazing fact: after painting, joint defects become more noticeable, not less, as many expect. Why?
Paint seeps into gaps, creating dark lines. Even if the gap was invisible on white plastic, the dark paint line in the recess stands out. Irregularities at the ends, which were not visible before painting, become noticeable steps afterward—paint highlights height differences.
Spackle in joints, if applied unevenly or not sanded, appears as raised stripes after painting. Light hits at an angle, creating shadows that emphasize every irregularity.
Cracks in spackle:
If a joint is spackled but details are not taped together, the spackle cracks with temperature fluctuations. After painting, the crack becomes very noticeable—paint is not elastic and highlights the line of separation.
Structural durability
Monolithic vs. separate plank set:
Properly mitered baseboards function as a single structure. Load is distributed evenly, each plank supports its neighbor. Poorly mitered planks are a set of separate elements, each holding itself independently.
Under mechanical stress (accidental impact, furniture pressure), a monolithic structure is stable. Individual planks easily shift, peel off, or break at joints.
Service life:
A properly mitered baseboard will last 20-25 years without repair. Poorly mitered baseboards will require intervention within 2-3 years—re-taping loose sections, filling widened gaps, repainting problem areas.
Cost of correcting errors
Remaking is more expensive than doing it right the first time:
Correcting poor mitering is more difficult and expensive than doing it right the first time. To fix it, you need:
-
Remove baseboard (risk of breakage)
-
Clean off old glue residue
-
Re-cut ends
-
Reinstall
-
Spackle, sand, paint
Work time: 3-4 hours per room. Master’s labor cost: 3000-5000 rubles. Plus possible baseboard damage during removal—another 1000-2000 rubles for materials.
Correct mitering from the start takes the same 3-4 hours, but it’s done once and for all.
End preparation and marking
Tools for precise end cutting
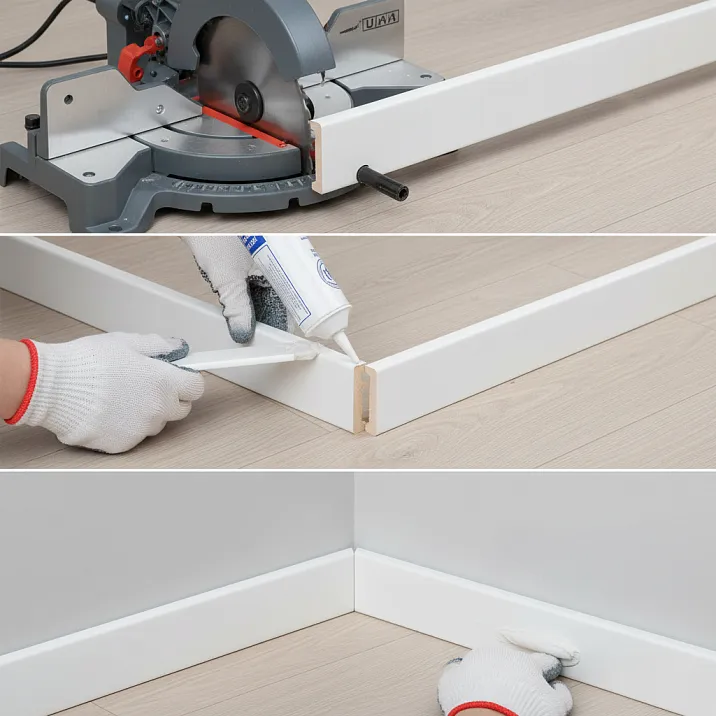
Miter gauge—basis of accuracy:
Quality miter gauge—80% of success in mitering angles. Cheap plastic miter gauge for 150 rubles has slots that break after 10-15 cuts. The angle becomes inaccurate (not 45°, but 44° or 46°), and all subsequent cuts result in a gap at the joint.
Recommendation: Use a precision miter gauge with metal guides (800-1200 rubles) or a rotating miter gauge with angle adjustment (1500-3000 rubles). For one-time jobs, a mid-quality miter gauge for 400-600 rubles with reinforced slots is sufficient.
Saw—sharpness is critical:
A dull saw crushes polystyrene, making it impossible to achieve a quality miter. Signs of a dull saw:
-
Strong pressure is required for cutting
-
End is uneven with burrs
-
Material chips, especially at the end of cut
Solution: Use a metal hacksaw with fine teeth (18-24 teeth per inch) and a sharp blade. Replace the blade at the first sign of dullness. Blade cost is 50-80 rubles; saving on blades results in damaged joints.
Alternative - miter saw:
For large volumes of work (entire apartment, multiple objects), a miter saw is justified. Advantages:
-
Perfectly even cut without effort
-
Absolute angle accuracy
-
Speed - cut in 5 seconds
-
Result repeatability
Disadvantage - price (from 5000 rubles). However, it can be rented for 1-2 days for 500-800 rubles.
Cutting technique for perfect joints
Rule 1: Cut across, not along:
Hacksaw movements must be perpendicular to the baseboard, not along it. Many beginners cut at an angle to the longitudinal axis, resulting in an uneven end.
Rule 2: Minimal pressure:
Do not press down hard on the hacksaw. Polystyrene cuts easily; pressure only deforms the material. Smooth, weight-assisted movements are optimal.
Rule 3: Support the cut piece:
Hold the cut piece by hand at the end of the cut. Otherwise, it will break off under its own weight, leaving a chip on the end.
Rule 4: Cut in one pass:
Do not stop cutting in the middle. Continuous motion from start to finish gives a smooth end without steps.
Ends finishing after cutting
Even a sharp hacksaw leaves microscopic unevenness on the end. For a perfect joint, ends must be sanded.
Tools:
-
Sandpaper grit 180-240 (for rough sanding)
-
Sandpaper 320-400 (for finishing)
-
Smooth wooden block or special sanding block
Technique:
-
Wrap sandpaper around the block
-
Place the block with sandpaper flat on the table
-
Press the baseboard end against the sandpaper
-
Lightly sand the end back and forth
-
Usually, 10-15 movements are enough
-
Check the result - the end should be smooth, without burrs
Quality check:
Place the two ends together. They should fit snugly over the entire surface without gaps. If there is a gap, sand it down.
Marking for straight joints
Straight joints (connection of two planks on a long wall) seem simple, but there are nuances here too.
Planning the placement of joints:
Where NOT to make joints:
-
At the center of the wall (the most noticeable spot)
-
In the focus zone (opposite the entrance door)
-
At eye level (for wall moldings)
Where JOINTS CAN be made:
-
Closer to corners (less noticeable)
-
In areas where furniture will be placed (a cabinet will cover the joint)
-
In shadowed areas
Plank length:
Standard skirting board length is 2 meters. For a 4-meter wall, you need two joints (3 planks of 2m each). But you can be smarter:
-
Buy one 2.5m or 3m plank (if available) + one 2m plank
-
You'll get one joint instead of two
-
Less work, better appearance
Marking ends for a straight joint:
A straight joint is cut at a 90° angle. But professionals sometimes cut at 89-91°, creating a micro-gap on one side and tight fit on the other. After filling the micro-gap with putty, the joint becomes invisible.
Marking corners: internal and external
Internal corner (usual room corner):
Both parts are cut at 45°, but mirrored. The difficulty is that real room angles are rarely exactly 90°.
Measuring the real angle:
Use a protractor (digital gives accuracy to 0.1°) or a simple method:
-
Place two planks against the corner
-
Mark the line of their intersection
-
Measure the resulting angle with a protractor
-
Divide by 2 - this is the cutting angle for each part
Example: actual angle 88°. Cut each piece at 44° instead of the standard 45°.
Outside angle (wall protrusion, column):
Technically more complex, as cutting is opposite to the inside angle. The short cut side is on the back of the baseboard.
Important: Before cutting, make a test fit on scraps. Ensure you correctly orient the baseboard in the joint.
Part Marking
When installing baseboard throughout the apartment, it's easy to get confused: which part goes where, which side faces out, for which angle.
Marking System:
-
Write on the back of each part with a pencil:
-
Room number (Room 1, 2, 3...)
-
Wall number (north, south, or simply 1, 2, 3, 4)
-
Joint type (IL - inside left, IR - inside right, OL - outside left, OR - outside right, S - straight)
-
-
Draw a room layout on paper and number the walls
-
On the layout, mark the length of each wall and the type of angles
-
Cut parts according to the layout, marking them immediately
This may seem unnecessary, but it saves a lot of time during installation. You won't have to remember which angle each part is for or which side to glue.
Adhesive, putty, and seam filler
End sealing: why it's needed
Many install baseboards, applying adhesive only to the back (for mounting to the wall), forgetting about the ends. This is an error.Polystyrene baseboard jointsmust be sealed.
Reasons for end sealing:
Structural rigidity:
Sealed ends turn two separate strips into a single unit. A monolithic structure is stronger and does not separate during temperature fluctuations.
Preventing separation:
Even with perfect trimming, microscopic gaps are inevitable. Adhesive fills them, preventing the strips from separating over time.
Base for putty:
Putty applied to sealed joints holds better. On unsealed joints, putty may crack during movement.
Types of adhesive for sealing joints
Installation adhesives (liquid nails):
Universal option used both for mounting to walls and for sealing joints.
Application technique:
-
Apply a thin bead of adhesive to the end of the first piece
-
Attach the second piece
-
Press the joint firmly
-
Wipe away excess adhesive immediately with a damp cloth
Advantages:
-
One material for everything
-
Fast setting (10-15 minutes)
-
Strong bond
Disadvantages:
-
After drying, forms a raised seam (needs to be trimmed or sanded)
-
Does not fill micro-gaps as well as putty
Joint adhesive:
Specialized adhesive for bonding baseboards, moldings, and picture frames. Available in small tubes.
Composition: Usually based on cyanoacrylate (instant bonding) or polyurethane (elasticity).
Advantages:
-
Very strong bond
-
Fast setting (30 seconds - 2 minutes)
-
Thin seam
Disadvantages:
-
More expensive (300-500 rubles for a small tube)
-
Must work quickly and precisely (correcting mistakes is difficult)
-
Some formulations contain solvents (check compatibility with polystyrene)
Acrylic putty:
Professional method — use putty both for bonding and filling the seam.
Technique:
-
Apply putty to both ends
-
Join the parts and press firmly
-
Excess putty forms a raised bump
-
Smooth the putty with a putty knife or damp finger to create a seamless transition
-
Wipe away excess with a damp cloth
Advantages:
-
Bonds and fills the seam simultaneously
-
Ideal for subsequent painting
-
Cost-effective
Disadvantages:
-
Slower setting (requires clamping for 2-4 hours)
-
Requires skill
End joint gluing technique
For straight joints:
-
Apply glue to the end of the first piece with a thin line down the center
-
Or with two lines along the edges (for wide baseboards)
-
Place the second piece, aligning by height
-
Press the joint firmly for 30-60 seconds
-
Check height alignment - any discrepancy will be very noticeable
-
Remove excess glue immediately
For corner joints:
Corner joints are more difficult to glue due to the beveled ends.
-
Apply glue to both ends (both beveled at 45°)
-
Only a small amount of glue is needed - a thin line along the bevel
-
Join the pieces at the corner
-
Align by height and level
-
Press the joint
-
Temporarily secure with pins or painter's tape
-
Allow the glue to set (15-30 minutes)
Gluing mistakes:
Error 1: Too much glue. It squeezes out, stains the surface, and is hard to remove.
Error 2: Too little glue. The joint holds poorly and may separate.
Error 3: Uneven application. Glue applied only on one side of the end - the joint will be crooked.
Joint filling: materials and techniques
After gluing and installing the baseboard, joints must be filled to make them invisible.
Acrylic sealant - best choice:
Why acrylic:
-
Can be painted with any paint (silicone cannot be painted!)
-
Elastic - compensates for micro-movements
-
White color - matches white baseboard
-
Does not yellow over time
-
Easy to apply and smooth
Sealant choice:
Required characteristics:
-
Acrylic (NOT silicone!)
-
White color
-
For interior use
-
Paintable (check packaging)
Recommended brands:
-
Moment Gherment acrylic (150-200 rub)
-
Tytan Professional acrylic (180-220 rub)
-
Ceresit CS 25 (200-250 rub)
Acrylic putty:
Alternative to sealant.How to fill gaps in polystyrene ceiling skirting boards- question of choosing between sealant and putty.
Advantages of putty:
-
Cheaper than sealant
-
Same as used for installation
-
Can be sanded after drying (sealant cannot be sanded)
-
Paints perfectly
Disadvantages of putty:
-
Less elastic (may crack under movement)
-
Shrinks (apply generously, may require a second layer after drying)
-
Requires time to dry and sand
When to use sealant:
-
For narrow joints (up to 2-3 mm)
-
When speed is needed (dries in 2-4 hours)
-
For flexible joints (movement possible)
-
For ceiling skirting boards (easier to apply)
When to use putty:
-
For wide joints (more than 3 mm)
-
When careful grinding and painting are planned
-
For static joints
-
For economy
Sealant application technique
Preparation:
-
Cut the nozzle of the tube at a 45° angle
-
Hole diameter - 2-3 mm (less than the joint width)
-
Insert the tube into the caulking gun
-
Test on paper - should form a smooth sausage
Application:
-
Position the nozzle at a 45° angle to the joint
-
Slowly move along the joint, evenly pressing the trigger
-
The sealant should fill the joint with a slight excess (0.5-1 mm protrusion)
-
Try to apply continuously, without stopping
-
For long joints, make pauses every 30-50 cm
Smoothing (critical stage!):
The quality of smoothing determines whether the joint will be noticeable.
Method 1: Wet finger
-
Wet your finger in soapy water (soap prevents sticking)
-
Run your finger along the joint with light pressure
-
In one continuous motion over the entire length of the joint
-
The sealant will smooth out, excess will collect on the finger
-
Wipe the finger with a damp cloth, re-wet it
-
Repeat if necessary
Method 2: Rubber spatula
-
Wet the spatula in soapy water
-
Run at a 30-45° angle along the joint
-
More even result than with a finger
-
Suitable for long straight joints
Method 3: Jointer (professional tool)
-
Set of profiles of different radii (300-500 rub)
-
Select profile for seam size
-
Moisten, run along the seam
-
Perfectly smooth concave profile
-
Used by professionals
Excess removal:
-
Immediately after smoothing with a damp sponge, wipe excess along the edges
-
Change the sponge often — dirty one will smear the sealant
-
Do not touch the seam itself — you may ruin the shape
-
Let dry 2-4 hours before painting
Spackle filling technique
Spackle preparation:
-
Ready spackle — mix until homogeneous
-
Powdered — dilute with water to the consistency of thick sour cream
-
Do not make it too liquid — it will run out of the seam
Application:
-
Apply spackle into the seam using a narrow putty knife (40 mm)
-
Press in, filling completely
-
Apply generously — after drying it will shrink
-
Smooth flush or with slight convexity
Profile formation:
Form the desired profile with a damp finger or putty knife. For an invisible seam, a concave profile (light indentation) is better — it is less noticeable.
Drying:
-
Thin layer: 4-6 hours
-
Thick layer: 12-24 hours
-
Do not speed up drying with heaters — may crack
Sanding:
-
After complete drying, sand with fine grit (220-320)
-
Sand with light movements
-
Form a smooth transition from spackle to baseboard
-
Remove dust with a damp cloth
Reapplication:
If indentations from shrinkage appear after drying:
-
Apply a second thin layer
-
Allow to dry
-
Sand
Primer:
Before painting, prime all spackled areas. This will equalize absorption, ensuring even paint coverage.
How to make joints invisible
Color matching rule
White on white - classic:
White acrylic sealant or spackle on a white polystyrene base, after painting with white paint, creates an absolutely invisible seam. This is the ideal combination.
Important: Use white sealant, not transparent. Transparent sealant, after painting, turns into a dark line — paint settling into the groove creates a shadow.
Colored baseboards:
If the baseboard will be painted in color:
-
First, fill the joints with white sealant/spackle
-
Allow to dry
-
Then paint the baseboard along with the joints
Colored paint will cover the white sealant, making the seam invisible. Do not attempt to match the sealant color — it’s unnecessary and difficult.
Joint geometry: concave vs convex
Perception physics:
Convex joint (sealant/spackle protrudes above surface) casts shadows along the edges. Two dark lines make the joint very noticeable.
Concave joint (slight depression) gathers light in the depression. Appears as a light line, barely noticeable on a white background.
Recommendation:
When smoothing the sealant, form a slight concave shape. Do not aim for a perfectly flat surface — a small concave (0.3–0.5 mm) will make the joint less noticeable.
“Dissolving” joint technique
Professional technique: create a smooth transition from the joint to the baseboard over a 20–30 mm distance on both sides.
For spackling:
-
Apply spackle into the joint
-
Smooth with a trowel, extending 2–3 cm beyond the joint
-
Create an extremely thin layer, gradually fading to nothing
-
After drying, sand to create an invisible transition
-
Prime the entire area (joint + 5 cm on each side)
-
Paint
Result: the joint literally disappears, it is impossible to notice even up close.
For sealant:
Similarly, but instead of sanding - carefully smooth with a wet tool, creating a seamless transition.
Working with light and shadow
Lighting analysis:
Inspect the room under different lighting:
-
Daylight from the window
-
Artificial lighting in the evening
-
From different angles
Determine where the main light source is. A joint lit from the side is most noticeable. A joint lit directly is less noticeable.
Planning the placement of joints:
If possible, position straight joints so that the main light falls directly on them, not from the side. This will reduce the visibility of even imperfect joints.
Matte paint vs. glossy:
Matte paint scatters light, hiding small irregularities. Glossy paint creates reflections, highlighting any defects.
Recommendation: For baseboards with joints, use matte or satin paint, not glossy.
Multi-layer filling technique
For wide joints (over 5 mm), single-layer filling does not work - the material shrinks, creating dips.
Technique:
Layer 1 - Filling:
-
Fill the joint with putty to 2/3 of its depth
-
Allow to dry (4-6 hours)
-
Do not smooth perfectly - a rough surface will improve adhesion of the next layer
Layer 2 - Leveling:
-
Apply putty flush or with slight convexity
-
Smooth with a wet tool
-
Allow to dry (4-6 hours)
-
Sand
Layer 3 - Final (if needed):
-
If micro-undulations remain after sanding
-
Apply a very thin layer of finishing putty
-
Smooth perfectly
-
After drying, light sanding with 400 grit
Result: perfectly flat surface, seam is invisible.
Quality check before painting
Visual inspection:
-
Inspect all seams under bright side lighting
-
A flashlight directed along the baseboard will reveal any irregularities
-
Run your finger along the seam — it should feel smooth
Painting test:
Before final painting, perform a test:
-
Paint a small section containing the seam
-
Allow to dry
-
Inspect under different lighting conditions
If the seam is visible — correct it before painting the entire baseboard. It's harder to fix after painting.
Criteria for a quality seam:
-
Not visible from a distance of 1.5–2 meters under normal lighting
-
Feels smooth to the touch with no steps or ridges
-
Does not stand out in color or texture after painting
Corner processing and final finishing
Internal corners: step-by-step technology
Internal corners are the most complex and critical area. This is where the viewer’s gaze naturally falls upon entering the room.
Preparation:
-
Measure the actual room angle (rarely exactly 90°)
-
Calculate the cutting angles: actual angle / 2
-
Cut both pieces according to the calculation
-
Sand the ends with sandpaper
Test fit (mandatory!):
-
Place both pieces against the corner without adhesive
-
Check the fit tightness
-
If there is a gap, trim one or both parts.
-
Achieve tight contact
Installation:
-
Apply adhesive to the back of both pieces (for mounting to the wall)
-
Apply adhesive to the ends (for sealing the joint)
-
Install the first piece into the corner, press it against the wall
-
Install the second piece, aligning it in the corner
-
Press the joint firmly
-
Check height alignment
-
Secure with painter's tape until the adhesive dries
Joint filling:
-
Allow the glue to set (15-30 minutes)
-
Fill the joint with acrylic sealant
-
Smooth with a wet finger, forming a neat angle
-
Important: form a clear angle line, do not spread the sealant widely
Outside corners: increased difficulty
Outside corners (wall protrusions, columns) are more difficult to install and more prone to damage.
Cutting features:
For an outside corner, the short side of the cut is on the back of the baseboard (unlike for inside corners). Orientation error during cutting is a common problem for beginners.
Reinforced mounting:
Outside corners experience more mechanical stress (rubbed during passage, hit by furniture). Requires more secure mounting:
-
Always seal the ends of the joint
-
Use more adhesive when mounting to the wall in the corner zone
-
Consider additional fixation with small nails or screws (patch later)
Corner protection:
Polystyrene baseboard outside corners are brittle and easily chip.
Solutions:
-
Install a plastic corner piece (sold separately)
-
Strengthen the corner with an additional layer of putty with reinforcing mesh
-
For frequently rubbed corners, consider a more durable material (duropolymer)
Complex angles: not 90 degrees
Sharp angles (less than 90°):
Found in rooms with complex geometry, bay windows.
Technique:
-
Measure the exact angle
-
Divide by 2
-
Cut both parts at the resulting angle (e.g., for a 70° angle, cut each part at 35°)
-
For cutting, use a miter gauge or a circular saw
Obtuse angles (more than 90°):
Technique:
Similar to acute angles. For example, a 110° angle — cut each part at 55°.
Problem: standard miter gauge cuts only at 45°. Need a rotating miter gauge or a circular saw.
For small deviations (88-92°), you can correct the standard cut with sandpaper, slightly adjusting the angle.
Joining relief baseboards
Baseboards with complex relief or moldings are harder to join — you need to align the pattern.
Place two boards and align the pattern
Technique:
-
Mark the cutting line so that after joining, the pattern is symmetrical
-
Cut at the required angle
-
If necessary, trim relief elements with a sharp knife for perfect alignment
-
Filling joints:
Filling joints:
In relief baseboards, joints are filled with putty (not sealant — it won’t penetrate the relief recesses).
-
Apply spackle into the joint
-
Smooth out, filling all relief recesses
-
Remove excess with a damp brush or sponge from the relief
-
After drying, clean relief details with a toothpick or thin stick
Final sanding
After filling all joints and full drying (24 hours) — final sanding.
Tools:
-
Fine sandpaper (320-400)
-
Sanding sponge (convenient for relief)
-
Respirator (spackle dust is harmful)
Technique:
-
Lightly sand all spackled areas
-
Goal — create a smooth transition from spackle to baseboard
-
Do not press too hard — you may damage the baseboard itself
-
Blow away dust or wipe it off with a brush during the process
-
Check the result by touch — the surface should be smooth
Dust removal:
-
Vacuum the baseboard with a soft attachment
-
Wipe with a slightly damp cloth
-
Allow to dry (1-2 hours)
Priming before painting
Why prime?
-
Spackle and baseboard have different absorption rates
-
Paint on spackle looks different than on polystyrene
-
Primer equalizes absorption, ensuring even paint coverage
What to prime:
All spackled areas plus 5-10 cm around them. Or the entire skirting board (easier and better result).
Technique:
-
Use acrylic primer for interior work
-
Apply with a brush in a thin layer
-
One layer is sufficient
-
Drying time - 2-4 hours
-
Painting can begin after drying
Final painting
Paint selection:
-
Acrylic water-emulsion - optimal
-
Latex - for rooms with high humidity
-
Matte or satin - hides minor defects
-
Glossy - highlights all unevenness (not recommended)
Painting technique:
-
Protect adjacent surfaces with painter's tape
-
Use a 40-60 mm wide brush or a small roller
-
Apply paint in a thin layer along the skirting board
-
First layer dries in 4-6 hours
-
Apply the second layer after the first is fully dry
-
Two or three thin layers are better than one thick layer
Checking seam quality after painting:
After paint dries, inspect all seams under different lighting. Quality work: seams are not visible from 1 meter away, corners meet perfectly, surface is uniform.
If defects are found, they can be corrected locally:
-
Spackle the problematic area
-
Sand
-
Prime
-
Touch up
Corner protection after installation
For exterior corners exposed to damage:
Decorative corner caps:
Special elements covering exterior corners. Installed after skirting board installation and painting. Protect against chips and damage.
Additional reinforcement:
For critical corners (children's room, active zone):
-
Apply a thin reinforcing mesh over the corner
-
Fill with a thin layer
-
Sand
-
Paint
This will create a protective layer preventing chipping.
Conclusion: Mastery in the Details
Quality baseboard joints are not a talent, but knowledge of the technology and attention to detail.How to join polystyrene baseboardsCorrectly - the answer lies in sequentially performing all stages: precise cutting, end smoothing, joint sealing, careful filling of gaps, careful sanding and priming.
Each stage is important. Skip one - and the result will suffer. But carefully complete all stages - and you will get joints that are impossible to detect even upon close inspection. The baseboard will appear as a monolithic structure, precisely made to fit your room's dimensions.
Don't rush. It's better to spend an extra hour on careful preparation and filling gaps, than later for years see poor-quality joints that spoil the impression of your renovation. Use quality materials - the right adhesive, acrylic sealant, good spackle. Saving 200-300 rubles on materials results in noticeable defects.
STAVROS, a partner of Hi Wood (Hi Wood, HiWood, Hiwood), offers not only high-quality baseboards, but also the complete set of materials for perfect joints: specialized adhesives, acrylic sealants, finishing spackles, primers and paints. Consultants will help you select optimal materials for your project, explain application nuances, and provide professional recommendations.
Hi Wood baseboards, due to their density of 32-35 kg/m³, have flat end surfaces, which simplifies jointing. Clear profile geometry ensures that, with proper cutting, parts will fit perfectly. Quality material - half the success in creating invisible joints.
Follow the technology, don't rush, pay attention to details - and your baseboards will look flawless for decades, delighting the eye with the monolithic unity and completeness of the interior.