Article Contents:
- When the need arises to dismantle a slatted ceiling
- Leak or emergency
- Planned design replacement
- Replacement of individual damaged panels
- Repair of hidden utilities
- Decoration update
- Tools and protection: preparing for dismantling
- Tools for dismantling a slatted ceiling
- Room protection and personal safety
- How to remove slatted ceiling panels: step-by-step technology
- Step one: identify the edge panel
- Step two: free the edge panel from the wall profile
- Step three: unclip the slat from the stringers
- Step four: remove the slat
- Step five: removing the remaining slats
- Step six: dismantling the wall profiles
- Step seven: dismantling the stringers
- Step eight: dismantling the hangers
- What to do with the frame: preserve or completely dismantle
- When the frame can be preserved
- When the frame is completely dismantled
- Assessment and sorting of dismantled material
- Preparing the base after dismantling: don't skip this step
- Repairing holes and damage
- Checking the condition of the plaster
- Antiseptic treatment for leaks
- Priming
- When it makes sense to update ceiling decor
- Why polyurethane molding is the optimal choice for updating
- What to update when repairing a ceiling
- Removing old polyurethane molding: non-destructive technique
- If the molding was held only by adhesive
- If the molding was attached with adhesive + mechanical fasteners (nails, screws)
- Cleaning the base after removing the molding
- Reinstalling polyurethane molding: step-by-step guide after renovation
- Material acclimatization
- Surface Preparation
- Marking
- Cutting corner elements
- Applying adhesive and installation
- Joint sealing
- Painting
- How to avoid damaging the surface and geometry during removal and reinstallation
- When removing slatted panels
- When removing molding
- During reinstallation
- About the Company STAVROS
- FAQ: Answers to Popular Questions
Ceiling repair is always a moment of truth. This is where all previous decisions are revealed: correct and erroneous, thoughtful and random. Some open up the ceiling due to a leak. Others — because the old design has long been unsatisfactory. Some discover that the slatted ceiling has begun to sag or creak. One way or another, the question "how to remove slatted ceiling panels" sooner or later arises for every homeowner who once chose a slatted system. And the next question appears immediately: what to do with moldings, cornices, decorative elements? Remove them? Leave them? Reinstall them? Let's break it all down step by step, without panic and without chaos.


When the need arises to dismantle a slatted ceiling
Before picking up a tool, it's important to understand: why? This is not a rhetorical question. The answer determines the scope of work, the dismantling tactics, and the decision about the fate of the frame, panels, and decor.


Leak or accident
The most common reason. Water came from above — from neighbors' apartment or through the roof — and the slatted ceiling either hides the extent of the damage or has been damaged itself. In this case, access to the ceiling slab, utilities, and the damaged area is needed. The task of dismantling is to open, inspect, eliminate the cause, and assess the damage.
Important nuance: if the panels are made of MDF or solid wood, they may be irreversibly deformed after flooding. It is advisable to replace them. Aluminum or PVC panels after flooding are generally restorable — drying and cleaning are sufficient.
Our factory also produces:


Planned design replacement
Tastes change. A slatted ceiling that seemed modern ten years ago looks outdated today. Or the entire interior concept changes—and the old ceiling doesn't fit the new look. Here, the task of dismantling is to carefully disassemble the structure with maximum preservation of the frame (if it is suitable for reuse) and prepare the base for a new solution.
Get Consultation
Replacement of individual damaged panels
Mechanical damage to one or two slats—a scratch, chip, deformation—does not require dismantling the entire ceiling. It's enough to remove the damaged elements and replace them. This is the most limited type of dismantling, but it also requires an understanding of the technology to avoid damaging adjacent panels in the process.
Repair of hidden utilities
A slatted ceiling conceals electrical wiring, ventilation, and sometimes pipes. If something goes wrong in the hidden space—a burnt cable in a conduit, a failed built-in light fixture, condensation on an air duct—dismantling at least part of the panels is needed to access the problem area.
Decoration update
It also happens like this: the ceiling itself is functional, the panels are in order—but you want to changeinstallation of polyurethane moldingthe perimeter, update the cornices, add sockets, or replace outdated profiles with more modern ones. In this case, the panels themselves are not dismantled; work is done only with the decorative elements at the boundaries of the ceiling plane.
Tools and protection: preparation for dismantling
Dismantling a ceiling 'just with bare hands' is an idea that ends with scratched panels, pulled-out dowels, and a stained floor. Proper preparation takes 20 minutes and saves several hours dealing with the consequences.
Tools for Demounting a Suspended Ceiling
-
Wide knife or rigid spatula (width 100–150 mm) — for popping slats out of stringers. The knife must be rigid, not flexible: a flexible tool does not provide the necessary leverage.
-
Screwdriver with a set of bits — for removing screws from wall profiles and stringers.
-
Pliers — for working with clips and wire hangers.
-
Wide flat-head screwdriver — as a backup tool when working with stringers.
-
Hammer drill with a carbide-tipped drill bit — for extracting jammed anchor dowels (if they don't yield to a screwdriver).
-
Stepladder — stable, with wide steps. Working on the ceiling requires stability when applying force.
-
Containers or bags — for sorting removed fasteners (reusable elements are saved and sorted separately).
Room protection and personal safety
Dust from the ceiling falls down — into eyes, onto furniture, onto the floor. This is an axiom that everyone knows and most ignore.
-
Safety goggles are a must. Especially when working with old ceilings: dust from dowel holes flies right into your face.
-
FFP2 respirator — when working with old structures (ceilings installed before the 1990s may contain asbestos materials).
-
Gloves — metal rails have sharp edges. A cut from the edge of an aluminum panel is a painful surprise.
-
Floor and furniture — cover with film or cardboard. Even if panels are removed carefully, dust from the space above the ceiling inevitably falls down with every movement.
-
Turn off electricity in the room — before starting work. Built-in lights, cables in the frame space — all are live until powered down.
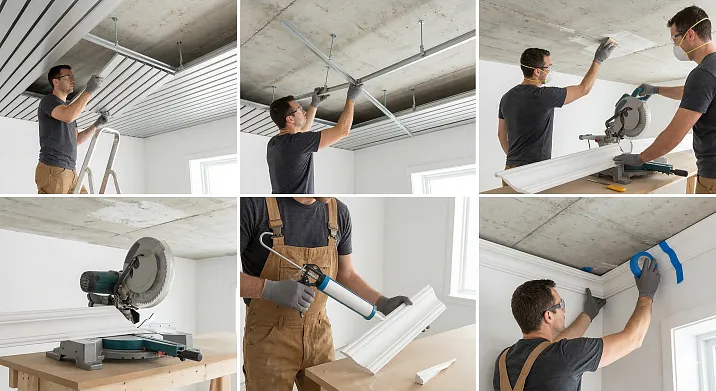
How to remove suspended ceiling panels: step-by-step technique
Now — to the main part. Dismantling a suspended ceiling looks like a destructive process, but with the right approach, it is methodical and careful. Panels are removed one by one, in strict order, without force.
Step one: identify the edge panel
The suspended ceiling structure is designed so that the first and last panels are trimmed in width and slid into the wall profile (corner). On one side of the room, there is always a panel that can be shifted sideways — creating a gap for popping out.
How to identify this panel: gently press along the rail — it should slide easily along the stringers. If it slides — this is the edge panel, removal starts with it.
Step two: release the end panel from the wall profile
First, slide the end slat along the wall profile until it stops in one direction. A gap will form at the opposite end. Through this gap, the slat is removed from the wall profile—first one end, then the other.
If the slat does not slide—it may be screwed to the wall profile with self-tapping screws (some installers additionally secure the end slats). In this case, find and unscrew the screw with a screwdriver.
Step three: unclip the slat from the stringers
When the end slat is released from one end—insert a knife or rigid spatula between it and the adjacent slat in the area of the nearest stringer. With a slight turn of the tool (like a lever), pry the slat from below—it will unclip from the stringer's lock. Run the knife sequentially along all stringers from one end to the other.
Important: do not pull the slat down with force—it may deform or pull the stringer out of the hangers. Work sequentially, from stringer to stringer.
Step four: remove the slat
After being released from all stringers, the slat is removed with a diagonal movement—one end is moved down, the other is taken out of the wall profile on the opposite side. It is this diagonal movement that allows the slat to be removed without bending it.
If the panels are intended to be preserved for reuse—they are carefully laid horizontally in a prepared place (stack face down, on a soft underlay—foam, fabric).
Step five: removing the remaining slats
After the first (outermost) slat, all others come off much easier: they already have a free side, which simplifies access. The sequence is the same: knife into the gap — pop out of the stringers — remove with a diagonal motion.
If the ceiling has inserts between the slats (typical for PVC systems of the 'closed joint' type) — first remove the inserts (they are held by clips, pry them out with a knife), then the slats.
Step six: removal of wall profiles
Wall corner pieces (L-shaped profiles around the perimeter) are fastened to the walls with screws or dowels. Unscrew the screws with a screwdriver — it's a few minutes of work. If the dowels don't give way — use pliers (grab the protruding part and wiggle) or a hammer drill (drill out the dowel).
If the wall profiles were installed with adhesive (a non-standard but encountered solution) — pry them off with a putty knife, if necessary heat with a construction heat gun (the adhesive softens when heated). Do not pull with force — this damages the wall plaster.
Step seven: removal of stringers
Stringers — the load-bearing profiles of the slat system — are attached to hangers. They are removed simply: unscrew the screws securing the stringer to the hanger. If the stringer was snapped into the hanger without screws — remove it by hand.
Step eight: removal of hangers
Hangers are held by anchor dowels in the ceiling slab. Anchors are unscrewed with a screwdriver (if the fastener type allows) or extracted with a hammer drill. Holes after removal — are filled with putty or plaster.
What to do with the frame: keep or remove completely
This is a practical question with financial implications. The metal frame is not the cheapest part of a ceiling system. If it is in good condition, it makes sense to preserve it.
When the frame can be preserved
-
If the geometry of the suspended system maintains level (check with a level after removing the slats).
-
If there is no corrosion on the profiles and hangers (especially critical in damp areas).
-
If the stringer spacing matches the parameters of the new panels. The key question here is: if a different design is planned—Batten panels for ceilings—the stringer spacing may not align.
-
If no replanning of utilities in the frame space is needed.
When the frame is completely dismantled
-
In case of a leak: the base and the frame space require drying, antiseptic treatment, and possibly replacement of affected elements.
-
When replacing the system with a fundamentally different design (e.g., switching from a metal slat ceiling to wood or MDF with a different mounting profile spacing).
-
If necessary, adjust the height of the ceiling plane.
-
During a comprehensive capital renovation of the premises.
Assessment and sorting of dismantled materials
After complete dismantling, an inspection is conducted:
-
Metal profiles (stringers, guides) — checked for straightness, absence of deformations and rust. Suitable ones are retained.
-
Hangers — checked for integrity (bent hangers lose load-bearing capacity).
-
Fasteners (dowels, screws) — single-use, not reused.
-
Wall profiles — often remain suitable if carefully dismantled.
-
Slats/panels — if free from mechanical damage, moisture-induced deformations, and visible defects, can be reused. MDF panels after contact with water are generally unsuitable for reinstallation.
Preparing the base after dismantling: do not skip this stage
Once the frame is removed and the room is cleared of the structure, the ceiling surface requires preparation. This is not an optional stage.
Repair of holes and damages
Multiple dowel holes left after removing the hangers are filled with gypsum- or acrylic-based putty. If the holes are large (over 12 mm in diameter), they are filled with plaster or mounting foam followed by putty.
Cracks in the plaster are widened (the crack is slightly expanded), filled with putty in several layers, and sanded.
Checking the condition of the plaster
By tapping across the entire ceiling surface, areas with detached plaster are identified. Detachments are completely removed. If there are many areas of detachment, the option of partial or complete plastering of the ceiling is considered.
Antiseptic treatment in case of leaks
If the reason for the dismantling was a leak, antiseptic treatment of the entire ceiling surface with an antifungal agent is mandatory. Application in 2 coats, with drying between them. Installation of new structures is only allowed after the base has completely dried (at least 48 hours).
Priming
After repair and drying, prime with an acrylic deep-penetration primer. This strengthens the base and ensures adhesion for subsequent adhesive (when installing molding) and fasteners.
When it makes sense to update the ceiling decor
Ceiling repair is an opportunity. An opportunity not just to restore what was, but to make it better. This is where the question of polyurethane decor arises.
Why polyurethane molding is the optimal choice for renovation
installing polyurethane moldingand other decor made from this material combines several key advantages that make polyurethane the best solution for repairs:
Lightweight. Polyurethane is 3–5 times lighter than plaster and 8–10 times lighter than cement molding. For ceilings, this is a critical parameter: lightweight decor creates minimal load on the adhesive bond and does not require mechanical fastening in most cases.
Moisture resistance. Unlike plaster molding, polyurethane does not deteriorate when exposed to moisture, does not swell, and does not crumble. This is especially important for ceilings—the plane most vulnerable to leaks.
Geometric precision. Industrial polyurethane decor is manufactured using precise molds. Each element is identical in size—this simplifies fitting and ensures accurate joints.
Paintability. Polyurethane decor can be painted with acrylic paints in any color, including metallics and tinted compositions. This allows for perfect integration of the decor into any color concept.
Affordability. Compared to handcrafted plaster molding, polyurethane decor is significantly more affordable while delivering comparable visual results.
What to update during ceiling repair
When completely removing a slatted ceiling and subsequently installing new panels, it makes sense to:
-
Replace old ceiling cornices around the perimeter with new ones — of a different scale, profile, and color.
-
Add ceiling outlets (if there were none).
-
Add decorative polyurethane beams — as a structuring element of the new ceiling.
-
Update wall moldings, coordinating their scale with the new slatted panels.
Demolition of old polyurethane stucco: a non-destructive technique
Before installing new decor, you need to remove the old one. How to remove a polyurethane cornice or overlay without damaging the base?
If the stucco was held only by adhesive
This is the most common case. A polyurethane cornice on adhesive is removed as follows:
-
Carefully insert a thin spatula or wide knife into the joint between the cornice and the surface.
-
Gently move the tool back and forth to break the adhesive layer. Do not pull forcefully — this can tear out the plaster.
-
If the adhesive doesn't yield — heat it with a construction dryer (temperature 60–80°C). Most mounting adhesives soften when heated and lose adhesion.
-
After removing the element — scrape off adhesive residue from the base with a putty knife. Large residues can be sanded with abrasive paper.
If the molding was attached with adhesive + mechanical fasteners (nails, screws)
First, locate and extract all mechanical fastening points. If nails are driven flush and puttied — a metal detector will find them. Screws are unscrewed with a screwdriver after removing the putty above them. Then — follow the same scheme: putty knife + dryer.
Cleaning the base after removing molding
Traces of adhesive remain on the ceiling or wall, possibly — damaged plaster. This is normal. The area will be covered with new decor, but the base beneath it must be level:
-
Remove adhesive residue with a putty knife or sand it off.
-
Fill dents and scratches in the plaster with putty.
-
Prime the base.
Reinstalling polyurethane molding: step-by-step guide after renovation
And now we've reached the final part. The base is prepared, the paneling is installed, the room is ready for decorative finishing. How to properly performinstallation of polyurethane moldingafter renovation — so that the result looks professional and lasts a long time?
Material acclimatization
Polyurethane products must spend at least 24 hours in the room before installation. This step is often skipped — and in vain. With a sudden change in temperature, polyurethane changes its linear dimensions: it expands slightly when heated and contracts when cooled. If you install a cornice brought from a cold warehouse into a warm room — after a few hours it will expand and the seam at the joints will open up.
Surface preparation
The base (ceiling, wall) must be:
-
Dry (humidity no higher than 8%).
-
Clean (degreased — wipe the contact area with acetone or isopropyl alcohol).
-
Primed.
The back surface of the polyurethane element is also degreased before applying the adhesive.
Marking
The horizontal installation line for the cornice is drawn using a laser level or a chalk line. The offset from the ceiling (if the cornice is installed only on the wall or at the wall-ceiling junction) must be the same along the entire perimeter. Even a deviation of 3–4 mm along the length of the wall will be noticeable to the naked eye.
The centers of rosettes and overlay elements are marked taking into account the final position of light fixtures, furniture, and the overall ceiling composition.
Cutting corner elements
Cornice corner joints are cut at 45°. Tools: fine-toothed hacksaw for metal or electric jigsaw with fine teeth. Angle is maintained using a miter box.
Before applying adhesive, corner elements must be dry-fitted to check joint accuracy. Ideal joint: gap no more than 0.5 mm. If gap is larger, adjust with a knife or fine sandpaper.
Applying Adhesive and Installation
Adhesive: acrylic mounting adhesive (like 'liquid nails') or specialized polyurethane adhesive.
-
Apply adhesive to the back surface of the element in a zigzag pattern or with dots (dots every 10–15 cm).
-
Wait 2–3 minutes (open time - adhesive activates in air).
-
Press element to the base, apply pressure along entire length.
-
Hold for 30–60 seconds.
-
Secure with painter's tape during curing time (2–4 hours).
Installation order: first corner elements, then straight sections between them. Length of straight sections is measured in situ between already installed corner pieces - not according to plan.
Joint sealing
Immediately after installation, while the adhesive has not yet reached full strength — fill the joints between elements with acrylic finishing putty. The putty is applied into the seam and smoothed with a wet finger or a narrow spatula.
After drying (4–6 hours) — sanding with fine sandpaper (grit 150–180). Sand with light circular motions, without pressure — polyurethane is soft and can be easily scratched by coarse paper.
Painting
After the adhesive and putty have completely dried — painting. Acrylic paint, 2 coats with intermediate drying. The cornice and slatted panels are painted in a single color — this creates a sense of architectural unity for the ceiling.
If a tinted color (not white) is needed — an acrylic base with added pigment is used. Metallic effects (silver, gold) are applied with a brush over the base coat as a patina.
How not to ruin the surface and geometry during disassembly and reassembly
These are practical nuances that separate a neat result from chaos.
When disassembling slatted panels
No jerking. A slat stuck in the stringer is not pulled out by force — it is freed with a tool. A jerk will deform the slat and may tear the stringer off along with the hanger.
Diagonal removal. The slat is always removed from the wall profiles diagonally. A straight pull — the slat will hit the profile and bend.
Aluminum slats dent. Aluminum panels are a soft material. Any contact with a hard tool leaves a dent. When disassembling aluminum slats, the tool is inserted only into the gap, not onto the front surface.
During cornice removal
Hairdryer is your best friend. A stubborn cornice stuck with hardened glue won't come off with a putty knife without damaging the plaster. Heating with a hairdryer for 60–90 seconds — and it comes off effortlessly.
Work from the edge. Always insert the putty knife from the edge, not from the middle of the element. Trying to pry the cornice in the middle breaks it and tears out the plaster.
During reinstallation
Open glue exposure time — don't skip it. 2–3 minutes in the air before pressing — that's the difference between 'holds rock solid' and 'slides down in an hour'.
Tape fixation — remove no earlier than 4 hours later. Especially critical for ceiling rosettes, where the entire load on the glue is vertical.
Joint puttying — before painting. Never the other way around. Putty over paint is a guarantee of peeling.
Room temperature during installation — not below +10°C. At lower temperatures, acrylic glue loses plasticity and adheres poorly.
About the company STAVROS
Ceiling repair is not just removal and installation. It's choosing a new material that will last the next 15–20 years. STAVROS manufactures plank panels from solid wood and MDF, which are used both for initial installation and for replacement after repair. A wide range of plank widths, substrate formats, and ready-made finishes — for any space and any design solution.
STAVROS polyurethane decorative elements —Ceiling stucco decorFull range available: cornices with over 200 profiles, rosettes, overlays, moldings, corner blocks. All products feature precise geometry, a base white coating, and are ready for painting in any color.
STAVROS is a manufacturer, not a middleman. This means quality control at every stage and real support for those who take ceiling work seriously. When the renovation is complete, the result should bring joy, not remind you of itself a year later with a sagging slat or a detached cornice. For that, you need the right material. STAVROS produces it.
FAQ: Answers to popular questions
Can removed slatted panels be reused?
Metal and PVC panels without deformation or mechanical damage — yes, after cleaning and if a suitable frame is available. MDF and wooden panels — only if there was no contact with water and no deformation. Check the geometry of each panel before remounting.
How to remove a single slatted ceiling panel without dismantling the entire ceiling?
Locate the nearest edge or movable slat next to the damaged one. Slide it along the stringers to create a gap. Through the gap, sequentially unclip the slats using a knife, moving toward the damaged one. After replacing it, mount in reverse order.
Is it necessary to remove the ceiling cornice when replacing slatted panels?
Depends on the design. If the cornice overlaps the panel ends (mounted on top) — it needs to be removed to access the wall profile. If the cornice is installed above the level of the slatted ceiling — it can be left untouched.
How long does it take to dismantle a slatted ceiling in a standard room of 15–18 sq.m.?
With tools and one person — 2–4 hours to remove panels and wall profiles. Full dismantling including stringers and hangers — 3–6 hours. Careful dismantling with material preservation takes more time than demolition 'for disposal'.
What to do with holes from anchor dowels after dismantling the frame?
Fill with alabaster or gypsum-based putty. For large holes (from 10 mm anchors and larger) — first fill with mounting foam, after drying trim excess, putty, sand.
Can polyurethane molding be glued directly onto slat panels?
No. Polyurethane decor is attached to permanent bases — plastered ceiling, drywall, concrete. Slat panels are not a suitable base for adhesive mounting of decor.
How long after installation can polyurethane decor be painted?
After 24–48 hours after installation — after the adhesive has fully cured and the putty at joints has completely dried. Painting before this time may compromise paint adhesion in areas of uncured adhesive.
Should polyurethane decor be primed before painting?
Light sanding (grit 180–220) + acrylic primer — recommended preparation. Primer improves paint adhesion and ensures even coverage without 'bare spots'.