Article Contents:
- Ceiling preparation: the forgotten foundation
- Assessing the condition of the base
- Priming and antiseptic treatment
- Ceiling marking
- Two methods for attaching slatted panels to the ceiling
- First method: direct mounting on the base
- Second method: frame mounting with a suspension system
- Frame mounting of slatted panels on the ceiling: step-by-step instructions
- Step one: mounting the hangers
- Step two: installation of load-bearing guides
- Step three: installation of cross profiles (if required)
- Step four: routing of utilities
- Step five: installation of slatted panels
- Step six: built-in lighting fixtures
- Accounting for weight, geometry, and fastener spacing
- Loads on ceiling fasteners
- Frame geometry and fastener spacing
- Installation of polyurethane molding on the ceiling
- Materials for installation
- Surface preparation before installation
- Marking the location of cornices
- Corner connections of cornices
- Step-by-step cornice installation
- Installation of ceiling rosettes and overlays
- Joints, corners, painting and finishing
- Sealing Joints and Gaps
- Painting polyurethane decor
- Finishing seams of slatted panels
- DIY slatted ceiling: how to avoid professional mistakes
- First mistake: installation without level marking
- Second mistake: fastening into a hollow-core slab with a regular dowel
- Third mistake: adhesive without open curing time
- Fourth mistake: using silicone sealant for decorative joint filling
- Fifth mistake: installing cornice before slatted panels
- Sixth mistake: neglecting antiseptic treatment in wet areas
- Seventh mistake: skimping on the hanger step
- Combined installation of slatted panels and molding: correct sequence
- Work sequence
- Why the order matters
- About the Company STAVROS
- FAQ: Answers to Popular Questions
The ceiling is a surface that is always visible. Unlike walls, furniture does not cover it, rugs do not cover it. The ceiling exists in open space, in plain sight, and any installation error becomes obvious immediately—a sagging slat, a crooked cornice, a crack in the molding joint. That is why the question ofhow to attach slatted panels to the ceilingand how to install them correctlypolyurethane ceiling moldingsrequires not general words, but a specific step-by-step technology. Without unnecessary digressions — let's break it down in order.


Ceiling preparation: the forgotten foundation
Most installation errors are made not at the stage of attaching the material, but at the stage of preparing the base. A ceiling that looks level often is not. Variations of 10–20 mm over a length of 3 m are normal for most reinforced concrete floors. And it is these variations that will become a problem if not eliminated before starting work.


Assessing the condition of the base
The first step is an inspection of the ceiling surface. What needs to be checked:
Level variations. Measurement is done with a laser level or a long straightedge (2–3 m). The permissible variation for direct mounting of slatted panels onto the base is no more than 3–5 mm over 2 m. For larger variations — only frame mounting.
Condition of the plaster. Old plaster may only be holding on in certain areas. Problem areas are identified by tapping (a hollow sound = delamination). Delaminated plaster is completely removed — a fastener that lands on a delaminated layer will eventually pull out along with it.
Presence of utilities. Before marking the frame, it is necessary to know where hidden electrical cables and pipes run. Accidentally drilling into a cable means stopping work, repairing the wiring, and, in the worst case, a short circuit.
Base moisture. For rooms with unstable humidity (bathroom, kitchen, rooms with leaks), the base must be dry and treated with antiseptic primer. Installing on a damp base is a direct path to mold appearing behind the panels.
Our factory also produces:


Priming and antiseptic treatment
After removing dust, old paint residues, and peeling — priming. The primer performs several functions: strengthens the surface layer of the base, ensures adhesion of the adhesive (if adhesive installation of molding is used), and seals small pores.
For ceilings in wet rooms — antiseptic primer-concentrate, applied in 2 layers. For dry living rooms, standard deep-penetration acrylic primer is sufficient.
Get Consultation
Ceiling Marking
Marking is the foundation of all subsequent work. An error at the marking stage multiplies across the entire installation area. Rules:
-
The zero line (horizontal) is drawn with a laser level around the entire perimeter of the room. This is a reference for the frame and for installing the cornice.
-
The axes of the frame guides (if frame installation is used) are marked with a step of 400–600 mm depending on the weight and rigidity of the panels.
-
The attachment points for hangers are marked along the guide axes with a step of 500–600 mm.
Two methods of attaching slatted panels to the ceiling
There are two fundamentally different approaches to installing slatted panels on the ceiling. The choice between them depends on the condition of the base, the design of the panels, and the purpose of the room.
Method one: direct mounting to the substrate
This method is used only on perfectly level substrates (deviation no more than 3–5 mm over 2 m) and for lightweight panels on thin underlayment. Advantages: minimal ceiling height reduction, simplicity, speed. Disadvantages: no ventilation gap, inability to conceal utilities, sensitive to substrate irregularities.
Direct mounting technology:
-
Apply mounting adhesive to the panel underlayment using a notched trowel (6–8 mm tooth).
-
Press the panel against the substrate and hold for 30–60 seconds.
-
Additionally — secure with finishing nails or staple gun staples in the batten area (fasteners are concealed behind battens).
-
Joints between panels — butt joint or with a 2–3 mm gap for filler application.
Method two: frame mounting with a suspended system
This is the professional standard for most real-world situations.Installing slatted panels on the ceilingthrough the frame allows:
-
level any unevenness of the ceiling;
-
create a ventilation gap between the panels and the base (critical in wet rooms);
-
hide electrical cables, pipes, ventilation ducts;
-
integrate built-in lights.
The frame mounting technology is described in detail below.
Frame mounting of slatted panels on the ceiling: step-by-step instructions
Step one: mounting hangers
Hangers are fastening elements that connect the guide profiles to the ceiling. A standard hanger is a U-shaped straight hanger made of galvanized steel.
The type of hanger attachment to the ceiling depends on the material:
-
Reinforced concrete ceiling — anchor bolt with a diameter of 6–8 mm, driving depth 40–50 mm.
-
Hollow-core floor slab — butterfly anchor or special anchor for hollow bases. A regular nail-in anchor is not used for hollow-core slabs.
-
Wooden ceiling — 5×70 mm screw directly into the load-bearing beam. It is important to hit the beam, not the infill between beams.
Spacing of hangers along the guide: 500–600 mm. Distance from the edge (end of the guide) to the first hanger — no more than 200 mm.
Step two: installation of load-bearing guides
Guide profiles (CD 60/27 or a similar profile for the specific panel system) are inserted into the hangers and aligned to the zero line. Alignment must be done using a stretched string or laser level: even a slight deviation of the guide from horizontal will be visible on the finished ceiling.
Connection of guides to each other (for ceiling lengths over 3 m) — via a connector or with an overlap of 200–300 mm. Joints of adjacent guides — staggered, not in the same transverse line.
Spacing between guides: for MDF and solid wood panels — 400–500 mm. For heavy solid wood panels — 350–400 mm. For lightweight acoustic panels on thin backing — 500–600 mm.
Step three: installation of cross profiles (if required)
In some slatted ceiling installation systems, cross profiles are not used — the slats are attached directly to the load-bearing guides. In other systems, a two-level frame is needed: load-bearing guides + cross profiles for the slats. This depends on the design of the specific panels — study the manufacturer's instructions.
Step four: routing utilities
Before installing the panels, the following are laid in the space between the frame and the base:
-
Electrical cables in corrugated pipes (corrugation is mandatory for cable protection and replacement capability).
-
Signal and internet cables.
-
Ventilation pipes (flexible ducts).
All cables are secured to the base or frame elements with clips or ties. Sagging cables touching the back surface of the panels are a source of noise during vibration and a risk of mechanical damage.
The cutout locations for light fixtures are marked and cut in the panel underlay before installation — this is much more convenient than cutting already installed panels.
Step five: installation of slatted panels
Finally — the panels themselves.How to install slatted panels on the ceilingCorrect installation is not just about fasteners, but also about sequence.
Installation direction. Panels are installed starting from one wall (usually the wall opposite the room entrance) and moving towards the entrance. This allows each panel to be aligned sequentially relative to the previous one.
Fasteners. Battens are attached to the guides through the underlayment using screws (in the batten area where the screw will be hidden) or with galvanized steel clips. Clip fastening is concealed: the clip is inserted into the underlayment groove and screwed to the guide. The next panel covers the clip.
Wall gap. A 5–10 mm expansion gap is left around the perimeter of the ceiling between the panel end and the wall. This gap is covered by a cornice or ceiling molding. Without a gap, thermal expansion will cause the panels to press against the wall and deform.
Horizontal control. Check the plane with a level every 2–3 panels. A slight deviation in one panel accumulates and becomes noticeable after 5–7 panels.
Step six: recessed lighting fixtures
Recessed spotlights are installed in cut-out holes in the panel underlayment. The fixture type must be recessed ceiling-mounted with a mounting depth matching the frame depth. Cables are connected before the final fixation of the fixture in the hole.
Accounting for weight, geometry, and fastener spacing
A ceiling is not a wall. Gravity acts differently on ceiling mounting: each fastener works in tension, not in shear. This fundamentally changes the requirements for fasteners.
Loads on ceiling fasteners
The pull-out load-bearing capacity of a 6 mm diameter anchor dowel in reinforced concrete is 300–500 N (30–50 kg). For standard MDF slat panels (weight 4–6 kg/sq.m.), this provides a sufficient safety margin. For heavy solid wood panels (weight 8–12 kg/sq.m.), larger diameter dowels (8–10 mm) or a reduced hanger spacing are required.
Practical rule: the total load on one hanger should not exceed 30% of its rated load-bearing capacity. This is a threefold safety factor, standard for building structures.
Frame geometry and fastener spacing
The heavier and stiffer the panel, the closer the spacing of guides and hangers. A lightweight fabric-backed acoustic panel can manage with guides spaced at 600 mm. A massive 20 mm thick oak slat requires a spacing of 350–400 mm.
Pay special attention to corners and perimeters. In corners and along walls, the load on fasteners is higher due to fewer support points for edge panels. Here, hanger spacing is reduced to 300–400 mm.
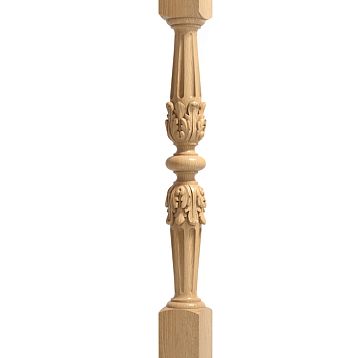
Installing polyurethane molding on the ceiling
Now we move on to the decorative part.installation of polyurethane molding— this is a separate discipline with its own rules, mistakes, and professional nuances. Let's examine it step by step.
Materials for installation
Polyurethane decorative elements are attached with adhesive. The choice of adhesive is a fundamental issue.
Acrylic mounting adhesive (liquid nails type). A universal option for dry rooms. Applied in dots or a zigzag pattern to the back surface of the element. Open time after application is 2–5 minutes (the element is held in the air to activate the adhesive, then pressed to the base).
Polyurethane adhesive. Slightly higher adhesion, water resistance. Used in rooms with unstable humidity.
Specialized adhesive for polyurethane. Some manufacturers offer adhesive specifically designed for polyurethane decorative products. If available, it is the priority choice.
What not to use: solvent-based adhesive — it destroys the polyurethane surface by dissolving the top layer and disrupting the relief geometry.
Surface preparation before installation
The success of an adhesive bond is 80% determined by preparation. The back side of the polyurethane element must be degreased — wiped with acetone or isopropyl alcohol. The ceiling surface is also degreased at the contact point. Adhesive does not hold on a greasy surface (traces of paint, silicone, wax).
The base must be dry: surface moisture not higher than 8%. Applying adhesive to a wet surface critically reduces adhesion.
Marking the location of cornices
Before applying adhesive — full marking on the ceiling and walls. The cornice is installed at the junction of the wall and ceiling — this is the most loaded area in terms of structural deformations of the building (shrinkage, thermal expansion). The cornice installation line is drawn using a level. The offset from the ceiling (if the cornice is partially on the ceiling, partially on the wall) must be the same along the entire perimeter.
Forpolyurethane ceiling moldingIn the form of rosettes, medallions, overlays — the center of each element is marked in advance. Especially important: the rosette for the chandelier must be precisely centered on the ceiling (or above the table if it's a dining area) — a shift of 3–5 cm creates a feeling of the entire ceiling being crooked.
Corner joints of cornices
This is the most technically complex element of polyurethane cornice installation. Corner joints — internal (90° inward) and external (90° outward) — require a precise 45° cut.
Cutting polyurethane — only with a fine-toothed hacksaw for metal or an electric jigsaw with a fine tooth. The 45° cutting angle is maintained using a miter box. Crucially important: cut slowly, without pressure, otherwise the polyurethane crumbles and chips at the edge.
Sequence for installing corner elements: first, the corner pieces are mounted (45°+45° = 90°), then the straight sections are filled in. This allows for precise fitting of the length of the straight sections between the already fixed corners.
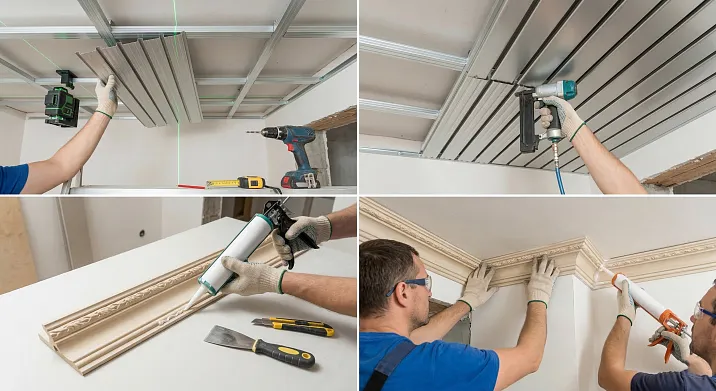
Step-by-step cornice installation
Step 1. Cut the corner elements of the cornice (45°). Dry-fit — without glue — ensuring the joint is precise. If necessary — adjust the miter box or correct with a hand saw.
Step 2. Apply glue to the back surface of the corner element in a zigzag or dotted pattern (dots every 10–15 cm). Let it air open for 2–3 minutes.
Step 3. Press the element against the ceiling and wall simultaneously (the cornice rests on both planes). Hold for 30–60 seconds. If necessary — secure with painter's tape until the glue reaches full strength (usually 2–4 hours).
Step 4. Wait for the corner elements to set. Only then — install the straight sections between them.
Step 5. Cut straight sections of the cornice to the measured length (measure between already installed corner pieces). Installation is similar to the corner pieces.
Step 6. Joints between elements - immediately after installation, fill with acrylic-based putty. Apply putty into the seam, smooth with a spatula, and sand after drying.
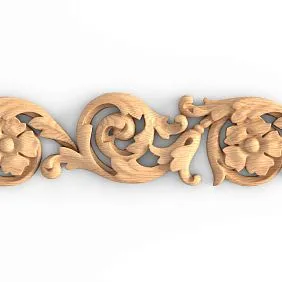
Installation of ceiling rosettes and overlays
Rosettes and decorative overlays are installed using the same technology as cornices, but with one feature: due to their weight and horizontal placement (only on the ceiling, without wall support), they experience maximum load on the adhesive bond.
For large rosettes (diameter from 400 mm), mechanical fastening in addition to adhesive is mandatory: one or two screws with wide heads through the central mounting hole (if provided by the rosette design) or through a decorative element into a point concealed by the chandelier's lampshade.
Small rosettes (up to 300 mm) - adhesive only, provided surfaces are properly prepared. Mechanical mounting holes are not provided in them, and drilling polyurethane 'at random' is not necessary.
The pressure holding time for ceiling rosettes is at least 5-10 minutes. Using painter's tape for temporary fixation here is difficult (hard to evenly stretch tape to the ceiling). A convenient alternative: temporary wooden support props from the floor to the center of the rosette during the adhesive curing period.
Joints, corners, painting and finishing
Installation is complete - but this is not yet the finish. The final finish determines whether the result will look professional or like a weekend DIY job.
Filling joints and gaps
All joints between cornice elements, between the cornice and wall/ceiling, between panel strips and the cornice - are filled with finishing acrylic putty or acrylic sealant. Silicone sealant is not used for decorative seams - it cannot be painted, and it's impossible to mask with paint.
Application technique: apply a small amount of putty into the joint (preferably in two thin layers rather than one thick layer), smooth it with a wet finger or a putty knife, and after complete drying, sand it with fine sandpaper (grit 120–180).
A gap between the cornice and the ceiling or wall wider than 3 mm should be filled in several layers with intermediate drying. A wide gap cannot be filled in one layer without shrinkage.
Painting polyurethane decor
Polyurethane products come with a basic white coating. This is already a finished color for most interiors. But if repainting is necessary (tinting to match the wall color, metallic, or the color of slatted panels), polyurethane paints perfectly.
Preparation for painting: light sanding of the surface (grit 180–220) to improve paint adhesion. Priming with acrylic primer. Painting with acrylic paint in 2 layers with intermediate drying.
Oil-based and nitro paints are not used for polyurethane—they can dissolve the surface layer and damage the relief.
Finish joints at slatted panels
The perimeter gap between slatted panels and walls is concealed by a cornice. The cornice is installed after completing the panel installation. If the cornice is polyurethane, it is installed using the technology described above. If it is wood or MDF, it is attached with hidden fasteners to the frame.
Correct sequence: first, install the slatted panels (with an expansion gap at the walls), then the cornice, covering the gap. Do not install the cornice before the panels—this will deprive the panels of the expansion gap.
DIY slatted ceiling: how to avoid professional mistakes
The troubleshooting section is the most valuable in any technical article. Because it's the mistakes that cost money, time, and nerves.
First mistake: installation without level marking
The most common one. The installer mounts the hangers and guides 'by eye'. As a result, the finished ceiling has a wavy surface—not a plane, but a relief. A laser level is a mandatory tool for ceiling installation, not an option.
Second mistake: fastening into a hollow-core slab with a regular dowel
Many floor slabs in Soviet and post-Soviet buildings are hollow-core slabs. A regular expansion dowel in a void either doesn't open or opens into the void—without gripping the material. In six months to a year, the fastener pulls out with a characteristic sound. For hollow-core slabs—only special anchors.
Third mistake: glue without open curing time
When installing polyurethane decor with acrylic mounting glue—an open curing time of 2–3 minutes after applying the glue is mandatory (the element is held in the air, the glue 'activates'). Without this step, the glue simply slides when pressed, not creating adhesion. The element seems secured—and falls after a few hours.
Fourth mistake: silicone sealant for filling decor seams
Silicone sealant cannot be painted. If you fill a seam with it and then paint—the seam will remain a visible spot with a different texture. The correct material for seams is acrylic filler compound or acrylic sealant.
Fifth mistake: installing the cornice before the panel strips
The cornice was installed first—neatly and beautifully. Then, slatted panels are mounted, and it's discovered: now there's no gap between the panel and the cornice for thermal expansion. Or vice versa—the gap turned out to be too large, and there's nothing to cover it with. Always: panels first, then decorative elements around the perimeter.
Mistake six: neglecting antiseptic treatment in damp rooms
Wooden or MDF slatted panels in the bathroom without antiseptic on the base and the back of the underlay—this is future mold. It's not visible from the outside, but it destroys the material from within and appears as dark spots after 2–3 years.
Mistake seven: saving on the hanger spacing step
"I'll manage with hangers every 800–900 mm"—a common thought during installation at height. As a result, after a year, straight panels begin to sag between the hangers. Hanger spacing is not a recommended parameter, but a mandatory one. For slatted panels—500–600 mm maximum.
Combined installation of slatted panels and molding: correct sequence
When a project includes both slatted panels on the ceiling and polyurethane decor, the correct sequence of work is important.
Work sequence
-
Preparation and marking—full ceiling marking: frame axes, cornice lines, center points of outlets.
-
Installation of the frame for slatted panels.
-
Routing of utilities within the frame space.
-
Installation of slatted panels with expansion gaps at the walls.
-
Puttying of the ceiling surface (if there are areas without panels — near molding installation zones).
-
Installation of polyurethane cornice around the perimeter, covering the gap between panels and wall.
-
Installation of sockets and surface-mounted elements on the ceiling.
-
Sealing all joints with putty.
-
Sanding of puttied joints.
-
Painting — unified ceiling painting (panels + decor in a common tone).
Why the order is important
If the cornice is installed before the panels — it is impossible to ensure the correct expansion gap. If the cornice is painted before sealing the joints — the paint will be damaged during subsequent puttying. If sockets are installed before the panels — their final position relative to the installed ceiling cannot be accurately determined.
The logic is simple: structural first, decorative later. Hidden first, visible later.
About the company STAVROS
A ceiling starts with the right material. STAVROS produces solid wood and MDF slat panels for ceiling installation: various slat widths, backing formats, paintable coatings, and pre-finished surfaces. The entire line is designed for installation either on a frame or directly onto the substrate—depending on the room conditions.
Simultaneously, STAVROS offers a full range ofof polyurethane ceiling moldings: over 200 cornice profiles, rosettes, overlay elements, and corner blocks. Each product has precise geometric parameters, a ready base coating, and technical installation documentation.
STAVROS is a proprietary Russian manufacturer, offering stable quality and real professional support: consultations on choosing the installation system, material calculation, and work technology. Because a ceiling that lasts for decades without sagging or delamination is no accident. It's the right material chosen and the right installation performed.
FAQ: Answers to popular questions
Is a frame needed for a slat ceiling in a bathroom?
Yes, frame installation is mandatory. In wet rooms, the frame provides a ventilation gap between the panels and the ceiling slab, preventing condensation buildup and mold formation.
What is the difference between fastening into a concrete slab and fastening into a hollow-core slab?
For concrete: an expansion anchor bolt with a diameter of 6–8 mm, depth 40–50 mm. For a hollow-core slab: a toggle bolt or a special anchor for hollow bases. A regular dowel does not hold the pull-out load in a hollow space.
How long does the adhesive take to dry when installing a polyurethane cornice?
Initial set (fixation can be removed) — 2–4 hours for acrylic adhesive. Full strength gain — 24–48 hours. Proceed to puttying and painting — only after full strength gain.
Can polyurethane molding be installed directly on slatted panels?
No. Polyurethane decor is attached to stationary surfaces — plastered ceiling, drywall, surfaces outside the slatted panel area. Molding is not attached to the slats themselves.
How to calculate the length of cornice for a room?
Room perimeter minus width of door openings (if cornice does not extend beyond the door) plus 10–15% reserve for corner trimming and possible errors. For a 4×5 m room, perimeter 18 m + 10% = about 20 linear meters.
Can MDF slatted panels on the ceiling be painted after installation?
Yes, if the panels are supplied for painting (with a base primer). Apply acrylic paint in 2 coats. Important: when painting slats and cornice in a single color, the ceiling is visually perceived as a unified architectural plane — this is a professional technique for creating a cohesive look.
Are finish nails needed in addition to adhesive when installing cornice?
In dry rooms for small cornices (up to 80 mm) — adhesive is sufficient. For wide cornices (100 mm and more) and in damp rooms — additional mechanical fixation with finish nails or construction stapler staples in the non-profile area of the cornice, followed by puttying the holes.