Article Contents:
- Diagnosing old furniture: where to start the update
- Structural integrity: holding together or falling apart
- Type of finish: what to remove
- Style assessment: what to add
- Carved furniture overlays: transforming facades without replacing doors
- Where to place overlays: compositional schemes
- Choosing an ornament: matching the furniture style
- Installing overlays: gluing technology
- Wooden furniture handles: replacing hardware as an update accent
- Types of wooden handles: knobs and pulls
- Choosing wood species and handle finishes
- Installing handles: replacing old hardware
- Wooden door decor: updating cabinets with paneled facades
- Overlays on the door frame
- Overlay on the panel
- Moldings as panel framing
- Restoring classic furniture: step-by-step technology for a complete update
- Step 1: Disassembly and cleaning
- Step 2: Removing the old finish
- Step 3: Repairing damage
- Step 4: Installing decorative elements
- Step 5: Sanding the entire surface
- Step 6: Painting or oil finishing
- Step 7: Assembly and hardware installation
- Wall moldings as a background for updated furniture
- Molding panels on walls
- Ceiling cornice and baseboard
- Color palette
- Transformation examples: before and after
- Restoration Mistakes: What to Avoid
- Frequently Asked Questions About Furniture Restoration
- Conclusion: revive the beauty with STAVROS

What to do with an old oak sideboard inherited from grandma? Throw it away? But the wood is sturdy, the construction is solid, only the facades have faded, the handles are loose, and the finish is peeling. Sell it? But at a flea market, it would fetch pennies. Or perhaps, breathe new life into it? Add carved overlays to the facades, replace the old handles with handcrafted wooden ones, repaint, add patina — and voilà, it's no longer worn-out Soviet-era furniture, but a stylish piece for a classic interior, worthy of a living room. Today, we're breaking down the technology of furniture restoration and updating usingwooden furniture decorandfurniture handles: from condition diagnosis to final assembly, from choosing overlays to installation, from simple cosmetic repairs to a radical transformation.
Furniture restoration is not just about saving money (a new solid oak sideboard costs 150-300 thousand rubles, while restoration will cost 15-30 thousand). It's about preserving family history, generational connections, and respect for the craftsmanship of the past. It's eco-friendly — instead of throwing old furniture into a landfill and buying new particleboard furniture, you're restoring quality wood. It's creativity — an opportunity to create a unique piece that no one else has. It's a skill that will stay with you for life and save you hundreds of thousands of rubles.


Diagnosing old furniture: where to start the update
Beforebuy wooden decor for furnitureand start working, you need to realistically assess the item's condition. Not all furniture is suitable for restoration. If the structure is falling apart, the wood is rotten, the joints are destroyed — it's easier to buy new. But in most cases, old solid wood furniture has an excellent frame and only requires cosmetic updating.


Structural strength: holding up or falling apart
Check all joints. Open the cabinet doors, pull out the dresser drawers, shake the chair. If everything holds firmly, there are no creaks, no warping — great, the structure is fine. If there is play, creaking, warping — joint repairs are needed (tightening screws, replacing dowels, gluing tenon joints). This is extra work, but quite doable yourself.
Inspect the wood. If there are cracks (small drying cracks are acceptable), wormholes (signs of woodworms), rot (soft dark spots) — this is a problem. Cracks can be filled with epoxy resin, wormholes treated with antiseptic and filled, rot — cut out and insert a fresh wood patch. But if there is a lot of damage, restoration may not be cost-effective.
Our factory also produces:


Type of finish: what to remove
Old furniture may be coated with varnish (shellac, oil-based, nitrocellulose, polyurethane), oil, wax, paint (oil-based, enamel, acrylic). The type of finish determines how to remove it.
Varnish — removed with stripper (a chemical varnish solvent, applied with a brush, after 10-20 minutes the varnish softens and is scraped off with a putty knife) or mechanically (with a sander using coarse sandpaper with 60-80 grit). Stripper is faster but toxic (work in a respirator, ventilated area). Sanding is slower but safer.
Paint — removed with stripper (for oil-based paints) or thermal method (a heat gun heats the paint to 300-400 degrees, it bubbles, and is scraped off with a putty knife). If the paint is holding firmly, you may not need to remove it completely, but sand it (with 120-150 grit sandpaper), prime, and paint over it.
Oil or wax — removed with solvent (white spirit, gasoline) or simply sanded off.
Get Consultation
Style assessment: what to add
Determine the furniture's style. Soviet furniture from the 1960s-80s is usually simplified classic (straight lines, minimal decor, functionality). Pre-revolutionary furniture from the early 20th century — Art Nouveau, Neoclassical (curved lines, floral patterns, carving). Furniture from the 1920s-40s — Constructivism (geometry, absence of decor). Imported furniture from the 1990s-2000s — Eclecticism (mix of styles).
The style determines whatdecorating wooden itemswill suit. For Soviet classic, simple geometric overlays, rectangular or oval, are suitable. For Art Nouveau — floral patterns (acanthus, grapevine, flowers). For Constructivism — minimalist handles, no overlays. For Eclecticism — any decor, the main thing is harmony.
Carved furniture overlays: transforming facades without replacing doors
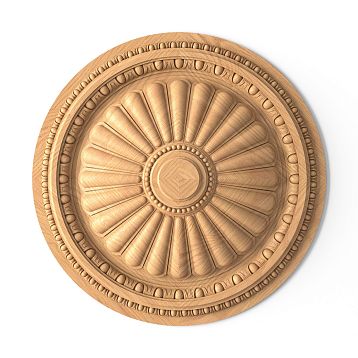
The most effective way to update furniture's appearance is to add carved wooden overlays to the facades. An overlay is a flat element made of solid wood, sized from 50×30 mm to 300×200 mm, with a relief pattern on the front side, which is glued onto cabinet doors, dresser drawer fronts, chair backs, bed sides.
Where to place overlays: compositional schemes
Central overlay — the basic scheme. On each cabinet door or each drawer front — one overlay in the geometric center. Overlay size — 1/4 to 1/3 of the door width. For example: a door 40 cm wide, 60 cm high — an overlay 10-15 cm wide. A central overlay draws the eye, creates a focal point, and hides surface defects (scratches, chips, faded spots).
Corner overlays — a more complex scheme. In each corner of the door — a small overlay (usually 50×50 mm or 70×70 mm). Four corner overlays create a frame, visually structuring the plane. This scheme suits large doors (over 50 cm wide), where a single central overlay gets lost.
Overlays plus framing — a comprehensive scheme. A central overlay plus framing with thin moldings (wooden strips with a cross-section of 10×30 mm or 15×40 mm), forming a rectangular frame around the overlay. The frame creates depth, visual complexity, characteristic of high-class furniture.
Vertical or horizontal composition — for tall narrow doors (e.g., a wardrobe), a vertical chain of two or three overlays, placed one above the other, is used. For low wide ones (e.g., a dresser) — a horizontal row of overlays.
Pattern choice: matching the furniture style
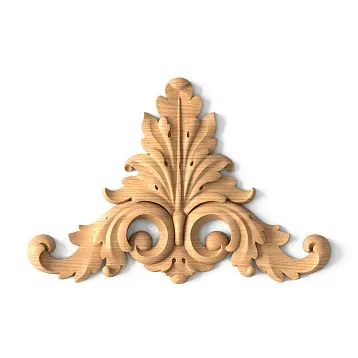
The overlay pattern should match the furniture style. For classic furniture, floral patterns are suitable — acanthus leaves, grapevine, rose flowers, rococo scrolls.carved applique N.VRS-004measuring 120×80 mm with a floral pattern will perfectly fit on the facades of sideboards, dressers, cabinets in the styles of Classicism, Empire, Baroque.
For furniture in the Art Nouveau style, patterns with curved lines, stylized plants (lilies, irises), and asymmetry are suitable.Carved Applique N-182.1with smooth scrolls will suit furniture from the early 20th century.
For neoclassicism (simplified classicism, popular in Soviet furniture) geometric ornaments are suitable — circles, rhombuses, rectangular setbacks, flutes (vertical grooves).Carved appliqué N-467Lwith a laconic geometric pattern will suit furniture from the 1960s-80s.
Overlay installation: gluing technology
Prepare the front surface. If the front is coated with varnish or paint, sand the gluing area with 120-150 grit sandpaper (create roughness for better adhesive grip). Degrease with alcohol or acetone.
Apply glue to the back of the overlay. Use polyurethane glue (Moment Crystal, Titebond Polyurethane) or two-component epoxy glue (EDP, Poxipol). Polyurethane glue is more convenient (single-component, sets in 10-15 minutes), epoxy is stronger (withstands greater loads, water-resistant).
Place the overlay onto the front, align it to the center (use a ruler, pencil for marking), press. Maintain pressure for 30-60 seconds (for polyurethane glue) or secure with a clamp for 2-4 hours (for epoxy). Immediately wipe off excess glue that has squeezed out along the edges with a damp cloth (before it sets).
For large overlays (over 150×100 mm) additionally secure with finishing nails (length 20-30 mm, diameter 1-1.5 mm). Nails are driven into the corners of the overlay, the heads are countersunk with a nail set, the holes are filled with wood putty, sanded. After coating, the fastening points are invisible.
Wooden furniture handles: replacing hardware as an accent of renewal
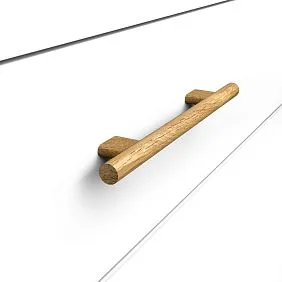
Handles are what you touch every day. Old loose metal handles with peeling chrome or gold plating spoil the impression even of well-restored furniture. Replacing handles withWooden furniture handleshandmade — a simple but effective way of updating.
Types of wooden handles: knobs and pulls
Knob handles — round or oval, small in size (diameter 30-50 mm), attached with one screw. Suitable for dresser drawers, nightstands, small doors.Furniture Handle Luna HL-005Mmade of solid oak with a diameter of 40 mm — a classic knob, suitable for furniture of any style. Knobs are convenient because they don't protrude much (save space), are simple to install (one hole).
Pull handles — arc-shaped, attached with two screws. Center-to-center distance (distance between the centers of the mounting holes) — 64 mm, 96 mm, 128 mm, 160 mm. Suitable for wide dresser drawers, cabinet doors.Taurus furniture handle HL-060-2Mmade of solid wood with metal mounting — an elegant pull, combining the naturalness of wood with the strength of metal. Pulls are more ergonomic than knobs (easier to pull a drawer), but require two holes (when replacing old handles, the center-to-center distance must match).
Carved handles — knob or pull handles with a carved ornament on the front side. These are piece goods, often handmade, expensive, but creating exclusivity. A carved handle with a floral ornament turns an ordinary dresser into a piece of furniture art.
Choosing the wood species and finish of handles
The wood species of the handles should match the wood species of the furniture (or the wood species of the overlays, if you added them). If the furniture is oak, the handles should also be oak. If the furniture is beech, the handles should be beech. This creates unity, integrity of the image.
The finish of handles can be:
-
Natural under oil — the wood grain is visible, the color is warm. Suitable for furniture coated with oil or clear varnish.
-
Tinted — oil with pigment (grey oak, graphite oak, wenge oak). Suitable for modern interiors where a cool or dark shade is needed.
-
Painted — opaque paint (white, black, colored). Suitable for furniture painted in an opaque color. White wooden handles on a white buffet — a classic of French Provence.
-
With patina — artificial aging (wear, showing through base, gold or silver highlights). Suitable for antique or pseudo-antique furniture.
Handle installation: replacing old hardware
Remove the old handles (unscrew the screws from the inside of the door or drawer front). If the new handles have the same center-to-center distance as the old ones, use the existing holes. If the center-to-center distance is different, you will have to drill new holes.
Mark the locations of the new holes with a pencil (using a template made of cardboard or plastic with holes of the required center-to-center distance). Drill through holes with a diameter of 5-6 mm (for an M4 or M5 screw) through the front. Place the handle on the front side, insert the screws from the inside, tighten. Do not overtighten (the wood may crack).
Old holes (if they are not used) fill with wooden dowels 6-8 mm in diameter glued in, cut off protruding ends, sand, putty, paint to match the front color.
Wooden door decor: updating cabinets with paneled fronts
If the cabinet or buffet has paneled doors (a frame of stiles and rails, inside — a panel inserted into grooves),Decorating Wooden Doorsmay include multiple levels.
Door frame overlays
Small corner overlays measuring 50×50 mm or 70×70 mm are glued at the corners of the door frame (where vertical and horizontal bars meet). They conceal the joints (which are often cracked and uneven) and create a decorative accent. Four corner overlays transform a simple frame into a decorated one.
Panel overlay
A carved overlay is glued to the center of the panel (the flat insert inside the frame). The overlay size is 1/3 to 1/2 of the panel size. The overlay adds volume, turning a flat panel into a relief one. If the panel is small (20×30 cm), one overlay of 70×100 mm is sufficient. If the panel is large (40×60 cm), you can use a 150×200 mm overlay or several small overlays forming a composition.
Moldings as panel framing
A thin wooden molding with a cross-section of 10×20 mm or 15×30 mm is glued along the perimeter of the panel (at the border between the panel and the frame). The molding creates a recess, visually highlights the panel, and gives the door an architectural look. This is more complex work (the molding needs to be precisely cut at 45-degree angles at the corners), but the result is impressive.
Classic furniture restoration: step-by-step technology for complete renewal
Now let's put it all together — a step-by-step technology for the complete restoration of a buffet, chest of drawers, or cabinet made of solid wood using buy wooden furniture decor and new handles.
Step 1: Disassembly and cleaning
Remove all removable elements — doors, drawers, shelves, handles, hinges. Disassembly makes the work easier (each element is processed separately) and allows access to hard-to-reach places. Clean all surfaces from dust, dirt, and grease (soap solution, sponge, then wipe dry).
Step 2: Removing old finish
Remove old varnish or paint using a stripper or sanding (see the 'Type of finish' section above). The goal is to reach clean wood. If the wood is dark (from age or old varnish), you can bleach it with a special wood bleach (two-component based on hydrogen peroxide and alkali). Bleaching lightens the wood by 2-3 tones, restoring a fresh appearance.
Step 3: Repairing damage
Fill cracks with epoxy resin (mix resin with hardener, pour into the crack, sand after curing). Treat wormholes with an antiseptic (insecticidal composition, inject into holes with a syringe), fill with wood putty. Fill chips and dents with putty. Sand all puttied areas with 150-180 grit sandpaper (the surface should be smooth and even).
Step 4: Mounting decorative elements
Glue carved overlays onto door fronts and drawer fronts (technology described above). Wait for the glue to fully cure (for polyurethane — 24 hours, for epoxy — 48 hours). Sand the edges of the overlays (if there are small steps between the overlay and the front), smooth the transition.
Install new wooden handles (technology described above). Fill old holes if they do not match the new ones.
Step 5: Sanding the entire surface
Sand the entire furniture with sandpaper sequentially using 120 → 150 → 180 → 220 grit. Sanding levels the surface, removes minor scratches, and prepares the wood for finishing. Sand along the grain (not across, otherwise scratches will remain). After sanding, thoroughly remove dust (vacuum, then a damp cloth, then a dry one).
Step 6: Painting or oil coating
Choose the type of finish:
-
Transparent (oil, wax, clear varnish) — wood grain is visible. Suitable for beautiful wood (oak, walnut, ash).
-
Tinted (oil with pigment, tinted varnish) — grain is visible, but color is changed. Suitable for color unification (if furniture is made from different wood species or of different ages).
-
Opaque (enamel paint, acrylic paint) — grain is hidden, any color. Suitable for furniture made from inexpensive wood (pine, birch) or for interiors where a colored accent is needed (white, gray, blue furniture).
Transparent finish: apply oil (Osmo, Biofa) with a brush or cloth, rub in, remove excess after 10-15 minutes. Two to three coats with intermediate drying of 12-24 hours. Or apply varnish (polyurethane, acrylic) with a brush or sprayer, two to three coats with intermediate sanding using 320 grit sandpaper.
Opaque finish: prime the wood with wood primer (acrylic), one coat. Sand with 220 grit. Apply paint (acrylic enamel, alkyd enamel) with a brush, roller, or sprayer. Two to three coats with intermediate drying according to the manufacturer's instructions (usually 4-6 hours).
Patination: after painting (usually in white, beige, gray), apply patina (pigmented wax, bitumen varnish) to protruding parts (edges, carvings, moldings), partially wipe off (remains in recesses). Creates an aged, antique effect.
Step 7: Assembly and installation of hardware
Assemble the furniture in reverse order. Install hinges, screw on doors, insert drawers. Adjust the doors (they should close tightly, without warping). Install the final hardware (magnetic latches, stops, legs, if they were replaced with new ones).Wooden furniture legs).
Wall molding as a background for updated furniture
Restored furniture is a work of art. But if it stands against a backdrop of peeling wallpaper or bare walls, the effect is lost.Classic Furniturerequires an appropriate background — walls decorated with polyurethane molding, moldings, cornices.
Molding panels on walls
Divide the walls into rectangular sections with polyurethane moldings (the technology is described in previous articles). Inside the sections — a painted background (contrasting or matching). Molding panels create an architectural structure, against which the furniture looks organic, as part of a unified interior.
Ceiling cornice and baseboard
Framing the room at the top (polyurethane ceiling cornice) and bottom (wood or MDF floor baseboard) completes the composition. If the furniture is classic, the cornice and baseboard should also be of classic profiles (with curves, grooves). If the furniture is neoclassical, simplified profiles will work.
Color palette
Wall colors should harmonize with the furniture. If the furniture is dark (dark oak, walnut), walls are light (white, beige, light gray) — contrast highlights the furniture. If the furniture is light (light oak, birch, painted white), walls can be slightly darker (gray, olive, dusty blue) — depth is created. If the furniture is colored (blue, green), walls are neutral (white, gray).
Transformation examples: before and after
Example 1: Soviet oak sideboard from the 1970s.
Before: Dark varnish (almost black from age), wear, loose metal handles, simple facades without decoration.
Restoration: Old varnish removed with stripper, wood bleached, sanded. A central carved overlay N.VRS-004 measuring 120×80 mm with a floral pattern was added to each door. Handles replaced with wooden Luna HL-005M knobs made of oak. Coated with Osmo oil with light tinting (honey oak).
After: Light sideboard with pronounced oak texture, carved overlays create relief, wooden handles continue the theme of naturalness. Material cost: 8000 rubles (stripper, bleach, overlays 6 pcs at 800 rub each, handles 8 pcs at 250 rub each, oil). Work time: 3-4 days. Result: a sideboard that is not embarrassing to place in the living room.
Example 2: Pine chest of drawers from the 1980s.
Before: Cheap solid pine furniture, stained yellow-brown, varnished. Pine is soft wood, dents, scratches. Simple drawer fronts, plastic handles.
Restoration: Varnish removed, defects filled. Drawer fronts painted with white acrylic enamel (two coats). In the center of each front — a carved overlay N-182.1, painted with white enamel. Handles replaced with wooden Taurus HL-060-2M brackets, painted with white enamel. The chest of drawers body (sides, top lid) coated with natural oil (pine texture preserved, but color natural light).
After: Chest of drawers in French Provence style — white fronts with carved decor, natural sides. Material cost: 7000 rubles. Work time: 2-3 days. Result: from cheap Soviet furniture — a stylish interior item.
Example 3: Display cabinet from the early 20th century.
Before: Antique walnut furniture, coated with shellac varnish (alcohol-based varnish used before the 1950s). Varnish cracked, partially peeled. Original carving (turned legs, carved cornice) preserved, but doors — simple paneled, without decoration.
Restoration: Old varnish removed with shellac stripper (alcohol-based). Defects filled with walnut-colored filler. Corner overlays (four per door) and a central overlay N-467L added to the doors. Handles remained original (brass, polished). Coated with shellac varnish (original technique restored — application with a pad in several layers).
After: Antique cabinet restored to museum level. Material cost: 12000 rubles (stripper, filler, overlays 10 pcs, shellac varnish). Work time: 5-7 days (shellac coating requires time, multiple layers). Result: an item worthy of an antique shop, value increased from 20 thousand (in shabby condition) to 80-100 thousand (after restoration).
Restoration mistakes: what to avoid
Mistake 1: Disproportionate decor. Too large overlays on small fronts (overlay size 200×150 mm on a door size 300×400 mm) look crude, overwhelming. Too small overlays on large fronts (overlay 70×50 mm on a door 600×800 mm) get lost. Rule: overlay occupies 1/4 — 1/3 of the front area.
Mistake 2: Style mismatch. Floral Baroque overlays on Constructivist furniture (geometry, minimalism) create dissonance. Geometric overlays on Art Nouveau furniture (curved lines) are also inappropriate. Study the furniture style, select matching decor.
Mistake 3: Poor surface preparation. Gluing overlays onto old varnish or a dirty surface — glue doesn't hold, overlay falls off in a week or month. Be sure to sand, degrease the gluing area.
Mistake 4: Cheap materials. MDF overlays with photo printing 'like wood' instead of carved solid wood — savings are pennies, but the result cheapens the furniture. Better to buy fewer, but qualitywooden overlays for furniture, than many cheap ones.
Mistake 5: Sloppy work. Glue drips, unpainted spots, tool scratches — all this is visible in the final result. Restoration requires neatness, patience, attention to detail.
Frequently asked questions about furniture restoration
Can furniture made of chipboard or MDF be restored?
Furniture made of chipboard with a laminated coating (film) is difficult to restore — the film cannot be removed, and underneath it are pressed wood chips. At most — replace handles, add overlays (glue with liquid nails), paint (prime with a special primer for laminate, then paint). But the result is mediocre. Furniture made of MDF with a painted coating can be restored normally — sanded, primed, repainted, added decor.
How much does a full restoration of a chest of drawers or wardrobe cost?
Materials (paint stripper, putty, overlays 6-10 pcs, handles 8-12 pcs, oil or paint): 8000-15000 rubles. If doing it yourself — only materials. If hiring a master — the work is estimated at 20000-50000 rubles (depends on volume, complexity, region). Total: yourself 8-15 thousand, with a master 28-65 thousand. For comparison: a new solid oak sideboard — 150-300 thousand. The savings are obvious.
Where to buy quality decor for restoration?
Choose manufacturers working with solid natural wood (oak, beech), using CNC milling or hand carving.Carved decorative inserts for furniture made of solid oak or beech — this is durability, clarity of relief, the possibility of any finish (oil, varnish, paint, patina).
Are special tools needed for restoration?
Minimum set: orbital sander (or vibrating sander), drill, screwdrivers, brushes, rollers, sandpaper of various grits, spatulas, clamps. Optional: miter saw (for trimming moldings), router (for creating grooves), paint sprayer (for spray painting). If you don't have tools, you can rent them or do sanding by hand (longer, but possible).
Can carved overlays be painted a color different from the furniture?
Yes, this is a common technique. Furniture painted with white enamel, overlays covered with gold or silver patina — classic French Rococo. Furniture natural oak with oil finish, overlays painted with white enamel — modern eclecticism. Furniture gray, overlays black — graphic, strict. Contrast highlights the decor, makes it an accent.
How to care for restored furniture?
Furniture with oil finish: wipe with a dry or slightly damp cloth, do not use aggressive cleaning agents. Every 1-2 years, renew the oil coating (wipe, apply a thin layer of oil, rub in).
Furniture with varnish finish: wipe with a damp cloth, you can use mild cleaning agents. Varnish protects wood from water and dirt.
Painted furniture: wipe with a damp cloth. For mechanical damage (chips, scratches), touch up locally.
Is it worth restoring cheap furniture?
Depends on the material and construction. Cheap furniture made of solid pine or birch (even simple Soviet-era) is worth restoring — the wood is natural, the construction is sturdy, adding decor and repainting, you'll get a stylish piece. Cheap furniture made of chipboard (modern mass-produced) is not worth restoring — under the laminated film are pressed wood chips that do not hold fasteners, swell from moisture, and last 5-7 years.
Conclusion: Revive beauty with STAVROS
Furniture restoration and renewal is not just about saving money. It is an opportunity to create a unique interior item that no one else has. It is the preservation of family history, the connection of generations. It is creativity that requires vision, taste, patience. It is a skill that will stay with you for life and will allow you to turn ordinary things into works of art.
to buy, which will allow you to transform your furniture using carved wooden elements. You can use the C-003-3 decor set to decorate furniture, walls, doors, or any other surface. The C-003-3 decor set is made of oak or beech, known for their strength, durability, and beauty. You can buy the C-003-3 decor set at the Stavros decor store, which specializes in producing and selling decorative elements and hardware for furniture and interiors. At the Stavros decor store, you will find a wide selection of decor sets of various shapes, sizes, and styles. You can choose — carved overlays, rosettes, moldings — turns simple fronts into decorated ones, flat surfaces into relief ones, faceless furniture into author's pieces.solid wood furniture handles — knobs and pulls of various shapes, sizes, finishes — complete the look, add functionality and aesthetics.
Company STAVROS — the leading Russian manufacturer of solid wood products with over twenty years of history. STAVROS creates products for craftsmen, designers, restorers, for everyone who values natural materials, precision of execution, durability.
Carved decorative inserts for furniture from STAVROS — solid oak or beech of class A, CNC milling (precision of relief, repeatability), hand sanding of Prestige level (products are ready for finishing without additional work). In the catalog — over 150 models of overlays sized from 50×30 mm to 300×200 mm: floral patterns (acanthus, grape, roses), geometric patterns (diamonds, circles, fluting), classic motifs (palmettes, volutes, rocaille). Each overlay can be made of oak (expressive texture, strength) or beech (uniformity, paintability).
wooden furniture handles from STAVROS — knobs with a diameter of 30-50 mm, pulls with a center-to-center distance of 64-160 mm, carved handles with ornament. Solid oak, beech, ash. Finishes: natural oil, tinting, painting in any color from the RAL catalog, patination with gold, silver, copper. Each handle undergoes quality control — checking geometry, surface smoothness, fastening strength.
wooden furniture legs from STAVROS — turned, carved, shaped supports for tables, chairs, chests of drawers, sofas. Height from 50 to 800 mm, cross-section from 50×50 to 120×120 mm. Classic balusters, tapered legs, cabriole legs (curved legs in Baroque style), cylindrical legs with carved rings. Replacing legs is a simple way to update furniture, change its height, style, proportions.
The possibility of custom painting all elements in any color from the RAL catalog, patination, oil coating allows you to get decor that fully matches your project. STAVROS specialists will professionally paint overlays, handles, legs — you will receive ready-made elements that only need to be mounted.
Professional STAVROS consultants will help you select a set of elements for restoring your furniture: recommend overlays by style and size, select handles by shape and finish, calculate the quantity. On the company's website — detailed catalogs with photos, sizes, prices, articles with restoration instructions, examples of completed projects. Delivery throughout Russia is possible, pickup from warehouses in Moscow and St. Petersburg.
Choosing STAVROS, you choose the quality of natural wood, precision of processing, reliability of fastening. You choose the opportunity to realize any idea — from light cosmetic renewal to complete furniture transformation. You choose a partner who understands the tasks of a restorer and offers solutions tested by time.
Do not throw away old solid wood furniture. Restore its beauty, add decorating wooden items, replace handles, repaint — and it will serve for decades more, pleasing the eye and preserving family history. With STAVROS products, restoration ceases to be a difficult task and turns into a creative process accessible to everyone. Start your restoration project today — and tomorrow your home will be filled with unique furniture created by your own hands!