


Article Contents:
- Hierarchy of verticals: when a post becomes a support, and a baluster becomes rhythm
- Posts as structural dominants of the system
- Balusters as filling verticals and bearers of decor
- Materials science of stair verticals: from pine to exotic woods
- European oak: unyielding strength of centuries
- Oriental beech: pliability while maintaining strength
- Manchurian ash: contrasting expressiveness
- Structural joints: where engineering meets aesthetics
- Fastening support posts to steps and floor
- Installation of intermediate balusters on steps
- Connecting the handrail to support posts
- Geometry of rhythm: calculating baluster spacing and post placement
- Determining installation points for support posts
- Calculating the quantity and installation spacing of balusters
- Stylistic variations: from classic turned forms to modern geometry
- Turned balusters: legacy of lathe craftsmanship
- Carved balusters: sculpture on an interior scale
- Geometric balusters: minimalism of form
- Finishing treatment: from natural texture to glossy shine
- Transparent coatings: preserving natural beauty
- Toning: color control while preserving texture
- Painting with opaque enamels: color as an accent
- Professional installation technology: step-by-step algorithm
- Preparation stage: marking and calculation
- Installation of support posts: foundation of reliability
- Installation of intermediate balusters: creating rhythm
- Fastening the handrail: completing the structure
- Frequently asked questions about balusters and posts
- What is the optimal distance between balusters?
- Can different wood species be combined in one staircase?
- How many support posts are needed on a straight flight?
- What handrail diameter is optimal for a comfortable grip?
- Do balusters require special treatment for wet areas?
- How to care for wooden balusters?
- Can an individual baluster be replaced without dismantling the entire railing?
- What railing height is optimal for a residential staircase?
- Economic feasibility: investing in durability and status
- Cost comparison of various materials and solutions
- Alternative materials: when is replacing wood appropriate?
- Conclusion: STAVROS — where craftsmanship traditions meet innovative technologies

Imagine a staircase without a railing. Bare steps ascending create not just discomfort—they trigger an instinctive anxiety. Human perception requires support, a visual and physical boundary that transforms a potentially dangerous climb into comfortable movement between the levels of a home. This is wherebalusters posts support elements—a structural system where each component plays its unique role in creating a reliable and aesthetically perfect railing.
But what makes these elements so significant? Why do professional builders and designers pay such close attention to them? It's not just about safety, though that remains the top priority.Balusters and posts made of woodThey form the visual rhythm of the staircase, define its stylistic identity, and create the very atmosphere that distinguishes an ordinary dwelling from a thoughtfully designed interior with character and individuality.


Hierarchy of verticals: when a post becomes a support and a baluster becomes rhythm


Posts as structural dominants of the system
What distinguishes a support post from an ordinary baluster? This question often stumps even experienced craftsmen, not to mention clients. However, the difference is fundamental and defines the very logic of constructing a staircase railing.
wooden post baluster—is a massive vertical element installed at key points of the flight: at its start and finish, at turns, on intermediate landings, and at the entry to winder steps. The post's cross-section significantly exceeds the dimensions of a standard baluster—typical sizes are 80×80 mm, 100×100 mm, or even 120×120 mm for particularly stressed nodes.
Why is such massiveness necessary? When a person leans on the handrail, a horizontal force is generated, directed outward from the staircase. Posts bear the lion's share of this impact due to their increased moment of inertia. If a baluster under a 50 N horizontal load may deflect 3–5 mm, a 100×100 mm post remains practically immobile under the same force.
Post fastening is performed using reinforced methods. Metal studs 10–12 mm in diameter, glued into the base to a depth of 70–80 mm, ensure rigid anchoring. Additional side screws 90–100 mm long, driven at an angle through the post into the load-bearing structure, create multi-point fixation that prevents loosening even after decades of use.
Our factory also produces:


Balusters as filling verticals and decorative carriers
Balusters are numerous thin posts that rhythmically fill the space between support posts. Their cross-section is typically 40×40 mm, 50×50 mm for square profiles, or 40–50 mm in diameter for turned round forms. Such proportions provide visual lightness with sufficient rigidity.
The function of balusters is dual. On one hand, they create a physical barrier preventing a person from slipping between the verticals. Building codes regulate a maximum distance of 120 mm horizontally between balusters—a child's head cannot pass through such a gap. On the other hand, balusters form a visual rhythm, transforming the monotonous interval between posts into a structured composition.
The installation spacing of balusters varies from 100 to 150 mm depending on style and safety requirements. For families with small children, a spacing of 100–110 mm is recommended, creating dense filling. In interiors without young occupants, increasing the spacing to 140–150 mm is permissible, giving the railing visual lightness.
The decorativeness of balusters is determined by the processing method. Turned forms with smooth transitions, swellings, and grooves create a classic aesthetic. Carved balusters with floral ornaments, twisted elements, and geometric motifs transform the railing into a work of joinery art. Modern minimalist solutions use balusters of simple rectangular cross-section with chamfered edges—the severity of form emphasizes the conceptual nature of the interior.
Get Consultation
Materials science of staircase verticals: from pine to exotics
European oak: unyielding strength of centuries
When talking aboutbalusters posts for wooden staircaseOak traditionally holds the position of the number one material for critical structures. Its density of 650–750 kg/m³ provides mechanical strength unattainable for coniferous species.
The compressive strength of oak wood is 58 MPa, and its bending strength is 105 MPa. This means that a 100×100 mm oak column can withstand a compressive load of approximately 30–35 tons before failure. Of course, such extreme loads do not occur in real-world use, but it is precisely this safety margin that guarantees absolute reliability for decades.
The high tannin content (up to 10% by weight) gives oak natural resistance to biological degradation. Fungi and wood-boring insects avoid oak wood, which is critical for staircases in homes with variable microclimates. Even with humidity fluctuations from 40% to 70%, oak components maintain geometric stability due to moderate hygroscopicity.
The texture of oak, with its pronounced annual rings and medullary rays, creates visual depth. A radial cut reveals characteristic 'mirrors'—shiny stripes that reflect light. A tangential cut produces a wavy pattern resembling flowing forms. This diversity allows for material selection to meet specific aesthetic requirements.
Eastern Beech: Malleability while maintaining strength
Beech is often underestimated, considered 'second-rate' compared to oak. However, this is a misconception. Beech density of 620–680 kg/m³ is only slightly lower than oak, and in some strength indicators, it even surpasses it. Its compressive strength is 62 MPa, and its bending strength is 120 MPa.
The main advantage of beech for manufacturing balusters is its exceptional formability after steaming. At 100–110°C, the wood becomes plastic, allowing for the creation of curved elements for radius sections of staircases. The minimum bending radius is 8–10 times the workpiece thickness without cracking or fiber tearing.
The fine-pored, homogeneous structure of beech is ideal for turning complex profiles with thin details. Cutting tools leave a clean surface without chips or tear-outs. After sanding with P180–P240 grit, the beech surface acquires a silky smoothness, pleasant to the touch.
The neutral pinkish hue of beech makes it a universal base for staining. Stains of any color—from light maple to dark wenge—apply evenly, without blotchiness. This allows for coordinating balusters with other wooden interior elements by color.
The only drawback of beech is its increased hygroscopicity. With significant air humidity fluctuations (more than ±15%), deformations are possible. Therefore, beech balusters are recommended for rooms with a controlled microclimate: temperature 18–24°C, relative humidity 45–65%.
Manchurian Ash: Contrasting expressiveness
Ash is a material for those who appreciate contrasting texture combined with high mechanical properties. Its density of 650–690 kg/m³ is comparable to oak, but its visual pattern is completely different. The light sapwood sharply contrasts with the dark heartwood, creating a striped texture with a pronounced graphic effect.
The impact toughness of ash surpasses all European hardwood species—130 kJ/m² compared to 95 kJ/m² for beech and 85 kJ/m² for oak. This means ash balusters withstand dynamic loads without cracking. Upon accidental impact with a heavy object, ash deforms but does not chip like more brittle species.
Processing ash requires sharp tools due to the wood's toughness. Cutters must have a positive cutting angle and high rotational speed. After proper processing, the surface becomes smooth with a natural silky sheen.
The color palette of ash ranges from creamy white to light brown with gray streaks. Staining emphasizes the contrast of the texture. Techniques like brushing (removing soft fibers) followed by two-tone staining are especially effective—deepening the recesses while leaving the raised parts light.
Structural Joints: Where engineering meets aesthetics
Attaching support posts to treads and floors
The reliability of the entire railing system begins with the quality of the support post attachment. There are several proven methods, each with its own optimal application area.
Installation on a metal stud. This is the most common method for wooden staircases and floors. A hole 10–12 mm in diameter is drilled 70–80 mm deep into the center of the post's bottom end. A metal M10 stud, 150–180 mm long, is glued into the base (tread, floorboard) using epoxy adhesive or chemical anchor. The protruding part of the stud (80–100 mm) is coated with wood glue. The post is fitted onto the stud until snug. Additionally, the post base is secured to the floor with lateral screws 90–100 mm long (2–3 pieces at an angle).
The advantage of this method is concealed fastening without visible hardware. The disadvantage is the difficulty of removal if post replacement is needed. Suitable for permanent structures in residential homes.
Attachment via an anchor plate. A metal plate, 100×100 mm in size with holes, is screwed to the post's bottom end. The plate is secured to the base with anchor bolts 8–10 mm in diameter. This method is simpler than the previous one, provides high reliability, but the plate remains visible. Used for technical staircases or when the post base is covered by a decorative element—a baseboard or rosette.
Attachment using the 'tenon-mortise' method. A traditional joinery method requiring high precision. A rectangular mortise is cut into the base, and a corresponding tenon is made in the post's bottom end. The mortise depth and tenon length are 50–70 mm. The joint is made with wood glue and additional fixation with wooden dowels (pins) 8–10 mm in diameter or lateral screws. This method creates the most aesthetic joint without visible fasteners but requires professional equipment for precise mortising and tenon fabrication.
Installing intermediate balusters on treads
Balusters are installed on treads with a spacing of 100–150 mm, depending on safety requirements and visual fill density. The attachment must ensure strictly vertical positioning of the balusters, even on sloped sections of the flight.
Installation on wooden dowels. A hole 8–10 mm in diameter is drilled 40–50 mm deep into the center of the baluster's bottom end. A wooden dowel (oak or beech pin), 8 mm in diameter and 80–100 mm long, is glued into the tread to a depth of 40–50 mm. The protruding part of the dowel (40–50 mm) is coated with D3 class PVA glue. The baluster is fitted onto the dowel until it stops. This method is completely concealed, eco-friendly, and provides a strong connection. The disadvantage is that precise marking and drilling strictly perpendicular to the tread surface are required.
Attachment with screws from under the tread. If the staircase design allows access to the underside of the tread, balusters can be attached with screws driven from bottom to top. Screw length is 60–70 mm, diameter 4–5 mm. The screw passes through the tread and enters the baluster's bottom end by 30–40 mm. This method provides concealed fastening from the front side, allows for precise adjustment of baluster verticality before final tightening. Applicable only for staircases with an open underside.
Installation via a baluster shoe. A baluster shoe is a wooden strip mounted along the edge of the treads for the entire flight. Balusters are attached to the shoe, which in turn is attached to the treads. This method simplifies marking (all balusters are installed on a single baseline), speeds up installation, and ensures visual integrity of the railing. The shoe can be decoratively finished—profiled, painted in a contrasting color. The disadvantage is increased material consumption and slight added weight to the structure.
Connecting the handrail to support posts
The upper part of the support posts serves as the attachment point for handrails. The reliability of this joint is critical, as it is here that the main horizontal load from a person leaning on the railing is applied.
Inserting the handrail into a post groove. A groove matching the profile of the handrail is milled into the upper part of the post.round handrail. The groove depth is 30–40 mm, which provides sufficient gluing area. The end of the handrail is inserted into the groove and secured with polyurethane adhesive. Additionally, a wooden dowel or screw is driven at an angle through the side face of the post into the handrail. This method creates a strong connection with minimal visual manifestation of the fastener.
Mounting on a support platform. The upper part of the post has a flat platform sized to match the width of the handrail. The handrail is placed on the platform and secured with screws driven from below through the platform into the handrail (length 50–60 mm, diameter 4 mm). To conceal the screws, the platform can have a decorative overlay. The method is simple to execute, provides strength, and allows for relatively easy handrail removal if necessary.
Angular connection with dowels. The end of the handrail is cut at an angle (usually 90° to the plane of the post) and tightly pressed against the side face of the post. Holes for wooden dowels with a diameter of 8–10 mm are drilled into the end of the handrail and the corresponding face of the post. The dowels are glued in, creating a multi-point connection. Additionally, the joint area can be reinforced with a decorative overlay—a carved rosette, ring. The method provides an aesthetic connection, especially when using contrasting wood species for the dowels.
Rhythm geometry: calculating baluster spacing and post placement
Determining installation points for support posts
The logic for placing support posts is dictated by the structural features of the staircase. Mandatory positions are the beginning and end of each flight, turning points (for U-shaped and L-shaped staircases), and intermediate landings. For straight flights longer than 3 meters, installing an intermediate post is recommended to prevent handrail sagging.
Load distribution is taken into account during calculation. If support posts are spaced more than 2.5–3 meters apart, the handrail between them begins to work in bending. For a round handrail with a diameter of 50 mm made of oak, the critical span is about 3.5 meters—with a greater length under a load of 50 N (typical hand support force), the deflection will exceed the permissible 5 mm.
At staircase turns, a support post is installed on the corner step or landing. Its task is to absorb the lateral load from two handrails converging at an angle. The cross-section of the corner post is often increased to 120×120 mm to enhance rigidity.
At the entry points to winder (turning) steps on the inner side of the turn, a central post—a column—may be installed, to which the narrow ends of the winder steps and the lower ends of the balusters are attached. Such a design is characteristic of spiral and semi-spiral staircases.
Calculating the quantity and installation spacing of balusters
The number of balusters on a flight is determined by the flight length, safety requirements, and aesthetic preferences. The basic rule is that the horizontal distance between adjacent balusters should not exceed 120 mm (requirement of SP 54.13330.2016 for residential buildings). This prevents a child's head from slipping through.
The formula used for calculation is: n = L / (s + b) + 1, where n is the number of balusters, L is the length of the section between support posts (mm), s is the spacing between balusters (mm), b is the width of the baluster (mm).
Calculation example. Distance between support posts L = 2400 mm. Baluster width b = 40 mm. Desired spacing s = 120 mm. Substituting into the formula: n = 2400 / (120 + 40) + 1 = 2400 / 160 + 1 = 15 + 1 = 16 balusters.
Practical recommendation—install two balusters per step for a standard flight width of 900–1000 mm. For a flight width of 1200–1300 mm, the number of balusters per step is increased to three. This creates uniform filling and visual stability.
Marking begins from the support posts. The first baluster is installed at a distance of half the spacing from the post, the last one—symmetrically on the other side. This arrangement creates visual balance, avoiding the impression of balusters 'stuck' to the post.
Stylistic variations: from classic turned forms to modern geometry
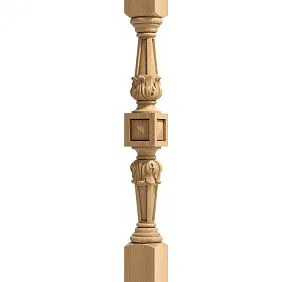
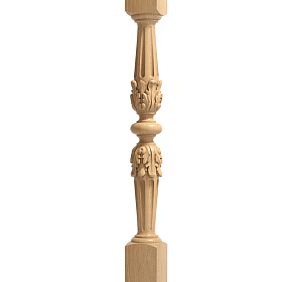
Turned balusters: a legacy of lathe craftsmanship
A turned baluster is a classic, with roots in the Renaissance and Baroque eras. A lathe allows creating profiles with smooth transitions, thickenings, waists, and grooves. A typical turned baluster consists of several zones: base (square or round cross-section 50×50 mm), lower thickening (diameter 60–70 mm), central part with grooves (diameter 35–45 mm), upper thickening, finial (square cross-section for handrail attachment).
The variety of turned profiles is limitless. Balusters in the classicism style have restrained forms with minimal decoration—one or two beads, simple grooves. Baroque balusters are distinguished by complex multi-tiered thickenings, spiral elements, and an abundance of small details. Art Nouveau introduced asymmetrical smooth lines, imitating natural forms—plant stems, sea waves.
Modern production uses CNC lathes, copying a given profile with an accuracy of ±0.1 mm. This ensures the identity of all balusters in a batch, which is critical for large projects. After turning, multi-stage sanding with abrasives of grit P80–P120–P180–P240 follows to achieve surface smoothness.
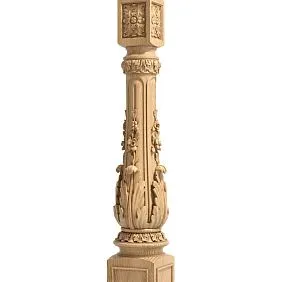
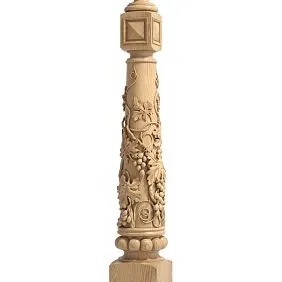
Carved balusters: sculpture on the scale of interior
A carved baluster is the pinnacle of decorative craftsmanship. Three-dimensional carving transforms a utilitarian structural element into a work of art. Classic motifs include acanthus leaves, grapevines, rococo scrolls, geometric braids, architectural fluting (vertical grooves).
Production of carved balusters is carried out on CNC milling centers with 3–5 axes of processing. A 3D model is created in a CAD system, then the machine control program calculates the cutter movement trajectories. The carving depth varies from 5–10 mm for fine ornaments to 20–30 mm for large expressive elements.
Carved balusters require careful manual finishing after machine processing. The master removes small burrs, cleans out recesses, and sands protruding parts. Patination (applying contrasting pigment into the carving recesses) emphasizes the relief, creating an antique effect.
The cost of carved balusters is 2–3 times higher than turned analogues, but the visual effect justifies the investment. A staircase with carved balusters becomes the central element of the interior, attracting admiring glances.
Geometric balusters: minimalism of form
Modern architecture gravitates towards minimalism, where decorativeness gives way to purity of lines. Geometric balusters have a simple rectangular or square cross-section of 40×40 mm, 50×50 mm with chamfers on the edges to soften the form.
Vertical balusters are complemented by horizontal inserts, creating lattice compositions. Asymmetric arrangement of elements, alternation of thick and thin profiles, use of contrasting colors (dark balusters on light steps) form a modern aesthetic.
Metal inserts—stainless steel tubes, cables, glass panels—are combined with wooden elements, creating a fusion style. Such solutions are characteristic of loft interiors, where the industrial roughness of metal is softened by the warmth of natural wood.
Finishing: From Natural Texture to Glossy Shine
Clear Coatings: Preserving Natural Beauty
The natural texture of wood is a self-sufficient value worth highlighting, not hiding. Clear coatings serve a protective function while revealing the depth of annual rings, the contrast between sapwood and heartwood, and the silky surface.
Oil-Wax. Natural oils (linseed, tung) deeply penetrate the wood, strengthen the surface layer, and impart water-repellent properties. Hard wax creates a protective film while forming a pleasant tactile effect. The advantage of oil-wax is preserving the wood's 'breathing' and allowing for local repairs without complete re-sanding. The disadvantage is the need for renewal every 12–18 months in high-contact areas.
Water-Based Varnish. An eco-friendly material without odor or solvents. Dries quickly (1–2 hours between coats), does not yellow the wood. Forms a thin, elastic film resistant to abrasion. Optimal for stairs in homes with children and people with heightened sensitivity to chemicals. Applied in 2–3 coats with intermediate sanding using P320 abrasive.
Polyurethane Varnish. A two-component system creates an ultra-durable film resistant to mechanical damage, household chemicals, and moisture. Glossy options emphasize the material's luxury, matte ones create noble restraint. Polyurethane varnish is optimal for high-traffic stairs. The disadvantage is the difficulty of local repair if the coating is damaged.
Toning: Color Management While Preserving Texture
Stains change the color of the wood while preserving the visibility of the texture. Modern water-, alcohol-, or oil-based compositions offer a wide palette of shades—from light maple to practically black wenge.
Toning technique requires uniform application. Stain is applied with a brush, sponge, or spray along the grain. Excess is removed with a cloth after 5–10 minutes. After drying (4–12 hours depending on the stain type), final varnishing follows to set the color.
Patination—applying a contrasting pigment into the recesses of carvings, grooves of a turned profile, followed by sanding the protruding parts. This creates an effect of natural aging, emphasizing the decorative relief. Classic combinations: gold on white background, silver on gray, black on brown.
Brushing (removing soft fibers with a metal brush) enhances the relief of annual rings. Subsequent two-color toning (dark pigment in recesses, light on protrusions) creates contrasting expressiveness. The technique is characteristic of loft, rustic, and country styles.
Painting with Opaque Enamels: Color as an Accent
Polyurethane enamels completely hide the wood grain, creating a smooth, solid-color surface. This allows the use of less expensive species (pine, spruce), achieving the visual effect of premium finishing.
Classical painting for traditional interiors suggests white, cream, ivory. These shades visually lighten massive balusters, creating a sense of airiness. The contrast of dark treads and light balusters emphasizes the staircase's architecture.
Modern interiors use bold color solutions. Graphite, anthracite, black balusters against light walls create a dramatic effect. Pastel shades (mint, powder, lavender) are characteristic of romantic styles like Provence, shabby chic.
Two-color painting—when balusters are one color, and support posts and handrails are another—adds visual complexity. For example, white balusters with dark brown posts and handrails create classic elegance.
Professional Installation Technology: Step-by-Step Algorithm
Preparation Stage: Marking and Calculation
Quality installation begins with careful marking. First, the points for installing support posts are determined. On the bottom and top steps (or landings), the centers of the posts are marked, considering the handrail overhang beyond the edge of the flight (usually 50–70 mm).
A cord is stretched between the outermost posts, defining the line for installing balusters. The cord must run exactly over the centers of the future balusters. Using a square and level, it is checked that the cord is parallel to the edge of the steps and at an equal distance from it on all steps.
On each step, the points for installing balusters are marked. The spacing between balusters should be the same on all steps to create a visual rhythm. When calculating, it is considered that the first and last balusters are placed at half the spacing from the support posts.
The drilling depth for holes under dowels or studs is controlled by a depth stop on the drill. Exceeding the calculated depth leads to baluster sagging; insufficient depth leads to incomplete seating.
Installing Support Posts: The Foundation of Reliability
Installation begins with support posts. At the installation point, a hole is drilled for an M10 metal stud to a depth of 70–80 mm. The hole diameter must correspond to the external thread diameter of the stud (for M10, this is 10 mm).
The stud is glued into the hole with epoxy adhesive or chemical anchor. The adhesive fills 2/3 of the hole volume; the stud is screwed in with a rotational motion until fully seated. Excess adhesive is squeezed out and removed with a cloth. Epoxy adhesive polymerization time is 24 hours at 20°C.
After the adhesive hardens, the post is placed over the protruding part of the stud. A hole 10 mm in diameter and 70–80 mm deep is pre-drilled in the lower end of the post. The inner surface of the hole is lubricated with D3 class PVA wood glue. The post is pressed onto the stud with force until fully seated.
The post's verticality is controlled with a level in two planes (along and across the flight). If necessary, the position is corrected with light taps from a rubber mallet. After setting vertically, the post is additionally secured with side screws 90–100 mm long, screwed in at an angle through the post into the base.
Installing Intermediate Balusters: Creating Rhythm
After installing the support posts, proceed to installing intermediate balusters. On each step, according to the markings, holes are drilled for wooden dowels 8 mm in diameter and 40–50 mm deep.
Dowels are made of oak or beech—hardwoods that ensure joint strength. Dowel length is 80–100 mm. The dowel is glued into the hole with wood adhesive to a depth of 40–50 mm. The protruding part (40–50 mm) remains above the step surface.
An 8 mm diameter hole is drilled into the bottom end of each baluster to a depth of 40–50 mm. Drilling accuracy is critical—the hole must be precisely centered on the end and perpendicular to its plane. Any deviation will cause the baluster to tilt.
The protruding part of the dowel is coated with glue. The baluster is placed onto the dowel and pressed down until fully seated. Vertical alignment is checked with a level. If the baluster deviates from vertical, its position is adjusted by gently rotating it around the dowel axis.
After installing all balusters, a technical pause of 12–24 hours is observed for the glue to polymerize. Then, the handrail installation begins.
Handrail Fastening: Completing the Structure
Round Handrail Installation on Postsbegins with trimming the ends to the required angle. For a straight flight, the ends are cut perpendicular to the handrail axis. For turning sections, the trimming angle is determined by the turn geometry.
The handrail is laid on the top ends of the balusters and support posts. The position is checked visually—the handrail should rest smoothly on all supports without gaps or misalignments. If necessary, the height of individual balusters is adjusted by trimming the bottom end.
Fastening to support posts is done by fitting into a groove or onto a support plate (as described earlier). Fastening to intermediate balusters is performed using 4 mm diameter, 50–60 mm long self-tapping screws, screwed in at an angle through the top end of the baluster into the handrail. The screw is driven from the front side of the baluster, and the head is countersunk 2–3 mm. The hole is filled with wood-colored putty.
Alternative method—using a handrail mounting bracket. The bracket is fastened to the top ends of the balusters with screws from above. The handrail is laid on the bracket and secured with screws from below through the bracket into the handrail. This method provides concealed fastening without visible hardware on the front side.
Frequently Asked Questions about Balusters and Posts
What is the optimal distance between balusters?
Building codes (SP 54.13330.2016) regulate a maximum horizontal distance of 120 mm between vertical railing elements. This requirement ensures safety by preventing a child's head from slipping through. In practice, the distance is 100–120 mm for families with children, 130–150 mm for interiors without young children. Visually, dense spacing (100–110 mm pitch) creates a sense of security, while sparse spacing (140–150 mm) gives a feeling of lightness and airiness.
Can different wood species be combined in one staircase?
Combining contrasting species creates expressive compositions. Popular combinations: light ash balusters with dark oak posts and handrail, beech balusters with walnut accents. It is important to observe technological compatibility—the species should have similar coefficients of thermal and moisture deformation. Oak and beech are compatible; pine and oak require caution due to different movement with humidity changes.
How many support posts are needed for a straight flight?
Minimum—two posts: starting and ending. For flights longer than 2.5–3 meters, an intermediate post is recommended to prevent handrail sagging. The distance between support posts should not exceed 3 meters for handrails with a 50 mm diameter made of hardwood. For softwood (pine, spruce), a reduced spacing of up to 2.5 meters is recommended due to the material's lower rigidity.
What handrail diameter is optimal for a comfortable grip?
Grip ergonomics are determined by the anthropometric data of the human hand. The optimal diameter for a round handrail is 45–55 mm. Handrails with a diameter less than 40 mm are uncomfortable for finger grip, while those over 60 mm cannot be fully encircled by the palm. For elderly people or those with limited joint mobility, a diameter of 50–55 mm is preferable, providing a confident grip without excessive hand strain.
Is special treatment required for balusters in damp areas?
Staircases in high-humidity areas (swimming pools, saunas, damp basement zones) require enhanced wood protection. Balusters and posts are treated with moisture-resistant impregnations based on wax or synthetic polymers. The finish coating is a waterproof varnish or oil-wax with water-repellent components. Oak is preferable to other species due to its natural moisture resistance. Beech requires particularly thorough treatment due to its high hygroscopicity.
How to care for wooden balusters?
Regular care includes weekly dry wiping with a soft cloth or vacuuming with a soft brush. Monthly damp cleaning with a well-wrung cloth is allowed, without aggressive detergents. Oil-wax finishes require renewal with specialized compounds 2–3 times a year. Varnished surfaces are treated with furniture polish every 3–6 months. Carved elements are cleaned with soft brushes, a vacuum with a narrow attachment, or compressed air for hard-to-reach areas.
Can an individual baluster be replaced without dismantling the entire railing?
Replacement is possible but labor-intensive. The damaged baluster is cut off flush with the tread at its base. The remaining dowel is drilled out. A new dowel is glued in, and a new baluster is installed on it. The difficulty lies in adjusting the height of the new baluster to match the existing handrail. Often, removing the handrail in the replacement section is required. If the balusters are mass-produced, finding an identical one is not difficult. For exclusive carved balusters, custom replication may be necessary.
What is the optimal railing height for a residential staircase?
Building codes (SP 54.13330.2016) regulate a minimum railing height of 900 mm for residential buildings, 1200 mm for children's institutions. In practice, for private homes, a height of 950–1000 mm is adopted, providing comfortable support for people of average height (170–180 cm). For tall owners (over 190 cm), an increase to 1050–1100 mm is recommended. It is important that the handrail is at a level allowing natural arm support without raising the shoulder or excessive elbow bending.
Economic Feasibility: An Investment in Durability and Status
Cost Comparison of Various Materials and Solutions
The cost of a baluster and post set for a standard 3-meter straight flight varies widely. Simple turned pine balusters will cost 25,000–35,000 rubles per set (support posts, 20–25 balusters, handrail). Oak analogues of the same configuration cost 60,000–80,000 rubles. Carved oak balusters with hand finishing can reach 150,000–250,000 rubles per flight.
The seemingly high cost of oak elements is offset by their durability. The service life of an oak railing is 50–70 years without loss of functionality, while pine requires replacement after 20–30 years. The total cost of ownership over 50 years for oak is lower due to the absence of replacement costs.
An additional factor is the impact on property value. A high-quality wooden staircase with carved balusters increases the market value of a house by 5–8% in the premium-class country real estate segment. Buyers are willing to pay a premium for a unique interior element that requires no additional investment.
Alternative Materials: When Is It Appropriate to Replace Wood
Stainless steel, chrome-plated, or painted metal balusters are less expensive than their wooden counterparts. The cost of a set for a standard flight ranges from 30,000 to 50,000 rubles. Advantages include absolute moisture resistance, minimal maintenance, and a modern aesthetic. Disadvantages are a cold feel, industrial character, and incompatibility with traditional interiors.
Combined solutions (wooden handrails and posts with metal balusters) combine the cost-effectiveness of metal with the tactile comfort of wood. Such structures are optimal for loft interiors, where a balance between natural and industrial elements is required.
Glass panels instead of balusters create a weightless effect and visually do not clutter the space. Tempered glass 10–12 mm thick with wooden posts and a handrail costs 80,000–120,000 rubles per flight. This solution is characteristic of modern interiors with minimalist and high-tech styling.
Conclusion: STAVROS — Where Craftsmanship Traditions Meet Innovative Technologies
Creating a stair railing is not just about installing vertical posts between the steps and the handrail. It is the design of a complex hierarchical system, where massive support posts bear the main load, intermediate balusters form the visual rhythm and protective barrier, andwooden interior decortransforms a functional structure into a work of joinery art.
Whybalusters posts support elementsdeserve such close attention during interior design? Because they determine not only the safety of movement but also the aesthetic expressiveness of the entire space. A staircase with a well-thought-out balustrade becomes the central element of the hall, attracting attention and setting the tone for the entire interior.
Since 2002, STAVROS has specialized in the production of wooden stair components, embodying in each product the many years of


