Article Contents:
- Classification of corner elements: geometry and purpose
- Internal corners: concave joints
- External corners: convex joints
- Universal corner blocks: adaptability
- Replacing miter cuts with ready-made corners: a revolution in installation
- Traditional miter cutting: complexity and risks
- Installation with ready-made corners: simplicity and speed
- Types of corner elements by shape and decor
- Simple transition corners: functionality
- Ornamented corner blocks: accentuation
- Corner rosettes: circular symmetry
- Time savings during installation: efficiency calculation
- Ceiling cornice installation using traditional method
- Installation with corner elements
- Joining corner elements with straight sections: technology
- End abutment: universal method
- Insertion into groove: precise joining
- Polyurethane corner blocks in different interior styles
- Classical interiors: ornamentation
- Minimalist interiors: restraint
- Painting corners in a uniform color: finishing technology
- Priming: surface leveling
- Base painting: creating tone
- Decorative finishing: gilding, patina, effects
- Frequently asked questions about molding corner elements
- Conclusion: corners as finishing touches of perfection
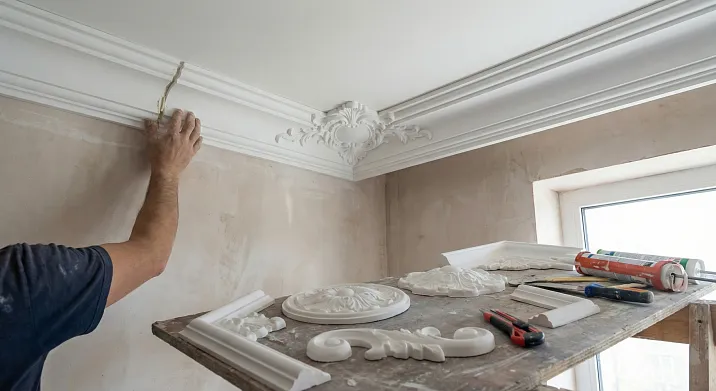
A corner is where one plane ends, another begins, and two realities of the interior meet. In standard repairs, the corner is hidden (wall joints are overlapped with wallpaper, seams are plastered and concealed), while in decorative repairs, the corner is emphasized and becomes an accent.Polyurethane molding cornerstransforms the problematic installation zone (where moldings, cornices, and baseboards join at a forty-five-degree angle, requiring jeweler-like precision in cutting and creating a risk of gaps and mismatched relief) into a decorative element. The corner block is a ready-made part installed at the junction point of two strips, replacing the need for cutting, simplifying installation by three to five times (installation time for a corner with cut moldings is twenty to thirty minutes, with a ready-made corner element it's five to seven minutes), guaranteeing a perfect joint (the factory-made part is geometrically precise, the relief matches the molding millimeter by millimeter, gaps are eliminated).
Why complicate? Because it simplifies the result. A rectangular room has at least four internal corners (a ceiling cornice around the perimeter means four joints), a room with a complex layout has eight to twelve corners (a bay window, niche, protrusion — each adds corners). Each corner without a ready-made element requires cutting two strips at an exact forty-five-degree angle (a deviation of half a degree creates a gap of one to one and a half millimeters, visible to the eye, requiring puttying, sanding, adjustment, doubling the installation time). Corner elements eliminate cutting (strips are brought to the corner, cut perpendicularly at ninety degrees — ten times simpler, precision is not critical, the end is hidden by the corner block).


Classification of corner elements: geometry and purpose
Corner elements differ by function (internal or external corner), size (from three to twenty-five centimeters per side), and decorativeness (simple transition element or ornamented overlay).


Internal corners: concave joints
An internal corner is the joint of two walls in a room corner (a ninety-degree angle, walls form a concave line). A corner element for an internal corner is a part installed in the corner, to which two strips of molding, cornice, or baseboard are brought from opposite sides. Element shape: square or rectangular plate (front part width equal to the molding width, thickness two to four centimeters), front surface flat or decorated (smooth for minimalist profiles, ornamented for classical ones — rosette, geometric pattern, floral motif), side edges at a ninety-degree angle (the ends of the moldings, cut perpendicularly, join to them).
Application of internal corners. Ceiling cornices (frame the ceiling around the perimeter — four internal corners in a rectangular room, more in a complex layout). Wall moldings (create panels — each panel has four corners, with a three by three panel grid — twenty-four internal corners). Floor baseboards (frame the floor — at least four internal corners).
Our factory also produces:


External corners: convex joints
An external corner is a protruding edge (a column, pilaster, bay window, wall protrusion form an angle where walls diverge outward at a ninety-degree angle). A corner element for an external corner is a part that wraps around the protrusion, to which moldings are brought from two sides. Element shape: corner overlay (two planes at a ninety-degree angle, each plane equal to the molding width), front part on the corner edge (semicircular, beveled, decorated — ornament emphasizes the edge), side edges for joining with moldings (molding ends are cut perpendicularly, joined to the corner element).
Application of external corners. Columns, pilasters (the shaft is decorated with vertical moldings — an external corner element on each shaft corner). Bay windows (protruding part of a room with windows — external corner elements connect cornices, moldings at bay window corners). Wall protrusions (architectural elements — niches, fireplaces, portals — have protruding corners requiring external elements).
Get Consultation
Universal corner blocks: adaptability
A universal corner block is an element suitable for both internal and external corners (the design allows installation in both configurations). Shape: symmetrical square or round overlay (diameter or side equal to the molding width), thickness sufficient to compensate for gaps (three to five centimeters), symmetrical decor (round rosette, square overlay with a central ornament — looks identical from any side).
Application of universal blocks. Complex layouts (rooms with many corners of different configurations — easier to use one type of element for all corners than to select specific ones). Decorative panels (grid of moldings on a wall — panel corners are decorated with universal blocks, creating rhythm and ornamentation). Gallery compositions (frames around paintings, mirrors on a wall — universal blocks in frame corners emphasize geometry and add elegance).
Replacing cutting with ready-made corners: a revolution in installation
Traditional molding installation requires precise corner cutting at forty-five degrees.Polyurethane stucco cornerready-made eliminates cutting, radically simplifies the technology.
Traditional cutting: complexity and risks
Classic technology: two molding strips join at a corner, each cut at a forty-five-degree angle (diagonal cut, the top part of the strip is longer than the bottom for an internal corner, shorter for an external one). Tool: miter box (a device with guides for a saw at a forty-five-degree angle) or a miter saw (a power tool with a rotating blade that cuts at a set angle). Precision is critical: a deviation of half a degree (saw shifted in the miter box, saw blade set inaccurately) creates a one to two millimeter gap in the joint (visible, requiring puttying, sanding, sometimes recutting).
Problems with cutting. Imperfect wall angles (most rooms have angles not exactly ninety degrees — deviations of one to three degrees are typical, standard forty-five-degree cutting does not join perfectly, requires adjustment). Complex profiles (ornamented moldings with deep relief — cutting at an angle creates a diagonal joint where the ornament of one strip must match the other — often doesn't match, the pattern is interrupted, the joint is noticeable). Time (cutting two strips, fitting, adjusting, recutting, installation takes twenty to thirty minutes per corner — a room with four corners requires one and a half to two hours just for corners). Waste (inaccurate cutting ruins a strip — a new one is needed, waste increases, costs rise).
Installation with ready-made corners: simplicity and speed
Simplified technology: a corner element is installed in the corner (glued to the wall, ceiling), two molding strips are brought to it (cut perpendicularly at ninety degrees — ten times simpler than at forty-five), the strip ends join with the side edges of the corner element (the element hides the ends, gaps of a few millimeters are acceptable — invisible). Tool: hacksaw for metal (cuts polyurethane perpendicularly — precision not critical), tape measure, pencil. Precision not critical: wall angle ninety-two to eighty-eight degrees (typical deviations) do not affect installation — the corner element is flexible, compensates for deviations, strips join without gaps.
Advantages of ready-made corners. Speed (installing a corner element plus bringing two strips takes five to seven minutes — four to five times faster than cutting, a room with four corners is installed in twenty to thirty minutes instead of one and a half hours). Joint guarantee (factory-made corner element is geometrically precise — relief matches the molding, joint is tight without gaps, puttying not required). Material savings (no waste from inaccurate cutting — strips are cut perpendicularly, hard to make a mistake, waste is minimal). Decorativeness (corner element is often ornamented — rosette, cartouche, geometric pattern — adds visual value, corners become accents, not hidden joints).
Types of corner elements by shape and decor
Variety of shapes, sizes, ornaments allows selecting an element for any style, molding profile, or task.
Simple transition corners: functionality
Minimalist shape: square or rectangular plate (front part smooth or with minimal relief — one or two chamfers, rounding), size equal to the molding width (molding eight centimeters — corner eight by eight centimeters), thickness two to three centimeters. Color: factory white (primed, ready for painting), painted to match the molding tone (after installation — the entire composition is a single color, the corner element blends with the molding).
Application of simple corners. Minimalist interiors (Scandinavian style, loft, modern classic — where decor is restrained, corners should be functional, not accent). Smooth moldings (profiles without ornament — geometric, chamfered — simple corner harmonizes, doesn't add excess). Budget projects (simple corners are two to three times cheaper than ornamented ones — significant savings with a large number of corners).
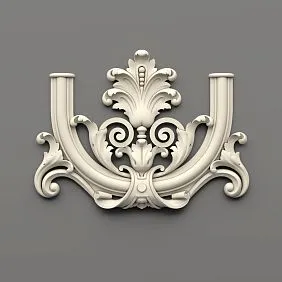
Ornamented corner blocks: accentuation
Decorative shape: square, round, diamond-shaped overlay (front part decorated with relief — rosette with petals, cartouche with scrolls, geometric pattern, floral motif), size varies (from equal to the molding width to exceeding it by one and a half to two times — corner ten by ten centimeters for an eight-centimeter molding — protrudes, dominates), thickness three to six centimeters (relief deep, voluminous).
Application of ornamental blocks. Classical interiors (Baroque, Rococo, Empire, English classic — styles where decoration is abundant, corners should support opulence). Ornamented moldings (profiles with relief — acanthus leaves, dentils, egg-and-dart — an ornamented corner continues the motif, creates visual unity). Accent zones (panels around a fireplace, portal, mirror — ornamented corners emphasize the significance of the zone, attract the eye).
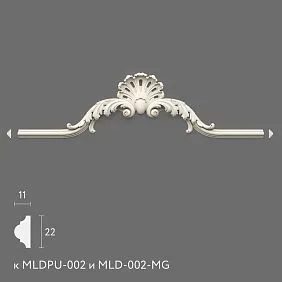
Corner rosettes: circular symmetry
Shape is round: a disc with a diameter equal to or exceeding the width of the molding (molding ten centimeters — rosette diameter twelve to fifteen centimeters), front side with radial ornament (petals, rays, concentric circles radiate from the center), thickness three to five centimeters. Installation: the rosette is glued into the corner (the center of the rosette coincides with the vertex of the angle), moldings are brought to the rosette (ends touch the circumference of the rosette, joined tightly or with a gap of one to two centimeters — depends on the design).
Application of corner rosettes. Ceiling compositions (cornices frame the ceiling, rosettes in the corners create rhythm — a repeating element visually connects walls, ceiling). Wall panels (moldings form frames, rosettes in the corners add elegance — especially effective in symmetrical compositions where rosettes accentuate the geometry). Decorative frames (framing mirrors, pictures on the wall with moldings — rosettes in the corners of the frame turn utilitarian framing into a decorative object).
Time saving during installation: efficiency calculation
How much do corner elements really speed up installation? Calculation using a living room of twenty-five square meters as an example.
Installation of a ceiling cornice using the traditional method
The room is conditionally square, side five meters, perimeter twenty meters, four internal corners. Cornice is polyurethane, twelve centimeters wide, with ornament. Time for one corner (cutting two planks at forty-five degrees, fitting, adjusting, installation): twenty-five to thirty-five minutes (depends on the craftsman's experience, tool accuracy, profile complexity). Four corners: one hundred to one hundred forty minutes (one and a half to two and a half hours). Straight sections (cutting planks to length, installation on the wall): five minutes per linear meter, twenty meters one hundred minutes (one and a half hours). Total: two hundred to two hundred forty minutes (three to four hours).
Installation with corner elements
Four corner elements (installation of each — glue into the corner, align, fix with painter's tape until the adhesive sets): five to seven minutes per element, four elements twenty to thirty minutes. Straight sections (cutting planks perpendicularly, installation, joining with corner elements): four minutes per linear meter (simpler than diagonal cutting), twenty meters eighty minutes (one hour twenty). Total: one hundred to one hundred ten minutes (one hour forty — two hours).
Time saving. Traditional method three to four hours, with corner elements two hours — saving one to two hours (thirty to fifty percent of time). When installing an entire apartment (three to four rooms, hallway, kitchen — cornice perimeter one hundred to one hundred twenty meters, twenty to twenty-four corners) saving five to ten hours (a full craftsman's working day). Craftsman's work cost five hundred to seven hundred rubles per linear meter of cornice (includes corner cutting) — saving time saves the customer money or allows the craftsman to complete more orders.
Joining corner elements with straight sections: technology
Polyurethane corner moldingjoins with moldings in two ways: butt joint of the end to the side edge of the element or insertion of the end into a groove of the element.
Butt joint: universal method
The corner element has flat side edges (at a ninety-degree angle to each other for an internal corner, at a two hundred seventy-degree angle for an external one). The molding is cut perpendicularly (end is flat, at a ninety-degree angle to the longitudinal axis), the end is applied to the side edge of the corner element (joined tightly, adhesive is applied to the end of the molding and the edge of the element, parts are pressed together, fixed with painter's tape until the adhesive sets). A gap is permissible (one to three millimeters — filled with acrylic sealant, sanded, painted — becomes invisible).
Installation sequence. First method (element first): the corner element is glued into the corner (positioned precisely so that the side edges are parallel to the walls), after the adhesive sets (one to two hours for acrylic, ten to fifteen minutes for polyurethane), the moldings are fitted to the element (the distance from one corner element to another or to the end of the wall is measured, the molding is cut perpendicularly to this length, the ends are joined with the elements, the molding is glued). Second method (moldings first): the moldings are glued along the walls (cut perpendicularly to the length of the wall minus the width of two corner elements—space is left for the elements in the corners), after the adhesive sets, the corner elements are glued into the corners (they fill the space between the ends of the moldings, joining tightly). The first method is easier for beginners (elements are fixed, moldings are fitted to them), the second is faster for experienced installers (moldings are glued without test fittings, elements are added finally).
Insertion into a groove: precise joining
Some corner elements have grooves (recesses on the side edges into which the ends of the moldings are inserted). Groove depth five to ten millimeters, width equal to the thickness of the molding. The molding is cut perpendicularly, the end is inserted into the groove (fits tightly, fixed with adhesive applied into the groove), the joint is completely hidden (the end of the molding is inside the groove, only the front side of the molding and element are visible outside, joining flush).
Advantages of the groove. Precision (the groove guides the end of the molding — eliminates displacement, misalignment, gaps are minimal). Speed (no need to position the molding relative to the element — insert into the groove, press, fix). Aesthetics (joint is hidden, invisible — molding and element appear monolithic).
Disadvantages of the groove. Limited compatibility (the groove fits only for moldings of a specific thickness — an element with a groove for a molding ten millimeters thick is not suitable for a molding fifteen millimeters thick). Price (elements with a groove are more complex to produce — the mold is multi-component, cost is twenty to thirty percent higher).
Polyurethane corner blocksin different interior styles
The choice of corner element depends on the interior style, molding profile, aesthetic goals.
Classical interiors: ornamentation
Baroque, Rococo, Empire, English classic — styles where decoration is abundant, corners are accentuated. Corner elements are ornamented (rosettes with acanthus leaves, cartouches with scrolls, geometric patterns with dentils), size exceeds the width of the molding by twenty to fifty percent (molding ten centimeters, corner twelve to fifteen centimeters — protrudes, dominates), color contrasts or harmonizes with the molding (gilding on white background, patina on beige, white on colored).
Ceiling cornices. Wide ornamented cornices (fifteen to twenty-five centimeters) with modillions, dentils, acanthus friezes. Corner elements are massive (rosettes diameter twenty to thirty centimeters with multi-tiered relief — petals, scrolls, central rosette). After painting and gilding, corners become visual centers of the ceiling (the eye glides along the cornice, stops at the corners — rhythm, accents).
Wall panels. Moldings form frames (rectangular panels height one meter to one meter twenty, width eighty centimeters to one meter), corner blocks in the corners of the frames (square overlays eight by eight — ten by ten centimeters with relief). The panel acquires completeness (corners are emphasized, the frame is perceived as a finished composition, not just a set of planks).
Minimalist interiors: restraint
Scandinavian style, loft, modern classic — aesthetics where decoration is minimal, forms are pure. Corner elements are simple (square smooth plates without ornament or with minimal relief — one bevel, rounding), size equals the width of the molding (merging with the composition, not dominating), color is unified with the molding (after painting the corner is invisible — joining is unnoticeable, composition is monolithic).
Ceiling cornices. Narrow smooth cornices (five to ten centimeters, geometric profile without ornament). Corner elements are minimalist (squares five by five to ten by ten centimeters, smooth or with a single bevel). After painting white or the ceiling color, the cornice frames the ceiling discreetly (accentuates the boundary, does not overload with decoration).
Wall moldings. Narrow moldings (three to six centimeters) create thin lines on walls (vertical, horizontal — they divide the plane without bulkiness). Corner elements are tiny (squares three by three to six by six centimeters, smooth). Joining is unnoticeable (corners blend with the moldings, lines are perceived as continuous).
Painting corners in a unified color: finishing technology
Corner elements are supplied white and primed. Final painting unites the elements and moldings into a single composition.
Priming: surface leveling
If elements are not factory-primed (rare, but happens with budget manufacturers) — they are primed with acrylic primer (applied with a brush, roller, aerosol — fills micropores, evens out absorbency, ensures paint adhesion). Primer is white (base layer for any paint), dries in two to four hours, sanded with fine sandpaper grit 220-280 (removes fibers, unevenness — surface is smooth, ready for painting).
Base painting: creating the tone
Acrylic interior paint (matte, semi-matte, glossy — choice depends on style, preferences) is applied with a brush (for ornamented elements — brush penetrates recesses of the relief, paints every detail) or roller (for smooth elements — faster, more even). First layer (base) applied thinly (paint diluted with water by ten to fifteen percent — penetrates relief easier, dries faster), second layer (finish) after four to six hours (paint undiluted — creates dense, opaque coverage, color is saturated, uniform).
Base painting colors. White (classic, universal — suits any walls, ceilings, styles, creates contrast with colored walls, harmonizes with white). Wall color (moldings and corners painted the same color as walls — elements blend with the background, create a relief texture, not contrasting decor). Contrast color (dark moldings on light walls, light on dark — elements stand out, accentuate geometry, create graphic quality).
Decorative finishing: gilding, patina, effects
Gilding. Imitation gold leaf (thin sheets of metallic film) is glued onto gilding adhesive (applied with a brush to protruding parts of the corner element and molding relief, becomes tacky after an hour, gold leaf is applied, pressed with a soft brush, excess removed). Result: gilded relief protrusions, recesses remain base color (white, beige) — effect of an antique frame where gold has worn away in recesses, remained on protrusions.
Patination. Patina (dark paint, diluted to semi-transparency — brown, green, gray) is applied generously with a brush onto the relief (fills recesses), after five to ten minutes excess is wiped off with a rag (patina remains in recesses, removed from protrusions). Result: recesses are dark (create depth, shadows, emphasize relief), protrusions are light (appear illuminated, come to the foreground) — effect of antiquity, volume.
Crackle. Crackle varnish (special composition that cracks when drying) is applied to a painted element (base color light — white, cream), dries in two to four hours (cracks appear — a network imitating antique cracked varnish), cracks are rubbed with dark paint (brown, black — rubbed in with a rag, fills cracks), surface is wiped (paint remains in cracks, forms a dark network on a light background). Result: effect of an antique item that has endured centuries.
Popular questions about plaster corner elements
Is it mandatory to use corner elements or can one manage with mitering?
Not mandatory, but advisable under several conditions. If the craftsman is experienced (makes precise 45-degree miter cuts, miter box or saw are perfectly set, wall angles are close to 90 degrees) — mitering is possible, result identical to corner elements (joint tight, no gaps, relief matches). If the craftsman is a beginner (mitering imprecise, cheap miter box with play, saw without precise adjustment, wall angles imperfect) — corner elements save the day (compensate for inaccuracies, simplify installation, guarantee result). If the molding is complex (deep ornament, multi-tiered relief — mitering at an angle creates a diagonal joint where aligning the ornament is difficult) — corner elements are preferable (hide the joint, element's ornament visually continues the molding's ornament, no dissonance). If there are many corners (twenty-thirty in an apartment — wall panels, ceiling cornices, floor skirting boards) — corner elements save time (five-ten hours saved on the entire volume — significant).
Can corner elements be used for moldings from different manufacturers?
Yes, but with caveats. The corner element must match the molding profile in width (molding ten centimeters — element ten by ten centimeters or slightly larger, if element is smaller — molding protrudes beyond the element edge, joining looks bad). The element's relief must harmonize with the molding's relief (ornamented molding — ornamented element, smooth molding — smooth element, mixing creates dissonance). Thickness of molding and element should be close (if molding thickness fifteen millimeters, element twenty-five — element protrudes above molding, creates a step — unsightly, if thicknesses equal — joining is flush). Manufacturers from different countries use different size standards (European moldings often multiples of centimeters, American in inches — joining may require adjustment).
How much do corner elements cost compared to moldings?
A corner element costs one and a half to three times more than a linear meter of molding. Simple corner element (smooth, size eight by eight centimeters): two hundred fifty to four hundred rubles per piece. Corresponding molding (width eight centimeters, smooth): three hundred to five hundred rubles per linear meter. Ornamented corner element (size twelve by twelve centimeters, relief): six hundred to one thousand two hundred rubles per piece. Corresponding molding (width twelve centimeters, ornamented): five hundred to eight hundred rubles per meter. Seems more expensive, but: one corner element replaces two molding segments of ten to fifteen centimeters (which would be cut off, discarded when mitering at 45 degrees — waste), saves installation time (one-two hours per room — craftsman's work cost five hundred to seven hundred rubles per linear meter), guarantees result (reworking corners due to imprecise mitering costs more than buying elements).
How to paint a corner element so it blends with the molding?
Simultaneous painting — the key to unity. After installing the corner element and moldings (adhesive set, painter's tape removed, joints filled with acrylic sealant, dried, sanded) the entire composition is painted in one go (same paint, applied with brush, roller to moldings and elements without interruption — color identical, shade does not vary). Two coats of paint (first base, second finish) with intermediate drying four to six hours. If decorative finishing (gilding, patina) — applied to the entire composition uniformly (gold leaf on relief protrusions of moldings and elements, patina in recesses of moldings and elements — technique identical, result homogeneous). After painting, the boundary between molding and element is invisible (only if looked at closely, a joint is noticeable — from a distance the composition is monolithic).
Can wooden corner elements be used with polyurethane moldings?
Technically possible, aesthetically questionable. Wood and polyurethane differ in weight (wood is three to five times heavier — corner element loads the wall more), tactile temperature (wood feels warmer to the touch — if elements are within hand's reach, the difference is noticeable), sound (wood resonates when tapped, polyurethane is dull — if elements are at hand level, the difference is noticeable). Visually after painting the difference is minimal, but: wood grain (annual rings) shows through paint, polyurethane is homogeneous (if both painted with opaque paint, grain not visible, difference disappears, if paint is semi-transparent — wood grain contrasts with polyurethane smoothness, dissonance). Price of a wooden element is two to three times higher than polyurethane (wood is cut, milled, sanded — labor-intensive, polyurethane is cast — fast). Recommendation: use a single material in a unified composition (polyurethane moldings with polyurethane elements, wooden with wooden).
Conclusion: corners as finishing touches of perfection
Polyurethane molding cornersturns a problematic installation zone into an element of the decorative system. The corner ceases to be a place where planks meet (requiring jeweler-like precision in mitering, creating risk of gaps, mismatches, necessity for puttying, sanding, correction), becomes an accent (ready-made element is installed in the corner, moldings are brought to it with a simple perpendicular cut, joining is guaranteed, installation time is halved or reduced by two-thirds, result is professional even for a beginner craftsman).
Classification of elements is extensive: internal corners (for concave wall joints — at least four per room, more with complex layouts), external corners (for protrusions — columns, pilasters, bay windows, portals), universal blocks (suitable for both configurations — simplify selection, minimize procurement nomenclature). Forms vary: simple transitional (smooth squares, functional, minimalist, budget), ornamented blocks (rosettes, cartouches, geometric patterns — decorative, accent, premium), corner rosettes (circular symmetry, radial ornament — elegant, classic).
Time savings during installation are measurable: a room with four corners installed traditionally (45-degree mitering) takes three to four hours, with corner elements takes two hours (saving one to two hours — thirty to fifty percent of time). An apartment with four rooms, cornice perimeter one hundred meters, twenty-four corners saves five to ten hours (a full craftsman's workday, which is paid at a rate of five hundred to seven hundred rubles per linear meter — savings are substantial or allows the craftsman to take on an additional order).
Joining elements with moldings is technological: butt joint to side edge (universal method — molding cut perpendicularly, end butted to element, joined tightly, gaps up to three millimeters acceptable, filled with sealant), insertion into a groove (precise method — element has a recess, molding end inserted, joint completely hidden, gaps minimal, but compatibility limited to specific molding thickness). Installation sequence is flexible: elements first (fixed in corners, moldings fitted to them — easier for novices) or moldings first (glued along walls, elements glued between them — faster for experienced).
Painting unites elements and moldings into a monolithic composition: priming (levels surface, ensures adhesion), base painting (two coats of acrylic paint — white, colored, contrasting or harmonizing with walls), decorative finishing (gilding with gold leaf — classic luxury, patination — antique effect, crackle — imitation of antiquities). After painting, the boundary between element and molding is invisible (composition perceived as whole, not assembled).
STAVROS offers polyurethane corner elements of European quality — over twenty models (from simple smooth squares measuring three by three to eight by eight centimeters for minimalist interiors to ornamental rosettes with diameters of fifteen to twenty-five centimeters for classic palace spaces), polyurethane density of three hundred to three hundred fifty kilograms per cubic meter (maximum strength, detailed relief, geometric stability), factory primer (white acrylic primer — ready for final painting without additional preparation), compatibility with STAVROS catalog moldings (each molding profile has a corresponding corner element — width, relief, and style are coordinated, guaranteed fit).
The catalog includes elements of all styles: minimalist (smooth squares for Scandinavian style, loft, modern classic, priced at two hundred to four hundred rubles per piece), classic (ornamental blocks with geometric patterns, floral motifs for traditional interiors, priced at five hundred to eight hundred rubles), baroque (rosettes with acanthus leaves, multi-tiered relief for palace spaces, priced at nine hundred to one thousand five hundred rubles). Internal and external corners are available for each molding profile (universal coverage — any room configuration is provided by elements from the catalog).
Professional service includes consultations (assistance in selecting elements for a specific molding profile, interior style, corner configuration — managers are competent, understand fitting, compatibility, aesthetics), quantity calculation (website calculator calculates the number of corner elements based on the number of corners in the room — minimizes excess purchases, eliminates shortages), delivery (via transport companies across Russia, courier in Moscow — elements are carefully packaged, delivered without damage), warranty (elements do not deform, yellow, or lose relief detail for two years — material defects are replaced free of charge).
Additional services: kit assembly (the client orders moldings and corresponding corner elements in one shipment — STAVROS selects elements, checks compatibility, ships as a kit), painting (professional craftsmen paint elements and moldings before shipping — the client receives ready-made parts in the desired color and decorative finish, installs without additional painting), turnkey installation (STAVROS team installs elements, moldings, and performs painting at the client's site — guaranteed result).
By choosing STAVROS corner elements, you get simplified installation (time is cut in half, cutting precision is less critical, the result is professional for any craftsman), guaranteed fit (factory elements are geometrically precise, relief matches moldings millimeter by millimeter, gaps are eliminated), decorative appeal (elements are not just functional but also decorative — ornamentation and relief turn corners into compositional accents), cost savings (element cost is offset by saved installation time, elimination of waste from imprecise cutting, and no need for rework). STAVROS corner elements are finishing touches that transform a set of molding strips into a unified architectural composition, where every corner is not an installation problem but a detail of thoughtful decor.