


Article Contents:
- The philosophy of modular furniture: why it works
- Basic elements: what you need to know before starting
- Furniture frames: the foundation of construction
- Legs: supports with character
- Overlays: details that change everything
- Tabletops: work surfaces
- Tools and consumables: the minimum set
- Essential tools
- Desirable tools
- Consumables
- Element connection techniques: from simple to advanced
- Glue connection
- Screw connection
- Dowel connection
- Confirmat connection
- Metal bracket connection
- Beginner project: wall shelf with decorative brackets
- What you'll need
- Creation process
- Intermediate project: coffee table on turned legs
- Concept and elements
- Frame Assembly
- Tabletop attachment and finishing
- Advanced project: dining table with carved elements
- Planning and elements
- Assembly and decoration
- Finishing: the art of turning wood into furniture
- Oil: natural beauty
- Wax: soft shine and protection
- Varnish: Durable Protection
- Staining: color without losing texture
- Staining: full color control
- Patination: effect of time
- Frequently Asked Questions
- Are professional carpentry skills needed?
- How much does it cost to make a table yourself vs buying a ready-made one?
- Where to buy quality ready-made elements?
- Can elements from different wood species be combined?
- Is a finish coating mandatory?
- How long does it take to create furniture?
- What to do if there is no workshop?
- Can power tools be used or is everything done by hand?
- Conclusion: From Idea to Reality
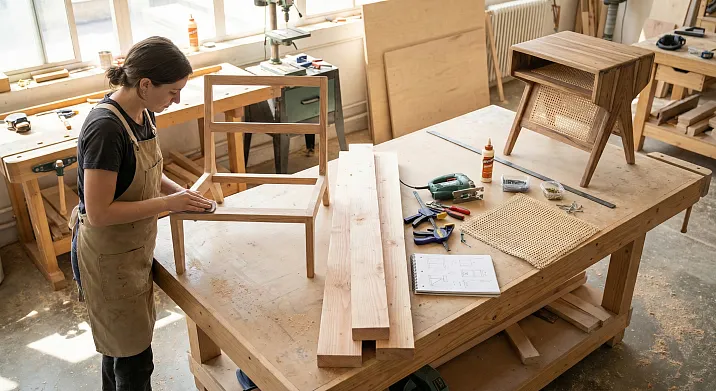
Have you ever stood in the middle of a furniture showroom and thought: 'Everything is beautiful, but nothing is mine'? Standard sofas, faceless tables, clone dressers — mass production has stripped furniture of its soul, turning it into a faceless commodity. But what if I told you thatcreate furniture with your own handsis real, even if you've never held a plane? That you don't need a workshop with a dozen machines, years of carpentry training, and a bottomless budget?
The secret is in the modular approach: using quality ready-made solid wood elements — frames, legs, overlays, tabletops — which you combine like construction kit parts, creating unique pieces. This is a revolution in DIY furniture: you get professional production quality plus the freedom of authorial design. Turned oak legs, carved overlays with ornaments, perfectly processed tabletops — all this has already been made by craftsmen on high-precision equipment. You are left with the main task: to assemble the elements to your taste, add decor, choose the finish — and get furniture that will be one of a kind.
This article is your complete guide to the world of creating authorial furniture. We will break down all stages: from selecting elements to final assembly, from tools to finishing techniques. You will see specific projects for different skill levels — from the simplest shelf to a complex dining table. And most importantly — you will understand that this is truly accessible to anyone who is willing to spend a weekend on creativity.


The philosophy of modular furniture: why it works
Traditional carpentry requires dozens of specialized tools, deep knowledge of wood, years of practice. To turn a single furniture leg, a professional turner needs several hours. To carve a decorative overlay with a floral ornament, a wood carver requires a day's work. And yet, for one table, you need four identical legs and a dozen overlays.
The modular approach flips the logic. Instead of manufacturing each part from scratch, you use ready-made elements of industrial production.furniture legsare already turned on professional lathes with perfect symmetry.furniture appliquésare cut on CNC machines with micron precision. Frames are assembled with reliable joinery connections. Tabletops are sanded to a velvety smoothness.
This is not a compromise — it's common sense. Industrial production ensures quality that is unattainable at home. And you are freed from routine operations and focus on creativity: composition, combination of elements, choice of color and texture, creating an authorial appearance.
Moreover, modular furniture costs less than custom-made. A ready-made designer solid oak table costs 100-150 thousand rubles. A table assembled by you from ready-made elements will cost 30-50 thousand with comparable or even higher quality. The savings are obvious, and the pleasure from the process and pride in the result are priceless.


Basic elements: what you need to know before starting
Before diving into projects, let's break down the main types of ready-made elements and their role in furniture construction.
Our factory also produces:


Furniture frames: the foundation of the structure
furniture framesare ready-made load-bearing structures for tables, armchairs, chairs. A table frame includes legs, aprons (horizontal planks connecting the legs), sometimes stretchers (lower crosspieces for reinforcement).
Advantages of ready-made frames:
-
All joinery connections are already professionally executed (mortise and tenon, dowel joints)
-
The structure is tested for strength and stability
-
Elements are perfectly fitted to each other
-
Time saving: no need to calculate joints, select angles, cut tenons
Frames are produced in various styles: classic with turned legs and shaped aprons, modern minimalist, industrial rough. Sizes also vary — from compact coffee tables to massive dining tables.
Get Consultation
Legs: supports with character
If the frame is a ready-made structure, then individual legs are modular elements from which you assemble the construction from scratch. Turned legs made of solid oak or beech transform a simple tabletop into a full-fledged table, and a solid wood panel into a bench.
Types of legs:
Balusters — classic turned legs with thickenings, bindings, and smooth transitions. Used for tables, cabinets, and consoles in classic interiors.
Cones — legs that taper downwards. A more modern, streamlined silhouette. Suitable for Scandinavian and minimalist interiors.
Cylinders — straight legs of constant diameter. A simple, strict form for laconic furniture.
Cabriole — curved legs with a characteristic outward curve at the top and inward curve at the bottom, often ending in a decorative paw. A classic of Baroque and Rococo.
Square — legs with a square cross-section, often with chamfered or shaped edge treatment. Versatile, suitable for various styles.
The diameter or side of the leg depends on the size of the furniture. For coffee tables — 40-60 mm, for dining tables — 70-100 mm, for massive furniture — 100-120 mm and more.
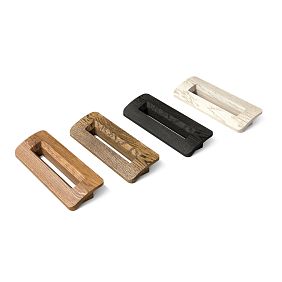
Overlays: details that change everything
Decorative overlays are carved or shaped elements that do not bear structural load but radically change the appearance of furniture. Imagine a simple cabinet with smooth fronts. Add carved frames made of overlays to the fronts — and the cabinet turns into a classic sideboard with paneled doors.
Types of pads:
Rosettes — round or oval elements with carved ornamentation (floral, geometric, abstract). Placed in the center of panels, on table aprons, on cabinet fronts.
Cartouches — shaped shields with complex contours, often with space for a monogram or coat of arms. Characteristic of Baroque-style furniture.
Corner elements — triangular, fan-shaped, or complex-shaped overlays for furniture corners. Visually reinforce structural joints.
Friezes — long narrow strips with repeating ornamentation. Used for framing tabletops, fronts, panels.
Capitals and bases — decorative elements for finishing columns, pilasters, vertical furniture elements.
Overlays are made from the same solid wood as the main furniture (oak, beech, ash) and are mounted with wood glue. They can be painted the same color as the furniture or made contrasting to highlight the decoration.
Tabletops: work surfaces
The tabletop is the upper plane of the table, the working and visual dominant.Wooden tabletopsare made from solid wood (solid lamella panel), plywood with veneer overlay, or MDF.
Solid wood — a premium choice. An oak tabletop 30-40 mm thick will last for decades, it can be sanded and restored multiple times. The texture of natural wood creates warmth, coziness, and a connection with nature.
Plywood with veneer — a compromise between price and quality. Visually indistinguishable from solid wood, lighter, cheaper. But less durable, the veneer may chip upon impact.
Tabletop shape: rectangular (universal), square (compact), round (creates coziness), oval (elegant). Edge treatment: straight cut, chamfer, radius, shaped molding.
Tabletops can be ordered in any size for a specific project. This provides freedom: you design a table of the required size, and the tabletop is manufactured exactly to your specifications.
Tools and consumables: minimal set
To create furniture from ready-made elements, a carpentry workshop is not needed. A basic set of tools, which many have at home or are inexpensive, is sufficient.
Essential tools
Screwdriver or drill — for drilling holes and driving screws. Cordless is better — more convenient to work with.
Saw — for trimming elements if necessary. Hand saw, jigsaw, or circular saw depending on the volume of work.
Miter box — if you need to cut elements at a precise angle (for example, when making frames).
Roulette, square, ruler — for marking and checking geometry.
Pencil or marker — for applying marks.
Brushes and rollers — for applying glue, paint, varnish, oil.
Sandpaper — various grits (from 120 to 320) for sanding and surface preparation.
Desirable tools
Sander — orbital or vibrating. Speeds up sanding, provides a smoother surface than manual processing.
Clamps — for fixing parts during gluing. The more the better, minimum 4-6 pieces of different sizes.
Router — for advanced projects requiring edge processing, groove cutting, creating decorative profiles.
Miter saw — for precise angled cuts. Not mandatory, but greatly simplifies the work.
Consumables
Wood glue — PVA for wood or polyurethane. Provides a strong connection of parts.
Screws — various lengths (25-70 mm) depending on the thickness of the elements being joined.
Confirmat screws — special furniture connectors for strong joining of thick parts.
Dowel pins — wooden cylindrical rods for hidden joining of parts.
Metal corner brackets — for reinforcing structural joints.
Wood filler — for sealing joints, holes, minor defects. Choose to match the wood tone.
Primer — if painting is planned, primer ensures better paint adhesion.
Finishing coatings — wood oil, wax, varnish (matte, semi-matte, or glossy), paint (acrylic for wood).
Stain or dye — for tinting wood without losing the grain.
Protective materials — felt pads for legs, glides, furniture stops.
Element joining techniques: from simple to advanced
The quality of furniture depends not only on the elements but also on how you join them. Let's examine the main techniques.
Glue joint
The simplest and most universal method. PVA wood glue creates a joint stronger than the wood itself. The key is proper technique.
Surface preparation: both surfaces to be glued must be clean, dry, and degreased. Sand them with fine sandpaper for better adhesion.
Applying glue: apply glue in a thin, even layer to both surfaces. Too thick a layer won't strengthen the joint but will create excess that will need to be removed later.
Clamping and fixing: join the parts, press firmly, and secure with clamps. Clamping time — minimum 30 minutes, preferably 2-4 hours for full setting.
Removing excess: wipe away squeezed-out glue with a damp cloth before it sets, or with a sharp knife after full drying.
Screw joint
A fast and strong method that doesn't require long clamping. Important nuances:
Pre-drilling: before driving the screw, drill a hole slightly smaller than the screw diameter. This prevents the wood from splitting.
Countersink: a recess for a screw head so it is flush with the surface or below (then it can be filled with putty).
Screw length: should be such that it passes through the first part and securely enters the second part by at least 2/3 of its thickness, but does not go all the way through.
Glue + screws combination: for maximum strength, use both methods — glue for the main joint, screws for temporary fixation during drying and additional strength.
Dowel joint
Dowels are wooden cylindrical rods that are inserted into corresponding holes in the parts to be joined. This is a classic furniture joint, strong and hidden.
Marking: accurately mark the position of the dowels on both parts. Use doweling jigs or marking templates for precision.
Drilling: drill holes exactly according to the markings. The hole depth is approximately half the length of the dowel plus a 2-3 mm allowance.
Assembly: apply glue into the holes and onto the dowels, insert the dowels into one part, then join with the second part. Clamp until the glue dries.
Confirmat joint
Confirmat (Euro screw) is a special furniture fastener with a thread and a wide head. Provides a very strong joint for thick parts (tabletops, fronts, cabinet sides).
A two-step hole is drilled for the confirmat: a thin one (for the confirmat body) in the first part and a thick one (for the thread) in the second. The confirmat is screwed in with a special hex key.
The downside of confirmats is the visible head. It can be masked with decorative plugs in a matching color or overlays.
Metal angle bracket joint
Metal furniture angle brackets are a simple way to reinforce structural nodes. The bracket is screwed with screws to both parts being joined, creating a rigid angular connection.
Use angle brackets where strength is important but aesthetics are secondary (internal corners of frames, attaching tabletops to bases, reinforcing chair frames).
Beginner project: wall shelf with decorative brackets
Let's start with a simple project that can be completed in an evening. A wall shelf is a functional and decorative element that will be excellent practice before more complex tasks.
What you'll need
-
Board or furniture panel for the shelf: 80×25 cm, thickness 20-25 mm (oak, ash, or pine)
-
Two turned legs, length 25-30 cm, diameter 50-60 mm (they will become the brackets)
-
Two decorative rosettes, diameter 60-80 mm
-
Block 30×30 mm, length 50 cm (for reinforcing the brackets)
-
Screws, wall plugs, glue, oil or paint
Creation process
Step 1: Cut the turned legs at an angle of approximately 75-80 degrees at one end (this end will rest against the shelf). Cut the other end at a 90-degree angle (for attaching to the wall).
Step 2: Sand the shelf, round the front edge with sandpaper or a router (for safety and aesthetics).
Step 3: Glue a 30×30 mm block to the back side of each leg-bracket — it will be the main load-bearing element, and the leg will be a decorative overlay.
Step 4: Glue the rosettes to the top part of the brackets (where they meet the shelf) for a decorative accent.
Step 5: Coat all elements with oil, wax, or paint in the chosen color. Let dry.
Step 6: Attach the brackets to the underside of the shelf with screws from the inside (so the fasteners are not visible).
Step 7: Mark the shelf position on the wall, attach the brackets to the wall using dowels and screws. Ensure you're fastening into a solid base (brick, concrete), not just drywall.
Result: an elegant shelf with turned brackets that looks like an expensive console but cost pennies and was created in an evening.
Intermediate-level project: coffee table on turned legs
The next level of complexity is a full-fledged coffee table. This project will provide experience in assembling a frame and attaching a tabletop.
Concept and elements
Coffee table dimensions: 100×60 cm, height 45 cm. Construction: four turned legs, four rails (horizontal planks between legs), tabletop made of oak furniture board.
Required elements:
-
Four turned legs, 43 cm long, diameter 50-60 mm
-
Four boards for rails: two 90 cm and two 50 cm, cross-section 80×20 mm
-
Tabletop 100×60 cm, thickness 25 mm
-
Four corner decorative overlays
-
Fasteners, glue, finishing materials
Frame assembly
Step 1: Mark the position of the rails on the legs. The rails are attached approximately 5 cm from the top edge of the legs (leaving space for the tabletop).
Step 2: Connect the legs and rails. There are several options:
-
Using dowels (requires precise marking and drilling)
-
Using confirmat screws (quick and sturdy, but screw heads are visible)
-
Using screws at an angle from the inside (fasteners are hidden)
First assemble two sides (two legs + one long rail), then connect them with short rails. Work on a flat surface, ensure right angles.
Step 3: Glue the corner overlays at the joints of legs and rails — they will hide the seams and add decorative appeal.
Tabletop attachment and finishing
Step 4: Sand the tabletop, treat the edges (chamfer or round them).
Step 5: Apply a finish to the frame and tabletop. For a table that will be in the living room, oil (natural look) or matte varnish (more durable protection) is suitable. If you want color — stain plus varnish or painting.
Step 6: Attach the tabletop to the frame. Flip the tabletop, place the frame on it, align it (the tabletop overhangs should be even). Attach using metal corner brackets or Z-shaped plates (they allow the tabletop to "breathe").
Step 7: Attach felt pads to the legs to prevent scratching the floor.
Result: a stylish solid oak coffee table that will become the centerpiece of the living room and a source of pride.
Advanced project: dining table with carved elements
For those who have mastered basic projects — a serious challenge: a dining table for 6-8 people with carved decor.
Planning and elements
Table dimensions: 180×90 cm, height 75 cm. Construction: four massive turned legs, four rails, stretchers for reinforcement, oak tabletop 40 mm thick, decorative overlays.
Elements:
-
Ready-made carved table frame or individual components:
-
Four baluster legs, 72 cm high, 90-100 mm in diameter
-
Aprons 170×100 mm and 80×100 mm (two of each size)
-
Stretchers (optional)
-
-
Tabletop 180×90 cm, 40 mm thick, oak, finished edges
-
Decorative overlays: 4 rosettes for apron centers, 8 corner elements
-
Fasteners, glue, finishing materials
If using a ready-made frame, assembly is simplified—just attach the tabletop and add decor. If building from scratch, the process is more complex but more interesting.
Assembly and Decoration
Step 1: Frame Assembly (if using individual components)
Connect the legs and aprons using dowels and glue—this ensures maximum strength. The work requires precision: mark the dowel positions using a jig, drill holes strictly perpendicular to the surface.
Assemble the frame dry (without glue), check the geometry: all angles are right, diagonals are equal, the structure is stable. If everything is accurate, disassemble, apply glue, assemble finally, and clamp until dry.
If the design includes stretchers, attach them 20-25 cm from the floor—they will reinforce the frame and add decorative appeal.
Step 2: Mounting Decorative Elements
Glue the rosettes to the centers of the aprons—they will become visual accents. Place the corner overlays at the joints of the legs and aprons. Optionally, add a frieze around the perimeter under the tabletop.
Attach all overlays with wood glue, additionally secure with thin finish nails in inconspicuous places.
Step 3: Finishing
For a classic table, staining (dark walnut or fumed oak color) followed by varnishing is suitable. For a modern look—natural wood with oil. For a Provence style—painting in a light color with patination.
Sand between coats for perfect smoothness. The tabletop must have particularly high-quality finishing—it is a work surface that will come into contact with dishes, hands, and objects.
Step 4: Final Assembly
Attach the tabletop to the frame using Z-shaped brackets or wooden mounting blocks. Do not use rigid fastening (screws directly through the aprons into the tabletop)—a solid wood tabletop must be able to expand and contract slightly with changes in humidity.
Result: a monumental dining table that will serve generations and become the heart of the home, a place for family dinners and festive gatherings.
Finishing: The Art of Transforming Wood into Furniture
Finishing is not just about protecting the wood; it is a choice of character and mood for the furniture. The same elements, treated differently, create completely different looks.
Oil: Natural Beauty
Wood oil penetrates deep into the fibers, protects from within, and highlights the texture and color. The surface remains warm to the touch, velvety, and breathable.
Types of oils: linseed (classic, dries slowly), tung (dries faster, more durable), special furniture oils (optimal for beginners).
Application: Apply a thin layer with a brush or pad along the grain. Let it soak in for 15-20 minutes, wipe off excess. Repeat 2-3 times with intervals of 6-12 hours. After the last coat, you can polish with a soft cloth for a light shine.
Wax: Soft Shine and Protection
Wax (beeswax, carnauba) creates a protective film with a soft, warm shine. Often used over oil for additional protection.
Application: Rub in with a soft cloth using circular motions, let it dry slightly, then polish. The process is meditative, the result—a silky surface with a noble shine.
Varnish: durable protection
Varnish creates a hard film on the wood surface, protecting it from moisture, scratches, and stains. For furniture, use polyurethane or acrylic varnishes — they are stronger than nitrocellulose varnishes and do not yellow.
Gloss level: matte (modern look, no glare), semi-matte (compromise), glossy (classic, but can look cheap on furniture — use with caution).
Application: with a brush or from a sprayer in 2-4 coats. Between coats — sanding with fine sandpaper (grit 320-400) to remove raised fibers. Do not sand the final coat.
Staining: color without losing texture
Stain changes the color of the wood while preserving the visibility of the fiber structure. It can darken light wood to imitate expensive species or lighten it to create a bleached oak effect.
Stains come in water-based (eco-friendly but raise fibers), alcohol-based (dry quickly), and oil-based (penetrate deeply). For beginners, water-based or oil-based are better.
Application: with a brush, sponge, or cloth along the grain. Wipe off excess immediately for evenness. After drying, a protective coating — varnish or oil — is mandatory.
Painting: full color control
Paint completely hides the wood texture, providing a uniform color. This is the choice for interiors requiring a specific shade or for furniture made from inexpensive wood species that need refinement.
Use acrylic paints for wood — they form a durable film, dry quickly, and have no strong odor. Primer is mandatory before painting — it evens out absorbency and reduces paint consumption.
Apply paint in 2-3 coats with a roller or brush. For a perfectly smooth surface, the final coat can be lightly sanded with fine sandpaper and coated with a protective varnish.
Patina: effect of time
A technique for creating artificial aging, characteristic of vintage and Provence interiors. Furniture is painted in a base color, then dark patina (bitumen, acrylic) is applied to the recesses of the relief (if there is carving or overlays). Excess patina is wiped off, leaving it only in the recesses, creating an aged patina.
Additionally, distressing can be done: after the paint dries, sand the protruding areas (corners, edges, ribs) with sandpaper, exposing the underlying layer or even the wood. This imitates natural wear.
Frequently asked questions
Are professional carpentry skills necessary?
No. Creating furniture from ready-made elements requires only basic tool skills, accuracy, and patience. Complex operations (turning, carving, joinery) are already done by the manufacturer.
How much does it cost to create a table yourself vs. buying a ready-made one?
A ready-made designer dining table made of solid wood — 80-150 thousand rubles. A table from ready-made STAVROS elements — 30-50 thousand. The savings are significant with comparable quality.
Where to buy quality ready-made elements?
From a manufacturer with a reputation and quality control. STAVROS in St. Petersburg offers a wide range of frames, legs, overlays, and tabletops made of solid oak and beech.
Can elements from different wood species be combined?
Yes, contrasting combinations can be very effective. For example, dark oak legs and a light ash tabletop. The main thing is harmony in proportions and finish.
Is a finish coating mandatory?
Yes, untreated wood quickly gets dirty, darkens, and absorbs moisture. At a minimum — oil or wax for protection and highlighting the beauty of the wood.
How long does it take to create furniture?
Simple project (shelf) — 4-6 hours. Medium (coffee table) — 1-2 days. Complex (dining table) — 3-5 days, including drying time between finishing stages.
What to do if there is no workshop?
You can work on a balcony, in a garage, even in a room (covering the floor with protective film). Ventilation is important for finishing. Many operations are performed outdoors or in a well-ventilated area.
Can power tools be used or is everything done by hand?
Power tools greatly speed up work and improve quality. A sander, screwdriver, jigsaw — affordable tools that pay for themselves on the first project.
Conclusion: from idea to reality
Creating unique furniture with your own hands is not a dream, but a quite realistic task accessible to everyone. Using ready-made quality solid wood elements frees you from the need to master complex carpentry operations but leaves room for creativity. You become the designer and assembler, choosing the style, proportions, color, decor — everything that makes the furniture yours, reflecting your taste and character.
The modular approach saves time, money, and nerves. Instead of spending months learning carpentry and purchasing expensive equipment, you immediately move to the interesting part—layout, assembly, decoration. The result is not inferior to professional products, and often surpasses mass-produced factory furniture in material quality and craftsmanship.
STAVROS Company is your reliable partner in creating custom furniture. STAVROS produces a wide range of ready-made elements from solid oak and beech: table and chair frames, turned legs of all shapes and sizes, carved decorative overlays, custom table tops, and millwork for additional decoration. In-house production on modern equipment guarantees the quality of every detail: proper wood moisture, precise geometry, clean surface finishing.
By choosing STAVROS, you get not just materials, but professional support: consultations on element selection, quantity calculations, recommendations for assembly and finishing, and delivery to any point in Russia. STAVROS is invested in the success of your project and does everything to ensure the result exceeds expectations.
Start with something simple—a shelf or a small table. Feel the pleasure of working with wood, the pride in creating something with your own hands. Then move on to more ambitious projects: a dining table that will bring the family together, an armchair that will be cozy for reading on winter evenings, a console that will become a decoration for the hallway.
Your home deserves furniture with soul, created with love and attention to detail. And now you know it's within your power. With ready-made elements from STAVROS, the journey from idea to reality becomes short and exciting. Create, craft, surround yourself with beauty—it's accessible to everyone!


