Article Contents:
- Why Choose a Wide Wooden Floor Skirting Board — Aesthetics and Function
- The Bottom Line of the Room: How Architectural Skirting Works
- Function: Not Just Beauty
- Wood vs. Plastic: An Honest Conversation
- Wide Skirting Board in Classic Interior: Dimensions and Profiles
- What Dimensions Are Considered 'Wide'
- Profiles of Wide Wooden Skirting Boards
- Wood: Which Species is Best
- Wooden Coving — Coving for Bathhouse, Sauna, Apartment
- What is Coving and How It Differs from Skirting
- Coving for Bathhouse and Sauna: Special Requirements
- Coving in the Apartment: Application in Living Spaces
- Wooden Ceiling Skirting: How It Differs from Floor Skirting
- Wooden Ceiling Skirting: Function and Logic
- Types of Wooden Ceiling Skirting Boards
- Comparison: Floor and Ceiling Wooden Skirting Boards
- Wooden Ceiling Skirting in Combination with Other Elements
- Wide Skirting Board Installation: Miter Box, Glue, Fasteners
- Preparation for Installation: What You Need to Know Before Starting
- Miter Box: A Tool for Precise Cutting
- Glue: Which to Choose for Wooden Skirting Board
- Fasteners: Nails, Dowels, Hidden Systems
- Final processing of joints
- Installation on Uneven Walls
- Prices for Wide Wooden Skirting Board: What Affects the Cost
- Pricing: Breaking Down the Components
- Approximate Budget Calculation
- Installation Costs
- Caring for Wooden Skirting Board: Extending the Product's Life
- How to Properly Care for Wood at the Skirting
- Skirting in High Humidity Areas
- FAQ: Answers to Popular Questions
- About the Company STAVROS

There are details that silently bear the entire interior load. They don't seek praise, don't demand attention—and that's precisely why they become indispensable.wide wooden baseboard— is exactly such a detail. It sits right at the floor, holds the room's bottom line, and yet defines everything: scale, style, the sense of completion. Do it carelessly—and the entire renovation, which took months, will turn into something unfinished. Do it right—and the space will acquire that very architectural weight which cannot be imitated by any wallpaper or chandeliers.
That is why the wide wooden baseboard deserves a separate conversation. A detailed, specific one, with no concessions to simplification.


Why choose a wide wooden floor baseboard—aesthetics and function


The bottom line of the room: how the architectural plinth works
When an architect looks at an interior, they think not in separate objects, but in horizontals. The cornice at the ceiling, the molding in the middle of the wall, the baseboard at the floor—these are three parallel strips that 'frame' the space, giving it tiering and weight. Remove even one element—and the structure falls apart: the wall becomes flat, without depth, without a transition between surfaces.
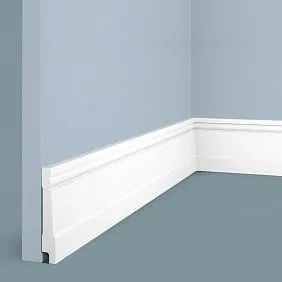
wide wooden baseboard— is the lower architectural element of this system. With a height of 100 mm and above, it creates a visual 'plinth' for the room: the feeling that the walls stand on a solid foundation, not just grow out of the parquet. This is not decoration—it's proportion. Just like a door casing or a ceiling cornice: remove it—and you immediately notice something is missing.
A rule every experienced designer knows: the height of the floor baseboard should be from three to five percent of the room's height. With a standard 3-meter ceiling, that's 90–150 mm. With a 3.5-meter ceiling—105–175 mm. It is within this range that the wooden profile looks organic: doesn't overwhelm, doesn't get lost, sets the scale.
Our factory also produces:


Function: not just beauty
To claim that a wide baseboard is an exclusively decorative element is to know less about renovation than it seems. It has three practical functions, each quite specific.
The first—expansion gap. Any flooring—parquet, solid wood, laminate, even porcelain tile—is laid with an 8–12 mm gap from the wall. This is a technical requirement: the material expands with changes in temperature and humidity. The perimeter gap prevents swelling and deformation of the flooring. The baseboard is the only element that covers this gap while preserving its function.
The second—protection of the lower part of the wall. The most vulnerable spot in a room is precisely the lower third of the wall: here the vacuum cleaner hits, the mop reaches, the legs of chairs and sofas press. A massive wooden baseboard made of oak with a density of 700–800 kg/m³ withstands these impacts where plaster or drywall would crack at the first collision.
The third—hidden utilities. In modern interiors, a wide baseboard is often used as a cable channel. The internal cavity of a profile 100–120 mm high accommodates power wires, low-voltage automation wires, signal cables—all of this goes under the baseboard during installation and no longer requires wall chasing.
Get Consultation
Wood vs. plastic: an honest conversation
Plastic baseboards exist—and they have their niche: temporary premises, rental housing, spaces where cost is more important than quality. In all other cases, wood wins without reservation.
Plastic deforms from heat: when heated by a radiator or underfloor heating system, it loses shape, sags, gaps appear at the joints. Wood behaves differently: it breathes with the room, expands and contracts slightly, but holds its shape for decades. An oak baseboard, installed correctly, will outlast two or three renovations and remain in its original condition.
MDF occupies a middle ground: cheaper than solid wood, holds shape better than plastic, but is inferior to wood in impact resistance and cannot be restored. A scratch on an oak baseboard can be sanded and oiled—it disappears. A scratch on MDF remains forever.
Wide baseboard in a classic interior: dimensions and profiles
What dimensions are considered 'wide'
In professional practice, a baseboard is called wide if its height exceeds 80 mm. The conventional classification looks like this:
-
Standard: 40–70 mm — suitable for small rooms with ceilings up to 2.7 m
-
Wide: 80–120 mm — optimal for living rooms with ceilings 2.8–3.2 m
-
Architectural: 120–200 mm and above — used in formal rooms, halls, living rooms with high ceilings
Not only the size is important, but also the ratio of width to profile thickness. A wooden baseboard 120 mm high with a 20 mm thickness looks harmonious. If the thickness is less than 15 mm, the profile seems 'flat' and cheap—the proportions are broken.
Profiles of a wide wooden baseboard
The shape of the baseboard's front part is its architectural 'character'. Each profile has a historical origin and corresponds to a certain interior style.
Straight (rectangular) profile — a minimalist rectangle without curves. This is the choice for a modern interior: loft, minimalism, Scandinavian style. The wider and thinner such a baseboard, the more graphic it looks.
Profile with a quarter — the top edge is cut at an angle or rounded. The classic Soviet baseboard was made exactly like this, but in a modern solid oak version, this profile looks completely different: strict and stylish.
S-shaped profile (Ogee, cavetto) — a complex curvilinear shape with concave and convex sections. This is a historical profile from the arsenal of classical architecture. It reads well in interiors in neoclassical, Empire, or Provence styles.
Stepped profile — a baseboard with a 'step' in the lower or upper part. Creates a depth effect, works as an architectural molding. Looks especially advantageous at a height of 150 mm and above.
Milled profile with ornament — the front surface is decorated with milling: rocaille, ions, acanthus leaves, geometric moldings. Used in palace and classic interiors, in projects where the detail is part of a general ornamental program.
Wood: which species is best
Choosing a species is not only about aesthetics but also physical properties that directly affect the durability of the product.
| Species | Density | Hardness | Features |
|---|---|---|---|
| Oak | 700–800 kg/m³ | High | Highest wear resistance, noble texture |
| Ash | 650–750 kg/m³ | High | Pronounced grain pattern, whitish color |
| Spruce | 480–580 kg/m³ | Medium | Affordable price, resinousness — a plus in finishing |
| Larch | 600–660 kg/m³ | High | Moisture resistance, recommended for baths |
| Linden | 400–500 kg/m³ | Low | Ease of processing, ideal for carving |
Oak is the perennial leader among species for floor skirting boards. Its dense structure is not afraid of point impacts, does not delaminate during sanding, and excellently accepts any finishing coatings: oil, wax, varnish, stain. An oak profile lasts 30–40 years without any signs of degradation.
For rooms with high humidity — bathrooms, baths, saunas, plunge pools — larch is the preferred choice. Its special resinousness creates a natural barrier against moisture, and this property does not need to be maintained chemically.
Wooden coving — coving for bath, sauna, apartment
What is coving and how it differs from a skirting board
Wooden Crown Moldings— are rounded wooden profiles used for decorating internal corner transitions between surfaces. In function, they are similar to a skirting board but have a specific geometry: the cross-section of a coving represents a quarter of a circle or ellipse.
If a skirting board covers the horizontal joint 'floor — wall,' then a coving works in two planes simultaneously. It closes the corner, rounds the transition, removes the straight gap between surfaces, and at the same time adds a softness to the line, which is especially valuable in interiors with a lot of wood.
Confusing a coving with a regular skirting board is impossible: it does not have a flat back surface that adjoins the wall. The back part of a coving consists of two straight edges perpendicular to each other. One presses against the wall, the other — against the floor or ceiling.
Coving for bath and sauna: special requirements
Baths and saunas impose requirements on wooden elements that no one thinks about in living rooms. Air temperature in the steam room reaches 90–120°C. Humidity during a steam bath — 80–100%. Temperature fluctuations when opening the door — 40–60°C in a few seconds. Under such conditions, most synthetic materials are simply unsuitable.
Wooden coving made of larch or linden — the optimal choice for a bath and sauna for three reasons:
-
Larch contains natural resins that, when heated, form a protective film preventing swelling and delamination
-
Linden has low thermal conductivity — it does not burn upon touch even at 100°C in the steam room, which is critically important for elements that are touched by hand
-
Both materials are absolutely safe in terms of chemical emissions: when heated, they do not release toxic substances unlike PVC, MDF, or synthetic varnishes
Installing coving in a bath differs from installation in a living room: here, water-based glue is not used (it degrades with sharp humidity fluctuations), metal fasteners without protective coating are not used (rust is inevitable), synthetic varnishes are not used (they peel and release fumes when heated). The only correct option is mechanical fastening with wooden dowels or finishing nails made of stainless steel followed by treatment with natural oils.
Coving in an apartment: application in living spaces
In a modern apartment, wooden coving solves several tasks simultaneously. First and foremost — it conceals expansion gaps and technical seams that inevitably arise when laying flooring and wall cladding. Secondly — it complements the system of wooden moldings and skirting boards, creating a unified finishing ensemble.
Wooden coving is especially appropriate in the following zones:
-
Bathroom with wooden elements — where natural wood meets tile, coving creates a soft transition
-
Wooden staircase — the internal angle between the tread and riser is traditionally covered with a quarter-round molding.
-
Children's room — rounded corners are safer for children than sharp edges.
-
Scandinavian-style bedroom — quarter-round moldings made of light ash or oak create a characteristic 'clean' look.
The size of the quarter-round molding is selected proportionally to the room height and baseboard width. If the floor baseboard has a height of 100 mm, the radius of the quarter-round should not be less than 20 mm — otherwise it will look like an incidental detail, unrelated to the main profile.
Wooden ceiling baseboard: how it differs from floor baseboard
Wooden ceiling baseboard: function and logic
Wooden ceiling baseboard— is a cornice that frames the transition between the wall and ceiling surface. Essentially, it is a mirror image of the floor baseboard, but with fundamentally different loads, proportions, and installation conditions.
While the floor baseboard bears mechanical loads (impacts, pressure from furniture, abrasion), the ceiling baseboard serves an exclusively aesthetic purpose. Therefore, there are no requirements for wood hardness: even softwoods like spruce or fir can be used here, which take paint well.
The key difference between a ceiling baseboard and a floor baseboard is the shape and installation angle. The floor baseboard is pressed against the floor and wall with two straight surfaces at a right angle. The ceiling profile is installed at a 45° angle to both surfaces, giving it the characteristic silhouette of an 'overhanging' cornice.
Types of wooden ceiling baseboards
The range of wooden ceiling baseboards in professional interiors includes several types:
Smooth cornice — a straight profile with minimal cross-section. Used in minimalist interiors where the 'thinness' of the line is important. Height — 40–80 mm.
Profiled cornice — one or several moldings on the front surface create a play of light and shadow. This is a traditional classic cornice, suitable for living rooms and studies.
Composite cornice — assembled from several elements: a straight shelf, a profiled body, and a lower molding. Such a cornice can have a height of 200–400 mm and creates a pronounced architectural effect. It is precisely this that is seen in interiors described as 'like in old houses'.
Cornice with lighting — the profile has a special cavity for an LED strip. In this case, the wood serves both as a decorative element and a functional housing for hidden lighting. It looks especially impressive in bedrooms and meeting rooms.
Comparison: floor and ceiling wooden baseboard
To avoid confusing these elements when ordering and installing, it is important to understand their key differences:
| Parameter | Floor baseboard | Ceiling baseboard |
|---|---|---|
| Installation location | Floor-to-wall transition | Wall-to-ceiling transition |
| Installation angle | 90° (to two surfaces) | 45° (to both surfaces) |
| Loads | Mechanical impacts | Only its own weight |
| Recommended wood species | Hardwoods (oak, ash) | Any, including softwoods |
| Profile height | 40–200 mm | 40–150 mm |
| Installation | Nails, dowels, glue | Glue + finishing nails |
| Processing | Oil, varnish, wax | Paint, varnish, gilding |
Ceiling and floor skirting boards from the same collection, made from the same wood species and finished with the same coating, create a unified finishing system that gives the room a sense of completeness. This is the 'frame' principle—the space is literally framed by wooden decor from below and above.
Wooden ceiling skirting board in combination with other elements
A wooden ceiling cornice doesn't work alone—it's always part of a system. In a classic interior, a rosette is placed above it, and a frieze or wall molding below it. In a modern interior, it can be the sole decorative element, in which case its silhouette must be perfectly proportioned.
If you're interested in how wooden profiles integrate into the overall staircase decor system—handrails, balusters, stringers—it's useful to study how wooden structural elements are used in spaces with different levels. Architectural wood in an interior is always a system, not a collection of separate parts.
Wide skirting board installation: miter box, glue, fasteners
Preparation for installation: what you need to know before starting work
Installing a wide wooden skirting board is a job that requires preparation. An experienced craftsman knows: half the success is achieved even before the saw blade is picked up.
The first step is material acclimatization. A wooden skirting board brought from the warehouse must spend at least 48 hours in the room before installation begins. During this time, the wood adapts to the room's humidity and temperature. Skipping this step will cause the skirting board to expand or shrink after installation, and the joints will open up.
The second step is checking wall geometry. In real apartments, there are almost no right angles. A 90° angle is an exception, not the rule: more often it's 89° or 91°. Before cutting the skirting board, each corner must be measured and the actual value recorded. For this, a sliding bevel or a special digital angle finder is used.
The third step is perimeter marking. A pencil line marking the top edge of the skirting board is drawn along the entire perimeter on the wall. This will allow controlling the horizontal alignment during installation and prevent the top edge from 'wandering'.
Miter box: the tool for precise cutting
For precise miter cuts on skirting boards, a miter box is used—a special device with slots to guide the saw blade. For wide wooden skirting boards with a height from 80 mm, a standard plastic miter box is unsuitable: it's too small and unstable. One of two options is needed here.
A compound miter saw—a professional tool that allows setting the cut angle with an accuracy of up to 0.5°. This is the optimal choice for wide skirting boards: the cut is perfectly smooth, without chips, with minimal gap at the joint.
A miter box with metal guides—a more affordable option. When using it, it's important that the skirting board is securely fixed in the miter box, and the saw blade has fine teeth (at least 18 teeth per inch).
Types of cuts encountered during installation:
-
Internal corner: both pieces are cut at 45° towards each other
-
External corner: also cut at 45°, but in the mirror direction
-
Butt joint: a straight cut at 90°—for joining two skirting board pieces lengthwise
A professional technique for internal corners is 'coping'. Instead of trying to achieve a perfect meeting of two ends cut at 45°, one skirting board is installed straight (at 90°), and the second is cut to the profile of the first. This gives a flawless joint even with uneven corners.
Glue: which one to choose for a wooden skirting board
Adhesive mounting is the primary method for wide wooden skirting boards. Additional nails or dowels are used only where the wall is uneven or the glue doesn't provide sufficient pressure during curing.
Acrylic-based mounting adhesive—a universal choice for living spaces. It remains flexible after drying, doesn't crack under vibration, and is easy to paint over. Full curing time is 24 hours. Applied in a zigzag pattern on the back surface of the skirting board.
Liquid nails (polyurethane)—provide higher adhesion than acrylic adhesive. Critically important: polyurethane adhesive is activated by moisture, so the back surface of the skirting board is slightly moistened before application. After application, the skirting board is pressed against the wall for 30–60 seconds, then removed, left to air for 5–7 minutes, and finally installed.
Silicone sealant—an acceptable but not optimal choice. Silicone doesn't provide rigid fixation, and a wide skirting board may 'pull away' over time. Using it as the primary adhesive is only permissible for lightweight profiles weighing up to 200 g per linear meter.
Prohibited to use:
-
Epoxy two-component adhesives — they do not allow subsequent disassembly without damaging the wall.
-
Solvent-based adhesives — they leave stains on wood and are incompatible with oil and wax finishes.
-
Wallpaper paste — it does not provide the required strength for profiles weighing more than 100 g/linear meter.
Fasteners: nails, dowels, hidden systems.
Where adhesive alone is insufficient — uneven walls, porous plaster, vibration-prone areas — mechanical fasteners are used.
Finish nails — thin nails with a diameter of 1.4–1.8 mm and a length of 40–50 mm. They are driven with a pneumatic nail gun or manually using a nail set. The head is countersunk below the surface, and the hole is filled with colored wood-tone putty.
Anchor nails — used for mounting on concrete and brick walls. A hole is drilled, a nylon anchor is installed, and a screw is driven in. The distance between fastening points is 400–600 mm.
Hidden fasteners — a system of metal clips mounted on the wall, onto which the baseboard snaps. Advantage: the baseboard can be removed and reinstalled without damage. Disadvantage: the system increases installation costs and only works with straight walls.
Final processing of joints
After installation, baseboard joints require finishing. This is the final step that determines the overall impression of the work.
Internal and external corners are treated with colored acrylic sealant. It is applied with a thin roller, and excess is removed with a wet finger or spatula. After drying (4–6 hours), the sealant fully matches the wood color if selected correctly.
End joints — where two baseboard pieces are joined lengthwise — are treated with PVA glue or wood glue during assembly. The joint is made at a 45° angle facing the direction of view (not 90°), making it visually inconspicuous.
Exposed nail heads are filled with wood paste or colored wax. Wax is applied with a heated spatula, and excess is removed after cooling with a fine-grit abrasive sponge.
Installation on uneven walls.
The most challenging case — walls with a plane deviation exceeding 5 mm per meter. Here, adhesive alone will not hold a wide baseboard: pressure on protrusions will be insufficient, and gaps will form over time.
Solution: combined installation. Along the entire length of the baseboard, holes for dowels are drilled 30–40 mm from the edges (spacing — 400 mm). Adhesive is applied between mechanical fastening points. Dowels secure the baseboard to the wall, while adhesive fills the space between them. After installation, screw heads are covered with decorative plugs made of the same wood species.
Prices for wide wooden baseboard: what affects the cost.
Pricing: breaking down the components.
The price of a wooden baseboard is always the sum of several factors. Understanding each of them allows you to avoid overpaying while ensuring quality material.
Wood species — the main pricing factor. Pine is the cheapest: the price per linear meter for a profile 100 mm high starts from 80–120 rubles. Oak of the same size costs 350–600 rubles per linear meter. Larch occupies an intermediate position: 200–350 rubles.
Profile size — the taller the baseboard, the greater the consumption of valuable wood. A 150 mm high oak profile at an average price of 500 rubles will result in costs of about 2000–2500 rubles for a standard 20 m² room.
Moisture content — green wood is significantly cheaper than kiln-dried wood. However, green baseboard behaves unpredictably: it continues to dry after installation, leading to cracks, warping, and gaps in joints. Kiln drying to 8–12% moisture content is a necessary condition for material stability.
Surface treatment — un-sanded baseboard in the 'paint-grade' category is cheaper. A profile factory-sanded to 180 Grit costs 20–30% more. A profile with factory-applied oil finish costs 40–60% more than the basic option.
Stock length — standard length for millwork is 2.4–3 m. Baseboard 4–6 m long costs 10–15% more but generates less waste during installation in large rooms.
Approximate budget calculation.
To calculate the budget for a wide wooden baseboard, use a simple formula:
-
Measure the room perimeter (sum of all wall lengths)
-
Subtract the total width of door openings from the perimeter
-
Multiply the result by 1.1 (10% waste allowance for cutting).
-
Multiply the result by the price per linear meter.
For an 18 m² room with a 17-meter perimeter and one 0.9 m door: (17 − 0.9) × 1.1 = 17.7 linear meters. At an oak baseboard price of 400 rub./linear meter, material cost will be about 7000–7500 rubles.
Installation cost
Installing wide wooden skirting boards is more labor-intensive work than installing standard plastic profiles. An experienced craftsman installs 20–25 linear meters of wide wooden skirting boards per day. The installation cost depends on the region, the complexity of the room's geometry, and the profile height:
-
Simple geometry (rectangular room without niches): 200–350 RUB/linear meter.
-
Complex geometry (bay windows, niches, beveled corners): 400–600 RUB/linear meter.
-
Composite cornice made of several elements: 600–900 RUB/linear meter.
Caring for wooden skirting boards: extending the product's lifespan
How to properly care for wood skirting boards
Wooden skirting board is a living material, and caring for it fundamentally differs from caring for plastic or MDF. With proper maintenance, an oak skirting board will look the same after 20 years as on the day of installation.
Daily care — a damp cloth or a soft vacuum cleaner attachment. Important: water should not stand on the surface of the skirting board. Quick wipe — and immediate drying. For skirting boards with an oil finish, adding a few drops of furniture oil to the water for wiping is allowed.
Annual coating renewal — once a year, the surface of the skirting board is treated with a thin layer of oil or wax. The surface is pre-wiped dry and degreased with a soft cloth. The oil is applied along the grain, and excess is removed after 15–20 minutes.
Scratch restoration — minor scratches are removed with a fine-grit sanding sponge (grit 220–320), after which the treated area is coated with oil. For deep scratches and chips, wood filler matching the tone is used, followed by sanding and oiling.
Skirting boards in high-humidity areas
If a wide wooden skirting board is installed in a bathroom or kitchen, the care regimen changes. Here, it is important to avoid prolonged contact with water: after wet cleaning, the skirting board must be wiped dry. Two to three times a year, the surface is renewed with a moisture-protective oil containing natural waxes, which creates a hydrophobic barrier.
If wooden covings are installed in a sauna or steam room, they are treated with special compounds for thermo-wood — they withstand temperatures up to 130°C without darkening or delamination.
FAQ: Answers to popular questions
Can wide wooden skirting boards be installed over underfloor heating?
Yes, but with a mandatory 5–8 mm gap between the skirting board and the floor surface for ventilation. Heat-resistant adhesive is chosen, and the wood should have a moisture content no higher than 8% to minimize deformation when heated.
Which wide skirting board is better: solid wood or glued laminated timber?
For floor skirting boards up to 120 mm in height, solid wood is preferable — it is denser and heavier, providing better fixation. For cornices 150 mm and higher, glued laminated timber is more stable: cross-glued layers compensate for the internal stresses of the wood and reduce the risk of cracking.
How long does a wooden baseboard last?
With proper installation and annual care, oak skirting boards last 30–50 years. Pine — 15–20 years. MDF under the same conditions — 7–12 years. Plastic — 5–8 years.
How to join wooden skirting boards in a long hallway?
The joint of two skirting boards on a straight section is made at a 45° angle (miter joint), not at a right angle. This makes the joint visually inconspicuous. The joint location is chosen not in the center of the wall, but closer to a corner or doorway.
Can wooden skirting boards be painted?
Yes. Before painting, the surface is sanded to a grit of 150–180 Grit, wood primer is applied, followed by acrylic enamel in 2 coats. For skirting boards already coated with oil, painting is only possible after completely removing the oil layer by sanding.
How do wooden covings differ from skirting boards?
A coving has a quarter-round cross-section and is mounted in the corner between two surfaces, covering the angle with a soft rounded line. A skirting board is a flat or profiled element that adjoins two surfaces with straight sides. Coving is used where a soft rounding of the corner is needed, not covering it with a straight profile.
How to calculate the amount of skirting board needed for a room?
Measure the room's perimeter, subtract the total width of all doorways, and multiply the result by 1.1 — this is a 10% waste allowance. The resulting number is the required number of linear meters with a small margin.
At what ceiling height is a 150 mm skirting board appropriate?
A wide 150 mm skirting board is appropriate for ceilings from 3 meters high. In a standard 'two-room apartment' with a 2.7 m ceiling, such a skirting board will look somewhat heavy. The optimal height for a 2.7 m ceiling is 80–100 mm.
About the company STAVROS
When it comes to quality wooden elements for interiors, the name STAVROS has long been synonymous with a professional approach. The company specializes in the production and supply of wooden millwork products: floor and ceiling skirting boards, covings, moldings, architraves, decorative trims, and architectural profiles made of solid wood.
The STAVROS range covers all key needs of modern interiors — from narrow classic skirting boards to wide architectural cornices 200 mm and higher in height. All material undergoes chamber drying to a moisture content of 8–12% and factory sanding, guaranteeing the stability of the products after installation.
STAVROS specialists are ready to help with profile selection, calculation of the required material quantity, and installation recommendations. Every order is accompanied by professional consultation, and the wide wooden skirting board from the company's catalog is a guarantee that the lower line of your interior will look exactly as you envisioned.