Article Contents:
- Neoclassicism: why wide skirting boards and wall plasterwork are the perfect pairing
- What neoclassicism means in the context of finishing
- Why plasterwork is necessary, not optional
- Three signs that proportions are chosen correctly
- Wide wooden skirting board – dimensions 80–120 mm, profiles, wood species
- Size range: which skirting board for which room
- Profile cross-section: the language of details
- Wood species: hardness, grain pattern, finishing possibilities
- Why kiln drying isn't a detail but a foundation
- Molded wall moldings and panels: how to divide walls into zones
- Three-zone scheme – the foundation of neoclassical walls
- Moldings as zone dividers
- Wall zoning: practical solutions for different spaces
- Polyurethane plasterwork vs wooden moldings – material compatibility
- Two systems, one result
- Why polyurethane moldings are the best choice for cornices
- Compatibility of wooden and polyurethane profiles: practical rules
- Wall polyurethane overlays: connection between skirting board and cornice
- Installation in correct sequence: plasterwork first then skirting board or vice versa
- Why sequence matters fundamentally
- Correct installation sequence
- Installing corner joints of skirting boards
- What to do if walls are uneven
- Painting and uniform color – how to achieve 'from one hand' result
- Main principle: one can of paint – for all decor
- Paint choice: matte, semi-matte or semi-gloss
- Priming: wooden skirting boards require special preparation
- Color solutions beyond white
- FAQ: Answers to Popular Questions
- About the Company STAVROS
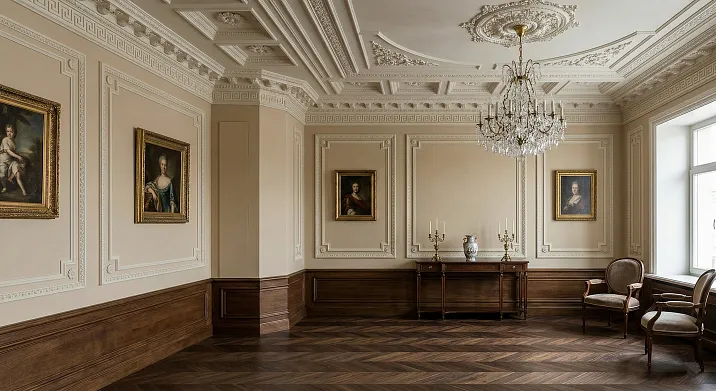
Neoclassicism is a style where nothing is accidental. Every line is deliberate. Every transition is justified. Every material is chosen not intuitively, but according to the principle of systemic belonging. This is why neoclassical interiors either turn out flawless – or don't work at all.
Two elements in this system occupy a special place:Wide Wooden Skirting Boardat the bottom andPolyurethane moldingsat the top. They exist on different levels of space, are made of different materials, carry different visual loads — and yet must speak the same language. This is not a task of 'finding something similar'. This is the architect's task: to create a unified vertical axis of decor, where the floor, walls, and ceiling form a cohesive statement.
This article provides a professional breakdown of how this system is built: what skirting board sizes work in neoclassicism, how to choose trimdecorative moldingfor a specific ceiling height, how to coordinate two materials — wood and polyurethane — in a unified finish, and in what sequence to install everything to achieve a flawless result.


Neoclassicism: Why a Wide Skirting Board and Wall Molding are the Right Pairing


What is Neoclassicism in the Context of Finishing
Neoclassicism is not just 'something with molding and cornices'. It is an architectural principle based on two ideas: the order system (floor — wall — ceiling as three zones with clear framing) and proportionality (each element corresponds to the scale of the space).
In practical terms, this means the following: a neoclassical interior requires horizontal dividers at all levels — at the bottom, middle, and top of the wall. The skirting board closes the lower transition. Wall moldings divide the body of the wall. The ceiling cornice completes the upper boundary. And this entire system only works when each of these elements proportionally corresponds to the others.
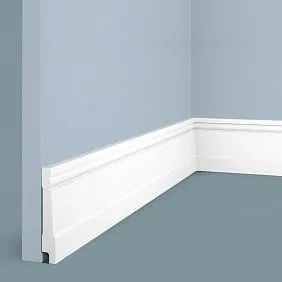
A wide skirting board is not a whim. It is a requirement of the space. With ceiling heights of 2.8 m and above, a thin 60 mm skirting board looks timid: it does not create a visual 'foundation' from which the wall begins.Wide wooden floor skirting boardwith a height of 80–120 mm — this is a 'plinth' that sets the scale for the entire vertical. It says: here begins the wall, and it is significant.
Our factory also produces:


Why Molding is Necessary, Not Optional
Can you create a neoclassical interior without molding? Technically — yes. Aesthetically — it would be neoclassicism without a 'top frame', a room that starts well and ends with nothing. It is precisely the molded trim — cornice, fillet, moldings — that creates what architects call 'closing the space'.
wall moldingin neoclassicism performs three functions simultaneously. The first is divisive: moldings divide the wall into functional zones, creating a hierarchy. The second is scaling: the cornice 'lowers' the ceiling to the desired visual level or, conversely, stretches it upward depending on the proportions. The third is decorative: the relief ornament creates chiaroscuro, which at any time of day makes the surface lively and voluminous.
And it is here that the correct pairing arises: the wide skirting board at the bottom sets the scale and 'weight' of the lower zone, the molding at the top responds to it in height and ornamental language. The room acquires a 'frame' — and within this frame, everything else falls into place.
Get Consultation
Three Signs That the Proportions Are Chosen Correctly
An experienced designer, when looking at a neoclassical interior, instantly reads three things:
First — the skirting board and cornice are approximately equal in height (or the cornice is slightly lighter). If the skirting board is 100 mm, the cornice is 90–110 mm. This is visual balance.
Second — the ornament of the skirting board and cornice belongs to the same 'vocabulary': both are floral, or both are geometric, or both are in the style of restrained classicism. Combining a floral skirting board with a geometric cornice is a stylistic conflict that cannot be hidden by any paint.
Third — the color of all decorative elements is unified. In classical neoclassicism — white. In modern neoclassicism — unified with the main tone of the wall or contrasting, but consistent: skirting board and cornice are the same color, the wall is another.
Wide Wooden Skirting Board — Sizes 80–120 mm, Profiles, Wood Species
Size Range: Which Skirting Board for Which Room
The question of the heightwide wooden baseboard— is not a question of 'how wide'. It is a question of proportion. An incorrectly chosen skirting board height visually destroys the space just as surely as an incorrectly chosen furniture scale.
80 mm skirting board — the lower boundary of the 'wide' format. Suitable for rooms with ceilings 2.7–2.9 m. This is a transitional size: it is no longer 'thin', but not yet 'monumental'. A good solution for apartments in modern buildings with improved layouts, where one wants classicism without heavy pathos.
100 mm skirting board — the universal standard of neoclassicism for ceilings 2.9–3.2 m. It is at this height that the skirting board looks 'correct' — significant enough to create a plinth zone, and delicate enough not to dominate the wall. Most country houses, apartments in new business-class buildings, renovated apartments in Stalin-era buildings — this size is precisely for them.
120 mm skirting board — a pronounced architectural character. Ceilings from 3.2 m. Such a skirting board creates a distinct plinth zone: the lower 12 cm of the wall are read as a separate 'layer', an architectural foundation. This is no longer just a skirting board, but the first tier of finishing.
140–180 mm skirting board — for mansions, villas, interiors with ceilings 3.5 m and above. This is a historically accurate reproduction of the estate scale of the 19th century. Rare in modern housing stock, but indispensable for restoration and projects with a pronounced classical character.
Profile Section: The Language of Details
A wooden skirting board is not just a 'strip at the floor'. Its profile is an architectural quote. Three main profiles for neoclassicism:
Ogee — a profile with a characteristic S-shaped curve in the upper part. This is a classical antique molding, used in column bases and cornices. In a skirting board, it creates a soft transition from the vertical wall to the horizontal floor. Suitable for neoclassicism of a moderate level — without excessive decorativeness.
Heel with a shelf — a horizontal 'shelf' at the top of the baseboard with a distinct straight projection. This is a more strict, geometrically defined profile. Works well with minimalist neoclassicism — where order without ornament is desired.
Multi-level profile — several steps: a straight shelf, a reverse curve, a straight part, a lower bevel. This is the most 'architectural' option, reproducing the proportions of an architectural base. Suitable for baseboard heights of 120 mm and above. Combined with a rich cornice, it creates a saturated, 'expensive' vertical.
Wood species: hardness, grain pattern, finishing possibilities
For baseboards in a neoclassical interior, the choice of wood species is directly related to the planned finish.
Oak — for transparent finishes (oil, varnish). A pronounced grain with characteristic rays gives a visually 'lively' surface. An oak baseboard matching an oak parquet floor is a case where details 'recognize' each other, and the room feels cohesive. The hardness of oak prevents dents from furniture and vacuum cleaner impacts.
Beech — for solid painting in white, gray, cashmere. The fine, uniform structure of beech provides a perfectly smooth surface for enamel. No 'show-through' of the grain pattern through white paint — only flawless smooth surface.
Larch — for rooms with high humidity: hallway, kitchen, country house. The resinousness of larch is natural protection against moisture. Comparable in hardness to beech. The texture is expressive, with clear rings — looks beautiful under tinting oil.
Pine — for budget projects under solid painting. A soft species, vulnerable to mechanical impacts, but with moderate load, it lasts long enough. The main thing: use a glued panel without knots, as in STAVROS production — it is significantly more stable than solid pine timber.
Why kiln drying is not a detail, but the foundation
A wooden baseboard made from insufficiently dried material will deform during installation or shortly after. The moisture content of wood in an untreated state is 20–30%. In a heated room, wood dries to 8–12% — and in doing so, shrinks, warps, cracks.
This is precisely why a wide wooden floor baseboard must be made from material with a moisture content of 8–10%, achieved under the controlled conditions of kiln drying. Only then does the product maintain its geometry after installation and not present 'surprises' after six months of use.
Molded moldings and wall panels: how to divide a wall into zones
Three-zone scheme — the foundation of a neoclassical wall
A neoclassical wall is not a homogeneous plane. It is a structure of three zones with clear horizontal dividers. This rule came from Greek and Roman architecture and, through the Renaissance, entered the European interior tradition, where it remains a standard to this day.
Lower zone ('plinth') — from the floor to the molding at a height of 85–100 cm. In this zone, the wall is 'heavy': wooden panels, a darker paint tone, wallpaper with a dense pattern are used here. A wide baseboard is the foundation of this zone.
Middle zone ('wall field') — from the lower molding to the upper one (at a height of 220–250 cm from the floor). This is the main wall space — light, neutral, with delicate decor or without it. Paintings, mirrors, wall decor are placed here.
Upper zone ('frieze') — from the upper molding to the ceiling cornice. Can be slightly darker or lighter relative to the middle field — to create a feeling of a 'frame' around the wall.
Moldings as Zone Dividers
Divider moldings on walls are horizontal profile strips that physically mark zone boundaries. In neoclassicism, they typically have a height of 30–60 mm with a moderate profile: a straight shelf with a small curved profile underneath.
To create frames within wall zones — rectangular 'panels' in the style of French boiserie — thinner moldings (20–30 mm) are used in combination with corner blocks. This creates a grid of frames on the wall, each framing a wall 'field'.
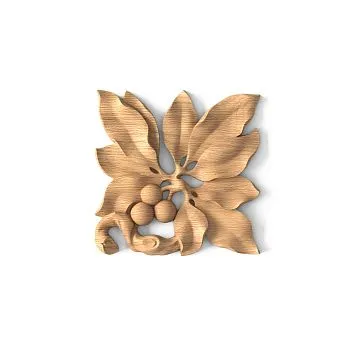
STAVROSmolding decorative elements— corner blocks MLD-1U, MLD-2U, MLD-3U and central overlays MLD-1-1, MLD-2-1, MLD-3-1 — were developed specifically for this task: they are installed at nodal points of the molding system and turn a set of strips into a complete ornamental program.
Wall zoning: practical solutions for different spaces
Living room with a 2.8 m ceiling: two levels of moldings — at 90 cm and at 245 cm. Between them — wallpaper with a delicate pattern or paint. In the lower zone — wooden panels or paint in a tone slightly darker than the middle zone. Corner blocks MLD-1U-1 — in every corner.
Bedroom with a 3.0 m ceiling: one level of molding at 100 cm — a horizontal line divides the wall into 'plinth' and 'field'. Below — wooden slats or paint. Above — wallpaper or solid-color paint. This technique works well in bedrooms: the plinth zone protects the lower part of the wall from accidental damage.
Study or library with a 3.2 m ceiling: full three-level scheme with wooden panels in the lower zone, molding frames in the middle zone, and a cornice with a fillet at the top. This is the most saturated solution — it requires more work volume but creates an interior of the highest class.
Polyurethane molding vs wooden millwork — material compatibility
Two systems, one result
At first glance, it seems that a wooden baseboard and a polyurethane cornice are two different worlds. Wood — warm, natural, with texture. Polyurethane — synthetic, uniform, smooth. How can they work together in one interior?
The answer lies in the principle of 'unified color'. When all decorative elements — baseboard, moldings, cornice, fillet, rosette — are painted the same white color, the difference in material visually disappears. The viewer sees relief, ornament, proportions — but does not see the 'seams' between materials. This is standard practice in neoclassical projects: wood where strength and tactile 'liveliness' are needed; polyurethane where lightness and precision of ornament are needed.
Floor baseboard — wood. It is in the zone of mechanical impacts: hits from furniture, vacuum cleaner, shoes. Polyurethane is vulnerable in this zone. Wood withstands.
Ceiling cornice — polyurethane. It is located high up, there are no mechanical impacts. But lightness (adhesive mounting without heavy dowels) and precision of ornament are important. Polyurethane provides both.
Wall moldings — both options are possible. Wood — for frames in the lower baseboard zone, where accidental contact with the surface is possible. Polyurethane — for moldings in the middle and upper zones, where profile accuracy and ease of installation are important.
Why polyurethane trim is the best choice for cornices
STAVROSDecorative polyurethane moldingThe KPU series is available in more than 30 models with varying levels of ornamental richness and profile height.
KPU-125 and KPU-105 — from 840 and 860 rubles per linear meter. Minimalist cornices with minimal ornamentation: straight shelves, a small curved profile. These are basic models for moderate-level neoclassicism — clean, without 'heaviness,' work well with ceilings 2.7–2.9 m.
KPU-034 and KPU-020 — from 2,040 and 2,730 rubles. Cornices with pronounced ornamentation: floral motifs, pearls, characteristic neoclassical relief. For ceilings 2.9–3.2 m — this is a 'medium' level of richness, not overwhelming but clearly readable.
KPU-006, KPU-003, KPU-004 — from 3,060 rubles. Cornices with a rich profile, multi-level cross-section with several ornamental zones. For projects with ceilings 3.0–3.5 m, where a pronounced architectural 'crown' is needed.
KPU-077, KPU-001, KPU-080 — from 6,190 to 7,380 rubles. Tall, rich cornices with deep relief. 'Prestige' level — for formal living rooms, halls, studies with ceilings 3.5 m and above.
KPU-012, KPU-074, KPU-081 — from 13,500 to 20,590 rubles. Monumental cornices with multi-level ornamentation. This is top-tier architectural decor — for mansions, restoration of historical interiors, representative spaces.
Compatibility of wood and polyurethane profiles: practical rules
Rule one: when painted white, both materials under matte acrylic enamel are indistinguishable from a distance of one meter or more. The difference is only felt upon tactile contact.
Rule two: the profile height of the wooden baseboard and polyurethane cornice must be coordinated according to the proportion described in the previous section. This is more important than material coordination.
Rule three: the ornamental language must be common. Wood with a classic 'cavetto + fillet' profile + polyurethane cornice KPU-020 with floral ornamentation — this is dissonance. Wooden baseboard with ogee + KPU-034 with moderate floral ornamentation — this is harmony.
Wall polyurethane overlays: the connection between baseboard and cornice
Relief DecorationThe STAVROS NPU series — these are wall overlays that fill the wall space between the baseboard and cornice. Models NPU.VRS-002-3, NPU.VRS-005, NPU.VRS-012 — these are decorative elements for the middle zone: they create ornamental accents on the wall plane without overloading it.
NPU.VRS-006 — large wall relief decor (29,320 rubles) — this is the level of formal decoration: it occupies a significant portion of the wall plane and creates a full ornamental program without additional moldings.
NPU.VRS-013 and NPU.VRS-014L/14R (from 6,810 rubles) — directional side elements for symmetrical framing of doorways and niches. Combined with baseboard and cornice, they create an 'architectural portal' — a complete framing that turns an ordinary doorway into a decorative event.
Installation in the correct sequence: first the molding, then the baseboard or vice versa
Why sequence is fundamental
An error in the installation sequence of decor is one of the most common in renovation. Its consequences: difficulty in painting, inability to hide joints, damage to already installed elements. The correct sequence solves all of this in advance.
Correct installation sequence
Step 1: Ceiling cornice.
The cornice is installed first — before the final painting of walls and ceiling. Reason: installing the cornice creates surface contamination (adhesive, joint filler). It's easier to eliminate these before painting than after.
Technique: priming the adjoining surface → applying adhesive (acrylic mounting adhesive for polyurethane) → pressing the cornice → securing with painter's tape until set → sealing joints with acrylic sealant.
Step 2: Wall moldings and decor.
After installing the cornice — wall moldings, corner blocks, decorative overlays. They are installed using the same logic: adhesive + temporary fixation with tape + sealing joints with sealant.
Step 3: Final painting.
After installing all upper and wall decor — painting the ceiling, walls, all decorative elements. Painting is done in a single color for all decor. Recommended: two coats of matte acrylic enamel, with light sanding with a 320-grit sponge between coats.
Step 4: Laying the final floor covering.
Parquet, laminate, tile are laid after painting the walls and ceiling. The covering is laid with an 8–12 mm expansion gap around the perimeter — this is necessary to compensate for thermal expansion.
Step 5: Floor baseboard.
The wide wooden baseboard is installed last. It covers the expansion gap between the floor covering and the wall. This is precisely why it is installed after laying the final floor covering: if the baseboard is installed earlier, the gap for the floor covering would have to be measured from it—this is more difficult and less accurate.
Baseboard installation technique: finishing nails 40–50 mm long every 40–50 cm into the lower third of the baseboard (to prevent wood from cracking); sink nails with a nail set; fill holes with wood filler; final painting to match the tone—1–2 coats.
Installation of baseboard corner joints
Inside corners: 45° miter cut on a miter saw. The second option is a 'butt joint': one baseboard enters the corner with its end, the second meets it face-on with a trimmed profile end. For a wide baseboard with a complex profile, the second option is significantly easier to execute and yields a cleaner result.
Outside corners: 45° miter cut on both baseboards from both sides of the corner. Cutting accuracy is critical: a 1° deviation results in a visible gap. A miter saw with a 45° stop and a thin saw blade is recommended.
What to do if the walls are 'wavy'
Real walls are not perfectly straight. Especially in older buildings. A wide baseboard, when pressed against a 'wavy' wall, will pull away at some points.
Solution: apply water-based liquid nails not in a continuous strip, but in a zigzag pattern—this allows for compensation of minor irregularities due to the adhesive's elasticity. Finishing nails provide additional fixation. Any remaining gaps between the baseboard and the wall are filled with acrylic sealant and painted.
Painting and a unified color—how to achieve a 'from one hand' result
The main principle: one can of paint—for all the trim
A professional result in a neoclassical interior with white trim is achieved in one way: all decorative elements—baseboard, moldings, cornice, rosette—are coated with the same paint, from the same batch, at the same time. Then the shade, sheen, and surface texture are identical on all elements.
If you buy paint from different stores or at different times—the shades may vary slightly. On white, this is visible, especially with side lighting. This is precisely why professionals mix paint in one bucket and do not paint each element from different cans.
Paint choice: matte, semi-matte, or semi-gloss
Matte acrylic enamel is the best choice for ceiling cornices, moldings, and rosettes. A matte surface does not reflect light sources and does not 'reveal' minor imperfections. Relief ornamentation looks soft and tactful.
Semi-matte or satin is optimal for floor baseboards. A slight sheen makes cleaning easier (can be wiped with a damp cloth) and makes the lower zone slightly more expressive compared to matte walls.
Semi-gloss is for baseboards in high-humidity areas (kitchen, hallway). Sheen equals moisture resistance: a glossy surface is less hygroscopic than a matte one.
Priming: wooden baseboard requires special preparation
Wooden products require priming before painting with white enamel—this is fundamental. Wood is porous: without primer, paint absorbs unevenly, wood fibers raise, and the surface becomes rough even after several coats.
Correct technique:
-
Apply acrylic primer for wood—1 coat
-
Let dry for 2–4 hours
-
Sand the surface with a 240–320 grit sponge (light motion, no pressure)
-
Apply the first coat of enamel
-
After drying (6–8 hours)—light sanding with a 320 grit sponge
-
Apply the final coat of enamel
Polyurethane products—no primer required. Apply 2 coats of enamel with light intermediate sanding between them.
Color solutions beyond white
Neoclassicism does not have to be white. Modern interpretation opens up rich possibilities:
Dark green (British Racing Green)—walls in a rich green tone, white trim (baseboard, cornice, moldings). This is the 'English library'—enclosed, rich, confident.
Gray-beige 'grisaille'—walls in a warm light gray, trim in a slightly darker tone from the same family. A soft, delicate result without contrasts.
Blue with gold — dark blue walls, white decor with gold detailing of cornice and rosette ornamentation. This already has 'character' — closer to Art Deco, but in classical forms.
'Scandinavian classic' — white walls, dark wooden baseboard (oil-finished 'dark oak' without painting), white cornice. The contrast between the lower dark strip of the baseboard and the light wall space — concise and expressive.
FAQ: Answers to popular questions
Is it necessary to use a polyurethane cornice with a wooden baseboard?
No, it's not necessary. The ceiling cornice can also be wooden — if it's made from the same material and finished with the same coating. Polyurethane is preferable due to its lightness, precision of ornamentation, and ease of installation at high positions.
Can KPU polyurethane cornice be used in an unheated room?
Polyurethane is resistant to moderate temperature fluctuations. For seasonally used spaces (cottage, summer veranda) without extreme frosts — possible. With constant frosts below -25°C and thawing — not recommended without additional protection.
What adhesive should be used for KPU series polyurethane cornices?
Specialized acrylic mounting adhesive for polyurethane without solvents. Solvent-based adhesives and cement compositions are prohibited: they destroy the polyurethane structure.
How many linear meters of cornice are needed for a room?
Room perimeter minus the total width of door openings + 10% for reserve (joints and cutting). For a 4×5 m room: perimeter = 18 lm minus 0.9 m door = 17.1 lm × 1.1 = ~19 lm.
Can KPU cornice be painted a dark color?
Yes. Polyurethane accepts any acrylic paints well. Dark tones — with mandatory final primer for dark paint (white primer neutralizes 'show-through' under dark layers). 2–3 coats of dark enamel are recommended for even coverage.
How to calculate molding height for dividing a wall into zones?
Base line (lower molding): 0.85–1.00 m from the finished floor level — this is the 'visual hand line' and a historically justified standard. Frieze line (upper molding): ceiling height minus 40–50 cm. Both moldings form the wall 'frame'.
What to do if KPU cornice doesn't fit tightly to the ceiling due to its unevenness?
Apply acrylic sealant into the joint between the cornice and ceiling. Smooth with a wet finger or jointing spatula. After drying — light sanding, painting. Gaps up to 3–4 mm are concealed with sealant unnoticeably.
About the company STAVROS
Neoclassical interior is not a style that 'just happens'. It's the result of systematic work with details: correct baseboard size, correct cornice level, correct ornaments in correct proportions. That's precisely why it's important where these details come from.
STAVROS producespolyurethane decorative moldingKPU series — over 30 models of cornices and trim products from 840 to 20,590 rubles per linear meter — andSolid wood productsfor floor and wall applications, including trim products, baseboards, moldings andDecor for MoldingMLD series.
Both directions — polyurethane decor and wooden trim — are developed as a unified system with coordinated profiles and ornaments. This allows selecting baseboard and cornice from one catalog with guaranteed stylistic compatibility.
Stock program — shipping from 1 piece on the order day. Delivery across Russia and CIS countries.
STAVROS is a manufacturer that understands: neoclassicism begins with details. And ends with them too.