Article Contents:
- Why a rosette is needed: functionality and aesthetics
- Masking Technical Elements
- Visual Enlargement of the Chandelier
- Architectural accentuation
- Stylistic Identification
- Rosette shapes: geometry of the center
- Round Rosettes: Classic Versatility
- Oval rosettes: elegance of elongation
- Square and polygonal: geometric rigor
- Rosette sizes: proportions matter
- Calculation for a specific chandelier
- Calculation based on room area
- Exceptions to the rules
- Ornament styles: from classic to modern
- Classicism: strictness and symmetry
- Baroque: boundless opulence
- Art Nouveau: plant-like curvature
- Minimalism: geometry and emptiness
- Installation on a regular ceiling: step-by-step instructions
- Surface Preparation
- Center Marking
- Applying adhesive
- Gluing and fixing
- Sealing the joint
- Installation on a stretch ceiling: special technology
- Installing a mounting block before stretch ceiling installation
- Alternative method: overlay rosette
- Painting rosettes: decorating techniques
- Monochrome painting: simplicity and elegance
- Two-tone painting: highlighting the relief
- Gilding: Palace Luxury
- Patina: effect of antiquity
- Rosettes with lighting: light from the center
- Construction of a rosette with lighting
- Effect
- Cost
- Questions and answers about polyurethane rosettes
- Is a rosette mandatory or can it be omitted?
- Can a rosette be installed after mounting the chandelier?
- What is the best glue for rosettes?
- Does a ceiling medallion hold on a stretch ceiling?
- Can you paint a ceiling medallion before installation?
- How to Care for a Rosette?
- Conclusion: the center deserves framing

A ceiling without decoration is an unfinished sentence. A chandelier hanging against a bare white background loses half its expressiveness, seems suspended in a void, devoid of architectural context.Polyurethane ceiling medalliontransforms the technical mounting point of a light fixture into the compositional center of the ceiling — an ornamental circle framing the chandelier, creating a visual focus that draws the eye and completes the room's architecture. It is not just decoration, but the logical completion of an interior composition, an element that has existed in European interiors since the 17th century and remains relevant in 2026.
Why has polyurethane displaced traditional plaster in medallion production? Because a plaster medallion with an 800 mm diameter weighs 15-25 kg — installation requires ceiling reinforcement, special fasteners, and professional installers. A polyurethane one of similar size weighs 2-4 kg — it is glued with standard construction adhesive in 20 minutes and holds for decades without risk of collapse. Plaster is fragile (cracks during transport, cracks during installation), polyurethane is impact-resistant (withstands a 2-meter drop without damage). Plaster fears moisture (gets soggy, loses shape), polyurethane is moisture-resistant (suitable for rooms with any humidity level). And with all this, modern polyurethane medallions are visually indistinguishable from plaster ones — the same sharpness of relief, the same depth of ornament, the same snow-white surface.
This article is a complete guide to the world of polyurethane ceiling medallions. We will break down the classification (shapes, sizes, styles), selection criteria (how to choose a medallion for a chandelier, for ceiling height, for interior style), installation technology (on a regular ceiling, on a stretch ceiling, on a suspended drywall ceiling), decoration techniques (painting, gilding, patination, hand-painting), special solutions (medallions with lighting, composite large-format ones, oval ones for asymmetrical chandeliers). The goal is to provide a tool for informed choice and competent application of medallions in interiors.


Why a medallion is needed: functionality and aesthetics


Camouflaging technical elements
A chandelier is attached to the ceiling via a hook, mounting plate, or crossbar. The mounting point often looks untidy: wires protrude, the junction box is visible, the edges of the hole in the ceiling are uneven (especially if the chandelier was replaced, and the new mount doesn't align with the old one — traces remain). A medallion with a diameter 100-200 mm larger than the chandelier's canopy completely conceals all technical details. The result is visual cleanliness and a professionally finished installation.
Our factory also produces:


Visually enlarging the chandelier
A chandelier with a 600 mm diameter on a ceiling area of 25-30 m² (a 5×6 meter room) looks small, gets lost in the space. The same chandelier with a 900 mm diameter medallion is perceived as a more substantial composition — the visual diameter increases by 1.5 times. The medallion works as an optical frame, expanding the boundaries of the central element.
Get Consultation
Architectural accentuation
A medallion creates a compositional center for the ceiling. In classical interiors, the center of the ceiling is a traditionally accentuated zone (historically, paintings, coffers, complex stucco compositions were placed there). Modern smooth ceilings lack a center — a medallion restores this tradition, creates a focal point, organizes the space around itself.
Stylistic Identification
The form and ornament of a medallion define the interior style. A medallion with acanthus leaves — classicism. With scrolls and shells — baroque. With geometric rays — art deco. Smooth with rings — minimalism. By choosing a medallion, you declare the stylistic affiliation of the interior, even if the rest of the finish is neutral.
Medallion shapes: the geometry of the center
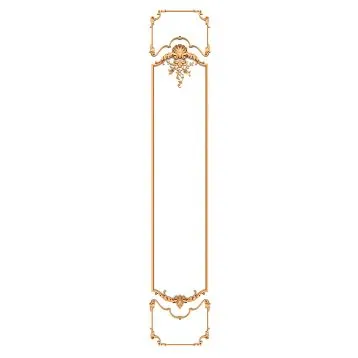
Round sockets: classic versatility
Circle — the most common shape for a ceiling medallion (90% of the market). Central symmetry perfectly complements most chandeliers (which are also symmetrical relative to the vertical axis). A round medallion works in any style — from strict classicism to contemporary.
Composition of round medallions:
Concentric circles (central medallion + 2-3 rings of different diameters, radiating from the center) — a universal structure suitable for any ornaments.
Radial symmetry (ornament radiates from the center in rays, 4, 8, 12, or 16 rays) — dynamism, movement from center to periphery.
Sectoral (circle divided into sectors, with a repeating ornament in each sector) — rhythm, decorative density.
Diameters:
Compact (200-350 mm) — for small rooms 10-15 m², small chandeliers 300-500 mm in diameter, recessed ceiling lights. Weight 400-900 grams, price 600-2500 rubles.
Standard (400-600 mm) — for typical rooms 15-30 m², chandeliers 500-800 mm. Weight 1-2.5 kg, price 1800-6000 rubles.
Large (650-900 mm) — for spacious rooms 35-60 m², chandeliers 900-1300 mm. Weight 3-5 kg, price 5000-15000 rubles.
Giant (1000-1500 mm) — for formal halls 70-150 m², chandeliers 1500-2500 mm. Weight 6-12 kg, price 12000-50000 rubles.
Oval medallions: the elegance of elongation
Oval (ellipse) — an elongated shape, stretched along one axis. Used less frequently than circles (5% of the market), but indispensable in certain situations.
When an oval medallion is needed:
For oblong chandeliers (linear pendants with several shades in a row, length 800-1500 mm, width 300-500 mm) — an oval medallion repeats the shape of the light fixture, creating harmonious framing.
On rectangular ceilings (room 3×6 meters — narrow and long) — an oval medallion, oriented along the long axis, visually corrects proportions, compensates for elongation.
In corridors (long narrow spaces with central lighting) — an oval rosette emphasizes the geometry of the room.
Oval sizes:
Small (400×250 mm to 600×400 mm) — for compact fixtures, small corridors. Price 2000-5000 RUB.
Medium (700×450 mm to 900×600 mm) — standard, for rectangular rooms 20-40 m². Price 4500-12000 RUB.
Large (1000×650 mm and above) — for large halls, massive linear chandeliers. Price 10000-30000 RUB.
Square and polygonal: geometric rigor
Square, rectangular, hexagonal, octagonal rosettes — rare (3% of the market), but a powerful design tool in certain styles.
Styles where appropriate:
Art Deco (geometric forms are the essence of the style, a square or octagonal rosette with rays, zigzags, steps emphasizes geometricism).
Art Nouveau (hexagons, asymmetrical polygons with plant ornamentation inside).
Modern architectural style (square rosette with minimalist relief for a square fixture — rare, but effective).
Application:
Rooms with pronounced geometry (a square study 4×4 meters — a square rosette enhances the geometric concept).
Designer fixtures of non-standard shapes (cube chandelier, polyhedron — a polygonal rosette creates consistency).
Rosette sizes: proportions matter
How to choose the rosette diameter? There is a golden ratio rule adapted for interiors: the rosette diameter should be 1.3-1.8 times larger than the chandelier diameter (or wider than the part of the chandelier visible from below).
Calculation for a specific chandelier
Chandelier diameter 500 mm → rosette diameter 500×1.5 = 750 mm (choose 700-800 mm).
Chandelier diameter 800 mm → rosette 800×1.5 = 1200 mm (choose 1100-1200 mm).
Chandelier diameter 400 mm (compact) → rosette 400×1.5 = 600 mm (choose 550-650 mm).
If the rosette is smaller than the coefficient 1.3 — it gets lost, fails to perform its framing function, looks stunted. If larger than 1.8 — it overwhelms the chandelier, draws attention to itself, creates visual imbalance.
Calculation based on room area
Alternative method (if the chandelier hasn't been purchased yet, choose the rosette first): rosette diameter = √(room area in m²) × 100 mm.
Room 20 m² → √20 × 100 = 4.47 × 100 = 447 mm (choose a rosette 450-500 mm).
Room 40 m² → √40 × 100 = 6.32 × 100 = 632 mm (choose 600-700 mm).
Room 80 m² → √80 × 100 = 8.94 × 100 = 894 mm (choose 850-900 mm).
Exceptions to the rules
Minimalist interiors — rosette 20-30% smaller than calculated (restraint, lack of decorativeness).
Palace styles (Baroque, Empire) — rosette 20-40% larger than calculated (opulence, dominance of decor).
Low ceilings (2.5-2.7 meters) — rosette 10-20% smaller than calculated (a large rosette on a low ceiling visually feels oppressive).
High ceilings (3.5+ meters) — rosette 30-50% larger than calculated (compensation for scale, the rosette is visible from afar).
Ornament Styles: From Classic to Modern
Classicism: strictness and symmetry
Classicism ornaments are borrowed from ancient architecture: acanthus leaves, palmettes, meander (Greek key), laurel wreaths, rosettes (stylized roses), egg-and-dart (egg-shaped elements alternating with arrows).
Composition:
Central rosette (a circle 80-150 mm in diameter in the center of the rosette, smooth or with a fine ornament).
Middle ring (width 50-100 mm, where the main ornament is placed — acanthus leaves radiating from the center, forming 8-12 lobes).
Outer ring (width 30-60 mm, framing ornament — beads, meander, egg-and-dart).
Proportions:
Relief depth of 8-15 mm — restrained volume, not aggressive.
Clear edges, sharp transitions between planes — architectural rigor.
Color traditionally white or ivory (light gilding on protruding elements is allowed — 10-20% of the ornament area).
Application:
Interiors in Classicism, Neoclassicism, American Classic, Classical Modern (early 20th century).
Spaces with high ceilings 3+ meters, large areas 30+ m².
Pairs with classical cornices (dentils, egg-and-dart, acanthus), moldings, pilasters.
Baroque: Opulence Without Bounds
Baroque rosette — a symphony of scrolls, volutes, shells, putti (baby angels), floral garlands, fruits. Ornament density is maximum — almost no free space, the entire surface is filled with decor.
Elements:
Central composition (a group of angels holding a garland, or a large shell, or a cartouche with a coat of arms) — a dramatic focal point.
Volutes (S-shaped scrolls radiating from the center in spirals) — dynamism, movement.
Floral garlands (grapevines, roses, leaves, intertwined, hanging) — natural opulence.
Shells, pearls, intertwined ribbons — marine symbolism (Baroque loves marine motifs).
Relief:
Depth 20-40 mm — dramatic shadows, play of light.
Multi-level — elements are arranged in several planes, creating volume.
Asymmetry of details (with overall radial symmetry) — liveliness, avoiding mechanical regularity.
Color solution:
White + abundant gilding (50-70% of the ornament is gold) — palatial luxury.
Colored background (rosette on a colored ceiling — blue, green, ochre) + white ornament — historically authentic.
Patina (artificial aging of gold with a greenish or brownish coating) — antique effect.
Application:
Baroque, Neo-Baroque interiors, glamorous styles.
Formal spaces — living rooms, dining rooms, halls, ballrooms.
Requires appropriate context — a Baroque rosette in a minimalist interior looks out of place.
Modern: Plant-Based Curvature
Modern (Art Nouveau, Jugendstil) — a style of the early 20th century, characterized by curved, flowing lines, plant motifs (irises, lilies, seaweed), asymmetry, and the rejection of right angles.
Art Nouveau rosette ornaments:
Curved plant stems (irises with long leaves, lilies, bindweed) entwining the central part of the rosette.
Female faces or figures (profiles framed by wavy hair) — Art Nouveau loves depictions of women.
Wavy lines that do not form a symmetrical pattern — free composition.
Dragonflies, butterflies, peacock feathers — natural motifs.
Features:
Asymmetry (the left and right halves of the rosette may differ) — a departure from classical central symmetry.
Smoothness of lines (no sharp angles, straight lines) — everything is curved, flowing.
Medium-depth relief (12-20 mm) — there is volume, but not Baroque drama.
Colors:
Pastel (pale green, lavender, peach) — softness, naturalness.
Matte gilding or silvering (not shiny, but muted) — elegance without vulgarity.
Application:
Interiors in Art Nouveau, Art Nouveau, romantic styles.
Bedrooms, boudoirs, studies — rooms where atmosphere is important, not formality.
Minimalism: geometry and emptiness
Minimalist rosette — the opposite of Baroque. Minimal ornament, maximum smooth surface, geometric rigor.
Types:
Concentric rings (2-4 circles of different diameters, smooth, separated by grooves 5-10 mm wide) — rhythm without ornament.
Radiant rosette (8-16 thin straight rays radiating from the center, relief depth 3-5 mm) — restrained graphics.
Smooth disc with a small central recess (diameter 300-600 mm, almost flat, recess in the center 20-30 mm for chandelier mounting) — an almost invisible rosette.
Dimensions:
Usually smaller than classical ones — diameter 300-500 mm even for large chandeliers. The goal is not accentuation, but delicate framing.
Colors:
Matte white (no shine) — purity, light.
Ceiling color (the rosette is painted the color of the ceiling, becoming almost invisible, only the relief is visible) — maximum restraint.
Dark (black, dark gray) on a white ceiling or white on a dark one — contrasting graphics (rare, but effective in modern interiors).
Application:
Modern interiors, Scandinavian style, Japanese minimalism, loft (where classical stucco is inappropriate, but chandelier framing is needed).
Rooms with low ceilings, small areas — where a large decorative rosette would overload the space.
Installation on a regular ceiling: step-by-step instructions
Surface preparation
The ceiling must be level (deviations no more than 2-3 mm over the rosette diameter), clean (no dust, grease, peeling paint), dry, primed. If the ceiling is painted with oil paint (glossy film), lightly sand with P120-180 to improve adhesive adhesion.
Center marking
The center of the rosette must coincide with the chandelier mounting point. Find this point (where the hook or mounting bracket comes out), mark it with a pencil. If installing the rosette before the chandelier, find the center of the ceiling (measure the length and width of the room, divide in half, the intersection is the center).
On the back of the rosette (the flat part that glues to the ceiling) find the central hole (diameter usually 40-80 mm for passing wires and chandelier mounting). Align this hole with the center mark on the ceiling.
Applying adhesive
Use polyurethane adhesive (Cosmofen, Moment Crystal) or acrylic mounting adhesive (Moment Mount, Tytan). Polyurethane sets faster (5-15 minutes), holds stronger, but is more expensive (500-800 rubles per 310 ml tube). Acrylic is cheaper (200-400 rubles per 400 ml tube), sets slower (30-60 minutes), requires fixation during drying.
Apply adhesive to the back of the rosette: a continuous line around the perimeter (stepping back 20-30 mm from the edge) + several lines across the center (crosswise or spiral). Adhesive consumption: for a rosette with a diameter of 600 mm — 50-80 grams of adhesive (1/4 tube).
Gluing and fixation
Raise the rosette to the ceiling, align the central hole with the chandelier mounting point (thread the wires through the hole), press the rosette against the ceiling with even pressure across the entire surface. Hold it pressed for 3-5 minutes (for polyurethane adhesive) or 10-15 minutes (for acrylic).
If the rosette is large (diameter 800+ mm, weight 4+ kg), secure it additionally: screw in 3-4 self-tapping screws 50-60 mm long through the rosette into the ceiling (in areas where the relief is deep — the screw heads will sink into the relief and not be visible). After the adhesive has completely dried (24 hours), the screws can be removed and the holes filled with putty.
Sealing the joint
A small gap (1-2 mm) may form between the edge of the rosette and the ceiling due to the ceiling's imperfect flatness. Fill it with white acrylic sealant, smooth it with a wet finger or a rubber spatula. After drying, the sealant will form an elastic seam that compensates for possible movement.
Installation on a stretch ceiling: special technology
A stretch ceiling is a vinyl or fabric film stretched onto profiles around the room's perimeter. It is impossible to glue the rosette directly to the film (the film won't hold, it will sag under the rosette's weight). A mounting platform (a platform glued to the base ceiling before installing the stretch ceiling, to which the rosette is glued through a slit in the film) is required.
Installing the mounting platform before stretch ceiling installation
The mounting platform is a plywood or plastic ring with a diameter 50-100 mm smaller than the rosette's diameter, 10-15 mm thick. It is glued to the base concrete ceiling at the future rosette location. After the film is stretched, a protective ring is glued onto the mounting platform (protects the film from cutting), the film inside the ring is cut out, wires are fed through the slit, and the rosette is glued to the mounting platform through the slit.
Sequence:
Before stretch ceiling installation: mark the chandelier's center on the base ceiling, glue the mounting platform with adhesive or secure with dowels, check the height (the lower plane of the mounting platform should be level with the future stretch ceiling).
Stretch ceiling installation: the film is stretched, forming a bulge at the mounting platform location (the film is stretched over the mounting platform).
Gluing the protective ring: a plastic ring with a diameter matching the inner diameter of the mounting platform is glued onto the film at the mounting platform location.
Cutting the film: the film inside the protective ring is cut out, exposing the mounting platform.
Rosette installation: the rosette is glued to the mounting platform (adhesive is applied to the back of the rosette, the rosette is pressed against the mounting platform through the slit in the film). The edge of the rosette presses the film, concealing the slit.
Alternative method: surface-mounted rosette
If the stretch ceiling is already installed and no mounting platform was provided, a surface-mounted rosette is used (glued onto the stretch ceiling film with a special adhesive safe for vinyl). It adheres to the film, does not require a mounting platform, but only supports its own weight (no more than 2 kg). Suitable for compact rosettes up to 500 mm in diameter.
Painting rosettes: decorating techniques
Rosettes are supplied white and primed — ready for painting. Leaving them white or painting them depends on the design concept.
Monochrome painting: simplicity and elegance
The rosette is painted in one color with acrylic paint. Ceiling color (if the ceiling is colored) — the rosette blends with the ceiling, only the relief stands out. Contrasting color (white rosette on a dark ceiling or vice versa) — graphic quality, accentuation. Pastel (rosette painted in pale blue, peach, lavender) — romanticism, softness.
Technology:
Apply two thin coats of paint with a short-nap roller (nap 5-7 mm) or a spray gun. The first coat is the base, covering the primer. The second is the finish, evening out the color. Drying time between coats is 2-4 hours. Paint deep recesses of the relief with a brush (the roller can't reach).
Two-tone painting: emphasizing the relief
Base color + accent color on protruding parts. Creates volume, emphasizes the detailing of the ornament.
Technology:
Paint the entire rosette with the base color (e.g., ivory). Let it dry.
Take a flat brush 10-20 mm wide, pick up the accent color paint (e.g., gold or a white lighter than the base), remove excess on the edge of the can (the brush should be almost dry).
With light strokes, run the brush over the protruding parts of the relief (leaves, volutes, beads) — the paint will only settle on the upper planes, the recesses will remain the base color. This technique is called dry brushing.
Result: enhanced volume, clearer relief definition, the rosette looks more expensive.
Gilding: palace luxury
Gilding — applying gold paint or imitation gold leaf (imitation of gold leaf) to the rosette's ornament.
With paint:
Use acrylic paint with metallic pigment (gold, copper, bronze). Apply with a brush to the protruding elements (dry brush technique) or paint the entire rosette (if full gilding is desired).
Finish: matte varnish (reduces shine, gives the gold a noble, antique look) or glossy (enhances shine, modern luxury).
Potali:
Potali are thin sheets of metallized foil that imitate gold leaf (real gold leaf costs 5000-15000 rubles for 10 sheets, potali costs 500-1500 rubles).
Apply potali glue (mixtion) to the areas of the rosette that need to be gilded. Let it sit for 15-30 minutes (the glue should become tacky, but not wet).
Place a sheet of potali, press it with a soft brush, the sheet will adhere to the glue. Remove the excess with a brush (it will fall off and can be collected and used on other areas).
Coat with a protective shellac varnish (potali without varnish oxidizes and darkens).
Result: the effect of real gold, luxury, suitable for Baroque and Empire interiors.
Patina: effect of aging
Patina — artificial aging, creating a coating in the recesses of the relief, imitating centuries-old dust, oxidation.
Technology:
Paint the rosette with a base color (white, ivory, gold). Let it dry.
Dilute dark paint (burnt umber, sienna, black) with water to a milk-like consistency.
Apply with a brush over the entire surface of the rosette. Immediately (without waiting for it to dry) wipe the raised parts with a damp cloth — the paint will be removed from the protrusions and remain in the recesses.
Result: recesses are dark (as if centuries-old dust has accumulated there), protrusions are light — an antique effect, suitable for classic interiors in historical buildings.
Rosettes with backlighting: light from the center
Modern technology — built-in backlighting in the rosette. An LED strip is mounted in a groove around the perimeter of the rosette (on the back side or in a specially provided groove on the front), creating a glow around the chandelier.
Construction of a rosette with backlighting
A standard polyurethane rosette + a groove 10-12 mm wide, 8-10 mm deep around the perimeter (at a distance of 30-50 mm from the outer edge). An SMD 2835 or SMD 5050 LED strip (density 60 diodes/meter, color cold white, warm white, or RGB with color change) is glued into the groove.
Power supply: 12V power supply (installed behind a stretch ceiling, in a niche or cabinet), wires run to the rosette and are connected to the strip.
Control: switch (on/off), dimmer (brightness adjustment), RGB controller (color change, flashing modes, smooth color transition — for RGB strip).
Effect
The rosette glows along the contour — creating a halo of light around the chandelier. In the evening with the chandelier off, the rosette backlight works as delicate night lighting (romantic atmosphere, soft light). With the chandelier on, the backlight enhances the central accent, making the rosette even more noticeable.
Colored backlighting (RGB) allows you to change the mood of the interior: blue — coolness, red — passion, green — calmness, smooth color transitions — festivity.
Cost
A rosette with pre-installed backlighting (the manufacturer has already embedded the strip, brought out the wires) costs 3000-8000 rubles more than a standard one (depending on diameter). DIY addition of backlighting: LED strip 500-1200 rubles/meter (requires 2-4 meters for a rosette with a diameter of 600-800 mm), power supply 800-2000 rubles, installation work 1500-3000 rubles. Total additional cost: 3500-9000 rubles.
Questions and answers about polyurethane rosettes
Is a rosette mandatory or can you do without it?
Technically, yes — a chandelier can be mounted without a rosette. Aesthetically, in classic interiors, a rosette is mandatory (its absence creates an unfinished composition), in modern minimalist ones — it is optional (often done without it to maintain visual lightness).
Can a rosette be installed after mounting the chandelier?
Yes. Remove the chandelier (turn off the electricity, unscrew the fasteners), glue the rosette (passing the wires through the central hole), wait for the glue to dry, reinstall the chandelier. Total time 2-3 hours including drying.
What is the best glue for rosettes?
Polyurethane (Cosmofen Plus, Moment Crystal) — for rosettes weighing up to 5 kg, quick setting, does not require long fixation. Acrylic mounting (Moment Montage, Tytan Professional) — for rosettes up to 3 kg, slower but cheaper. For heavy rosettes 6+ kg, add self-tapping screws (3-4 pieces).
Does a rosette hold on a stretch ceiling?
Yes, if installed correctly (with a mounting plate). The mounting plate holds the weight, the rosette is glued to the plate — the system is reliable. Without a mounting plate (surface-mounted rosette on the film) only rosettes up to 2 kg hold.
Can you paint a ceiling medallion before installation?
Yes, it's even more convenient — place the medallion on a table, paint it, let it dry, then install. But if you plan to use gilding or patination — do it after installation (these techniques require a vertical position for excess to drip off).
How to care for the rose?
Remove dust with a dry, soft brush (go over the relief every 2-3 months). For stains (if any) — use a damp cloth (not wet, wrung out), without aggressive cleaning agents. Polyurethane does not absorb dirt and is easy to clean.
Conclusion: the center deserves a frame
Ceiling medallions made of polyurethane— are not a decorative whim, but architectural logic. The center of the ceiling, where the chandelier hangs, illuminating the room, providing visual comfort, creating atmosphere — this center deserves a frame. The medallion creates this frame, completes the composition, turning a technical mounting point into a work of decorative art.
Choosing a medallion is a creative process that requires an understanding of proportions (medallion diameter to chandelier diameter, medallion size to room area), style (classicism, baroque, modern, minimalism — each style has its own ornaments), technology (installation on a regular ceiling is simple, on a stretch ceiling requires a mounting plate), decoration (monochrome, gilding, patina — the choice determines the atmosphere).
Selection mistakes are visible daily: a too small medallion gets lost and fails its framing function. A too large one overwhelms the chandelier, creating visual heaviness. A stylistically alien one (a baroque medallion in a minimalist interior) looks absurd, ruining the concept. A competent choice is invisible — the medallion is perceived as a natural part of the ceiling, as an element that has always been there, inseparable from the chandelier and ceiling.
STAVROS offers a full spectrumdecorative ceiling medallions for chandeliers— over 150 models of all sizes, styles, ornaments. From compact 250 mm diameter for 900 rubles to monumental 1400 mm for 45,000 rubles. From laconic minimalist rings to lush baroque compositions with angels and garlands.
STAVROS production — European polyurethane with a density of 180-250 kg/m³ (optimal density for medallions — lightweight, durable, sharp relief), high-precision molds (master models are created by sculptors by hand, then scanned, refined in CAD, CNC-cut with ±0.1 mm accuracy), multi-layer factory primer (snow-white, even, ready for painting with any paints).
The STAVROS catalog is conveniently structured: filters by diameter (select a range of 550-700 mm — see all suitable ones), by style (classicism, baroque, modern, minimalism — corresponding ornaments are displayed), by price (set a budget — see available options). Each model is provided with photos from different angles (top view, side view — showing relief depth, details), technical specifications (diameter, weight, relief depth, central hole diameter), recommendations (suits which chandelier diameter, fits which interior style).
STAVROS quality is proven by thousands of installations: medallions hold for decades without peeling (the adhesive bond is stronger than the polyurethane itself — the medallion will break before it peels off), the relief does not wear off (dense polyurethane is resistant to mechanical impact), color does not yellow (polyurethane with UV stabilizers does not change color under sunlight), absolute moisture resistance (suitable for bathrooms, kitchens, humid rooms).
STAVROS service — selection assistance (designers will select a medallion for your chandelier and interior, free consultation by phone, email, in the showroom), project cost calculation (if planning comprehensive molding decoration — medallion + cornices + moldings — we calculate the total estimate), delivery (warehouses in Moscow and St. Petersburg, shipping on the day of order or the next day, delivery across Russia by transport companies in 2-7 days), installation by partner crews (10+ years of experience, STAVROS certification, 24-month warranty on work).
Choose STAVROS — choose medallions worthy of your chandelier, your ceiling, your interior. The center of the room deserves a frame. Your chandelier deserves a STAVROS medallion.