


Article Contents:
- Diameters and Proportions: The Mathematics of Beauty
- The Golden Rule of Scale: Area Dictates Size
- Ceiling Heights: The Vertical Measure of Harmony
- Harmonizing with Chandeliers: A Dialogue Between Two Soloists
- Light Circle Layout: The Geometry of Light on the Ceiling
- Centering: Mathematical Precision
- Off-Center Compositions: Breaking Rules with Taste
- Composition with Multiple Recessed Lights: Symphony of Light
- Crown Molding Integration: Where Wall Meets Sky
- Stylistic Unity: The Language of Ornament
- Scale Harmony: Proportions of Height
- Corner Elements: Completing the Composition
- Creating Coffers: Deep Geometry
- Wiring and Installation: The Invisible Engineering of Beauty
- Site Preparation: From Wiring to Hole
- Chandelier Mounting Types: Hidden Mechanisms
- Recessed Light Installation: Adhesive, Precision, Patience
- Painting: The Master’s Final Stroke
- White on White: Classical Elegance
- Color Accents: When the Recessed Light Becomes a Star
- Patina: The Patina of Time and Nobility
- Harmonizing with Crown Molding: A Unified Ensemble
- FAQ: Recessed Lights and Chandeliers — Questions and Expert Answers
- Question: Can a heavy crystal chandelier be mounted on a polyurethane recessed light?
- Question: How to choose a recessed light if I have a stretch ceiling?
- Question: The recessed light looks too flat and inconspicuous. How can I add volume to it?
- Question: I have two windows on different walls in my room, and the room’s center is offset. What should I do about the recessed light?
- Question: Can I use recessed lights of different sizes in one room?
- Conclusion
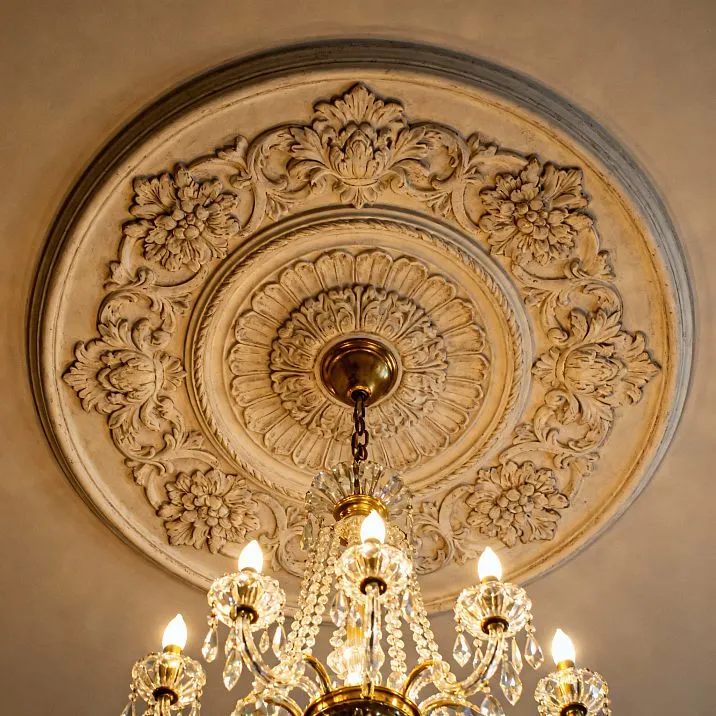
The ceiling is the fifth wall, unjustly forgotten in the era of minimalism. But precisely here, on this horizontal plane above our heads, unfolds an architectural spectacle, culminating in the chandelier. And framing this light source, transforming a utilitarian fixture into a jewel, is the ceiling rose — a molding element that for centuries has served as the compositional center, the focal point, drawing all gazes. Today, we speak not merely of decoration, but of the art of creating a harmonious ceiling ensemble, where diameters and proportions, arrangements of light circles, cornice junctions, concealed wiring, and masterful painting merge into a single symphony of style. If you wish for your ceiling to cease being merely a white surface and become a work of architectural art, this article will be your guide.


Diameters and Proportions: The Mathematics of Beauty
Beauty is measurable. Harmony obeys the laws of geometry and proportions. This is not metaphor, but literal truth when speaking of ceiling roses under chandeliers. An incorrectly chosen diameter can ruin the entire interior concept: a tiny rose will vanish on a spacious ceiling of a grand hall, while a giant "medal" will overwhelm a modest bedroom.


The Golden Rule of Scale: Area Dictates Size
First, what needs to be considered when choosingceiling rose molding, — is the area of the room. There exists a time-tested formula of harmony:
For rooms up to 12 square meters, the optimal rose diameter is 25–35 cm. These are modest bedrooms, offices, children’s rooms. Here, subtlety is needed, not flamboyance.
For rooms from 12 to 20 square meters, choose roses with a diameter of 40–55 cm. These are standard living rooms, spacious bedrooms. The rose should already make its presence known, but not dominate.
For large halls from 20 to 30 square meters, roses with a diameter of 60–80 cm are suitable. These are reception rooms, dining rooms, halls.
For palace-like spaces of 30 square meters and above, monumental roses with diameters from 90 cm to 120 cm and more can be used. Here, opulence, multi-tiered design, and rich ornamentation are appropriate.
Visually, these proportions are easy to imagine: the rose should occupy approximately one-eighth to one-tenth of the ceiling area. If the ceiling is 4 by 5 meters (20 square meters), a rose with a diameter of 50–60 cm will appear perfectly balanced.
Our factory also produces:


Ceiling Heights: The Vertical Measure of Harmony
Area is not the only factor. Room height plays an equally important role.
At standard ceiling heights of 2.5–2.7 meters, use flat, shallow roses. Dome-shaped or protruding structures visually "lower" the ceiling, creating a heavy, oppressive feeling.
At ceiling heights of 3 meters or more, you can afford voluminous, multi-tiered roses with deep relief and dome structures. The higher the ceiling, the more sculptural and complex the rose can be.
Get Consultation
Harmony Between Rose and Chandelier: Dialogue of Two Soloists
The rose and chandelier are not competitors, but partners. Their sizes must be in a reasonable proportion.
Classic rule: The rose’s diameter should equal or slightly exceed (by 10–20%) the diameter of the chandelier’s base or its widest part. If the chandelier has a 60 cm diameter, the rose should be 60–70 cm.
Exceptions: For minimalist modern chandeliers with small bases, the rose may be significantly larger, creating a decorative "pillow" upon which the fixture "rests." For massive multi-arm chandeliers in the Empire or Baroque style, the rose may be smaller than the base if the chandelier itself is the main art object.
Important: The rose must not be smaller than the chandelier’s bowl (base), otherwise it will simply be hidden behind the fixture and lose its meaning.
Arrangement of Light Circles: Geometry of Light on the Ceiling
The ceiling is not only the place for a central chandelier. Modern lighting design implies multi-level lighting, where the central source is complemented by recessed spotlights, hidden cornice lighting, and decorative fixtures. The rose becomes the center of this lighting composition, and its position must be planned down to the millimeter.
Centering: Mathematical Precision
A classic rose is always mounted strictly at the geometric center of the ceiling. Not "approximately in the middle," but precisely at the center found through measurement and marking.
How to find the center:
-
Measure the length and width of the ceiling.
-
From each wall, measure half of the corresponding dimension.
-
The point where the two lines intersect is the center.
-
Use a laser level or taut diagonal strings for verification.
Important: In rooms with complex geometry (L-shaped, with niches), the center is determined for the main, largest zone.
Off-center Compositions: Breaking Rules with Taste
Modern design allows socket displacement from the center, but only if it is justified functionally and compositionally.
When displacement is appropriate:
-
Above the dining table in a kitchen-living room, which is not centered in the room.
-
In the bedroom above the headboard of the bed, if the bed is the compositional center.
-
In asymmetrical spaces with beams or ceiling level transitions.
In such casescornice under the chandelierbecomes not just decoration, but a tool for zoning space.
Composition of Several Sockets: Symphony of Light
In large halls, galleries, long corridors, you can use several smaller diameter sockets instead of one giant one.
Layout principles:
-
Sockets are arranged symmetrically relative to the longitudinal axis of the room.
-
The distance between the centers of sockets should be no less than two of their diameters.
-
All sockets in one room must be of the same design and size to maintain rhythm.
-
Each socket is fitted with its own light fixture, creating even lighting.
Such a composition is especially effective in rooms with high ceilings, where it transforms a plane into a rhythmic ornamental surface.
Cornice Junction: Where Wall Meets Sky
Ceiling composition does not exist in a vacuum. It must be harmoniously linked to walls through ceiling cornices (galleries, moldings, moldings). This is a transition, an architectural rhyme, connecting vertical and horizontal elements.
Stylistic Unity: Language of Ornament
The first rule — the socket and cornice must speak the same language.
For classical interiors: If you have chosen a socket with vegetal ornament (acanthus leaves, laurel, roses), thenWooden corniceor polyurethane must contain similar motifs. Not necessarily identical, but similar in spirit.
For neoclassicism: A socket with geometric ornament (meander, beads, fluting) requires equally strict, orderly cornices.
For modern: Smooth, flowing lines of the socket must find resonance in the curves of the cornice.
For minimalism: A concise, smooth socket with a simple profile combines with simple, narrow cornices without ornament.
Scale Coordination: Height Proportions
The width of the cornice should be proportional to the size of the socket and the height of the ceiling.
Rule: In a room with a ceiling socket of 60 cm diameter, the optimal cornice width is 10-15 cm. The larger the socket, the heavier the cornice may be.
For low ceilings (2.5 m): Use narrow cornices (5-8 cm) and small rosettes.
For high ceilings (from 3 m): You can use wide, multi-profile cornices (15-25 cm) and large rosettes.
Corner Elements: Finishing the Composition
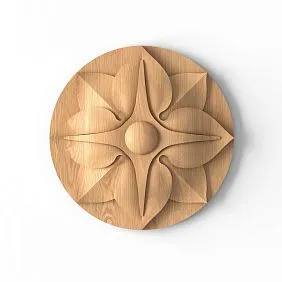
Angles where cornices meet require special attention. Here, you can use specialCorner decorative elementsthat transform a technical joint into a decorative accent that echoes the ornament of the central rosette.
Creating Coffered Ceilings: Deep Geometry
Advanced technique — creating a coffered ceiling where the rosette is located at the center of a geometric cell formed by cornices and moldings. This visually raises the ceiling, adds depth, and turns it into an independent architectural piece. This approach is characteristic ofceiling moldingsin palace and especially luxurious interiors.
Wiring and Installation: The Invisible Engineering of Beauty
The rosette is not simply glued to the ceiling. It must conceal the electrical wiring underneath and ensure safe chandelier installation. This is an engineering task requiring a professional approach.
Preparation of the Area: From Wires to the Hole
Step 1: Electrical. Before mounting the rosette on the ceiling, an electrical cable for the chandelier must be run. It should have at least 15-20 cm of spare length for convenient connection.
Step 2: Marking. Find the center of the ceiling and mark it. Place the rosette and mark its outline with a pencil.
Step 3: Central hole. A hole must be drilled in the center of the rosette (and ceiling) for wiring. The hole diameter depends on the type of chandelier mounting, usually 8-12 mm. The cable and hook or bracket will pass through it.
Chandelier Mounting Types: Hidden Mechanisms
Hook: Classic method. An anchor hook is screwed into the ceiling (concrete), to which the chandelier is hung. The rosette is mounted on top of the chandelier's suspension and hides the hook.
Mounting bracket: Modern standard. A metal bracket with threaded bolts is mounted to the ceiling, to which the chandelier's base is screwed. The rosette is installed before mounting the bracket.
Cross-bracket: For heavy and bulky chandeliers. Mounted on four points, ensuring maximum reliability.
Important: If you have a stretch ceiling, all mountings must be installed before its installation. A hole is cut in the stretch fabric, reinforced with a plastic ring, through which the wiring is passed, and the rosette is glued on top of the fabric.
Rosette Installation: Glue, Precision, Patience
Materials:
-
Polyurethane rosette (lightweight, moisture-resistant, easy to install).
-
Mounting glue (acrylic-based "liquid nails" or special polyurethane glue).
-
Acrylic sealant (for sealing joints).
Technology:
-
Cleaning: The ceiling surface must be clean, dry, and degreased.
-
Fitting: Place the rosette on the ceiling, center it, run the wire through the central hole. Ensure everything is perfect.
-
Applying glue: Apply glue to the back of the rosette in a zigzag or dots pattern with 5-7 cm spacing. Don't be stingy with glue, but also don't overdo it.
-
Gluing: Press the rosette to the ceiling, center it, press firmly. Hold for 1-2 minutes.
-
Fixation: For heavy, large-diameter rosettes, use temporary support (ladder, braces) during glue drying (12-24 hours).
-
Sealing joints: After the glue dries, run a thin bead of acrylic sealant along the rosette-ceiling joint. Wipe off excess with a damp cloth. This creates a monolithic effect.
Painting: The Master's Final Stroke
The rose is mounted, but this is not the end of the story. It is the paint that transforms the white polyurethane element into a work of art, integrating it into the interior color palette.
White on White: Classic Elegance
The most common and foolproof option — a white rose on a white ceiling. But 'white' is not the same for all whites.
Shades of white:
-
Cool white (with a bluish undertone) — for modern interiors.
-
Warm white (with a slight cream or yellowish tint) — for classic styles.
-
Cream, ivory, ecru — for vintage and Provence styles.
Technique: Use matte acrylic paint. Apply 2–3 thin layers with a brush or spray. A glossy finish on ceiling moldings looks cheap and outdated; a matte texture is a sign of modern taste.
Color Accents: When the Rose Becomes the Star
The rose can be painted in a contrasting or accent color, turning it into the main decorative element of the ceiling.
Gold and silver: Classic palace interiors. Use special metallic paints or gold leaf (imitation of gilt). A gilded rose on a white or pastel ceiling — this is luxury and status.
Pastel tones: The rose can be painted in a shade matching the walls (e.g., soft blue, pale pink, lavender), creating a color harmony.
Contrasting colors: A bold choice — a dark rose (graphite, anthracite, black) on a light ceiling, or vice versa, a white rose on a dark ceiling. This is characteristic of modern interiors in loft or contemporary styles.
Patina: The Patina of Time and Nobility
Patina is artificial aging, giving the rose the appearance of an antique piece.
Technique:
-
Paint the rose with a base color (ivory, light gray).
-
After drying, apply patina (gold, bronze, brown) to the recesses of the ornament using a dry brush or sponge.
-
Immediately wipe off excess patina, leaving it only in the recesses.
-
Result — a volumetric, deep relief with accents.
Coordination with Cornices: A Unified Ensemble
The rose and ceiling cornices must be painted using the same technique and color palette. If the rose is matte white, then the cornices must also be matte white. If the rose has a gold accent, gold must also be present on the cornices.
FAQ: Roses and Chandeliers — Questions and Expert Answers
Question: Can a heavy crystal chandelier be mounted on a polyurethane rose?
Answer: The rose is a decorative element, not a load-bearing structure. The chandelier is mounted not to the rose, but to the ceiling structure via an anchor hook or mounting bracket. The rose is simply placed on top, concealing the mounting. Therefore, the weight of the chandelier does not matter for the rose. What matters is that the mounting in the ceiling itself can support the weight of the fixture. For heavy chandeliers (over 10 kg), use anchor hooks screwed into concrete, not just drywall anchors.
Question: How to choose a rose if I have a stretch ceiling?
Answer: For stretch ceilings, use special lightweight polyurethane roses that are glued onto the fabric using a special adhesive. Important: first, at the point where wiring exits the stretch ceiling, install a reinforced plastic ring to prevent tearing the fabric. Then, run the wiring and chandelier mounting through this ring. The rose is glued over this spot, concealing the technical opening. Heavy plaster roses are not suitable for stretch ceilings.
Question: The rose looks too flat and inconspicuous. How to add volume to it?
Answer: Use light and shadow effects through painting. Apply the patina technique: apply a darker shade (gray, brown) to the recesses of the ornament, leaving the raised parts light. This visually deepens the relief. You can also install hidden perimeter lighting (LED strip with a small offset) around the rose, creating a 'floating' effect and highlighting every detail of the ornament.
Question: I have two windows on different walls in the room, and the room's center is offset. What should I do with the rose?
Answer: In rooms with non-standard geometry or complex layouts, the center is determined visually, not mathematically. Orient yourself to the compositional center — the place where the main furniture group (sofa, dining table) will be placed. The chandelier with the rose should be positioned exactly above this spot. Do not hesitate to shift the rose away from the geometric center if it is functionally justified.
Question: Can you use multiple ceiling rose fixtures of different sizes in one room?
Answer: Technically yes, but it's a complex design technique requiring impeccable taste. If you use ceiling roses of different diameters, they must be from the same collection (with identical ornamentation) and arranged according to a clear hierarchy: the largest one in the main zone, smaller ones in secondary zones. This approach is most often used in antechambers or very large rooms with complex zoning. For standard rooms, it's safer to use one ceiling rose.
Conclusion
A ceiling rose under a chandelier is not merely a decorative detail. It is the centerpiece of composition, an architectural accent capable of transforming the perception of the entire space. A properly selected ceiling rose, in terms of diameter and proportions, seamlessly integrated into the lighting layout, harmoniously coordinated with ceiling cornices, professionally installed, and masterfully painted, turns an ordinary white ceiling into an art object. This is an art form requiring knowledge of compositional laws, understanding of materials, and mastery of techniques. But the result is worth the effort: the interior gains completeness, status, and that elusive magic which distinguishes a home from mere living space.
To create such flawless ceiling compositions, elements of the highest quality are required. The company STAVROS offers an extensive range of ceiling moldings: from elegant roses with a 30 cm diameter for modest rooms to monumental compositions over a meter in diameter for palace halls. Every element from STAVROS is perfect geometry, crisp relief, lightweight and durable polyurethane or noble wood for cornices. Using STAVROS products, you get not just decoration, but ready-made tools for creating interiors where every detail is a work of art, and the ceiling becomes the fifth dimension of your space.


