Article Contents:
- Where Room Transformation Begins
- Selecting Materials for a Specific Budget
- MDF vs Solid Wood: When Saving is Justified
- DIY Walls: Accessible Decoration Techniques
- Ceiling Decor: Moldings as a Quick Upgrade
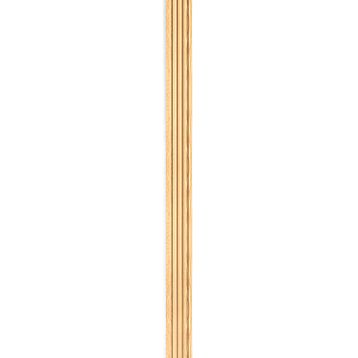
- Baseboard: The Boundary Between Wall and Floor as a Style Element
- Tools for the Home Craftsman: Essential Minimum
- Work Sequence: From Base to Decor
- Where to Find Materials for Final Finishing
- Common mistakes for beginners and how to avoid them
- Frequently Asked Questions
- Creating a Unique Interior Without a Designer

The thought of renovation evokes mixed feelings. On one hand — anticipation of a renewed space, on the other — fear of the scale of expenses and the need to hire a team of professionals. But what if you take the initiative into your own hands?DIY decorative wall finishingis quite realistic even for a person without professional experience. The main thing is to choose materials correctly, plan the sequence of actions, and not be afraid to experiment. Let's figure out how to create your dream interior with your own hands, wisely distributing the budget between quality and affordability.


Where Room Transformation Begins
The desire to change the interior often arises spontaneously — tired of old wallpaper, wanting freshness, novelty. But spontaneity is detrimental to renovation. You need to start with a clear plan that turns a vague dream into a specific sequence of actions.
Visualizing the desired result is the first step. Browse photos of interiors on social media, magazines, specialized platforms. Save the options you like, forming a visual database. After a week, return to the collected images and choose those that still evoke an emotional response. This is your true taste, cleansed of momentary impulses.
Analyzing the existing space determines the scope of work. Measure the room, sketch a plan with windows, doors, niches. Assess the condition of walls, ceiling, floor. Serious wall irregularities require leveling, otherwise any decorative finish will look crooked. Old wiring may need replacement before decorative work begins. Understanding the actual condition of the room prevents unpleasant surprises during the process.
Determining the budget is the most sobering stage. Write down the maximum amount you are willing to spend. Break it down into categories: materials for floor, walls, ceiling, decorative elements, tools, unforeseen expenses (allocate 15-20% of the total amount). This creates financial boundaries within which decisions must be made.
Prioritizing rooms optimizes resource allocation. It's impossible to simultaneously do quality renovation throughout the entire apartment with a limited budget. Choose one room to start with — the one where you spend the most time, or the living room, which forms the first impression of the home. Concentrate resources on it, do it well. The other rooms can wait.
A time schedule considering real possibilities prevents burnout. Working after main employment or on weekends — that's 10-15 hours per week. Painting a 15-square-meter room with preparation will take 3-4 days of pure time, meaning 2-3 calendar weeks. Installing baseboards — one day. Installing decorative elements — another week. A realistic schedule reduces stress and allows you to enjoy the process.


Selecting Materials for a Specific Budget
The market for finishing materials is huge. From frankly cheap solutions that will fall apart within a year, to premium ones that consume the entire budget on one wall. The art lies in finding balance — materials that look expensive, last long, but cost reasonably.
Dividing the budget using the 50-30-20 principle works effectively. 50% of funds go to the foundation — wall leveling, primers, basic painting or wallpaper. 30% — to accent elements that create the character of the interior: decorative moldings, quality baseboard, interesting light fixtures. 20% — reserve for unforeseen expenses and small things that always come up.
Comparing the cost per square meter of various solutions provides clarity. Wall painting — 300-500 rubles per square with materials (primer, paint, rollers). Paper wallpaper — 400-700 rubles. Mid-range vinyl wallpaper — 800-1200 rubles. Decorative plaster — 1500-2500 rubles. Wooden panels — from 2500 rubles. These numbers help immediately understand which solutions are realistic for your budget.
Combining materials from different price segments creates visual richness without bankruptcy. Three walls painted with budget-quality paint — that's the foundation. The fourth accent wall gets a more expensive solution — decorative plaster, wooden slats, molding panels. The eye focuses on the accent wall, perceiving the entire interior as expensive.
Phased implementation spreads costs over time. First stage — basic finishing: leveling, painting. The room is already livable. Second stage after a month or two — installing quality baseboard, ceiling cornice. Third stage — adding decorative elements to walls. Fourth — textiles, lighting. Each stage is financially manageable, and the result grows gradually.
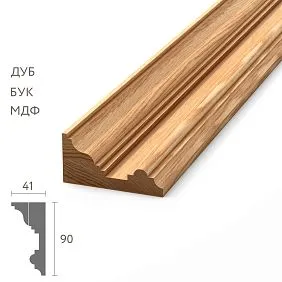
Prioritizing quality in visible places is an important strategy.Baseboard MDFfrom a good manufacturer looks decent and costs reasonably. But in the formal living room, where attention is drawn to it, it makes sense to invest in a wooden baseboard made of oak or beech. The price difference is 300-400 rubles per linear meter, but the perception of the interior changes radically. In the bedroom, where the baseboard is hidden behind furniture, MDF can be used.
Our factory also produces:


MDF vs Solid Wood: When Saving is Justified
The eternal debate - MDF or solid wood? Natural material enthusiasts sneer at the mention of MDF. Pragmatists point to the price difference. The truth, as always, lies in the middle: each material has its own optimal application area.
MDF is medium-density fiberboard. Wood chips are ground into fibers, mixed with binding resins, and pressed under high pressure. The result is a homogeneous, dense material without knots, cracks, or internal stresses typical of solid wood. After being covered with a film or enamel, MDF is visually indistinguishable from wood to a non-specialist.
Cost is the main advantage of MDF. An 80 mm high MDF skirting board costs 200-350 rubles per linear meter. A similar one made of solid oak costs 800-1200 rubles. The 3-4 times difference means that the saved funds can be used to purchase decorative wall elements, quality paint, or beautiful light fixtures.
Stable geometry is the second advantage. Solid wood, even when well-dried, reacts to changes in humidity and temperature. In winter, with dry air from heating, it contracts; in summer, with humidity, it expands. MDF lacks this characteristic—its geometry remains stable year-round. Skirting board joints stay tight, with no gaps appearing.
Ease of processing makes MDF ideal for DIY installation. The material is easily cut with a regular handsaw or jigsaw, does not split, and provides a clean cut. Solid wood requires sharper tools and can split along the grain if handled carelessly. For a beginner, MDF is forgiving of mistakes.
But there are also limitations. MDF cannot withstand direct, prolonged contact with water - it swells, deforms, and loses strength. In bathrooms, kitchens near sinks, it's better to use solid wood or moisture-resistant materials. MDF is inferior to solid wood in mechanical strength - it can break under a strong impact, whereas oak can withstand it.
The optimal application for MDF is living rooms with normal humidity: bedrooms, living rooms, studies, children's rooms. Here it lasts for decades without needing replacement. The savings allow investing in other interior elements that enhance its quality. Solid wood is chosen for formal areas, wet rooms, and places with high mechanical load.
Combining materials is a wise decision. A solid oak floor skirting board in the living room creates a sense of quality. In bedrooms - MDF for painting to match the wall color saves the budget. Ceiling cornices - lightweight polyurethane, visually indistinguishable from plaster, but many times cheaper and easier to install. Each material is used where its advantages are maximized and its disadvantages are not critical.
Get Consultation
DIY Walls: Accessible Decoration Techniques
Smooth painted walls are boring. Texture, relief, and visual complexity turn a simple room into an interesting space. But complex techniques like Venetian plaster require years of experience. There are methods accessible to beginners that still yield impressive results.
An accent wall in a contrasting color is the simplest way to add dynamism. Three walls are painted in a light neutral shade, the fourth - in a saturated color: deep blue, emerald, terracotta, graphite. Choose the wall visible upon entry, or the one with a key piece of furniture - a bed, sofa, desk. Painting one wall in a 15 square meter room will require 2-3 liters of paint costing 1500-2500 rubles. The work will take a day with preparation and two coats.
Moldings create architectural depth. Vertical and horizontal polyurethane strips form framed compositions on the wall. Inside the frames, the wall is painted in the main color, the moldings themselves - in a contrasting color or a matching tone. This imitates classic boiserie panels but costs many times less and can be installed over a weekend. A linear meter of polyurethane molding costs 150-400 rubles depending on width and relief.
Painting through a stencil gives a clear graphic pattern. A stencil can be bought ready-made or made yourself from thick cardboard or plastic. Attach the stencil to the wall with painter's tape, apply paint with a sponge or roller. Repeat the pattern across the entire wall or create a composition in a specific area. Geometric patterns, floral motifs, abstractions - the choice is vast.
Decorative slats create a fashionable linear pattern. Wooden planks 20×40 mm are attached vertically to the wall with a spacing of 50-100 mm. They can be painted to match the wall color for a subtle relief effect or in contrast for graphic impact. The slats hide wall imperfections, create volume, and work as an acoustic diffuser. The cost of slats for a 10 square meter wall is 5000-8000 rubles including fasteners.
Wallpaper inserts within molding frames combine materials. Walls are painted, molding frames are mounted on them. Inside the frames, wallpaper with an expressive pattern is pasted - damask, floral ornament, geometry. The wallpapers become paintings on the wall, the moldings - their frames. This solution requires a small amount of expensive wallpaper, which saves the budget.
Textured painting with a long-nap roller creates a soft texture. Special patterned rollers leave a relief on the painted surface - resembling fabric, plaster, marble. The technique is simple: apply a base coat of paint, after drying apply a second coat with the textured roller. Movements should be in one direction to create a uniform pattern. The cost of a textured roller is 500-1500 rubles, it can be used multiple times.
Ceiling Decor: Moldings as a Quick Upgrade
The ceiling is the fifth wall of a room, often ignored. A white smooth ceiling is functional but boring.Sculptural decorationstransform it, adding elegance and architectural completeness without major investments.
A ceiling cornice around the perimeter is a classic solution. The cornice hides the wall-ceiling joint, creates a soft transition, and visually raises the ceiling. The cornice width is chosen based on room height: for ceilings 2.5-2.7 meters, a 50-80 mm cornice is suitable; for higher ones - 100-150 mm. Installing a cornice in a 15 square meter room (perimeter about 16 meters) will take 4-6 hours with corner trimming.
Polyurethane cornices are lightweight, diverse in design, and inexpensive. A linear meter costs 200-600 rubles depending on width and profile complexity. The cornice is glued with special mounting adhesive; additional mechanical fastening is not required. After installation, the cornice is painted to match the ceiling color or a contrasting shade. Plaster cornices are heavier, more expensive, and more complex to install - polyurethane is optimal for DIY work.
A ceiling rosette for the chandelier adds decorativeness to the center of the ceiling. The rosette is a round or polygonal element with an ornament, mounted around the chandelier mounting point. The rosette diameter is chosen proportionally to the chandelier and room size: for a small room 30-50 cm, for a spacious living room 60-100 cm. The rosette is glued to the ceiling before installing the chandelier, the wire is passed through the central hole.
The cost of polyurethane rosettes starts from 800 rubles for simple models with a 30 cm diameter and goes up to 5000-8000 rubles for large elements with rich ornamentation. Installing a rosette takes 30-40 minutes. After installation, it is painted to match the ceiling color or with relief highlighting using two shades to create volume.
Decorative beams on the ceiling create rhythm and structure. False beams made of polyurethane imitate wooden ones but weigh 10 times less, simplifying installation. Beams are placed parallel to the long side of the room with a spacing of 80-120 cm or form a coffered structure - a grid of intersecting beams. This solution is especially effective in high-ceilinged rooms, where it visually lowers the ceiling, creating a more intimate atmosphere.
Corner elements - decorative overlays in the corners between walls and ceiling - replace or complement the cornice. They create accents without requiring treatment of the entire perimeter. Four corner elements create a visual frame for the ceiling, leaving the perimeter minimalist. The cost of a corner element is 300-1500 rubles, installation of each takes 10-15 minutes.
Painting the moldings is the final stage that determines perception. The classic option is white color matching the ceiling, with the molding highlighted only by its relief. Contrast painting - the cornice darker or lighter than the ceiling - creates a clear boundary. Two-color painting of moldings with recesses of one color and protrusions of another emphasizes volume and creates visual complexity. Using paint with a slight metallic or pearlescent effect gives a soft glow under artificial lighting.
Skirting Board: The Boundary Between Wall and Floor as a Style Element
A skirting board seems like a technical detail meant to close the gap between wall and floor. But it forms a visual frame for the floor, creates completeness, and affects the perception of room proportions. The correct choice and installation of a skirting board is an art accessible for self-mastery.
Skirting board height determines interior style. A low skirting board of 50-70 mm creates minimalism, modernity, and visually expands the walls. It seems to dissolve, not attracting attention. A medium skirting board of 80-100 mm is a universal solution suitable for most interiors. A high skirting board of 120-180 mm creates classic elegance, status, and works in tall, spacious rooms. In standard apartments with 2.6-2.7 meter ceilings, a high skirting board can visually reduce height - use with caution.
Skirting board profile - straight or shaped - coordinates with the style. A rectangular profile with sharp edges or slight corner rounding suits minimalism, Scandinavian style, loft. A shaped profile with beads, protrusions, complex relief works in classical, neoclassical, art deco interiors. A simple rule: the more contemporary the style, the simpler the profile.
Skirting board color — an extension of the wall, an extension of the floor, or a contrasting element? Three philosophies yield different results. A skirting board matching the wall color visually increases the wall height, creating a unified vertical plane. This is optimal for low-ceilinged rooms. A skirting board matching the floor color creates a unified horizontal plane, visually expanding the floor. A contrasting skirting board — white against dark walls and floor, or dark against light ones — creates a clear frame, graphic quality, and emphasizes architectural lines.
Skirting board material balances aesthetics and budget. Solid oak skirting board — luxury, strength, durability, natural grain. Cost: 800-1500 rubles per linear meter. MDF skirting board for painting or with laminate — practicality, stability, affordability. Cost: 200-400 rubles. A 3-4 times price difference means that for a room with a perimeter of 18 meters, the difference will be 10,000-20,000 rubles. This money can be directed towards quality wall paint, decorative elements, or textiles.
Skirting board installation is suitable for DIY. You will need a fine-toothed saw or a miter saw for precise 45-degree angle cuts. Fastening depends on the wall material: for concrete — dowel nails or adhesive like liquid nails, for drywall — screws, for wood — finishing nails or screws. The work is quick: a room with an 18-meter perimeter can be done in 3-4 hours, including cutting and fastening.
Cable channel in the skirting board — a practical feature. Many MDF and plastic skirting board models have an internal channel for running wires. This hides cables from the TV, internet, chargers, and removes visual clutter. Wooden skirting boards usually do not have a cable channel; wires are hidden behind them during installation with a small gap from the wall.
Tools for the home craftsman: the essential minimum
Professional finishers possess an arsenal of specialized tools worth hundreds of thousands of rubles. A home craftsman doesn't need that. There is a minimal set of tools that solves 90% of renovation tasks, costs reasonably, and will last for many years.
Measuring tools — the foundation of precision. A 5-meter tape measure, a 60-80 cm spirit level, a square, a pencil, painter's tape — this is a basic set costing 1500-2000 rubles. A laser level simplifies marking horizontal and vertical lines, but that's an option for 3000-5000 rubles. A bubble level is sufficient to start.
Cutting tools ensure precise fitting. A fine-toothed saw for skirting boards and moldings — 500-800 rubles. An electric jigsaw for faster work — 2500-4000 rubles for a decent model. A utility knife with replaceable blades for wallpaper, film, seals — 200 rubles. Metal shears for cutting profiles — 500 rubles.
Fastening tools speed up installation. A cordless drill/driver with a set of bits and drill bits — the central tool for a home craftsman. A budget model costs 3000-4000 rubles and will last for years for home tasks. A medium-weight hammer (400-500 grams) — 500 rubles. A liquid nails gun — 300 rubles. A furniture stapler for attaching films and fabrics — 800 rubles.
Painting tools determine painting quality. A roller with a long nap for walls, a short one for ceilings, a paint tray — a set for 800 rubles. Brushes of different widths for corners, moldings, small details — a set for 1000 rubles. Painter's tape of different widths for protecting borders — 500 rubles. Protective film for covering floors and furniture — 300 rubles.
Consumables create working conditions. Sandpaper of various grits for sanding — 500 rubles. Putty knives of different widths for applying filler — 600 rubles. Buckets for mixing compounds — 200 rubles. Sponges, rags, rubber gloves — 500 rubles.
Total cost of the basic tool set — 12,000-15,000 rubles. This is a one-time investment that pays for itself on the very first renovation. Hiring a crew to paint one room costs 15,000-25,000 rubles for labor alone. By doing it yourself, you save an amount exceeding the cost of the tools, which will remain with you for decades.
Renting specialized tools — an alternative to buying. A miter saw for precise angle cuts on moldings costs 15,000-30,000 rubles. Weekend rental — 1500-2000 rubles. If you need to cut skirting boards and cornices in one room, renting is more sensible than buying. A professional paint sprayer for perfectly even painting — rental 1000 rubles per day instead of buying for 10,000-20,000 rubles.
Work sequence: from base to decor
Chaotic work execution leads to rework. Painted the walls, then started installing the skirting board — stained the paint. Installed decor, then noticed wall unevenness — need to dismantle, level, reinstall. The correct sequence is critical for efficiency.
Stage 1: Surface preparation. Remove old wallpaper, peeling paint, clean walls from dust and dirt. Fill cracks and holes with filler, let dry, sand. Treat walls with deep-penetration primer — it strengthens the base and reduces paint consumption. Preparing a 15-square-meter room takes 2-3 days, accounting for drying times.
Stage 2: Basic wall finishing. Paint the walls in a base color or hang wallpaper. Painting requires 2-3 coats with intermediate drying of 4-6 hours. Use a roller on large areas, a brush in corners and near doors. Paint the ceiling first, walls second — drips from the ceiling won't ruin freshly painted walls. Painting a room takes 2 days.
Stage 3: Installation of floor skirting board. When the walls are completely dry, install the skirting board. Start from a corner, work around the perimeter. Internal corners are cut at 45 degrees and joined. External corners are also cut at 45 degrees. Fasten the skirting board with fastener spacing of 40-50 cm for reliability. The work takes half a day for a room.
Stage 4: Installation of ceiling decor. Cornices, rosettes, corner elements are installed after completing the basic wall and ceiling finishing. Apply adhesive to the back of the element, press it into place, secure with painter's tape or props while the adhesive sets. Cornice joints are sealed with acrylic sealant. Installing a cornice around a room's perimeter takes 4-5 hours.
Stage 5: Wall decor. Moldings, battens, overlays are installed on fully prepared and painted walls. Mark the placement of elements with a pencil and level — precise symmetry is critical for perception. Glue or screw the elements according to the manufacturer's instructions. Creating a molding composition on one wall takes a day.
Stage 6: Final painting of decor. All installed elements made of polyurethane or paintable MDF are painted after installation. Use water-based acrylic paint — it's odorless, dries quickly, provides an even finish. Paint with a brush for thorough coverage of the relief. Two coats with intermediate drying of 2-3 hours. Painting all the decor in a room takes a day.
Stage 7: Cleaning and furniture placement. Remove protective film, collect debris, wash the floor. Only after the room is completely ready, bring in furniture — moving furniture on an unprotected floor scratches the finish. Ventilate the room for the first few days after renovation to air out residual material odors.
Where to find materials for finishing
The construction materials market is fragmented. Large hypermarkets, specialized stores, online platforms, manufacturers with direct sales — each channel has pros and cons.
Construction hypermarkets — convenience of choice. A wide assortment of various manufacturers in one place allows comparison, touch, and evaluation. Consultants help with selection and calculate quantities. But prices are often higher than at specialized suppliers — hypermarkets include a markup for maintaining retail space.
Specialized stores focus on a narrow segment — only skirting boards, only moldings, only paints. The assortment depth is greater, sellers possess expertise. Prices are competitive, often with discount programs for regular customers. Disadvantage — you need to go to different places to source all materials.
Online stores save time and often money. The assortment is practically unlimited, prices are lower due to the absence of showroom costs. Detailed descriptions, photos, reviews aid selection. Doorstep delivery saves effort. Disadvantage — inability to assess the material tactilely. Order samples before the main purchase — many stores provide this service.
Direct sales from manufacturers are optimal for large purchases.wall finishing materialsBuying directly from a manufacturing company offers the best price-to-quality ratio. The absence of intermediaries reduces cost by 15-30%. Professional consultants with production experience provide competent recommendations. Possibility to order non-standard sizes and custom solutions.
Price comparison is critical for budget efficiency. The same item — for example, a polyurethane cornice of a specific profile — can vary in price by 30-50% at different points of sale. Spend two hours comparing prices at 4-5 sources before buying. Savings on a set of materials for one room can amount to 5000-10,000 rubles.
Seasonal sales and promotions reduce costs. Construction materials have seasonal demand. The peak is spring and summer when everyone does renovations. The decline is late autumn and winter. Stores hold sales to maintain turnover. Discounts reach 20-40%. If the renovation is not urgent, plan purchases for November-January.
Remainders and display samples are a source of quality materials at a discount. Sellers accumulate incomplete packages, samples, and discontinued models. They are sold at significant discounts. If you need 15 meters of baseboard, and there are two remnants of 8 meters each from different batches but with the same profile — the savings can be substantial with a visually identical result.
Common beginner mistakes and how to avoid them
DIY renovation is a learning process through mistakes. But some mistakes are costly and ruin the result. Knowing typical problems allows you to prevent them.
Saving on surface preparation is the main mistake. You want to move faster to the decorative part, skipping thorough leveling and priming. The result — paint applies unevenly, wallpaper bubbles, decor falls off. Rule: preparation takes 60% of the time for finishing work. It's boring but critical for quality.
Incorrect calculation of material quantity. Bought paint exactly according to the area calculation — not enough for the second coat, had to buy more. The shade of the new batch is slightly different — noticeable on the wall. Rule: buy materials with a 10-15% reserve. It's better to have excess paint, wallpaper, baseboards. Remains will be useful for future touch-ups and repairs.
Working without surface protection. Started painting a wall without protecting the floor and window — paint splatters everywhere. Then spend an hour cleaning. Rule: protective film on the floor, painter's tape on painting boundaries — mandatory preparation elements. Three minutes of protection save an hour of cleaning.
Rushing drying times. Applied the first coat of paint, didn't wait for it to dry completely, applied the second — the first coat wrinkled. Glued molding, painted immediately — the adhesive didn't set, the element fell off. Rule: follow the drying time indicated on the packaging. Better to wait an extra hour than redo the work.
Ignoring installation technology. Glued baseboard only with adhesive without additional fastening — it came off the wall after a month. Cut a molding corner 'by eye' without a miter box — a 5 mm gap is glaring. Rule: read manufacturer instructions, watch tutorial videos, use the right tool.
Inconsistency of elements. Bought baseboard of one style, cornice of another, moldings of a third — the result is eclectic and disharmonious. Rule: choose elements from the same collection or stylistically coordinated. A classic cornice requires a classic baseboard, a modern minimalist one — a laconic one.
Frequently asked questions
Can you renovate in parts while living in the apartment?
Yes, this is a common practice. Do one room at a time. Protect furniture and floors with film, work on weekends or evenings. The main thing is thorough cleaning after each stage so dust doesn't spread throughout the apartment. Bathrooms and kitchens require a faster pace due to the inability to do without them for long.
How to choose paint color if samples in the store look different than at home?
Lighting in the store differs from home lighting. Buy sample jars of liked shades in 100-200 ml volumes. Paint 50×50 cm squares on different walls of the room. Look at the color in the morning under natural light, in the evening under artificial light. After 2-3 days, one of the shades will seem ideal — buy it for the entire room.
Is it worth buying expensive branded paint or will budget paint do?
Paint is not the place to save. Expensive paint has better coverage — two coats instead of three, more durable finish, applies easier, gives a smooth surface without streaks. A price difference of 500 rubles per liter translates into savings of time, nerves, and ultimately money. Budget paint makes sense for primer coats or utility rooms.
How long does polyurethane molding last?
Decades with proper installation. Polyurethane doesn't crack, rot, or attract insects. The only threat is mechanical damage from careless handling. In houses and apartments, stucco lasts 20-30 years without losing appearance. Can be repainted multiple times when changing the interior.
Can you install wooden baseboard yourself without experience?
Yes, if you have basic tool skills. The hardest part is cutting 45-degree angles. Use a miter box — a device for precise cutting. Modern miter box models allow you to fix the baseboard and saw at the desired angle accurately. Practice on scraps before working with finished elements. The first room will take a day, subsequent ones will go faster.
What's more important: expensive materials or professional execution?
Professional execution is more important. Expensive materials installed crookedly look worse than budget materials installed well. If the budget is limited and the choice is between more expensive materials with DIY installation and simpler materials with hiring professionals — often the second option gives a better visual result. The ideal is to find a balance: good materials and careful DIY execution after studying the technology.
How to tell if a material is truly high quality?
Check the geometry—skirting boards and moldings should be straight, without warping. The surface should be smooth, free of pits, drips, or defects. Polyurethane molding should not be too light and porous—a sign of low material density. Inspect wooden elements for knots, cracks, or uneven texture. Request quality certificates from the seller.
How much do you really save by doing renovations yourself?
Labor constitutes 40-60% of renovation cost. Painting a 15 square meter room: materials 8000-12000 rubles, crew labor 15000-25000 rubles. Total 23000-37000 rubles turnkey. Doing it yourself, you pay only for materials — saving 15000-25000 rubles on one room. A three-room apartment — saving 45000-75000 rubles. But consider time: what a crew does in a week will take you a month to a month and a half.
Creating a unique interior without a designer
Professional interior designer is convenient but expensive. Services cost 1500-3000 rubles per square meter for the project only, without materials and labor. For a 60 square meter apartment — 90000-180000 rubles. Can you create an interesting interior yourself? Absolutely.
Inspiration is available for free. Social networks, design websites, magazines are full of ideas. Save liked interiors, analyze what exactly attracts: color scheme, material combinations, furniture arrangement. After a month of study, you'll form a visual library from which you can draw elements for your own project.
Copying with adaptation is a legitimate strategy. Saw a beautiful molding composition on a wall — repeat it in your room. Liked the combination of dark floor, light walls, and white ceiling cornice — use it. Design is combinatorics of proven solutions. Uniqueness is created through combination, not invention from scratch.
Limiting the palette simplifies decisions. Choose three colors: main (60% of areas), secondary (30%), accent (10%). For example, light gray main, warm beige secondary, deep blue accent. All color decisions for materials are made within this palette. This creates integrity, eliminates color chaos.
Style unity through repetition of forms. If the baseboard has a rectangular profile — moldings are also rectangular. If you chose classic shaped cornices — door trims are also shaped. Repetition creates visual coherence, subconsciously perceived as thoughtfulness.
Experimenting in small doses is safe. Unsure about a bright accent wall color — paint a niche or the area behind a shelving unit first. Live with this color for a week. If you like it — expand it to the wall. If you don't — it's easy to repaint a small area.
The company STAVROS supports DIY enthusiasts by providing not only quality materials but also expert assistance. The website features detailed installation instructions, video tutorials, and material quantity calculators. Consultants answer questions about selection, element compatibility, and installation techniques.
AssortmentMDF and solid wood skirting boardsincludes dozens of profiles of various heights, allowing you to find the perfect solution for any interior and budget. Paintable skirting boards offer freedom in color choice — paint them to match the exact wall color or create a contrast.
The STAVROS collectionpolyurethane molded decorationsfeatures cornices, moldings, rosettes, corner elements, and decorative overlays in various styles. From strict classic to lavish baroque, from laconic modern to minimalist profiles — everyone will find elements to realize their vision.
STAVROS production ensures consistent quality. Precise element geometry simplifies installation — joints fit tightly without additional adjustment. Dense, void-free polyurethane holds securely and does not deform. Wooden elements made from kiln-dried wood are stable and do not warp or twist after installation.
Direct sales from the manufacturer eliminate intermediary markups. The price per linear meter of molding is 20-30% lower than retail chains for identical or higher quality. For budget renovations, this is significant savings without compromising on quality.
Delivery across Russia makes materials accessible regardless of geography. Residents of regions receive the same range and quality as Muscovites. Packaging ensures safety during transportation — elements arrive intact and ready for installation.
An individual approach to clients means readiness to produce non-standard elements. Need a skirting board of a special height or a molding with a unique profile for restoration — STAVROS will consider the possibility of manufacturing. This is a level of service rare for manufacturing companies.
Create interiors that reflect your individuality. STAVROS provides the tools — quality materials, expert knowledge, technical support. Implementation is in your hands. Confidence in materials frees creative energy to bring ideas to life. DIY renovation is not only about saving money but also the pleasure of creating a space where every element is personally chosen by you, installed by your hands, and carries a piece of your soul. Start the transformation today — the result will exceed expectations.