


Article Contents:
- Engineering Foundations of Staircase Safety
- Normative requirements and safety standards
- Ergonomic design principles
- Material Science Aspects of Component Selection
- Wood Species Characteristics for Staircase Elements
- Requirements for Moisture and Material Quality
- Technological Processes for Preparation Before Installation
- Design and Calculation of Elements
- Preparing tools and materials
- Methods of Attaching Balusters to the Base
- Attachment using metal spikes
- Connection using wooden dowels
- Attaching with Angled Self-Tapping Screws
- Technology for Installing Support Posts
- Marking and positioning
- Methods of Attachment to Various Bases
- Installation of intermediate balusters
- Marking installation locations
- Verticality and Height Control
- Installing Handrails and Final Assembly
- Manufacturing and Fitting of Handrails
- Ways to Mount the Handrail
- Protective Treatment and Finishing Coatings
- Surface Preparation
- Types of protective coatings
- Quality control and defect elimination
- Criteria for Assessing Installation Quality
- Typical Errors and Ways to Eliminate Them
- Operation and Maintenance
- Regular care for wooden elements
- Preventive maintenance
- Modern Trends and Innovations
- Ecological Aspects
- Digital technologies in design
- Conclusion
Transforming an ordinary staircase into an architectural work of art — a task that requires not only aesthetic sense but also deep technical knowledge. Installing balusters and handrails on a wooden staircase Represents a complex technological process where every detail affects the safety, durability, and appearance of the entire structure. Properly executed staircase railing installation not only ensures protection against falls but also creates a unique atmosphere of comfort and elegance in the home.
Modern requirements for staircase structures go far beyond simple functionality. Today, railings must harmoniously integrate into the interior, reflect the lifestyle of the owners, and comply with strict safety standards. Quality installation of staircase elements requires understanding not only technical aspects but also material science, ergonomics, and design.


Engineering Foundations of Staircase Safety


Normative Requirements and Safety Standards
Safety of staircase railings is regulated by strict construction standards that define minimum requirements for height, strength, and structural features of handrails. The height of the railing should be at least 900 mm for residential buildings and at least 1200 mm for public buildings. These parameters are calculated based on anthropometric data and ensure protection for people of different heights and ages.
The distance between vertical elements of the railing should not exceed 100 mm in clear span, preventing children from slipping through the railing. This requirement is critically important for families with young children and must be strictly adhered to regardless of any design decisions.
The strength characteristics of railings must ensure resistance to horizontal loads of at least 0.8 kN/m for residential buildings without failure or residual deformation. This load simulates a situation where an adult person leans on the handrail with their full weight or accidentally falls onto it.
Our factory also produces:


Ergonomic design principles
The shape and dimensions of the handrail must provide comfortable grip for an average person. Optimal cross-sectional dimensions of the handrail are 40-60 mm in width and 25-40 mm in height. The surface should be smooth, without sharp edges or burrs that could cause injury during use.
Thermal properties of materials also affect the comfort of staircase use. Wooden handrails remain warm to the touch even in cold weather, making them more comfortable compared to metal counterparts. This is especially important for staircases in unheated areas or outdoors.
Psychological aspects of perceiving staircase space play an equally important role. Properly designed railings create a sense of safety and confidence when moving up or down stairs. Visual lightness of the structure should not contradict the actual strength and reliability of element connections.
Get Consultation
Material Science Aspects of Component Selection
Wood Species Characteristics for Staircase Elements
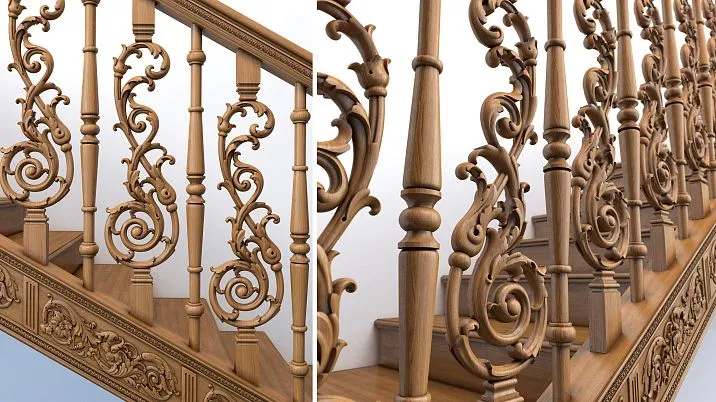
The selection of wood species for manufacturing balusters and handrails determines not only the appearance but also the operational characteristics of the entire structure. Oak remains the benchmark of quality due to its exceptional strength, dimensional stability, and distinctive texture. Oak density of 700-800 kg/m³ ensures product longevity, while its natural resistance to moisture and biological damage minimizes maintenance requirements.
Ash is attractive for its contrasting grain and high impact resistance, making it ideal for elements subjected to dynamic loads. Clearly defined annual rings create an expressive pattern, especially effective with radial cutting. Ash takes staining well, allowing the creation of products in virtually any color.
Oak has a uniform fine-grained structure and excellent workability. Its neutral color serves as an ideal base for any type of decorative finish. Oak is easily turned, which is important when manufacturing balusters of complex shapes with fine details.
Coniferous species represent a more affordable segment of materials. Common pine offers an optimal price-to-quality ratio, and its soft structure facilitates hand-tool processing. Siberian larch surpasses most coniferous species in strength and durability, approaching the characteristics of hardwoods.
Requirements for humidity and quality of materials
The moisture content of wood for manufacturing stair elements should not exceed 8-12% to ensure dimensional stability of finished products. Using undersized material leads to deformation, cracking, and weakening of joints during operation.
The quality of sawing affects the strength and appearance of products. Radial sawing ensures maximum dimensional stability and expressive grain, but costs more than tangential sawing. For critical elements such as handrails and support posts, only radially sawn wood is recommended.
The absence of wood defects — knots, cracks, rot, and insect damage — is critically important for structural safety. Even minor defects can become stress concentrators and lead to element failure under load. All materials must undergo careful sorting before use.
Preparation technology for installation
Design and calculation of elements
Process Installation of balusters and handrails on wooden stairs Design begins with detailed planning of all railing elements. The number of balusters is calculated based on the length of the stair run and requirements for maximum spacing between elements. It is necessary to account for the dimensions of the balusters themselves and ensure even distribution of elements along the entire railing length.
Determining the height of balusters requires consideration of the stair slope and handrail height. Each baluster must be individually calculated for height, as even minor deviations in stair geometry can result in an uneven handrail line. Modern design programs allow automating these calculations and minimizing errors.
The choice of fastening method depends on the structural features of the staircase, the material of the base, and requirements for joint strength. Each method has its advantages and limitations, which must be considered during the design phase.
Tool and material preparation
Quality tools are the foundation for successful installation work. An electric drill with a set of drill bits of various diameters is necessary to create fastening holes. Wood drill bits must be sharp and match the diameter of the fasteners, taking into account requirements for tight fit.
A miter saw provides precise angled cuts required for fitting elements to the stair slope. The ability to adjust cutting angles allows adapting details to any stair run geometry. A high-quality saw blade with fine teeth ensures clean cuts without chipping.
Measuring tools include a tape measure at least 5 meters long, a construction level, a square, and a plumb bob. A laser level significantly simplifies marking and ensures high positioning accuracy. Measurement accuracy determines the quality of all subsequent work.
Methods of attaching balusters to the base
Mounting on metal dowels
Using threaded bolts with a diameter of 8-12 mm is considered the most reliable method of attaching balusters to a wooden base. A central hole is drilled into the baluster end to a depth of 40-50 mm, with a diameter 1-2 mm smaller than the bolt diameter to ensure a tight fit.
The bolt is screwed into the baluster using PVA wood glue, which provides additional fixation and prevents accidental loosening. The protruding part of the bolt should be 50-70 mm to ensure secure attachment to the tread or sub-baluster.
A hole is drilled in the base with a diameter 1 mm smaller than the bolt and a depth corresponding to the protruding part length. The hole is filled with glue, and the baluster is placed in position with slight rotation to evenly distribute the glue. The glue joint fully cures over 24 hours.
Connection Using Wooden Dowels
The traditional carpentry method of attaching using wooden dowels provides strong and durable connections when properly executed. Dowels with a diameter of 8-12 mm are made from hardwoods — oak, beech, or ash — and have a length of 60-80 mm.
Central holes are drilled into the baluster end and base to a depth of 30-40 mm each. The hole diameter must ensure a tight fit for the dowel without excessive force. Wood glue is applied to the dowel and into the holes before installation.
The baluster is placed in position and secured until the glue fully dries. Such a connection is practically impossible to disassemble without damaging the elements, ensuring maximum fastening reliability. Excess glue is immediately wiped away with a damp cloth.
Fastening with angled screws
The simplest and fastest method of fastening involves using screws with a diameter of 6-8 mm, which are screwed in at an angle of 30-45 degrees through the baluster end into the base. Screw length should be 80-100 mm to ensure secure fastening.
A guiding hole with a diameter of 3-4 mm is drilled at an angle to the baluster axis. The screw is screwed in until the head is fully embedded in the wood. For one baluster, 2-4 screws are used depending on its size and expected load.
Screw locations are covered with wooden plugs, which are glued flush with the surface and sanded after the glue dries. This method of fastening allows for easy removal of balusters if needed, but provides less strength compared to other methods.
Technology for installing support posts
Marking and Positioning
Installing support posts begins with precise marking of their positions on the staircase. The first post is installed at the start of the run — on the lower landing or first step, the second — at the end of the run on the upper landing. Post placement must ensure optimal handrail geometry and even load distribution.
Post verticality is controlled using a plumb bob or laser level in two mutually perpendicular planes. Even minor deviations from verticality can disrupt the entire railing geometry and cause problems during handrail installation.
Temporary fixation of posts is done using braces or clamps, allowing precise positioning before final securing. After installing support posts, a control string is stretched between them to align intermediate balusters.
Mounting to wooden structures is performed using bolted connections with a diameter of at least 12 mm. The bolt passes through the entire thickness of the base and is secured with a nut and wide washer on the opposite side. Such a connection ensures high strength and allows for adjustment of tightness.
For concrete bases, anchor bolts of the appropriate diameter are used. The anchoring depth should be at least 80 mm to ensure reliable fastening. The hole in the concrete is drilled using a hammer drill with a concrete drill bit.
Metal bases require special mounting methods — welding or bolted connections. When using welding, it is necessary to protect wooden elements from high temperatures and sparks. Bolted connections allow for disassembling the structure if needed.
Even distribution of balusters along the length of the stair run is ensured by precise marking of their installation positions. The distance between the axes of adjacent balusters should not exceed 150 mm, and if there are small children in the house — 120 mm. Marking is performed taking into account the width of the balusters themselves.
Installation of intermediate balusters
Marking installation locations
For straight runs, marking is done using a tape measure and a square. First, the total length of the installation section is determined, then it is divided into equal segments according to the number of balusters. Each mark is checked twice to eliminate the accumulation of measurement errors.
Landing steps require a special approach to marking. Balusters are installed perpendicular to the direction of movement, which means they are placed at an angle relative to the horizontal. Marking is performed along the handrail line, taking into account the change in step width.
Landing steps require special marking. Balusters are installed perpendicular to the line of movement, meaning they are placed at an inclined angle relative to the horizontal. Marking is done along the handrail line, taking into account the change in step width.
Verticality and height control
Each baluster is installed strictly vertically, checked with a plumb bob or level. Deviations from verticality should not exceed 2 mm per meter of element height. Using temporary guiding battens helps maintain the correct position of balusters until final fastening.
The height of balusters is individually adjusted for each step, taking into account the slope of the stairs and possible inaccuracies in step geometry. The top surfaces should be aligned on a single line parallel to the future handrail line.
Height control is performed using a taut string stretched between support posts or a laser level. All balusters protruding beyond the control line are trimmed to the required size. Trimming is done with a circular saw, taking into account the slope of the stairs.
Handrail installation and final assembly
Handrail fabrication and fitting
The handrail is made from a solid beam or assembled from individual laminates to achieve the required length. The handrail cross-section is selected based on ergonomic requirements and the overall design of the staircase. Standard dimensions are 40-60 mm in width and 25-40 mm in height.
For staircases with turns, the handrail may be fabricated from several straight sections joined at an angle, or bent along a radius. Bent handrails require special equipment and high skill from the craftsman, but they provide a more aesthetically pleasing appearance.
Handrail fitting to balusters is performed using a handrail batten, which is attached to the top ends of the balusters and serves as a base for the handrail. A groove is milled into the batten for handrail installation, with a depth of 15-20 mm.
Handrail Mounting Methods
Handrail attachment to the handrail batten is done using self-tapping screws, which are screwed from below the batten into the handrail. This concealed fastening does not compromise the aesthetics of the product and ensures secure fixation. The screw length should be sufficient to pass through the batten and embed into the handrail by 20-25 mm.
Adhesive bonding further strengthens handrail attachment and prevents displacement. Woodworker's glue is applied into the groove of the handrail batten before installing the handrail. Excess glue is immediately wiped off with a damp cloth.
Handrail joints at turns are made at a 45-degree angle using special connecting elements. Connection points are reinforced with hidden dowels or confirmats. Final joint finishing includes sanding and fitting to achieve a perfectly smooth surface.
Protective Treatment and Final Coatings
Surface preparation
Quality surface preparation is the foundation of long-lasting protective coatings. Sanding is performed in several stages with gradually decreasing abrasive grit. Initial treatment is done with sandpaper of 120-150 grit to remove marks from mechanical processing.
Intermediate sanding with 180-220 grit abrasive removes risks from the previous operation and prepares the surface for final finishing. Final sanding with 280-320 grit abrasive creates a perfectly smooth surface ready for coating application.
Surface dusting is performed using an industrial vacuum cleaner and anti-static cloths. Dust residues can lead to coating defects and reduced adhesion to wood. Special attention is paid to recesses and hard-to-reach areas.
Types of Protective Coatings
Varnish coatings provide maximum protection for wood and highlight its natural beauty. Polyurethane varnishes are characterized by high strength and wear resistance, which is especially important for handrails subjected to intensive use. Acrylic varnishes are characterized by ecological safety and rapid drying.
Oil finishes penetrate into the wood structure, emphasizing its texture and creating a natural appearance. They are easily repairable for local damage and do not form a film on the surface. Oils look especially effective on wood with pronounced texture.
Wax compositions impart a silky finish and pleasant tactile sensations. Wax is applied in a thin layer and polished to achieve a uniform matte sheen. Such a coating requires regular renewal but creates a unique atmosphere of coziness and warmth.
Quality control and defect elimination
Criteria for evaluating installation quality
Geometric accuracy of installed elements is controlled using measuring tools. Deviations from verticality should not exceed 2 mm per meter of baluster height. Distances between elements are checked with a tape measure to an accuracy of 1 mm.
Connection strength is checked by gently rocking each element. A properly installed baluster should not have any play or movement. If weak connections are detected, they are reinforced with additional fasteners or by replacing the adhesive compound.
Surface quality is evaluated visually and tactilely. Absence of chips, scratches, or unevenness indicates professional workmanship. Uniformity of coating, absence of drips or stains characterize the quality of final finishing.
Typical errors and ways to correct them
Inaccurate marking leads to uneven baluster placement and disrupts the visual perception of the railing. Correction requires dismantling incorrectly installed elements and remounting them in accordance with the marking technology.
Insufficient depth of mounting holes reduces connection strength and may lead to loosening of elements during operation. Deepening existing holes is possible only if the base material has sufficient thickness.
Balusters tilted relative to verticality disrupt the railing's aesthetics and may indicate errors in marking or installation. Minor deviations are corrected by adjusting fasteners; significant deviations require reinstalling the balusters.
Operation and Maintenance
Regular care for wooden elements
Proper care ensures the longevity and preservation of the original appearance of stair railings. Daily dry cleaning with a vacuum cleaner or soft brush removes dust and prevents its accumulation in the grooves and joints of elements.
Weekly wet cleaning is performed with a slightly damp cloth without using aggressive cleaning agents. Excessive moisture may cause wood deformation and damage the finish. After wet cleaning, the surface should be wiped dry.
Monthly inspection allows identifying possible coating defects, loosening of fasteners, cracks, or other damage. Timely detection of problems enables their elimination with minimal time and cost.
Preventive Maintenance
The protective coating is renewed as needed, typically every 3-5 years depending on usage intensity and environmental conditions. Before applying a new coating, the surface must be thoroughly cleaned and sanded if necessary.
Fastener connections are checked annually. Loose connections are tightened, damaged fasteners are replaced. Special attention is paid to connections subjected to high loads — support posts and handrail mounting points.
Protection against pests includes regular treatment of wood with special compositions. Modern preparations provide long-term protection against insects and fungal damage with minimal impact on humans and the environment.
Modern trends and innovations
Ecological aspects
Growing attention to ecological issues stimulates the use of wood from sustainably managed forests. FSC certification guarantees that the material is obtained in accordance with strict ecological and social standards.
Non-toxic water-based coatings gradually replace traditional compositions with organic solvents. They do not emit harmful substances, dry quickly, and provide quality protection for wood.
Waste recycling technologies allow using almost all wood received for production. Shavings and sawdust are used to produce fuel briquettes, small offcuts — for manufacturing glued blanks.
Digital Technologies in Design
3D modeling allows calculating all details of the future structure in advance and optimizing material usage. Programs automatically calculate the quantity and dimensions of elements and generate drawings for manufacturing and installation.
Augmented reality technologies allow seeing the future staircase in the real interior even before work begins. This helps the client make the right decision and avoid design selection errors.
Automated production control systems ensure high quality and stable characteristics of finished products. Each item receives a unique code, allowing tracking of its entire manufacturing history.
Conclusion
Quality Installing balusters and handrails on a wooden staircase It is a complex technological process requiring deep knowledge of materials, strict adherence to technology, and high craftsmanship. Each stage of work — from material selection to final finishing — affects the safety, durability, and aesthetic qualities of the finished structure.
Modern requirements for stair railings go far beyond simple functionality. Today, they must harmoniously blend into the interior, reflect the owners' individuality, and comply with strict safety standards. Proper installation not only ensures protection against falls but also creates a unique atmosphere of coziness in the home.
Investments in quality materials and professional execution pay off through the structure's longevity, minimal maintenance costs, and high aesthetic qualities. Stair railings built according to all technological requirements will serve many generations of residents.
The future of stair construction is linked to the development of eco-friendly technologies, adoption of digital design methods, and creation of new materials. However, core principles remain unchanged — quality materials, precision manufacturing, and professional installation.
STAVROS embodies the best traditions of wooden architecture, enhanced by modern technologies and innovative solutions. Our long-standing experience and deep understanding of client needs enable us to create stair structures that surpass the highest expectations in quality, safety, and beauty. Choosing STAVROS guarantees professional execution of all work and long-lasting results.


