Article Contents:
- What is Ceiling Molding and Why is it Needed
- Brief Historical Context
- Functions of Ceiling Molding
- Why Polyurethane, Not Plaster
- Types of Ceiling Molding Elements: Complete Breakdown
- Ceiling Rosettes: Focus Above the Chandelier
- Cornices and Moldings: Architectural Transition
- Medallions and Coffers: Dividing the Ceiling Plane
- Corner Elements and Joining Plates
- Corbels: Decorative Support for Cornice
- Molding on the Ceiling: Styles and Interior Compatibility
- Classic and Neoclassical: Richness in Details
- Baroque and Rococo: When 'More' is the Rule
- Modern Classic and Neo-Art Deco: Geometry and Accent
- Minimalism: Molding as an 'Architectural Line'
- Scandinavian Style: Molding as a Nod to the Past
- Installing Ceiling Molding Yourself: Complete Guide
- Stage 1: Ceiling Preparation
- Stage 2: Marking
- Stage 3: Cutting Elements
- Stage 4: Applying Adhesive
- Stage 5: Sealing Joints and Puttying
- Stage 6: Priming and Painting
- Wooden Ceiling Skirting: Alternative or Addition?
- Wooden Skirting: Advantages
- Wooden Skirting: Limitations
- Synthesis: Wood and Polyurethane Together
- Practical Tips: What to Do and What to Avoid
- FAQ: Most Frequently Asked Questions
- STAVROS: Ceiling Molding and Polyurethane Decor — Full Catalog

The ceiling is the most underrated surface in a home. Walls are decorated, floors are covered with expensive parquet, furniture is selected with an architect — but the ceiling is painted white and forgotten. Yet the ceiling is in the field of vision every time a person lies down, tilts their head back, or looks up in thought. It is the only interior plane that cannot be filled with furniture.
Ceiling molding— is a conversation with that plane. Profiled cornices around the perimeter, a rosette in the center above the chandelier, medallions and coffers — all these are elements of the language with which the ceiling communicates with the rest of the room's space. And when this language is structured correctly, the result is felt instantly: the room ceases to be just a 'room' and becomes a place with character.


What is Ceiling Molding and Why is it Needed
Before delving into types and installation, it's worth answering the main question honestly: is molding even needed on the ceiling in a modern home?


Brief Historical Context
Ceiling decorative molding is a tradition over two thousand years old. Greek and Roman baths, medieval palaces, Renaissance palazzos, 19th-century St. Petersburg mansions — everywhere the ceiling was an object of decoration. Not because 'it's customary,' but because it works psychologically. A person entering a space with a rich ceiling instantly perceives it differently than a space with a bare ceiling.
The Soviet period 'reset' ceiling decor in most residential buildings. Standardized construction did not include cornices or rosettes. Generations grew up in homes with completely bare ceilings — and became accustomed to considering this the norm.
Today, the norm is changing. Country houses, apartment renovations, new construction — more and more people are returning to the question, 'What's up there?' And the answer to this question is now significantly more accessible than ever — thanks to polyurethane.
Our factory also produces:


Functions of Ceiling Molding
Visual completion of space. A cornice around the perimeter of the ceiling is the 'frame' of the room. Without it, walls and ceiling merge into a single unstructured surface. The cornice defines a boundary, making the space readable.
Managing the perception of height. A wide cornice with a large projection visually 'lowers' the ceiling — making the room cozier. A narrow, high-mounted cornice, on the contrary, emphasizes height. This is not an illusion: it's optics that architects have always used.
Concealing technical solutions. Wiring, cables, junctions of finishing materials, the seam between drywall and the wall —Ceiling molding— elegantly and definitively conceals all of this.
Hidden lighting. A polyurethane cornice with a recess for LED strip is one of the most popular modern application scenarios. The molding literally 'glows' here — creating diffused contour lighting around the perimeter of the room.
Decorative accent. A rosette above the chandelier, a medallion above the relaxation area, a coffered ceiling in the library — these are artistic statements. Not mandatory, but they are precisely what transform an interior from 'done' to 'lived-in.'
Get Consultation
Why Polyurethane, Not Plaster
ceiling molding— is not a compromise or a budget replacement for plaster. It is a material with fundamentally different properties, which in most scenarios prove preferable.
Polyurethane is lightweight. A decorative cornice made of PU weighs 8–12 times less than a plaster counterpart of the same profile. This means: no mechanical fastenings into the ceiling are needed, adhesive is sufficient. There is no risk of a heavy element 'falling' after a few years.
Polyurethane is resilient. Upon impact, it does not chip — it deforms slightly and returns to shape. Plaster crumbles upon impact. In living spaces with children or active lifestyles, this is critical.
Polyurethane is moisture-resistant. Bathroom, kitchen, sauna — where plaster begins to crumble from moisture over several seasons, polyurethane performs unchanged.
Finally, polyurethane can be installed independently. Without special equipment, without an assistant — one person can install ceiling decor throughout an entire apartment in a day.
Types of Ceiling Molding Elements: Complete Breakdown
The market for polyurethane ceiling decor offers several categories of elements. Each category has its own function, its own logic of application.
Ceiling Rosettes: Focus Above the Chandelier
A rosette is a round or oval ornamental element mounted at the central point of the ceiling — where the chandelier or other central light fixture is suspended.
Size range: diameter from 200 to 800–900 mm. Size selection is not a matter of taste, but of architecture. There is a rule of proportion: the diameter of the rosette should be 1/8–1/6 of the smaller room dimension. In a room 4×5 m (smaller dimension — 4 m = 400 cm), the optimal rosette size is 50–67 cm in diameter.
A rosette that is too small in a large room looks lost. One that is too large feels oppressive and disrupts proportions.
Rosette profile options in the STAVROS catalog:
-
Classical with acanthus leaf
-
Baroque with scrolls and garlands
-
Geometric — for modern interiors
-
Rosettes with a ring — with additional perimeter molding
-
"Ceiling medallion for chandelier" — with a central hole diameter for a specific suspension type
Cornices and moldings: architectural transition
Ceiling cornice — a horizontal profile element installed at the wall-ceiling transition zone. This is the most widely used type of ceiling decor: practically any room benefits from a good cornice.
Cornice parameters:
-
Width (projection): distance from the wall to the outermost point of the cornice. For rooms with a height of 2.5–2.7 m — 80–120 mm; for rooms with a height of 3 m and above — 120–200 mm.
-
Profile height: the vertical size of the cornice. Typically equal to or close to the projection width.
-
Profile: the combination of shapes and details of the cross-section. A simple "smooth" profile — for minimalism. A multi-step profile with curves, cavettos, shelves, dentils (teeth) — for classic style.
Molding — a simplified version of a cornice, flat or with slight relief. Used as a transition on the ceiling (above the cornice), as a decorative frame for a medallion, or as a divider for ceiling zones.
Medallions and coffers: dividing the ceiling plane
Medallion — a flat frame surrounding a section of the ceiling. Used to highlight the central zone above a table or seating area, to create a "picture frame" area on the ceiling.
Coffer — a recessed rectangular or square panel, creating the illusion of a coffered ceiling (a beamed ceiling with a cellular structure). Coffered ceilings are classic for libraries, studies, and formal living rooms. Created using a set of frame moldings arranged in a grid.
To create a coffered ceiling from polyurethane profiles, neither real beams nor structural alterations are needed. Only moldings with adhesive and proper layout.
Corner elements and joining plates
Corners — a technically complex aspect. A ceiling cornice is joined at a 45° angle (inside corner) or at an "outside" angle (when decorating columns, bay windows). A mistake in cutting the angle — and the joint becomes noticeable.
Manufacturers produce ready-made corner elements: inside and outside corners for standard cornice sizes. This significantly simplifies installation.
Corbels: decorative support for cornice
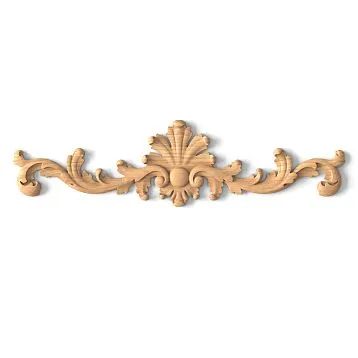
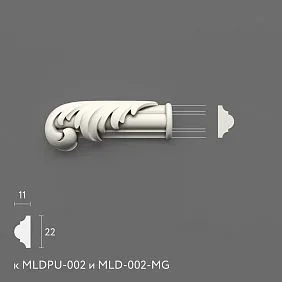
Corbel — a vertical decorative element imitating a supporting cornice bracket. In historical architecture, corbels were load-bearing. In modern polyurethane decor — purely decorative, yet visually convincing.
Corbels are installed around the perimeter under the main cornice with a spacing of 60–120 cm. They create rhythm and give the cornice "weightiness" — the feeling that it stands on supports, not just glued to the wall.
In the STAVROS catalog —Polyurethane bracketsvarious profiles for interior applications.
Ceiling molding: styles and compatibility with interior
One of the most common mistakes when choosing ceiling decor is the mismatch between the molding style and the interior style. A Baroque rosette in Scandinavian minimalism looks out of place. A geometric profile in a classic interior — boring. Let's consider the main stylistic scenarios.
Classic and neoclassical: richness in details
Classic interior — oak and beech, herringbone parquet, textured fabrics, furniture with legs, framed mirrors.Ceiling moldingHere, molding is essential — and should be "legible".
For classic style: cornice with dentils or bands, rosette with acanthus leaf, coffered ceiling in neutral zones, medallions above seating areas. Painting — white or a tone differing from the ceiling by 1–2 shades lighter or darker.
Baroque and Rococo: When 'More' is the Rule
A Baroque interior requires boldness. Here, stucco doesn't frame—it dominates. Scrolls, garlands, volutes, rococo shells—ornamental richness that is perceived as the norm in this style.
Gilding on polyurethane stucco is a frequently used technique for Baroque. Leaf gold or metallic paint is applied over a layer of reddish-brown primer (bole), creating a vibrant texture.
Modern Classic and Neo-Art Deco: Geometry and Accent
The 'modern classic' style requires stucco with a clear geometric profile without excessive ornamentation. The cornice is stepped, with horizontal planes. The rosette is minimalist, with rings and no scrolls. Moldings are straight.
Neo-Art Deco adds gold or bronze details, contrasting paint on moldings. A coffered ceiling in a dark color with white frame moldings is a characteristic Art Deco technique.
Minimalism: Stucco as an 'Architectural Line'
A minimalist interior is not the absence of decor; it is decor with maximum self-restraint. One simple cornice without relief is already enough. It creates a wall-ceiling transition, and that is sufficient for the visual completeness of the space.
In minimalism, stucco is almost functional: to hide a joint, create a niche for LED lighting, frame a transition. No rosettes, no medallions—only clean lines.
Scandinavian Style: Stucco as a Nod to the Past
An interior in the 'Scandi' style with high ceilings often plays with 'historical' stucco as an element of preserved heritage. One unpainted white cornice matching the ceiling is a nod to classicism without unnecessary pomp.
Installing Ceiling Stucco Yourself: Complete Guide
Installing polyurethane ceiling decor is a task accessible to a person without professional experience. It requires care, patience, and the correct sequence.
Stage 1: Ceiling Preparation
The ceiling surface must be:
-
Dry and clean
-
Level (irregularities no more than 3–5 mm per meter)
-
Primed with deep-penetration acrylic primer
If the ceiling is freshly painted with acrylic paint—removing dust is sufficient. If the ceiling is lime or chalk-based—be sure to remove the loose layer and prime it.
Stage 2: Marking
Marking determines everything. For a ceiling cornice:
-
Step back 5–10 mm from the corner (gap for the first element).
-
Mark a horizontal line along the entire perimeter with a laser level—this is the bottom line of the cornice.
-
Check the corners: in most rooms, corners are not 90°. Measure the actual angles with an angle finder.
For a rosette:
-
Find the geometric center of the ceiling: stretch a string along the diagonals—the intersection is the center.
-
Trace the outline of the rosette with a pencil.
-
Check symmetry relative to the walls.
Stage 3: Cutting Elements
Cornices and moldings are cut at a 45° angle for joints. Tools: a miter saw or a miter box. Cut quality is critical: an inaccurate cut, despite all other care, creates a visible gap in the corner.
Tip: number all segments in installation order. Dry-fit them against the ceiling and assess the overall look before applying adhesive.
Step 4: applying adhesive
For polyurethane ceiling decor, use:
Liquid nails / acrylic mounting adhesive — the classic option. Apply in a zigzag pattern to the back of the element. Open time — 5–10 minutes.
Polyurethane mounting foam (specialized for decor) — fast setting, high strength. Requires precise application: excess foams up and may spill over the element's edge.
Acrylic adhesive sealant — versatile, elastic, fills unevenness well.
Coating is applied in several thin layers with intermediate sanding using fine-grit sandpaper. Each layer must be fully dry before applying the next. The number of layers depends on the type of coating and surface quality requirements.
-
Apply adhesive in a strip along the entire length of the back surface.
-
Press the element against the ceiling.
-
Hold pressure for 30–60 seconds.
-
Secure with painter's tape.
-
Immediately wipe away any squeezed-out adhesive with a damp sponge.
Step 5: sealing joints and puttying
After the adhesive has fully dried (12–24 hours) — remove the tape and seal the joints.
Internal corners and element joints — acrylic sealant (water-soluble), smooth with a finger dipped in water.
Gaps between the cornice and ceiling or wall — the same acrylic sealant. Not putty: putty cracks over time at joints of different materials; sealant — retains elasticity.
Minor relief defects — wood putty or acrylic relief putty, applied with a brush into details.
Step 6: priming and painting
Priming — a mandatory layer before the finish paint. Acrylic primer, applied with a brush into the relief. Drying time — 2–4 hours.
Painting: acrylic ceiling paint with a brush (in relief elements) or spray gun. Two thin coats are better than one thick one. Between coats — 4 hours.
If the ceiling and molding are the same color — this is 'blended' molding, enriching the surface without dominating. If the molding contrasts with the ceiling — this is 'graphic' molding, creating a pronounced pattern.
Wooden ceiling skirting: alternative or addition?
Alongside polyurethane decor, there is an alternative —wooden ceiling moldingsolid wood. These are different products with different strengths.
Wooden skirting: advantages
Solid wood is a living material. An oak ceiling cornice or beech with open grain creates a fundamentally different feel than painted polyurethane. It's the warmth of natural material, which no coating can fully replicate.
Solid wood cornices and skirting boardsSTAVROS — made of oak and beech, professionally processed, with white acrylic primer. Used in:
-
Interiors with wooden beams and wooden furniture
-
'Forest' and 'rustic' styles (chalet, Provence, Scandinavian)
-
Baths and saunas (where polyurethane is unsuitable and plaster deteriorates)
-
As a transitional element between wooden wall panels and the ceiling
Wooden skirting board: limitations
Wood "breathes" — it expands and contracts with changes in humidity. In rooms with unstable climates (dachas without year-round heating, non-residential spaces), wooden skirting boards may develop cracks or gaps at joints.
Wood is more difficult to install: professional tools are needed for precise miter joints. Wooden skirting boards cannot be bent — for curved surfaces, only polyurethane is suitable.
Synthesis: combining wood and polyurethane
In a number of interior design solutions, the two materials work in tandem. For example: wooden ceiling beams (imitation or real) + polyurethane frame moldings for coffers + wooden cornice around the perimeter. This is a rich, non-uniform solution that adds depth to the ceiling.
Practical tips: what to do and what to avoid
Over years of working with ceiling decor, a list of mistakes that recur in different projects accumulates. Here are the most common ones:
Incorrect linear footage calculation. When ordering a cornice, add 15% to the measured perimeter. This accounts for miter cuts and inevitable waste.
Installation on a damp surface. If walls or ceilings have been recently plastered, allow them to gain strength and dry completely. Minimum — 28 days for cement plaster, 14 days for gypsum plaster.
Ignoring actual angles. The standard miter box angle is 45°. But the actual room angle is rarely exactly 90°. Always check with an angle finder and cut according to the actual measurement.
Installation without primer. Adhesive on an unprimed surface "bonds" with dust, not with the substrate. Primer is not optional.
Too heavy elements on adhesive. Cornices wider than 150 mm and massive gypsum elements require additional mechanical fastening: a screw and dowel every 400–500 mm. For polyurethane up to 150 mm wide — high-quality adhesive is sufficient.
FAQ: most frequently asked questions
Can polyurethane molding be glued directly onto wallpaper?
No. Wallpaper is an unstable base: the adhesive will hold not the molding, but the wallpaper, which will eventually peel off along with the decor. Wallpaper in the installation area must be removed or secured with rigid adhesive.
Which adhesive is better — liquid nails or acrylic sealant?
For primary installation — liquid nails (higher initial strength). For sealing joints — only acrylic sealant (flexibility for building settlement). Combining both is the correct solution.
How to create hidden LED lighting behind a cornice?
A cornice with a recess (niche) on the back side is needed — this is specifically provided in a number of profiles. The LED strip is adhered into the niche. The cornice must be mounted with a 30–50 mm gap from the ceiling (on a mounting rail) — this creates a gap for light emission.
What is the visual difference between a rosette with a diameter of 40 cm and one of 70 cm?
In a room up to 20 m², a 40 cm rosette will be barely noticeable and won't create an effect. In the same room, a 60–70 cm rosette becomes a central focal point. Size should be chosen based on proportions, not just personal taste.
Can polyurethane molding be painted to match the wall color?
Yes. A neutral or pastel wall tone extending onto the molding is a modern technique that "dissolves" the decor into the space. The effect is soft, unobtrusive.
How much does ceiling decor cost for a 60 m² apartment?
Depends on the complexity: just a perimeter cornice (approx. 40 lm) + a central rosette in 2 rooms — budget from 8,000 to 25,000 rubles for materials. A full set with coffers and medallions — from 40,000 rubles and up.
How to remove old polyurethane molding?
Use a utility knife to cut the adhesive seam along the entire length, carefully pry the element away. Remove remaining adhesive with a putty knife, fill joints with spackle.
STAVROS: polyurethane ceiling molding and decor — full catalog
Knowing about ceiling molding and being able to choose it is half the task. The other half is finding a manufacturer with a real catalog, real dimensions, and real delivery without waiting.
STAVROS is exactly that kind of manufacturer. The catalogpolyurethane molding decorationfeatures all main categories of ceiling decor:ceiling rosettes, Crown Molding, Moldings, Baseboards, Brackets, decor sets — all made from European technical polyurethane with characteristics confirmed by documentation.
For those choosing between polyurethane and wood: in the parallel STAVROS catalog —wooden moldings, cornices and baseboards made from solidoak and beech,balusters and stair components, Carved decorative elements. A single supplier for wooden and polyurethane decor — this is convenient for comprehensive interior projects.
Goodceiling moldingdoesn't require explanations. It simply works — quietly, confidently, elegantly. STAVROS produces exactly that kind.