


Article Contents:
- What to check when buying polystyrene: checklist of criteria
- Surface appearance
- Structural uniformity
- Geometric accuracy of profile
- Relief and detail clarity
- Smell
- Marking and Packaging
- Density and rigidity: choosing optimal parameters
- Density range
- How to check density when purchasing
- Density and profile compatibility
- Rigidity and elasticity
- Geometry and length of planks: selecting for room configuration
- Profile height and width
- Standard plank length
- Wall thickness
- Cross-sectional shape
- Corner elements and joint details
- Compatibility with base and finish coatings
- Base type
- Primers and impregnations
- Compatibility with paints
- Decorative finishes
- Accessories and adhesive: assembling full set for installation
- Construction Adhesive
- Installation gun
- Putty
- Primer
- Paint
- Tools
- Corner Elements
- Additional elements
- Material consumption and allowance for trimming: precise calculation
- Basic perimeter calculation
- Adjustment for room geometry
- Allowance for trimming and errors
- Cutting Optimization
- Buy 'on the spot' or with allowance?
- Calculation of accompanying materials
- Where to buy polystyrene online: criteria for choosing a store
- Assortment and Availability
- Polystyrene price: comparison and reasonableness
- Delivery conditions for valances
- Warranties and returns
- Reviews and reputation
- Consultations and support
- Reliable choice: store STAVROS
- Quality check upon receipt: action algorithm
- Step 1: Visual inspection of packaging
- Step 2: Counting quantity
- Step 3: Checking for damage
- Step 4: Checking for order compliance
- Step 5: Checking accompanying items
- Step 6: Filing complaints
- Step 7: Signing documents
- What to do if defects are found after installation?
- Storage and transportation conditions for polystyrene
- Temperature regime
- Moisture Content
- Sunlight Protection
- Storage position
- Protection from Mechanical Damage
- Transportation in a passenger car
- Cargo transportation rules
- What to do with leftovers after repair?
- Frequently asked questions when purchasing
- Conclusion

Buying polystyrene for decorative finishing is only the beginning. What follows is the most interesting part: selecting specific material characteristics, calculating quantities, finding a reliable supplier, and checking quality upon receipt. It seems simple — go to the store, point at the desired valance, and buy. But reality is that an incorrect choice may result in lost money, time, and nerves. A too thin profile will break during installation, improper density will cause deformation, and the absence of just one strip will force you to wait weeks for a new delivery.
Buying decorative polystyrene is not a spontaneous decision at a construction hypermarket, but a thoughtful process where every detail matters. From material density to profile geometry, from delivery conditions to storage rules — all these nuances affect the final result. Professional finishers know dozens of subtleties that help them choose the ideal material the first time. But what if you are doing the repair yourself and have no experience purchasing decorative polystyrene? Let’s examine all aspects of smart selection and purchase.


What to check when buying polystyrene: checklist of criteria
Before buying polystyrene valances or any other decorative element, you must clearly understand what to pay attention to. There are several critical parameters that determine the material's quality and suitability for a specific project.


Surface appearance
First, what catches the eye is the surface quality. A good polystyrene has a smooth, even surface without visible defects. Inspect the strip from all sides. There should be no:
-
Dents and scratches on the front surface
-
Excesses and unevenness on the relief (if the profile is relief)
-
Dark spots, streaks, color changes
-
Cracks and fractures
-
Deformations - bending, warping, twisting
Pay special attention to the corners and edges of the element - these are the most vulnerable areas, often damaged during transportation. If you see signs of impact, scratches deeper than 1-2 mm, or chipped fragments - do not use such a board.
Our factory also produces:


Structural uniformity
Polystyrene must have a uniform structure throughout its thickness. If it is a foamed material, the granules should be of the same size and tightly pressed. An uneven structure with large voids indicates a violation of the manufacturing technology. Such material will be brittle and unpredictable in use.
Simple test: lightly press your finger on the surface at several places. The material should not compress (unless it is a very soft foam, which is not used for decoration). The elasticity should be uniform along the entire length of the board.
Get Consultation
Geometric accuracy of the profile
Take two boards of the same article and align them end-to-end - they should match perfectly. Any discrepancies in height, width, or relief shape indicate low manufacturing quality. During installation, such elements will not fit together, and even after spackling, the seams will be noticeable.
Check the straightness of the board: place it against a flat surface (table, floor, wall) and look for gaps. The allowable curvature for a three-meter board is no more than 2-3 mm. If the "hump" or "dip" is greater, installation will be problematic.
Clarity of relief and details
If you are purchasing a profile with ornamentation, carefully examine the details. Lines should be sharp, without blurred areas or underformed elements. Compare several boards - the pattern on them should be identical. Differences indicate wear of the mold or instability in production.
Smell
Fresh polystyrene may have a mild specific odor - this is normal. However, if the odor is sharp, chemical, and does not dissipate over time - this is a warning sign. It is possible that low-quality additives were used during production or the technology was violated.
Marking and Packaging
Serious manufacturers mark each board or batch. On the packaging or label, the following should be indicated:
-
Manufacturer's name
-
Product article number
-
Dimensions (length, width, height of the profile)
-
Number of pieces in the package
-
Production date
Lack of marking is a sign of handmade production or counterfeit. Quality packaging (shrink wrap, cardboard boxes) protects the material during transportation and storage.
Density and rigidity: choosing optimal parameters
Polystyrene density is a key parameter that determines the strength, durability, and ease of installing decorative elements. It is measured in kilograms per cubic meter (kg/m³) and can vary within a wide range.
Density range
For decorative elements, polystyrene with a density of 15 to 40 kg/m³ is used. The higher the density, the stronger, stiffer, and less prone to crumbling during cutting the material is, but also heavier and more expensive.
Low density (15-20 kg/m³) - the most budget-friendly option. The material is very light, easily cut even with a regular knife, but brittle. When pressed with fingers, it noticeably compresses. Suitable for simple smooth profiles of small width (ceiling skirting up to 5 cm), which will not be subjected to mechanical loads. Not recommended for rooms where impacts are possible (children's rooms, hallways).
Medium density (25-30 kg/m³) - optimal balance of price and quality. Such polystyrene is sufficiently strong for most interior tasks, holds its shape well, and edges do not crumble much when cut. It is used to makepolystyrene corniceswith a width of 5-15 cm, floor skirting, moldings. This is the most popular category for home renovation.
High density (35-40 kg/m³) - premium material for wide cornices (from 15 cm), large decorative elements, large-diameter sockets. Such polystyrene withstands significant loads, practically does not deform, and provides a perfectly flat cut. Used where maximum durability and flawless appearance are important.
How to check density when purchasing
It is impossible to determine the exact density by eye, but you can estimate it approximately. Weigh the board in your hands - the heavier it is for the same dimensions, the higher the density. Squeeze the material with your fingers in several places - dense polystyrene practically does not compress, and immediately regains its shape when released.
Another test - cutting. Cut a small piece from the end of the strip with a sharp knife. Dense material gives a smooth, clean cut without crumbs. Loose material crumbles, leaving an uneven edge with protruding granules.
Density and profile compatibility
Manufacturers usually select the material density to match a specific profile. Narrow, smooth baseboards are made from lower-density polystyrene, while wide, complex-profile cornices are made from denser material. When purchasing decorative polystyrene, pay attention to the manufacturer's recommendations.
If you plan to paint the decorative element in dark, saturated colors, choose a denser material — it is less translucent and provides a more even finish.
Stiffness and elasticity
Stiffness is related to density, but not identical to it. A stiff profile holds its shape well, does not sag under its own weight during installation of long sections. This is important for ceiling cornices — a too-soft strip will sag between mounting points.
On the other hand, some elasticity is useful — it allows the material to conform to minor irregularities of the base, fitting tightly along the entire length. A fully rigid profile will leave gaps on an imperfectly flat wall.
The optimum is a material of medium stiffness, which holds its shape but slightly bends under slight pressure. You can check this by holding the strip at both ends and trying to bend it. Quality polystyrene will slightly bend but will not break or deform.
Geometry and length of strips: selecting according to room configuration
Decorative polystyrene elements are produced in standard sizes, but variability is still significant. Correct selection of profile geometry and strip length simplifies installation and saves material.
Profile height and width
Ceiling cornices differ in width (from 3 to 30 cm and more) and protrusion height (from 2 to 20 cm). Selection depends on ceiling height and room scale:
-
For standard apartments with ceilings 2.5–2.7 m, cornices 5–10 cm wide are suitable.
-
For high ceilings (3 m and above) — cornices 12 cm and wider.
-
For small rooms, use narrow profiles that do not 'consume' space.
-
For spacious living rooms, you can choose wide cornices with rich decoration.
Floor baseboards usually have a height of 5 to 20 cm. Tall baseboards (12 cm and above) visually raise the ceiling and give the room a more prestigious look, but in small rooms they may appear bulky.
Standard strip length
Most manufacturers produce strips 2 meters long — this is the optimal size for transportation and installation. Strips of 1.2 m, 2.4 m, 2.5 m, and 3 m are less commonly available.
Short strips (1.2 m) are convenient for small rooms with complex geometry — more waste, but less material loss. Long strips (2.5–3 m) are more economical for large rooms with straight walls — fewer joints, faster installation.
When selecting, consider the length of the longest wall in the room. If it is 4 meters, two 2-meter strips will result in one joint in the middle. With 3-meter strips, you’ll have a 1-meter short insert, which is harder to integrate harmoniously.
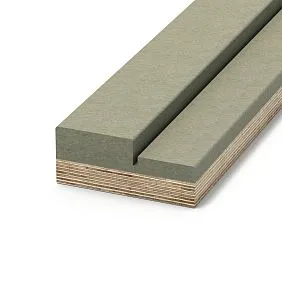
Wall thickness
Cornices and baseboards have a front surface and 'legs' — flat parts by which the element is glued to the wall and ceiling (or floor). The thickness of these legs varies from 3 to 10 mm.
Thin walls (3–5 mm) make the profile lighter and cheaper, but reduce stiffness. Such elements may deform during transportation or under their own weight after installation.
Thick walls (7–10 mm) ensure strength and shape stability. A cornice with thick legs securely holds on the wall, does not sag, and withstands light impacts without damage.
Cross-sectional shape
Cornices and baseboards have various profiles — from simple triangular to complex multi-step. When purchasing, pay attention to:
-
Relief depth — the deeper the relief, the more expressive the decoration, but the harder it is to clean.
-
Number and thickness of protruding elements — thin 'legs' are easily broken.
-
Presence of a shelf for hidden lighting (if planning to use LED strip).
-
Backside shape - it should ensure good contact with the wall/ceiling
Corner elements and joining parts
Along with straight planks, it makes sense to purchase ready-made corner elements - internal and external. They precisely replicate the cornice profile and are installed in room corners without 45-degree cutting. This simplifies installation and guarantees perfect joints.
For some collections, the following are also available:
-
Connecting elements for joining straight planks
-
End caps
-
Flexible inserts for curved sections
Check the availability of these accessories when purchasing - they significantly simplify the work.
Compatibility with substrate and finishing coatings
Not all polystyrene profiles mount equally well on different surfaces. And not all paints are suitable for painting them. These nuances need to be considered at the purchase stage.
Substrate type
Concrete and plaster - ideal substrate for polystyrene. The rough surface provides excellent adhesion with glue. The only requirement - the substrate must be strong, not crumbling. Loose plaster needs to be reinforced with primer.
Wallpaper - a debatable substrate. If the wallpaper is vinyl, dense, well-glued - polystyrene holds on them. But paper wallpaper, especially old ones, may peel off along with the decor. Ideally, mount polystyrene on a bare wall, and then glue wallpaper butt-jointed to it.
Painted surfaces - depends on the type of paint. Water-based emulsion, acrylic - suitable. Oil paint, glossy enamel - poorly hold glue, the surface needs to be sanded or primed.
Tile - polystyrene can be glued to ceramic tile (for example, on a kitchen backsplash), but special adhesive is needed - for tile and plastic. Regular mounting adhesive doesn't hold on smooth glaze.
Polystyrene tiles can be glued onto ceramic tiles (e.g., on a kitchen backsplash), but a special adhesive is required—one suitable for tiles and plastic. Regular mounting adhesive does not adhere to smooth glaze.
Primers and impregnations
If the substrate is loose, porous, strongly absorbs moisture - before mounting polystyrene it needs to be primed. Deep penetration primer will strengthen the surface and improve adhesion.
The polystyrene itself does not need to be primed before mounting. But before painting - it's advisable if you want to get a perfectly even coating.
Compatibility with paints
As we already discussed, only water-based paints are suitable for painting polystyrene - water-emulsion, acrylic, latex. Solvent-based paints (oil, alkyd, nitro enamels) dissolve polystyrene.
When purchasing paint, always read the composition and manufacturer's recommendations. If it says 'for all surfaces', clarify whether it's suitable for expanded polystyrene. Ideally, choose paint marked 'for foam plastic' or 'for polystyrene'.
Decorative coatings
Painted polystyrene can be coated with decorative compounds:
-
Patina (creates an antique effect)
-
Gilding (imitation of gold or bronze)
-
Pearlescent paints
-
Metallic coatings
All these compounds must be water-based. Before application, test on a small piece of material - make sure the coating doesn't corrode the polystyrene and applies evenly.
Accessories and adhesive: assembling a complete set for installation
Buying polystyrene is half the job. For quality installation, you need a whole set of related materials. Often beginners forget about them and during work are forced to buy additional items, losing time.
Mounting adhesive
Main consumable - adhesive for polystyrene. Its varieties we discussed above, but let's recall key points:
-
The adhesive should be solvent-free
-
The optimal option - acrylic mounting adhesive in tubes for a gun
-
Consumption: one tube of 310 ml for 15-20 linear meters of cornice
When purchasing, pay attention to the shelf life of the adhesive (usually 12-18 months from the date of manufacture) and storage conditions. Adhesive stored in the cold may separate and lose its properties.
Buy adhesive with a reserve - better to have extra than run short at the most inconvenient moment. An opened tube lasts only a short time (2-3 months), so do not buy more than needed for the current project.
Mounting gun
To work with adhesive in tubes, you need a mounting gun (skeleton or closed type). It costs little (300-800 rubles), but without it, it is practically impossible to squeeze the adhesive out of the tube. Guns can be mechanical or battery-powered - for home repairs, a simple mechanical one is sufficient.
Putty
Acrylic putty is needed to fill joints between elements, corners, small defects. Buy ready-made putty in buckets - it is more convenient than dry mixes that need to be diluted. A 1 kg volume is enough to process joints in a standard three-room apartment.
Primer
If you plan to paint polystyrene, buy acrylic primer. The volume depends on the area of decoration - usually 1 liter is enough for 50-70 linear meters of cornice in one layer.
Paint
Paint consumption depends on profile width and number of layers. On average, 1 liter of water-emulsion paint covers 30-40 linear meters of 10 cm wide cornice in two layers. For reliability, buy 10-15% more than the calculated amount - you will need to touch up joints and possible defects.
Tools
Basic tool set for installing polystyrene:
-
Construction knife or saw with fine teeth
-
Miter saw for cutting at 45-degree angles
-
Tape measure and pencil
-
Trowel (rubber or narrow metal)
-
Sandpaper (medium and fine grit)
-
Painter's tape
-
Brush or roller for painting
All of this is inexpensive and available in any hardware store.
Corner elements
If the profile allows, definitely buy pre-made inside and outside corners. They cost more than straight strips (from 100 to 500 rubles per piece), but save time and nerves. Calculate the number of corners in the room and add a couple of extra corners - you may need to replace a damaged element.
Additional elements
Depending on the design project, you may need:
-
Ceiling rose
-
Pilasters or half-columns
-
Moldings for wall panels
-
Decorative overlays
Purchase all elements from the same collection - they will definitely match in style and size.
Material consumption and allowance for cutting: precise calculation
One of the most common questions - how much polystyrene exactly to buy? It seems, measure the room's perimeter, divide by the length of the strip - and there's the answer. But in practice, it's more complicated.
Basic perimeter calculation
For ceiling cornice, measure the room's perimeter along the line of contact between the wall and ceiling. Use a laser tape measure or a regular one, but keep in mind that the room may slightly expand or narrow in height.
For baseboard, measure the perimeter along the floor, subtracting the width of doorways.
Record the length of each wall separately - this will help optimize the cutting of planks.
Adjustment for room geometry
Rectangular room - it's simple. Add up the lengths of all four walls, subtract openings, and you get the required length.
Room with complex shape - with niches, protrusions, bay windows. Divide the room into simple shapes, calculate the perimeter of each, and add them up. Don't forget about internal angles of niches and external angles of protrusions.
Room with curved elements - rounded corners, arches. For standard polystyrene, this is a problem - it doesn't bend. You'll either need to use flexible trim (usually more expensive), or build the radius using short straight segments. In the latter case, material consumption will increase by 15-20%.
Allowance for cutting and errors
Even with perfect calculations, there are always leftovers. Reasons vary:
-
Trimming corners to 45 degrees consumes 3-5 cm from each plank
-
Measurement or cutting errors
-
Accidental damage to a plank during installation
-
Wall irregularities that require adjusting the length of elements
Professionals recommend adding to the calculated material amount:
-
5-7% for rectangular rooms with simple geometry
-
10-12% for rooms with complex shapes
-
15-20% for rooms with many niches, protrusions, and complex joints
If the room has high ceilings and long walls (over 4 meters), you can reduce the allowance - large straight sections are installed with minimal waste.
Cutting optimization
To minimize waste, plan the layout of planks before purchasing:
Suppose the room is 4x5 meters, perimeter 18 meters, one door 0.8 m. Need 18 - 0.8 = 17.2 meters.
Option 1: Buy planks 2 meters long.
-
4 m wall: 2 planks (remainder 0)
-
5 m wall: 2 planks + 1 meter from the third (remainder 1 m)
-
Second 4 m wall: use the 1 m remainder + 2 more planks (remainder 0)
-
Second 5 m wall (minus 0.8 m door = 4.2 m): 2 planks + 0.2 m from the third (remainder 1.8 m)
Total: 10 planks (20 m), remainder 2.8 m (can be used for small inserts or kept as reserve).
Option 2: Buy planks 2.5 meters long (if the manufacturer produces this length).
-
4 m walls: 2 planks each (remainders 2x1 m = 2 m)
-
5 m walls (one minus door): 2 planks for one wall (remainder 0), 2 planks for the second (remainder 0.8 m)
Total: 8 planks (20 m), remainder 2.8 m.
As we can see, the result is approximately the same, but in reality there may be nuances that make one option more advantageous than the other.
Buy 'just enough' or with a reserve?
Some try to save money by purchasing material strictly according to calculations. This is risky:
-
If 20-30 cm are missing, you will have to buy an entire board.
-
Delivery of one board may cost more than the board itself.
-
The required item may not be in stock, you will have to wait.
-
If the board gets damaged during installation, there will be nothing to replace it.
A reasonable approach is to buy 1-2 extra boards. If any remain, they can be returned (if the store accepts returns) or kept 'just in case' — they will be useful for minor repairs, patching loose sections, or experimenting with painting.
Calculation of accompanying materials
Adhesive: 1 tube for 15-20 meters of cornice. For our example (17 meters), at least 1 tube is needed, but it's better to buy 2 — there will be some left for patching joints and possible rework.
Putty: 1 kg for 30-40 meters of joints. Count joints not by perimeter, but by number of connections: every 2 meters of cornice gives 1 joint, plus corners. In our example: 8-9 joints + 4 corners = approximately 15 meters of joints. 1 kg of putty is sufficient with a reserve.
Paint: 1 liter for 30-40 meters of 10 cm wide cornice (in two coats). For 17 meters, 0.5 liters will suffice, but buy a 1-liter can — you will need to touch up corners, joints, and possible defects.
Where to buy polystyrene online: criteria for choosing a store
The times when you had to go to the market or hypermarket to buy construction materials are fading into the past. Today, you can buy polystyrene cornices without leaving home — simply visit an online cornice store. But how to choose a reliable seller among hundreds of offers?
Assortment and availability
A good store offers a wide selection of profiles — from simple smooth ones to complex ornate ones. The catalog should include:
-
Cornices of different widths (from 3 to 20+ cm)
-
Baseboards of different heights
-
Moldings and decorative strips
-
Corner elements and accessories
-
Accompanying products (adhesive, putty, paint)
Pay attention to the relevance of availability information. If the website says 'in stock', but upon placing an order you find out the item needs to be waited for 2 weeks — this is a bad sign.
Polystyrene price: comparison and reasonableness
Prices for decorative polystyrene vary widely depending on the manufacturer, material density, and profile complexity. Approximate ranges (per linear meter):
-
Simple ceiling baseboards: 50-150 rubles
-
Cornices of medium complexity: 150-400 rubles
-
Wide cornices with ornament: 400-800 rubles
-
Premium collections: 800-1500 rubles
Too low a price should raise suspicion — it may be low-density, inferior material or even counterfeit. Too high a price — the store may be inflating an unjustified markup.
Compare prices in several stores for identical (or very similar) profiles. A difference of 10-20% is normal. A difference of 2-3 times — reason for concern.
Delivery conditions for cornices
Delivery is a critical moment when purchasing polystyrene. This fragile material is easily damaged during transportation. Please clarify:
Delivery cost: free from a certain order amount or paid? How much does delivery cost within the city, to the region, or to remote areas?
Delivery time: when will the order arrive? Can you choose a convenient delivery time?
Delivery method: courier, transportation company, or postal service? Delivery to the entrance or to the apartment (this is important if you live on a high floor without an elevator and there are many beams)?
Packaging: how is the product packaged? Professional stores package polystyrene in rigid cardboard boxes or in multiple layers of stretch film with protective corners. If you receive simply a bundle of beams wrapped with tape, there is a high risk of damage.
Responsibility for damage: what to do if the item arrives damaged? How is the return/exchange processed? Who covers the costs of return shipping?
Warranties and Returns
A serious store always provides a warranty on products and accepts returns if something doesn't meet expectations. Review the "Returns and Exchanges" section on the website:
-
Within what timeframe can you return the item (by law - 7 days after receipt for distance selling)
-
What condition should the item be in (usually, original packaging must be preserved)
-
What documents are required for return
-
How and when will the money be refunded
If the website has no information about returns or states "return is impossible" - this is a warning sign.
Reviews and reputation
Before placing an order, search for reviews of the store online - on Yandex Market, in topic forums, on social networks. Pay attention not to overly enthusiastic reviews (they are often ordered), but to negative and neutral ones. How does the store resolve customer issues? If it ignores complaints or is rude - better look for another seller.
Consultations and support
A good online store offers online consultations - chat on the website, hotline phone, messengers. Try asking a few questions before purchasing:
-
Which beam is suitable for ceilings 2.7 meters high?
-
How much glue is needed for a 20 m² room?
-
Are there corner elements for this profile?
If consultants respond quickly, accurately, and to the point - this is a good sign. If they remain silent, answer vaguely, or openly don't know their product - look for another store.
Reliable choice: store STAVROS
Company STAVROS specializes in decorative elements for interiors and offers qualitybuy polystyrenewith delivery across Russia. The catalog features dozens of collections of beams, baseboards, and moldings in various styles - from classic to modern. All products are in stock at our own warehouse, prices are transparent without hidden markups, delivery is insured, and self-pickup is available. Professional consultants will help you select the optimal decor option for your project and calculate the exact amount of material.
Quality check upon receipt: step-by-step procedure
You placed an order, waited for delivery, and the courier brought boxes with beams. What next? Don't rush to sign for receipt - first, inspect the goods. You have the right to examine the purchase upon receipt and refuse it if the quality is unsatisfactory.
Step 1: Visual inspection of packaging
Before opening the boxes, inspect them from the outside. Are there damages - dents, tears, signs of impact? If the packaging is seriously damaged, there is a risk that the contents are also damaged. Take photos of the damage (this will be useful if you need to file a complaint).
Step 2: Counting quantity
Unpack the goods and recount the beams. Does the quantity match what is indicated on the delivery note? Check the item numbers - are all positions present? If you find a shortage or incorrect item, immediately inform the courier and make a note in the acceptance documents.
Step 3: Check for damage
Remove the boards from the packaging (not all, it is sufficient to randomly check 30-50% of the batch) and carefully inspect:
Integrity: are there any cracks, breaks, or chipped fragments?
Geometry: are the boards bent, and are the profiles deformed?
Surface: are there dents, scratches, or dirty spots?
Relief: is the pattern clear, and are the decorative details not smudged?
Carefully inspect the edges and corners of the elements — these are the most vulnerable areas.
Step 4: Checking against the order
Compare the received goods with what you ordered:
-
Is it the correct profile (compare with the photo on the website or in the catalog)?
-
Are the correct dimensions (measure the length, width, and height of the profile)?
-
Is it the correct color (if you ordered painted elements)?
Sometimes similar but different items are mistakenly sent. If not checked immediately, proving a mismatch later will be more difficult.
Step 5: Checking accompanying goods
If you ordered polystyrene along with adhesive, putty, paint, or corner elements — check them too:
-
Expiration date (especially important for adhesive and paint)
-
Packaging integrity (are tubes not opened, are cans not dented?)
-
Matching item numbers in the order
Step 6: Filing a complaint
If you discover shortage, defects, or mismatch, do not accept the goods. Prepare an act detailing all defects. The act must be signed by you and the delivery representative (courier or transport company’s dispatcher).
Photograph the defects in close-up — from different angles — to clearly show the problem. Attach the photos to your complaint.
Contact the store and describe the situation. Honest sellers promptly resolve such issues — replacing defective goods, supplying missing items, or refunding money for items you refused to accept.
Step 7: Signing documents
If everything is in order, sign the delivery note or acceptance-transfer act. After signing, complaints about quality are harder to process — you will need to prove that damage occurred, not that it appeared after receipt.
What to do if defects are discovered after installation?
Sometimes defects appear during or after installation. For example, a cornice detaches even though the adhesive is good and the installation technique is correct. Or paint applies unevenly, even though such problems did not exist before.
In this case, contact the store, describe the problem, and provide photos and videos. If the defect is indeed manufacturing-related and not due to improper installation, the store must replace the item or refund the money.
However, proving this will be more difficult than during acceptance. Therefore, it is so important to carefully inspect the goods upon receipt.
Storage and transportation conditions for polystyrene
Even high-quality material can be damaged by improper storage or transportation. Polystyrene requires careful handling and adherence to specific conditions.
Temperature regime
Rule: allow the material to acclimate before installation. Bring polystyrene into the room where installation will take place and leave it there for a day at room temperature. Unpack (if the packaging is sealed) so the boards can "breathe".
Humidity
Foamed polystyrene is hygroscopic - it absorbs moisture from the air, albeit in small amounts. Long-term storage in a humid environment (basement, unheated warehouse in winter) may result in dark spots appearing on the surface.
Optimal storage humidity - 40-70%. This is normal humidity for residential and working spaces. If storing polystyrene in a garage or on a dacha, ensure it does not become damp.
Protection from sunlight
Ultraviolet radiation is the main enemy of polystyrene. In direct sunlight, the material yellows, becomes brittle, and loses strength. If boards have been lying near a window under direct rays for several months, it is better not to use them - they may crack during installation or shortly after.
Store polystyrene in a dark place or under opaque film. If purchasing material in bulk (for example, buying on sale with a discount), do not unpack it - factory packaging protects from light.
Storage position
Long boards (2-3 meters) must be stored horizontally on a flat surface. If standing them vertically against the floor, they may deform under their own weight - especially in hot weather.
Stack boards, but not too high - maximum 10-15 boards stacked on top of each other. A higher stack may crush the lower boards.
Place cardboard spacers or soft fabric between stacks of different articles - this will prevent damage to the surface relief.
Polystyrene is soft - it is easy to scratch, crush, or break off a piece. Store the material so as to avoid accidental impacts, falling heavy objects, or contact with sharp edges.
Protection from mechanical damage
If storing in a garage along with other construction materials, designate a separate zone for polystyrene, isolated from the rest of the storage area. Do not place heavy boxes, bags, or tools on the boards.
Transportation in a passenger car
If you decide to pick up polystyrene yourself from the store (self-pickup), consider the dimensions of the boards. Cornices up to 2-2.5 meters can fit in a station wagon or hatchback with folded rear seats. Sedans will only accommodate short boards (up to 1.5 m) or you will need to transport them with the trunk open (which is risky - you may lose the cargo or receive a fine).
Place boards horizontally, not at an angle - this reduces the risk of deformation. Place soft fabric or cardboard under the bottom to avoid scratching the trunk floor. Cover the top with something soft as well.
Do not transport polystyrene on the roof of a car (even in a box) - vibrations, wind, and temperature fluctuations may damage the material.
Cargo transportation rules
If transporting polystyrene by truck (for example, ordering a large amount of material for a big house renovation), follow the rules for transporting fragile cargo:
Pack in rigid cardboard boxes or wooden crates
-
Place cardboard or polystyrene between layers of boards
-
Secure boxes with straps or belts so they do not move around in the cargo area
-
Cover the cargo with tarpaulin to protect from rain and dust
-
Do not transport polystyrene together with heavy construction materials (bags of cement, bricks, metal profiles)
-
During loading and unloading, do not throw boxes, do not place them on their sides, and do not drag them with ropes.
What to do with leftovers after renovation
If there are leftover scraps and extra boards after installation, do not rush to discard them. Scraps longer than 30-40 cm may be useful for minor repairs, patching loose areas, or experimenting with painting. Whole boards - even more so, save them for future use.
Wrap leftovers in plastic film (stretch wrap or regular bags), label the article number, and store them on a high shelf, in a storage room, or on a balcony (if it is glazed). In this way, polystyrene can be stored for years without losing quality.
Frequently asked questions when purchasing
Frequently Asked Questions When Purchasing
Yes, if the store accepts returns and the conditions are met: the item is undamaged, packaging is intact, and no more than 7-14 days have passed since purchase (terms depend on the store's policy). The refund is processed within 10 days after submitting the return request.
Yes, if the store accepts returns and the conditions are met: the item is undamaged, packaging is intact, and no more than 7-14 days have passed since purchase (terms depend on the store's policy). The refund is processed within 10 days after submitting the return request.
How to determine the density of polystyrene if it is not specified in the product description?
Ask the seller — reputable stores provide technical specifications. If it's not possible to determine precisely, use price as a guide: inexpensive polystyrene (up to 100 rubles/m) is usually low-density, medium (150–300 rubles/m) — medium, expensive (from 400 rubles/m) — high-density.
Which adhesive is better - in tubes or in buckets?
For small volumes (one room), it's more convenient to use adhesive in tubes for a caulking gun — it dispenses precisely and doesn't dry out in packaging. For larger volumes (entire house), it's more economical to buy adhesive in buckets — cheaper per liter.
Do you need to buy primer for polystyrene?
Primer before painting is not mandatory but recommended for an ideal result. It evens out the surface's absorption and improves paint adhesion. If painting in light shades — you can skip primer. If painting in dark or saturated tones — it's better to prime first.
Which is better — wide or narrow cornice?
It depends on ceiling height and interior style. For ceilings up to 2.7 m — cornices 5–10 cm wide. For high ceilings (from 3 m) — from 12 cm. In small rooms, a wide cornice will look overpowering; in large rooms, a narrow one will be lost.
How much does delivery of cornices across Russia cost?
It depends on the region and the transportation company. In Moscow and the Moscow Oblast — usually 300–800 rubles. To regions — from 500 to 3000 rubles depending on distance. Many stores offer free delivery for orders above a certain amount (e.g., from 5000 rubles).
Can you order polystyrene to custom dimensions?
Standard profiles are produced in fixed lengths (usually 2 m). Some stores offer cutting to custom size as a paid service. But it's simpler to buy standard profiles and cut them yourself — it's not difficult.
How does polystyrene differ from polyurethane?
Polyurethane is denser, stronger, and more expensive. It is not afraid of moisture, does not yellow in sunlight, and better retains fine relief details. Polystyrene is lighter, cheaper, and easier to process. For dry rooms with normal conditions, both materials are equally suitable.
How to calculate the amount of adhesive?
On average, one tube of 310 ml is enough for 15–20 linear meters of cornice. For a room with a perimeter of 18 meters, you need 1–2 tubes. Always buy adhesive with a reserve — better to have extra than run short during installation.
What to do if the wrong item was delivered?
Contact the store, describe the situation, send photos of the received item and the order. A reputable seller will replace the item at their expense or refund the money. The key is to identify the discrepancy upon receipt and document it in the acceptance records.
Conclusion
Buying polystyrene for interior decoration is not a difficult task, but it requires attention to detail. The quality of installation and the longevity of the decoration depend on the correct choice of density and profile geometry. The reliability of the store ensures you receive quality material without unpleasant surprises. The accuracy of material calculation prevents work stoppages and unnecessary expenses.
The modern market offers a vast selection of polystyrene decor to suit any taste and budget. Dozens of manufacturers, hundreds of collections, thousands of items. In this variety, it's easy to get lost, choose the wrong item, or overpay. But if you arm yourself with knowledge (which we have tried to provide in this article), the purchasing process transforms from a stressful experience into an exciting journey through the world of design and architecture.
Remember the main point: saving on material quality leads to problems during installation and quick repairs. It's better to buy slightly more expensive material from a proven manufacturer and reliable seller. It's better to buy with a small reserve than to calculate every centimeter and risk stopping work due to a shortage of one profile. It's better to spend an hour carefully inspecting the item upon receipt than to spend weeks trying to replace defective goods.
Internet store STAVROS offers high-qualitypolystyrene cornices for salewith quality guarantees, transparent pricing, and convenient delivery. In our catalog, you will find everything needed to create a stylish interior — from simple ceiling skirting to ornate cornices. Experienced consultants will help you select the optimal option for your project, calculate the exact amount of material and accessories, and provide installation advice. Buy wisely — buy from professionals!


