


Article Contents:
- Profile Selection: Construction and Materials
- Key Difference: Mounting Only to the Wall
- Profile Construction for Lighting
- Materials: Polystyrene vs. Durapolymers vs. Polyurethane
- Profile Dimensions: How to Choose Correctly
- Joints with the Ceiling Fabric: Technical Solutions
- Installation Sequence: Before or After Ceiling Installation?
- Gap Size: What Determines the Lighting Character
- Light Direction: Upward to Ceiling or Downward into Room
- Ceiling Fabric Color: Its Effect on Brightness
- Integration of LED Strip and Power Supply: Electrical Component
- Choosing LED Strip: Power, Color, Protection
- Power Calculation and Power Supply Selection
- Wiring Connection and Layout
- Dimming and Control
- Mounting and Adhesive: Technology of Reliable Fixation
- Wall preparation
- Choosing Adhesive for Polystyrene and Durapolymers
- Amount of Adhesive and Application Method
- Adhesion process
- Installation Features for Corners
- Sealing Joints: Clean Light Lines
- Profile Joints: Filling Gaps
- Wall Joint: Sealing Gaps
- Joint with Suspended Ceiling Fabric: Technical Gap
- Painting: final transformation
- When to Paint: Before or After LED Strip Installation?
- Choosing paint
- Painting technique
- Frequently Asked Questions
- Can You Glue Baseboard to Suspended Ceiling?
- What Gap Between Profile and Fabric is Optimal?
- How Much Does It Cost to Organize Lighting?
- Can You Install Lighting in an Already Installed Ceiling?
- What LED Strip Power to Choose?
- Does the LED strip heat up, and will it damage the fabric?
- Can RGB strip be used?
- How long does LED lighting last?
- Is it necessary to prime the profile before painting?
- Can profiles be installed by oneself?
- Conclusion: light built into architecture
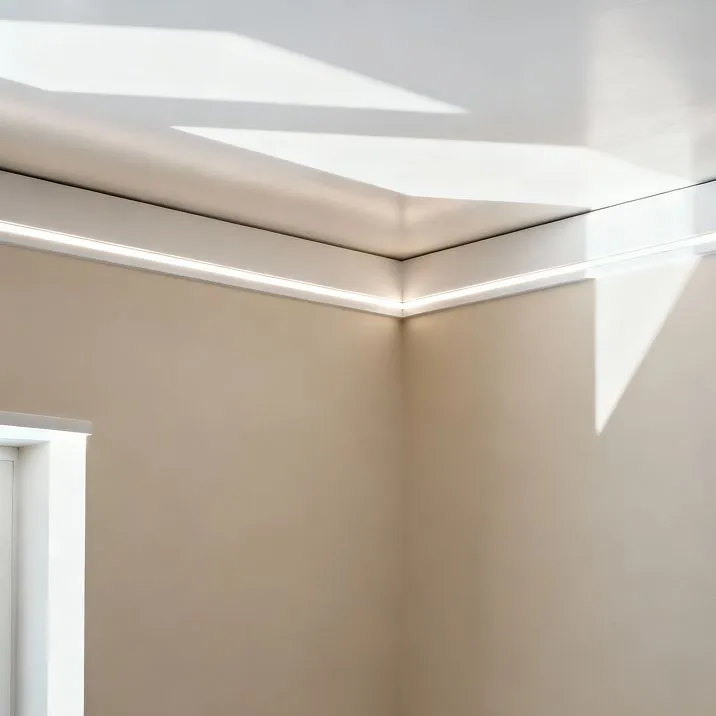
The stretch ceiling is installed. The fabric is perfectly taut and smooth. But the junction with the wall looks unfinished — the mounting gap, the mounting trim, the technical gap are visible. Functionally everything is correct, aesthetically — it lacks the final touch. A decorative element is needed to hide technical details and give a sense of completion.
Simply covering the gap with a skirting board — half the job. Modern interiors require more. Hidden perimeter lighting creates the effect of a floating plane, adds depth, transforms ordinary lighting into an architectural tool. The ceiling glows from within, the room gains depth, atmosphere, character.
Skirting board for stretch ceiling with lighting — a two-in-one solution. Decorative trim plus integrated lighting. But installation requires understanding nuances. How to choose the right profile? Where to place the LED strip? How to connect the power supply? Where to mount — to the wall or ceiling? How to seal seams to prevent light from leaking into unwanted areas? How to paint after installation? We will answer all questions step by step, from material selection to final finishing.


Profile selection: construction and materials
Not every skirting board is suitable for stretch ceilings and integration of LED lighting. A special construction is required, taking into account the specifics of installation.


Key difference: mounting only to the wall
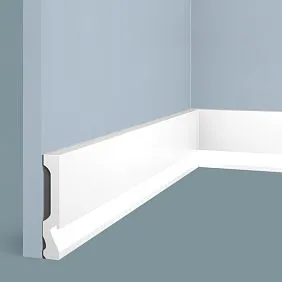
Ceiling skirting board for stretch ceiling Mounts exclusively to the wall, without contact with the fabric. This is a fundamental point. The stretch fabric is under tension; any additional pressure may deform it, create wrinkles or sagging.
Standard ceiling skirting boards are glued simultaneously to the wall and ceiling. For stretch ceilings, this is unacceptable. Specialized profiles have a construction ensuring mounting only to the vertical surface of the wall.
The width of the contact surface with the wall is critical. A narrow profile holds less securely, especially if the wall is uneven. The optimal width of attachment to the wall is 30-50 mm — this ensures secure mounting on glue without additional screws.
Our factory also produces:


Profile construction for lighting
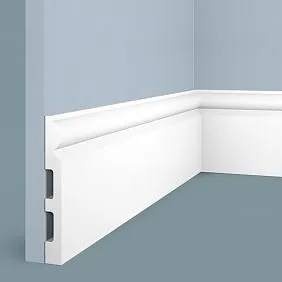
LED ceiling skirting board for stretch ceilings Has an L-shaped cross-section. The vertical part adheres to the wall, the horizontal flange serves as a base for placing the LED strip.
The flange width varies from 20 to 50 mm depending on the power of the planned lighting. For decorative strips of 5-7 W/m, 20-30 mm is sufficient. For functional lighting of 10-14 W/m, 30-40 mm is needed. For powerful strips of 14-18 W/m, 40-50 mm is required.
Profile height determines visual expressiveness and the size of the gap between the panel and the top edge of the profile. Standard heights are 70-150 mm. The higher the profile, the larger the gap, and the softer and more diffused the lighting from the backlight.
The flange lip holds the LED strip in place. Some profiles have a low lip of 5-10 mm along the edge of the flange, preventing the strip from sliding. This simplifies installation — the strip is laid and stays in place without additional fixation.
Get Consultation
Materials: polystyrene vs duroplastic vs polyurethane
Skirting boards for stretch ceilings — polystyrene — the most affordable option. Density 25-35 kg/m³, minimal weight. A two-meter plank 100 mm high weighs 150-250 grams. Easily cut, glued, painted with water-based paints.
Advantages: price 200-500 rubles/m, ease of installation, wide range of profiles. Disadvantages: brittleness (easily breaks with careless handling), low heat resistance (up to 80°C), tendency to yellow under UV exposure near large windows.
For decorative low-power lighting, polystyrene is ideal. For powerful strips, it is better to choose a more heat-resistant material.
Duroplastic — high-density polystyrene 350-420 kg/m³. Ten times denser than standard, accordingly stronger and more heat-resistant (up to 90-110°C). A two-meter profile weighs 800-1200 grams, requires more secure mounting — glue plus screws.
Advantages: strength, geometric stability, heat resistance, longevity of 25-30 years. Disadvantages: price 600-1200 rubles/m (2-4 times more expensive than polystyrene), greater weight requires mechanical mounting.
For powerful lighting, wide profiles 150-200 mm, premium interiors — duroplastic is optimal.
Polyurethane is the most expensive (800-1500 rubles/m), but it has elasticity. It can bend to accommodate curved sections — arches, bay windows, curved walls. Density 200-350 kg/m³, heat resistance up to 110-130°C.
Advantages: flexibility for non-standard shapes, absolute moisture resistance, maximum durability. Disadvantages: high price, greater weight.
For standard straight sections, polyurethane is overpriced. For curved surfaces — the only option.
Profile size: how to choose correctly
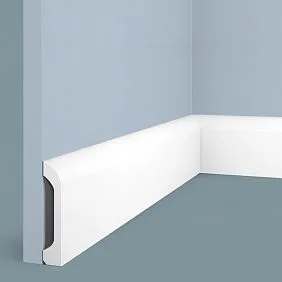
Profile height 70-100 mm is suitable for most rooms with ceilings 2.5-2.7 m. Visually not overwhelming, creates a moderate gap of 5-8 cm for backlighting. This is the golden middle — both decorative function and sufficient lighting effect.
Height 120-150 mm for rooms with ceilings 2.8-3.2 m. Wide profile matches the scale of high ceilings. Backlighting gap increases to 10-15 cm, light becomes more diffused and softer.
Height over 150 mm for rooms with ceilings 3.5 m and higher — Stalinist buildings, private homes, public buildings. This is already an architectural element dominating the interior. Gap of 15-20 cm creates very soft glow.
Standard plank length — 2 or 2.4 meters. This is optimal for transportation and minimizing the number of joints. For a room with 18-20 meters of perimeter, 8-10 planks are required.
Joints connecting to the fabric: technical solutions
Correct mutual positioning of the profile and stretched fabric determines the appearance and performance of the backlighting.
Installation sequence: before or after stretching?
Install the profile BEFORE stretching the fabric. This is the standard sequence of work: wall leveling → marking and installing the profile → mounting the valance for the stretched ceiling → stretching the fabric → laying LED strips → connecting and testing → painting the profile.
Why before stretching? Because installing the profile requires drilling, adhesive, and possible contamination. A stretched fabric is easily damaged by tools, stained with adhesive or paint. Profile installation is performed before the final finishing stage.
LED strip is laid AFTER stretching the fabric, when the exact gap between the fabric and the profile’s shelf is known. If laying the strip before stretching, it is unknown how it will light — ceiling stretchers may alter the fabric’s height during the process.
Gap size: what determines the lighting effect
Distance between the top edge of the profile and the stretched fabric is critical for the lighting effect. Narrow gap 3-5 cm creates a bright, concentrated light strip. Each LED point is visible; close-up, the effect is discrete.
Medium gap 7-10 cm — optimal for most cases. Light is sufficiently diffused so individual LEDs blend into a continuous line. Brightness is sufficient for functional lighting, but does not strain the eyes.
Wide gap 12-15 cm creates very soft, diffused glow. Individual LED points are completely indistinguishable. Backlighting works as a delicate architectural accent, visually lifting the ceiling.
Gap is adjusted by profile height and installation position relative to the stretched ceiling valance. If the valance is 5 cm from the base ceiling and the 100 mm profile is installed downward from the valance, the gap will be approximately 8-10 cm — optimal.
Light direction: upward to the ceiling or downward to the room
Ceiling trim with backlighting for stretched ceilings Usually directs light upward onto the fabric. LED strip is mounted on the horizontal shelf, lights upward, illuminating the ceiling. Light reflects off the fabric and diffuses throughout the room.
This is a standard solution creating a floating ceiling effect. The light strip visually separates the ceiling from walls, making it appear light and airy. Especially effective with glossy fabrics, which reflect light like a mirror.
Alternative — light directed downward onto the wall. For this, the strip is mounted on the inner vertical surface of the profile. Light slides down the wall, creating a vertical light gradient. The effect is different — not a floating ceiling, but a lit wall.
Two-way backlighting — strip lights both upward and downward simultaneously. Requires a profile with special construction featuring two shelves. More expensive, more complex to install, but maximum effect — light both on the ceiling and on the wall.
Ceiling fabric color: influence on brightness
Glossy white fabric reflects 80-90% of light, maximum brightness effect. Backlighting at 7-10 W/m creates sufficient illumination for use as ambient evening lighting.
Matte white reflects 60-70%, softer effect. Backlighting is increased to 10-12 W/m for comparable brightness. Matte surface provides more natural diffused glow without glare.
Beige or pastel fabric reflects 50-60% of light, altering its color temperature. Neutral white light becomes warm. Consider color temperature when choosing LED strips.
Dark fabric — gray, blue, brown — absorbs most of the light. Backlighting functions more as a light contour than as illumination. Strip power is increased to 14-18 W/m, but brightness remains moderate.
Integration of the strip and power supply: electrical part
Correct selection and connection of electrical components ensure the longevity and safety of the system.
LED strip selection: power, color, protection
For decorative lighting, 5-7 W/m, 60 LEDs per meter is sufficient. It creates a soft glow and ambiance, but does not functionally illuminate the room. Used as an addition to main lighting.
For functional lighting, 10-14 W/m, 120 LEDs per meter is required. This is already a significant light output, sufficient for reading, working, and daily life. Can be used as primary evening lighting in small rooms.
Color temperature is chosen based on the room's purpose. Warm white 2700-3000K creates a cozy atmosphere in bedrooms and living rooms. Neutral 4000-4500K is universal and suitable for any room. Cool 6000-6500K visually increases space and is used in bathrooms and kitchens.
RGB strips with multi-color LEDs allow changing the backlight color. Requires an RGB controller for operation. More expensive than single-color strips, but offers flexibility in color solutions. Ideal for holidays, parties, and creating various moods.
Protection rating IP: for dry rooms, IP20 (no protection) is sufficient. For humid areas — bathrooms, kitchens — IP65 (full water resistance, silicone coating) is required. Water-resistant strips cost 30-50% more but are necessary for longevity in humid environments.
Power calculation and power supply selection
Total system power = perimeter length × power per meter of strip. For a room with 20 meters of perimeter and a 10 W/m strip: 20 × 10 = 200 W. This is the total power consumption of the lighting system.
The power supply must exceed the calculated power by 20-30%. This provides a safety margin for startup currents and long-term stability. For a 200 W system, a 240-260 W supply is needed; the nearest standard is 250 W.
Voltage: for 12V strips, use a 12V supply; for 24V strips, use a 24V supply. Mismatch will damage the strip. 24V is preferable for lengths over 5 meters — it reduces voltage drop and ensures more uniform brightness along the length.
Power supply placement: in a niche behind a suspended ceiling on the base ceiling, in a technical cabinet, under a suspended ceiling in a corner on the raw surface. Ventilation is mandatory — power supplies heat up, and overheating shortens their lifespan.
Wiring connection and layout
Run a wire with cross-section 1.5-2.5 mm² from the power supply to the start of the LED strip, depending on power and length. Secure the cable to the wall or base ceiling with cable clips, and route it to the start of the strip.
Observe polarity: connect the positive terminal of the power supply to the positive terminal of the strip, and the negative to the negative. The strip usually has markings: + and -, red and black wires. If connected incorrectly, the strip will not light up but won’t burn out — simply reconnect correctly.
For long sections over 5 meters, use parallel connection. Divide the strip into two or three sections, and connect each section separately to the power supply. Series connection causes brightness drop at the end due to conductor resistance of the strip.
Joining strip segments is done by soldering or connectors. Soldering is more reliable — heat the contact pads with a soldering iron, apply solder, and connect the wires. Connectors are simpler — snap into place without tools, but the contact may weaken over time.
Dimming and control
A dimmer for brightness control is installed between the power supply and the strip. Simple rotary dimmers cost 500-1000 rubles and manually adjust brightness. Models with remote control cost 1500-3000 rubles and offer remote control.
An RGB controller for color strips allows selecting color and brightness. Basic models with remote control cost 1500-2500 rubles. Advanced models with Wi-Fi and smart home integration cost 5000-10000 rubles and are controlled via a smartphone app.
Programming scenes via smart controllers. Morning — gradual brightness increase, simulating sunrise. Evening — smooth dimming. Festive — colorful dynamic lighting. The system adapts to your lifestyle.
Mounting and adhesive: reliable fixation technology
Correct installation guarantees that the profile won’t detach after one or two years. This is especially important for suspended ceilings — reinstallation would require removing the fabric.
Wall preparation
The base must be flat, clean, dry, and strong. Remove peeling wallpaper and old paint — the profile holds only on a strong base. Wipe dust with a damp cloth and let it dry.
Level walls over 5 mm should be smoothed with spackle. The profile is rigid and won’t follow wall waves, creating gaps. Local bumps can be trimmed with a putty knife or sanded, and holes filled with spackle.
Priming improves adhesive bond. Use an acrylic deep-penetration primer for porous bases — plaster, drywall, aerated concrete. Concrete can be left unprimed, but priming is recommended.
Laser level marking is critical. Draw a strictly horizontal line around the perimeter at the height where the bottom of the profile will be. Even a millimeter deviation from horizontal is noticeable to the eye when the lighting is on — the light band will repeat the slope.
Choosing adhesive for polystyrene and duroplastic
For polystyrene, use ONLY water-based adhesives. Polymer adhesives (Titan, Dragon), acrylic sealants, and special foams for polystyrene. Organic solvents in adhesives will destroy the material — it will melt and lose its shape.
Acrylic-based liquid nails — a universal choice. Tubes of 300–400 ml, applied with a caulking gun. Sets in 30–60 seconds, full strength after 24 hours. One tube is sufficient for 4–6 meters of profile 100 mm high.
For duro-polymer, you can use any adhesives — water-based or solvent-based polymer. The material is resistant to organic substances. However, water-based adhesives are more convenient — no strong odor, excess can be washed off with water.
Amount of adhesive and application method
For lightweight polystyrene profiles up to 100 mm high, apply adhesive in a zigzag pattern along the vertical surface with a wave spacing of 10–15 cm. Or apply in dots spaced 10–15 cm apart. The profile holds securely without mechanical fasteners.
For heavy duro-polymer profiles, apply adhesive over the entire contact area in a thin layer using a notched trowel. Or apply generously in a zigzag pattern with a 5–7 cm spacing. Duro-polymer is heavy, requiring maximum bonding area.
For profiles wider than 100 mm, additional mechanical fastening is mandatory. Use self-tapping screws or finishing nails with a 40–50 cm spacing on straight sections and 30 cm in corners. Without screws, the profile may detach under its own weight — screws guarantee reliability.
Adhesive application process
Apply adhesive to the vertical surface of the profile that will be against the wall. Position the profile against the wall along the marked line and press firmly along its entire length. Hold for 30–60 seconds until the adhesive sets.
Immediately wipe away any excess adhesive squeezed out from under the profile with a damp cloth. If the adhesive has already hardened, removal will be difficult — you will need to cut it with a knife, scraping the wall. Work carefully and keep a damp cloth nearby.
For long profiles, work in pairs. One person holds the start at the corner, while the other gradually presses the profile against the wall, checking alignment with the marking. This avoids misalignment and ensures a straight line.
Immediately perform mechanical fastening with self-tapping screws right after applying the adhesive, while it is still wet. Drill a hole through the profile into the wall, insert a wall anchor, and screw in the self-tapping screw. Sink the screw head 2–3 mm below the surface, and fill the hole later with putty.
Features of installing corners
For internal corners, cut profiles at 45 degrees using a miter saw or a hand saw. Position both profiles against the corner, check the tightness of the joint. Fill micro-gaps up to 0.5 mm with acrylic sealant, smoothing with a wet finger.
External corners require special precision — they are visible, and gaps are very noticeable. Cut precisely at 45 degrees, check for trimming errors, and fit on-site. Additionally, fix the corner with a self-tapping screw — it is more susceptible to contact than straight sections.
Pre-fabricated corner elements simplify installation. Insert profiles into the corner element — and the corner is finished without precise trimming. For beginners, this is a lifesaver; for professionals — a time-saver.
Sealing joints: cleanliness of light lines
The quality of joints determines whether light will leak into unwanted areas or remain exactly where planned.
Profile joints: filling gaps
After installing all profiles, inspect the joints. Fill micro-gaps up to 0.5 mm with white acrylic sealant. Extrude a thin bead into the gap, smooth with a wet finger, and wipe away excess with a damp cloth.
Gaps of 0.5–2 mm require acrylic putty. Fill the gap with a small trowel, level with the surface, let dry for 2–4 hours. Sand with fine-grit sandpaper (180–220 grit).
Gaps larger than 2 mm indicate cutting errors. Recut the profiles to achieve a tight joint. Attempting to fill a large gap will result in a noticeable seam that even painting cannot conceal.
Sealing joints to the wall
On an uneven wall, the profile forms gaps between its back surface and the wall. Through these gaps, light from LED strips may leak downward, creating unwanted wall illumination.
Fill gaps with acrylic sealant BEFORE installing LED strips. Extrude sealant into the gap between the profile and the wall from the bottom, where it will not be visible. This prevents light leakage.
For large gaps — over 5–7 mm — use low-expansion construction foam. Blow foam into the gap, let it cure, trim excess with a knife. Cover the top with sealant for airtightness.
Sealing to tensioned fabric: technical gap
Between the top edge of the profile and the tensioned fabric, a gap of 3–15 cm remains — this is the working gap for backlighting. Do NOT seal it — in fact, light exits through this gap.
But check that light does not leak outward through gaps at the ends — in corners or doorways. If you see side illumination, block the gap with a piece of white foam or synthetic sponge that does not absorb light.
Painting: Final Transformation
Painting the profile — the final stage, determining the visual impression. Paint hides joints, fastener locations, and creates a uniform finish.
When to paint: before or after installing LED strips?
It is optimal to paint AFTER installing and connecting the LED strip. First, everything works and has been tested, then paint. If you paint before laying the strip, during installation you may dirty the paint with glue, hands, or tools.
Protect the LED strip from paint. Cover the strip with painter's tape or polyethylene film. Paint that gets on the LEDs reduces brightness and changes the color of light. Work carefully.
Alternative option — paint the profile before laying the strip, but after installing all profiles around the perimeter. Fill joints, sand, paint, let dry. Then carefully lay the strip without scratching the paint.
Paint Selection
For polystyrene, ONLY water-based paints — emulsion, acrylic, latex. Organic solvents will damage the material. For duroplastic, any type can be used, but water-based paints are more convenient.
Gloss level: matte finishes hide minor defects and prevent glare. Satin finishes create a soft sheen and highlight quality. Glossy finishes require perfect preparation and reveal any imperfections.
Color: white is universal and matches any wall. Wall color visually increases the area and blends the profile. Contrasting color emphasizes the trim, making it a striking element.
Painting Technique
Remove dust from joints after sanding with a dry cloth or vacuum cleaner. Wipe with a damp cloth and let dry. Even the smallest amount of dust under paint will create roughness.
First layer — primer, thin. Dilute paint with water by 10% for better penetration. Apply with a 40-50 mm wide brush or small roller. Work quickly and watch for drips. Let dry 2-4 hours.
Second layer — main coat. Do not dilute paint; apply thinly and evenly. Paint in long strokes along the profile, do not linger on one spot — this causes buildup. After 2-4 hours, evaluate the result.
Third layer if needed. If the base shows through, apply another layer. Three thin layers give better results than two thick ones — the finish is smoother, stronger, and longer-lasting.
Frequently asked questions
Can baseboard be glued to a stretch ceiling?
No, absolutely not. The stretch fabric is under tension; any glued-on addition will cause wrinkles, sagging, and deformation. Baseboard is attached ONLY to the wall, without contact with the fabric.
What is the optimal gap between the profile and the fabric?
For functional lighting, 7-10 cm — sufficient bright and even light. For decorative lighting, 10-15 cm — soft diffused glow. For minimal lighting, 3-5 cm — bright concentrated strip.
How much does it cost to install lighting?
For a room with 20 m perimeter: profiles 4000-10000 rub (polystyrene) or 12000-24000 rub (duroplastic), LED strip 3000-6000 rub, power supply 1500-3000 rub, dimmer 1000-3000 rub. Total materials 9500-22000 rub or 17500-36000 rub.
Can lighting be installed in an already stretched ceiling?
Theoretically yes, but it's difficult. You need to dismantle the ceiling, install profiles, and re-stretch. Or install profiles very carefully without damaging the fabric. It's better to plan lighting BEFORE stretching.
What LED strip power should be chosen?
For decorative lighting, 5-7 W/m. For functional lighting, 10-14 W/m on white ceilings. For dark ceilings, 14-18 W/m for noticeable effect.
Does the LED strip heat up and damage the fabric?
LED strips heat up to 40-60°C depending on power. With a 7-10 cm gap, the temperature on the fabric does not exceed 30-35°C, which is safe. PVC fabric softens at 60-70°C, but there is no danger at this distance.
Can RGB strip be used?
Yes, RGB strips allow changing the lighting color. An RGB controller (1500-5000 rub) is required. Colored lighting is striking, but for daily use, most prefer white light.
How long does LED lighting last?
Quality strips last 30-50 thousand hours — 10-20 years with daily use of 4-8 hours. Brightness degradation begins after 70% of the lifespan. Replacement is simple — remove the old strip, glue on the new one. Profiles remain in place.
Is it necessary to prime the profile before painting?
For polystyrene, it is desirable — seals pores and improves color. For duroplastic, not necessary — the surface is dense and paint adheres well. Use water-based acrylic primers.
Can profiles be installed by oneself?
Yes, installation is accessible for a DIY homeowner. Marking with a laser level, cutting with a miter saw or saw, gluing, laying LED strips, and connecting — all can be done by yourself in 2-3 days for an apartment.
— a solution combining decorative and functional roles. The profile conceals the technological gap of a suspended ceiling, creating a neat frame. LED backlighting transforms the ceiling into a floating plane, adds depth, and creates an atmosphere.
Skirting board for stretch ceiling with lighting — an affordable option for most projects. Lightweight, inexpensive, and easy to install. Perfect for decorative backlighting with low power. Duro-polymer — for powerful backlighting, wide profiles, and premium interiors.
Ceiling skirting board for stretch ceiling — an affordable option for most projects. Lightweight, inexpensive, and easy to install. Perfect for decorative backlighting with low power. Duro-polymer — for powerful backlighting, wide profiles, and premium interiors.
— correct profile selection, proper installation, and quality electrical components — the three pillars of a successful project. Mounting only to the wall without contact with the ceiling fabric. A 7–10 cm gap for optimal light distribution. Sealing joints for clean light lines.
LED ceiling skirting board for stretch ceilings — transforms an ordinary room into a space with thoughtful lighting design. The floating ceiling effect visually increases height and expands perception. Dimming control creates different lighting scenarios for various tasks.
Company STAVROS offers a full range of baseboards for suspended ceilings polystyrene and duro-polymer. Profiles of different heights, configurations, with led strip holders. Professional consultations on selection and installation, material calculation, and electrical component selection.
Create an interior with architectural lighting.
Ceiling trim with backlighting for stretched ceilings — an investment in atmosphere, comfort, and visual perfection of space, where light becomes part of the architecture.


