Article Contents:
- Typology of Internal Skirting Boards: From Floor to Ceiling
- Floor Skirting: Classic Protection and Decoration
- Ceiling Skirting: Coving and Cornices
- Wall Decorative Strips and Moldings
- Corner Protective Elements
- Wooden Skirting for Cladding: Harmony of Textures
- Matching Wood Species
- Matching Finishes
- Skirting Profiles for Cladding
- Installing Skirting on Cladding
- Decorative Profiles: From Minimalist to Carved
- Rectangular and Coving: Minimalism of Form
- Europrofiles: Modern Geometry
- Classical Profiles: Tradition of Relief
- Carved Elements: Handcrafted Work
- Choosing Internal Skirting: Criteria and Principles
- Criterion 1: Interior Style
- Criterion 2: Ceiling Height and Room Proportions
- Criterion 3: Color Harmony
- Criterion 4: Practicality and Maintenance
- Installing Internal Skirting: Reliability Technology
- Preparing the Base Surface
- Mounting methods
- Corner processing
- Final Finishing After Installation
- Frequently Asked Questions about Internal Wooden Skirting
- What is the difference between internal and external skirting?
- Can one type of skirting be installed on both floor and ceiling?
- Which wood species is best for internal skirting?
- Should skirting be primed before painting?
- How to hide wires behind skirting?
- Can wooden skirting be repainted?
- Conclusion: The Architecture of Boundaries

Interior begins with boundaries. Between the floor and the wall, between the ceiling and the wall, between one plane and another. Where surfaces meet, the need arises for a transitional element that technically seals the joint and aesthetically completes the composition.Wooden interior skirting board— is a system of architectural details operating at different levels of a room: at the floor (floor skirting board, protecting the bottom of walls from mechanical damage, dirt, concealing technical gaps between the floor covering and the wall), at the ceiling (cove moldings, cornices, creating a visual frame for the ceiling, softening the sharp angle between vertical and horizontal), on the walls (decorative strips, panel trims, moldings, structuring vertical planes), in corners (corner elements, protecting projections from impacts, covering interior and exterior room corners). All these elements are united by the material — solid wood, natural, warm, durable, capable of aging nobly, not degrading like synthetics.
Why does the interior skirting board require special attention? Unlike exterior facade moldings, which operate in extreme conditions (temperature fluctuations from -30°C in winter to +40°C in summer, direct rain, snow, ultraviolet light, wind loads), the interior skirting board exists in a stable environment (temperature +18-25°C year-round, humidity 40-60%, no precipitation, protection from direct UV). This allows for the use of a wider range of wood species (not only durable larch and oak, but also soft linden, pine, beech), thinner profiles (no need for excessive massiveness to withstand wind), and more diverse finishes (not only durable varnishes and oils for exterior work, but also thin waxes, acrylic enamels, natural impregnations). The interior skirting board is primarily about aesthetics, decor, stylistic expression, and only then about protective function. Although the function is not negated — the floor skirting board takes hits from vacuum cleaners, mops, furniture, protects wallpaper or wall paint from splashes when washing the floor, and conceals wires and cables running along walls.


Typology of interior skirting boards: from floor to ceiling
Wooden skirting board is not limited to just the floor variant. Inside a room, skirting board works at all levels, creating an architectural system.


Floor skirting board: the classic of protection and decor
Floor skirting board is the most common type. Installed along the perimeter of a room at the floor, it covers the joint between the floor covering (parquet, solid wood flooring, laminate, tile, linoleum) and the wall. The height of floor skirting board varies from 40 mm (minimalist narrow profiles for small rooms with low ceilings of 2.5-2.7 m) to 150-200 mm (wide classic skirting boards for spacious rooms with high ceilings of 3.0-3.5 m and above).
The functions of floor skirting board are multi-layered. Technical function: covers the expansion gap between parquet/laminate and the wall (a 10-15 mm gap is necessary for thermal expansion of wood or wood-based materials; without the gap, the floor will buckle with increased humidity), conceals the uneven bottom edge of wallpaper or paint (it's difficult to cut wallpaper perfectly straight at the floor; skirting board covers defects), protects the bottom of the wall from mechanical damage (hits from vacuum cleaners, mops, shoes, furniture when rearranging), prevents water from getting under the wall when washing the floor (skirting board fits tightly to the floor, creating a barrier). Decorative function: creates a visual frame for the floor (the floor is perceived as a finished plane, framed along the perimeter), emphasizes the interior style (a wide oak skirting board with a classic profile enhances traditionality, a narrow, laconic skirting board supports minimalism), harmonizes the color palette (the skirting board can match the color of the floor, creating unity of the horizontal plane, or match doors and architraves, unifying elements of vertical decor).
Profiles of floor skirting boards vary in complexity. Simple rectangular profile (a rectangular-section block with minimal processing — chamfered edges, rounded corners) suits modern interiors where line conciseness is valued. Simplified classic profile (with one or two beads, light relief) balances between minimalism and tradition, works in neoclassical, Scandinavian interiors with classic elements. Complex classic profile (with three or four relief elements — beads, grooves, roundings, chamfers) creates rich decor, appropriate in classic, palatial, historical interiors.
Our factory also produces:


Ceiling skirting board: coves and cornices
Ceiling skirting board is installed along the perimeter of a room at the junction of the wall and ceiling. Its main function is visual: to soften the sharp right angle between the vertical wall and horizontal ceiling, create a smooth transition, frame the ceiling, emphasize its shape and height. Technically, ceiling skirting board conceals the joint between the wall and ceiling (which is rarely perfect — there is often a 2-5 mm gap due to surface unevenness or building settlement), covers the top edge of wallpaper (wallpaper is rarely brought perfectly straight to the ceiling; the cove covers the unevenness).
Types of ceiling skirting boards: cove molding (narrow ceiling skirting board with a simple profile, often with a concave surface, 30-80 mm wide, creating a minimalist transition between wall and ceiling), cornice (wide ceiling skirting board with a complex multi-step profile, 100-300 mm wide, creating architectural decor, dominating the upper part of the room).
Wooden ceiling skirting board is less common than polyurethane or polystyrene (light synthetic materials are easier to mount on the ceiling, don't require powerful fasteners). But wood on the ceiling is appropriate in wooden houses (log house, timber — all surfaces are wooden; plastic ceiling skirting board looks alien), in baths and saunas (polyurethane cannot withstand the high temperature of the steam room; wood is the only material), in classic premium-level interiors (where the naturalness of all finishing elements and the status of materials are valued).
Get Consultation
Wall decorative strips and moldings
Wall moldings — horizontal or vertical strips on walls, not at the floor or ceiling, but at mid-height or in arbitrary locations. The function is purely decorative: to create wall structure, divide it into zones, frame panels, paintings, mirrors, highlight architectural elements (arches, niches, columns).
Types of wall moldings: horizontal belts (strips running parallel to the floor at a height of 80-120 cm, visually dividing the wall into two parts — a lower dark paneled part and an upper light part, a classic technique in English, French interiors), panel trims (strips creating frames on walls; inside the frames, wallpaper, fabric, painting, or another material differs from the rest of the wall — boiserie, the classic system of wooden panels), vertical pilasters (imitation of columns on walls, decorative elements with capitals, bases, creating a vertical rhythm).
Corner protective elements
Corners are vulnerable spots in an interior. Exterior corners (projecting into the room space — corners of columns, wall sections, niches, boxes) are subject to impacts and abrasion. Interior corners (recesses where two walls meet) accumulate dust and are difficult to clean. Corner moldings solve both problems.
Corner protective strips on exterior corners — wooden corner pieces, attached to the projecting wall corner, taking on mechanical impacts. Corner piece cross-section is 30×30 mm, 40×40 mm, 50×50 mm depending on the room's scale. Corner pieces are made from hardwoods (oak, beech, ash) for maximum strength, coated with wear-resistant varnishes or oils. Installed in places of maximum risk: corridor corners (where impacts are inevitable when moving furniture, large items), corners near doors (the door may hit the corner when opening), corners in children's rooms (children are active, impacts are inevitable).
Decorative corner elements for interior corners — not so much protection as decor. Corner moldings with carving, ornament are installed in interior corners of classic interiors, creating additional detailing, emphasizing the architectural nature of the finish.
Wooden skirting board for cladding: harmony of textures
Cladding (tongue and groove paneling) — a traditional method of wooden wall and ceiling sheathing. Narrow boards with a tongue-and-groove connection create a continuous wooden surface with a characteristic rhythm of vertical or horizontal joint lines.wooden board baseboardrequires combining materials by species, color, style to create a cohesive interior.
Matching wood species
If walls are clad with pine cladding, the skirting board should be made of pine (matching texture, color, natural wood grain). Linden cladding — linden skirting board (especially relevant for baths, saunas, where linden is traditional). Larch cladding — larch skirting board (an expensive solution, but material unity creates premium quality). Mixing species is possible but requires careful selection: light pine cladding + dark walnut skirting board will create contrast (may be appropriate in modern interiors where material contrast is part of the concept) but will disrupt the traditional harmony of rustic, country style.
Matching finishes
Cladding and skirting board must have the same finish. If the cladding is coated with clear varnish (preserving the natural wood color, visible grain), the skirting board is coated with the same varnish (creating visual unity). If the cladding is stained with wood stain (changing color while preserving the grain — walnut, chestnut, wenge), the skirting board is stained with the same stain. If the cladding is painted with opaque paint (white, gray, colored — grain is hidden), the skirting board is painted with the same paint.
Mistake: natural-colored cladding + white painted skirting board. Such a combination visually breaks the integrity of the wooden finish; the skirting board is perceived as an alien element. Exception: Scandinavian interiors, where the combination of natural wood and white elements is part of the style (but even there, light whitewashed cladding + white skirting board is preferable, not the contrast of dark pine cladding and white skirting board).
Baseboard Profiles for Cladding
Cladding is a material with a pronounced rhythm of vertical or horizontal lines (the joints between boards create a striped pattern). The baseboard should either support this rhythm or be as laconic as possible so as not to compete with it.
A simple rectangular baseboard (a smooth block 60×15 mm, 80×18 mm without relief) is the ideal solution for cladding. The minimalism of the baseboard does not distract from the rhythm of the cladding, creates a clear boundary between the wall and the floor (or ceiling) without excessive decoration. A simplified cove (concave profile 40-60 mm wide) is also suitable for cladding; it softens the transition without overloading it.
Complex profiled baseboards with numerous beads, grooves, and carvings are not suitable for cladding. Two competing rhythms (the rhythm of the cladding joints + the rhythm of the baseboard relief) create visual cacophony and overload the interior with details. Exception: historical reconstruction of Russian manor house interiors, where cladding (then called plank sheathing) was combined with carved baseboards, but this requires a professional design approach and an understanding of historical canons.
Installing Baseboard on Cladding
Cladding creates an uneven surface—each board protrudes 2-5 mm relative to its neighbor (due to the tongue-and-groove construction, where the tongue of one board fits into the groove of another, creating a step). A baseboard attached to the cladding does not fit tightly along its entire length—it fits against the protruding boards and hangs over the recesses.
Solution 1: attaching the baseboard with screws directly to the cladding. Screws are driven into every second or third cladding board (interval 40-60 cm), passing through the baseboard into the board. The baseboard presses against the cladding, partially deforming it (soft wood like pine or linden compresses, allowing the baseboard to fit more tightly). Screw heads are countersunk, filled, and painted. The method is simple but leaves micro-gaps between the baseboard and cladding (in places where the baseboard is not pressed by screws, there is a 1-2 mm gap).
Solution 2: attaching the baseboard through the cladding battens. The cladding is attached to vertical battens (30×40 mm bars installed vertically at 50-70 cm intervals). The baseboard is attached not to the cladding but to the battens (screws pass through the baseboard, through the cladding, and into the batten). The battens are rigid and hold the baseboard firmly. This method requires knowing the location of the battens (when installing the cladding, the batten locations must be marked for subsequent baseboard installation).
Solution 3: installing the baseboard with finish nails. Finish nails are thin (diameter 1.5-2 mm) with a small head that is countersunk into the wood and practically invisible. Nails are driven through the baseboard into the cladding at 30-40 cm intervals. The method is fast, does not require pre-drilling holes (as with screws), and creates a more delicate fastening. Disadvantage: less sturdy than screws (a nail can loosen or work its way out over time).
Decorative Profiles: From Laconic to Carved
The profile of a baseboard defines the style of an interior no less than color or wood species.
Rectangular and Coves: Minimalism of Form
Rectangular profile—a block of rectangular cross-section with minimal processing. Edges are rounded with a radius of 1-2 mm (so they are not sharp, safe), chamfers are removed. Cross-section 60×15 mm, 80×18 mm, 100×20 mm. Surface is smooth without relief. Such a baseboard works as a pure geometric form, a line separating one plane from another without decorative complications.
Styles where a rectangular baseboard is appropriate: minimalism (where every element is as simple, functional, and devoid of excess as possible), Scandinavian (where the naturalness of the material is valued, form follows function without embellishment), Japanese (where geometry is pure, lines are strict, decor is minimal), industrial, loft (where materials are rough, forms are utilitarian, no place for classical profiles).
Cove—a profile with a concave arc that smoothly connects two planes. Concavity radius 20-40 mm. Cove width 40-70 mm. A cove softens the sharp right angle between wall and floor (or ceiling), creating a visually softer transition. The concave surface reflects light at an angle, creating a gradient from light to dark, which emphasizes volume.
Styles where a cove is appropriate: neoclassical (a simplified version of classicism, where soft forms are preserved but without excessive decor), Art Nouveau (where smooth, curved lines are valued, rejecting sharp angles), Scandinavian with classical elements (where laconicism is combined with traditional forms).
Europrofiles: Modern Geometry
Europrofile—a term denoting baseboards with a laconic but not primitive profile. One or two relief elements (a bead, chamfer, rounding) create volume without overloading. Width 80-120 mm, thickness 15-20 mm. Europrofile combines functionality (sufficient width to protect the wall, hide wires) with modern aesthetics (rejecting excessive decor while preserving architectural expressiveness).
Europrofiles are popular in modern interiors of the mid-price segment, where something more than a simple block is desired, but there is no need or budget for complex classical profiles. Suitable for apartments in new buildings, offices, commercial spaces where a balance of aesthetics and practicality is important.
Classical Profiles: Tradition of Relief
Classical profile—multi-stepped, with three or four relief elements. Beads (convex cylindrical elements 8-20 mm in diameter), grooves (recesses between beads), chamfers (beveled edges), roundings (smooth transitions). Width of a classical baseboard 100-180 mm, thickness 20-30 mm. The relief creates a play of light and shadow, emphasizes architectural quality, and references historical styles (Baroque, Rococo, Empire, Classicism).
Classical profiles are appropriate in corresponding interiors: palace style (ceremonial rooms, high ceilings, stucco, gilding, marble), English classicism (dark wood, leather furniture, fireplace, library), French classicism (light tones, elegant forms, symmetry, luxury of details).Wooden Baseboards: How tochoose a profile—focus on the overall style of the interior, ceiling height, and scale of the room.
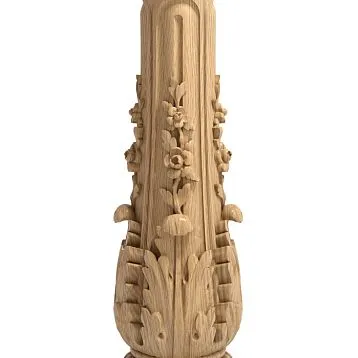
Carved Elements: Handcrafted Work
Carved baseboard—a custom-made item where an ornament (floral, geometric, anthropomorphic) is carved into the surface. Carving is done by hand (a master carver works with chisels, knives, creating a unique pattern) or on a CNC machine (a program controls a router that cuts a given ornament with high repeat accuracy). Hand carving is more expensive (cost per linear meter of hand-carved baseboard from 5000-15000 rubles depending on ornament complexity), CNC carving is cheaper (from 2000-5000 rubles) but less individual.
Carved baseboard is appropriate in exclusive interiors: historical reconstructions (manor houses, palaces where historical settings are recreated), ethnic interiors (Russian terem, where carving is traditional, Eastern styles with characteristic ornaments), premium private houses and apartments (where uniqueness, handcrafted work, and the status of materials are valued).
Choosing Interior Baseboard: Criteria and Principles
How to choose a baseboard from hundreds of profile, species, and size options?
Criterion 1: Interior style
Minimalism, high-tech, industrial—simple rectangular baseboard 60-80 mm high, minimal processing, natural or painted finish (white, gray, black). Scandinavian, Japanese—cove or simple profile 60-100 mm high, light wood (ash, light pine, whitewashed oak) or white finish. Neoclassical, modern classicism—europrofile or simplified classical 80-120 mm high, one or two beads, natural wood or stained (walnut, chestnut). Classicism, Baroque, Empire—complex classical profile 100-180 mm high, three or four relief elements, oak or beech, natural or dark stained finish. Rustic, country, Provence—simple or simplified profile 80-100 mm high, pine or linden, natural finish or white distressed.
Criterion 2: Ceiling Height and Room Proportions
Low ceilings (2.5-2.7 m) — narrow skirting board 40-70 mm high (a wide skirting board will visually lower the ceiling even more, making the room squat and oppressive). Medium ceilings (2.7-3.0 m) — skirting board 70-100 mm high (standard size suitable for most apartments, balancing proportions). High ceilings (3.0-3.5 m and above) — skirting board 100-180 mm high (a narrow skirting board will be lost in the scale of a room with high ceilings, a wide one creates proportionality and emphasizes the height).
Room area also matters. Small rooms (10-15 m²) — narrow skirting board (a wide one will visually consume wall area). Large rooms (30-50 m² and more) — medium or wide skirting board (a narrow one will be lost in the scale).
Criterion 3: Color Harmony
The skirting board can match the color of the floor (creating unity of the horizontal plane — the floor and skirting are perceived as a single wooden surface, visually expanding the floor area), with doors and architraves (creating unity of vertical trim — all wooden elements except the floor are the same color, forming an architectural system), with furniture (if the furniture is wooden, the skirting can repeat its color, linking stationary and mobile interior elements), or contrast with the walls (white skirting on a colored wall, dark skirting on a light wall — creating a clear boundary, emphasizing geometry).
Mistake: skirting board of a random color, not connected to the floor, doors, or furniture. For example, natural oak floor, white ash doors, dark walnut skirting — three different wood shades create visual chaos and destroy harmony.
Criterion 4: Practicality and Maintenance
Hardwoods (oak, beech, ash) are stronger than softwoods (pine, linden), scratch less, and retain their appearance longer. For high-traffic areas (hallways, corridors, living rooms), for homes with children and pets, oak or beech are preferable. For bedrooms, studies, where the load is low, pine or linden are suitable.
The finish affects maintenance. A varnished skirting board is easy to clean with a damp cloth; dirt does not soak into the wood. An oil finish requires periodic renewal (wipe with oil every 1-2 years to restore the protective layer) but creates a pleasant tactile feel and matte naturalness. A painted skirting board is practical (paint protects the wood, easy to clean) but hides the wood grain.
Smooth profiles (rectangular, simple coves) are easier to maintain — dust does not accumulate in recesses, wipes off with one cloth movement. Complex profiles with many grooves, beads require more thorough cleaning — dust gets stuck in the relief, requiring a brush or vacuum with a narrow nozzle.
Installation of Interior Skirting Board: Reliability Technology
Proper installation determines durability, appearance, and the absence of squeaks, peeling, or gaps.
Surface Preparation of the Base
The wall (for floor skirting) or ceiling (for ceiling skirting) must be level (deviations no more than 3-5 mm over a 2 m length), clean (free of dust, grease, peeling paint), and dry (humidity no more than 5%, otherwise the adhesive won't set). Deviations over 5 mm are leveled with plaster or filler. Significant deviations (10-20 mm) require leveling the entire wall height (otherwise the skirting will follow the wall wave, hang over the floor, or press against protrusions).
Marking the horizontal level. For floor skirting, the bottom edge must fit tightly against the floor along its entire length. If the floor is uneven (height variations of 5-10 mm over the room length — common in old houses), the skirting is either cut on-site (the bottom edge is trimmed to the floor profile so the skirting fits tightly) or gaps are filled with sealant after installation.
For ceiling skirting, marking is critical. A laser level projects a horizontal line around the room perimeter at a set height (the skirting width, e.g., 80 mm, is measured down from the ceiling, the laser projects the line — the skirting's bottom edge). All skirting boards are installed strictly along the line, creating a perfectly even perimeter. Without a laser level, a water level is used (two vials connected by a hose, water level in the vials is the same, allowing height marks to be transferred).
Methods of mounting
Adhesive fixing — polyurethane construction adhesive or liquid nails is applied to the back of the skirting (the surface against the wall) in a zigzag or dots at 10-15 cm intervals. The skirting is pressed against the wall, held firmly for 30-60 seconds until the adhesive sets. Advantages: speed (no drilling, screwing required), no visible fasteners (skirting surface is clean without screw heads or nails), possibility of removal (if needed, the skirting is carefully pried off, adhesive cut with a knife, skirting can be reinstalled). Disadvantages: requires a level wall (if uneven, the skirting doesn't fit, hangs, adhesive won't hold), not suitable for heavy skirting (oak skirting 150 mm high weighs 2-3 kg per linear meter, adhesive may not hold).
Mechanical fixing — screws or finish nails. Screws 50-70 mm long (length chosen so the screw enters the wall 30-40 mm) are screwed through the skirting into the wall at 40-60 cm intervals. Holes 3-4 mm in diameter are pre-drilled (drill bit thinner than the screw so the skirting wood doesn't crack, but the screw holds firmly). If the wall is concrete or brick, plastic plugs are inserted into the holes, then screws are screwed in. Screw heads are countersunk into the wood 2-3 mm, the recesses are filled, sanded after drying, and painted or tinted to match the skirting color.
Finish nails — thin nails 1.5-2 mm in diameter, 40-60 mm long, with a small head that is countersunk into the wood. Hammered through the skirting into the wall at 30-40 cm intervals. Heads are driven in with a nail set (metal rod that sinks the nail head 1-2 mm into the wood), recesses are filled. Advantages: speed (no pre-drilling as for screws), delicacy (thin nails don't split the skirting wood). Disadvantages: less secure fixing (nails can loosen over time, especially in soft walls — drywall, aerated concrete).
Combined fixing — adhesive + mechanical fastener. Provides maximum reliability. Adhesive is applied to the skirting, the skirting is pressed against the wall, additionally secured with screws or nails. The adhesive ensures full contact, the mechanical fastener prevents heavy skirting from peeling off.
Corner processing
Corners — the most complex part of installation. Internal and external corners require precise cutting of skirting planks at 45° (for a 90° room corner) or at a custom-calculated angle (if the room corner is not 90°). The cutting technique, joint checking, and fitting are detailed in previous materials. It's important to emphasize here: corner quality determines the perception of the entire skirting. A perfect corner without gaps — the skirting looks professional. A 1-2 mm gap — amateur installation, catches the eye, spoils the impression.
Alternative to cutting — ready-made corner elements. An internal or external corner piece made of solid wood, matching the skirting profile, is installed in the corner. Straight skirting planks with ends cut at 90° (straight cut, no angled cut) butt against the corner piece from both sides. The method is simpler, faster, but corner pieces are not available for all profiles and cost extra (300-1500 rubles per piece).
Finishing After Installation
After installation, the skirting is inspected for defects: gaps in corners or at joints of straight planks (on long walls where the wall length exceeds one skirting plank length, planks are joined with a straight joint — end to end), recesses from screws or nails (filled
with filler but visible), scratches or dents incurred during installation. Gaps are filled with acrylic sealant (transparent or wood-colored), fastener recesses are refilled (if filler shrank after first application), scratches are sanded with fine sandpaper P220-P320 and touched up.
After defect correction, the skirting is coated with a final protective finish (if installed unfinished): oil, wax, varnish, or paint applied with a brush over the entire visible surface. If the skirting was installed with a factory finish, only local touch-up is required at joints, corners, and fastener points.
Frequently Asked Questions about Interior Wooden Skirting
What is the difference between interior and exterior skirting?
Interior skirting operates in stable conditions (temperature +18-25°C, humidity 40-60%, no precipitation, direct UV), allowing a wider range of wood species (including softwoods like pine, linden), thinner profiles, and more diverse finishes. Exterior facade skirting (plinth) operates in extreme conditions (temperature fluctuations from -30°C to +40°C, rain, snow, ultraviolet light), requiring durable species (larch, oak), massive profiles (thickness from 30 mm), and resistant finishes (exterior varnishes, oils with UV filters). Interior skirting is primarily about aesthetics, exterior — primarily about durability.
Can the same type of skirting be used for floor and ceiling?
Yes, if the profile is suitable for both positions. A simple cove or rectangular profile is universal — works for both floor and ceiling. Complex classical profiles are often designed specifically for floor or ceiling application (floor profile is oriented vertically, ceiling profile horizontally or at an angle); using a floor profile on the ceiling or vice versa may look unnatural. In wooden houses, saunas, where all surfaces are clad with paneling, the same simple skirting (batten 60×18 mm) is often used for both floor and ceiling, creating unity in finish.
Which wood species is best for interior skirting?
Depends on budget, style, and operating conditions. Pine is a budget option (from 400-700 rubles per linear meter), suitable for country houses, temporary structures, budget projects, requires resin treatment before painting. Linden is optimal for baths, saunas (does not heat up, does not release resin), good for painting white (light base, uniform texture), medium price (from 800-1200 rubles). Beech is durable, dense, smooth, suitable for high-traffic areas, looks beautiful under clear varnish, price higher than linden (from 1100-1700 rubles). Oak is premium, maximally durable, long-lasting (lasts 50-100 years), expressive texture, high price (from 1500-2500 rubles), suitable for elite interiors where the status of the material is valued.
Do I need to prime the baseboard before painting?
Yes, primer is essential for a quality finish. Primer evens out the wood's absorbency (without primer, paint absorbs unevenly, creating stains), blocks the seepage of resins, tannins (which can tint white paint yellowish), improves paint adhesion (paint adheres more firmly, doesn't peel), reduces consumption of topcoat paint (primer is cheaper than paint). For baseboards under white paint, white acrylic primer (2 coats) or isolating alkyd primer (1 coat for problematic wood with high resin content) is recommended. For baseboards under clear finish (oil, varnish), primer is not mandatory, but a clear primer-impregnation can be used (improves oil absorption, evens out tone).
How to hide wires behind a baseboard?
Modern baseboards often have a cable channel — a recess on the back side (facing the wall), into which wires are laid (TV cable, internet cable, lighting wires). The cable channel is covered by a removable strip (snaps onto the baseboard) or remains open (wires lie in the recess, pressed by the baseboard against the wall, not visible). An alternative is to install the baseboard at a small distance from the wall (2-5 mm gap), wires are routed in the gap behind the baseboard. This method is less reliable (baseboard doesn't fit tightly, may pull away from the wall, wires may fall out of the gap).
For rooms with many wires (home theater, computer workstation), you can use a specialized baseboard with a wide cable channel (80-120 mm high with an internal cavity holding dozens of wires) or a trunking (plastic or wooden, installed along the wall above a regular baseboard, wires are laid inside, trunking is covered with a lid).
Can a wooden baseboard be repainted?
Yes, a wooden baseboard can be repainted an unlimited number of times. Process: light sanding P240-P320 (create roughness for new paint adhesion, remove gloss of old finish), dust removal, primer application (if new color differs significantly from old), application of 2-3 coats of new paint. Oil or wax finish is removed with solvent or sanding, then new finish is applied. Varnish finish can be refreshed without removal — light sanding with fine abrasive, application of 1-2 coats of fresh varnish. Repainting a baseboard is a simple way to update the interior without demolition, cost is minimal (paint consumption for an entire apartment 1-2 liters).
Conclusion: architecture of boundaries
Wooden interior skirting board— a system of elements creating the architectural structure of an interior. Floor baseboard protects and frames the horizontal plane of the floor, ceiling baseboard completes the vertical of walls, wall trim structures walls, corner elements protect and decorate corners. All elements work together, forming the visual framework of a room, where every boundary is designed, every joint is refined, every transition between planes is resolved through a wooden detail.
The choice of interior baseboard is determined by interior style (minimalism requires simple forms, classic complex profiles), room proportions (low ceilings narrow baseboards, high ceilings wide ones), practical requirements (high traffic hardwoods, low traffic softwoods), budget (pine is affordable, oak is premium). A correctly chosen baseboard harmonizes with the floor, doors, furniture, creates interior integrity. An incorrect baseboard (random profile, mismatched style, color unrelated to any element) destroys harmony, looks alien.
Installation of interior baseboard requires surface preparation (leveling, cleaning, marking level), correct choice of fastening method (adhesive for even walls and light baseboards, screws for uneven walls and heavy baseboards, combination for maximum reliability), precise corner processing (cut to measured room angle, dry-fit check, adjustment, end gluing), final finishing (sealing gaps with sealant, puttying fastener points, touch-up painting, application of protective finish). Quality installation ensures durability (baseboard doesn't peel, doesn't creak, lasts decades), appearance (corners without gaps, joints invisible, surface even without fastener dents), practicality (baseboard fits tightly to floor and wall, no dust accumulation, easy to clean).
Company STAVROS — a manufacturer of full-range wooden trim for interior finishing with 24 years of experience, offering comprehensive solutions: solid wood floor baseboards of oak, ash, beech, linden, pine from 40 to 200 mm height (over 50 profiles from simple rectangular to complex classic), ceiling covings and cornices of solid wood from 30 to 150 mm width (for wooden houses, baths, classic interiors), wall moldings and decorative strips (for framing panels, creating wainscoting, structuring walls), corner elements and corner pieces (ready-made internal and external corners, eliminating the need for precise cutting, protective corners for protruding corners). In-house full-cycle production: wood procurement (dried boards and beams, moisture 8-12%, selection without critical defects), sawing and calibration (dimensional accuracy ±0.2 mm), profile milling (CNC machines reproducing profiles of any complexity), sanding (sequential abrasive treatment up to P240, perfect smoothness), finish application (primers, varnishes, oils, paints — factory painting on request), packaging (shrink wrap, cardboard end caps, protection from damage).
STAVROS assortment caters to all styles and budgets: pine baseboards of simple profiles 60-100 mm height from 400-700 rubles per linear meter (for country houses, budget projects, rooms for painting), linden baseboards of simple and simplified profiles 60-120 mm height from 800-1400 rubles (for baths, saunas, light interiors, painting white), beech baseboards of medium and complex profiles 80-150 mm height from 1100-2100 rubles (for high-traffic areas, durable and beautiful), oak baseboards of all profiles 60-200 mm height from 1500-3500 rubles (for premium interiors where durability, status, expressive texture are valued). Prices are current as of January 2026, include VAT.
STAVROS consulting support: technical specialists will help choose baseboard profile for interior style (suggest which profile corresponds to minimalism, classic, Scandinavian style), select wood species for operating conditions (hardwoods for high-traffic zones, softwoods for bedrooms, moisture-resistant for kitchens and bathrooms), calculate required linear meters (room perimeter plus allowance for corner cuts), recommend fastening method (adhesive, screws, combination depending on wall type and baseboard weight), provide installation instructions (surface preparation, corner cutting, final finishing). STAVROS designers will develop a concept for comprehensive trim use (floor baseboard + ceiling covings + wall moldings in unified style and wood species) to create a holistic interior architectural system.
STAVROS delivery: Moscow and Moscow Region — own transport 1-2 days, Saint Petersburg and Leningrad Region — own transport 1-2 days, Russian regions — transport companies 3-10 days. Professional packaging (shrink wrap, cardboard end caps, horizontal stacking to prevent deformation), damage rate during transport less than 0.3%. STAVROS warranty 3 years on all solid wood products under operating conditions (humidity 40-70%, temperature +10-30°C, absence of direct prolonged contact with water).
STAVROS product samples: before ordering a large batch, you can order samples (30 cm baseboard sections of different profiles and wood species) to visually and tactilely assess wood texture, processing quality, profile complexity. Sample cost 150-300 rubles per section, when placing an order over 25000 rubles, sample cost is refunded. Samples are shipped via Russian Post or courier services within 2-3 days after payment.
Choosing interior wooden baseboard from STAVROS, you choose an architectural system where every boundary between planes is designed with respect for material, geometry, style. Solid wood on floor, ceiling, walls, in corners creates a natural warm environment that doesn't age but patinates nobly, doesn't degrade but gains character. Interior baseboard is an investment in durability (lasts decades), in aesthetics (completes interior composition), in eco-friendliness (natural wood doesn't emit harmful substances), in restorability (wooden baseboard can be sanded, repainted, restored any number of times, unlike synthetic analogs which after damage can only be replaced).
STAVROS — a partner in creating interiors where boundaries are not hidden but emphasized, where every joint becomes an architectural detail, where wood remains wood — alive, warm, durable, timeless, connecting modern space with centuries-old tradition of joinery craftsmanship.