


Article Contents:
- Why polyurethane defeated plaster and wood in the battle for interiors
- Surface preparation: the foundation of successful installation
- Assessment of wall and ceiling condition
- Cleaning and Degreasing
- Priming: A Mandatory Step
- Choosing adhesive composition: glue for every task
- Adhesives for interior work
- Adhesives for facade work
- Step-by-step interior installation technology
- Stage 1: Marking element positions
- Stage 2: Trimming elements and preparing corners
- Stage 3: Applying adhesive
- Stage 4: Installation and fixation
- Stage 5: Processing joints and seams
- Installation of moldings on facades: features of exterior work
- Facade preparation
- Marking and installation of elements
- Mechanical Fastening
- Joining and waterproofing of seams
- Installation features in Saint Petersburg and other regions
- High humidity
- Temperature features
- Biological factors
- Common Installation Mistakes and How to Avoid Them
- Mistake 1: Installation on Unprepared Surface
- Mistake 2: Insufficient Amount of Adhesive
- Error 3: Using unsuitable adhesive
- Error 4: Poor corner joining
- Error 5: Lack of fixation until adhesive sets
- Error 6: Ignoring temperature limitations
- Error 7: Painting over undried adhesive or putty
- Final finishing: painting and protection
- Choosing paint
- Painting technology
- Features of installation on various bases
- Drywall
- Concrete
- Wood
- Painted walls
- Delivery and service: importance of choosing a reliable supplier
- Answers to popular questions: FAQ on molding installation
- Conclusion: Mastery in Details
Take an ordinary room with smooth walls and ceiling. Add a cornice, molding, a rosette. What changes? It seems like a trifle—thin strips of decor around the perimeter. But suddenly, the space gains structure, logic, completeness. Why does this happen? Becauseinstallation of polyurethane molding— is not just gluing decor to a wall. It is architectural grammar, transforming a faceless volume into an interior with character.
By 2026, polyurethane molding has achieved such detail quality that it can only be distinguished from plaster by touch. The relief is crisp, lines are filigree, ornament is complex—everything is like in old mansions. But such decor can be installed even by a person without special training, if they know the technology. However, installation errors can ruin the most expensive material: the decor will fall off in six months, seams will separate, paint will crack. So how to do it right? What adhesive to use for different surfaces? How does installation on a facade differ from interior work? Why does St. Petersburg have its own installation nuances?

Why polyurethane defeated plaster and wood in the battle for interiors
Traditional molding was made from plaster. It is a noble material with a centuries-old history, but working with it required the highest skill. The form was cast on-site in parts, assembled, reinforced with metal, sanded, fitted. The process took weeks. The price ended up astronomical. And most importantly—plaster is fragile. One impact—and a column capital turns into a handful of fragments. Plaster fears moisture: when wet, it swells and loses shape. Plaster is heavy: a ceiling rosette one meter in diameter weighs 15-20 kilograms and requires serious fastening.
Wood is the other extreme. Carved wooden molding is beautiful, warm, alive. But wood changes dimensions with humidity: it swells in autumn, dries out in winter during the heating season. Seams separate, gaps appear. Wood carving requires months of manual labor, the cost rises to unrealistic amounts. Wood requires constant maintenance: sanding, impregnations, varnishes, repainting every 3-5 years.
Polyurethane solved these problems. It is 5-6 times lighter than plaster—a rosette one meter in diameter weighs 2-3 kilograms and holds on regular adhesive without anchors. It is not afraid of moisture—can be installed in bathrooms, kitchens, on unheated terraces. It is absolutely stable: does not change dimensions with humidity and temperature fluctuations. It is elastic: upon impact, it does not break but bends and restores shape. It is ready for installation: arrived from production white, primed, with perfect geometry—all that's left is to glue and paint.


Surface preparation: the foundation of installation success
Most problems with fallen molding start not with bad adhesive, but with poor base preparation. Even super glue will not hold decor on loose, crumbling plaster or a dusty wall. Therefore, before thinkinghow polyurethane molding is attached, you need to prepare the base.
Our factory also produces:


Assessing the condition of walls and ceiling
Run your palm over the surface. Does a whitish trace, dust remain? That means the plaster or paint is chalky, crumbling—it won't hold. Scratch the surface with a coin or key. Does the material crumble, peel? The base is not strong. Gently press on the wall in different places. Do you feel voids, plaster gives way, hear a hollow sound? There is delamination under the plaster—such areas need to be tapped with a hammer, discover the boundaries of weak zones, remove delaminated plaster down to a solid base.
If walls are painted, determine the paint type. Glossy enamel or oil paint will not provide adhesion for the adhesive—you need to matte the surface with medium-grit sandpaper, creating roughness. Water-based paint usually holds fine if not chalky. Test: wet a cloth with water, rub the wall. Does the paint soak and come off? That means it's chalky, needs to be removed or strengthened with primer.
Wallpaper is a separate topic. Light moldings up to 50 millimeters wide and weighing up to 100 grams per meter can be glued over wallpaper, if the wallpaper is glued well. Heavy cornices, wide moldings, ceiling rosettes are better attached to the wall, cutting the wallpaper along the installation line of the decor. Otherwise, in a year or two, the wallpaper will peel off along with the molding.
Get Consultation
Cleaning and degreasing
The surface must be clean. Dust is removed with a vacuum, then a damp cloth. Greasy stains (in kitchen, workshop) are degreased with alcohol, acetone, or mineral spirits. Soot and nicotine residue are washed off with alkaline detergents. After washing, the surface must dry completely—you cannot glue to a damp base, the adhesive will not set.
Mold and fungus are a serious problem. If there are black or green spots on the wall, the surface is treated with an antiseptic (chlorine-containing or special antifungal), held according to instructions, rinsed, dried. Gluing decor over mold means creating a favorable environment for fungus reproduction underneath it, which in a year will grow through the paint as black dots.
Priming: a mandatory step
Primer performs three functions. First—strengthens a loose base, penetrating pores and binding material particles. Second—reduces surface absorbency, preventing adhesive from quickly losing moisture and drying before it sets. Third—improves adhesion, creating a sticky film to which adhesive adheres better.
For interiors, use deep-penetration acrylic primer. It is suitable for plaster, drywall, concrete, wood. Applied with a brush, roller, or sprayer in one or two coats depending on base absorbency. Porous surfaces (aerated concrete, old loose plaster) require two to three coats. Drying time—2-4 hours at room temperature.
For facades, primer must be frost-resistant and moisture-resistant. Regular interior primer on a facade will deteriorate in the first winter. Use special facade primers on acrylic or silicone base. They create a vapor-permeable film, allowing moisture from inside the wall to escape outward, but protecting from atmospheric moisture penetration inward.
Choosing an adhesive composition: adhesive for each task
QuestionHow to install polyurethane moldingis inextricably linked with adhesive choice. A universal adhesive does not exist—each situation has its own optimal composition.
Adhesives for interior work
Polymer construction adhesives like 'liquid nails'—the most common option for light and medium decor. Sold in 310-milliliter cartridges for a caulking gun. Base—synthetic rubber or acrylic polymers. Advantages: high initial adhesion (decor sets in 30-60 seconds, no long fixation needed), versatility (holds on any bases—plaster, concrete, drywall, wood, metal), white or transparent color (does not show through thin sections of decor). Disadvantages: not suitable for heavy elements weighing over 2 kilograms, not for wet conditions and facades.
Acrylic sealant-adhesives—an intermediate option between sealant and adhesive. More elastic than construction adhesives, compensate for minor base deformations. Suitable for rooms with humidity fluctuations. After drying, form an elastic seam that does not crack with thermal expansion. Setting time longer—5-10 minutes, requires longer element fixation.
Polyurethane adhesives—professional choice for difficult conditions. One-component polyurethane adhesives (Tytan Professional, Soudal, Ceresit) form an exceptionally strong elastic bond. Moisture-resistant, withstand temperature fluctuations, do not lose strength over time. Suitable for wet rooms—bathrooms, saunas, pools. Disadvantage—higher price and need for protection from air moisture during storage (after opening, adhesive begins to polymerize from contact with air moisture, shelf life of opened cartridge—1-2 months).
Plaster adhesive or construction filler—traditional method for installing molding. Plaster filler like Knauf Fugen or similar is mixed to sour cream consistency, applied to the back of the element and the wall, decor is pressed. Advantages: cheapness, ability to compensate for base unevenness with a thick adhesive layer, quick setting (plaster hardens in 20-30 minutes). Disadvantages: messy work, inability to adjust after setting, not suitable for wet rooms (plaster absorbs moisture), heavy elements require additional fixation with screws until plaster hardens.
Adhesives for facade work
For facades, requirements for adhesive are stricter: it must withstand frost, heat, rain, snow, ultraviolet light. Interior adhesives on a facade deteriorate in 1-2 seasons.
Polyurethane adhesives for facades are the optimal choice. Adhesive foams like Tytan Styro 753, Ceresit CT84, or equivalents are specifically designed for attaching insulation and decorative elements to facades. They are applied with a mounting gun, expand to fill irregularities, set in 15-30 minutes, and fully polymerize in 24 hours. They withstand temperatures from -60 to +80 degrees Celsius, are moisture-resistant, and have frost resistance of over 100 cycles. They are elastic—compensating for thermal deformations of elements and the substrate.
Cement-based adhesives for insulation are an alternative option. The same compounds used for gluing polystyrene foam in facade insulation systems (e.g., Ceresit CT85, Knauf Sevener) are used. They are mixed with water to a thick sour cream consistency and applied with a notched trowel to the back of the decorative element, either fully or in strips. Advantages: low cost, good adhesion to mineral substrates (brick, concrete, plaster), and vapor permeability. Disadvantages: rigid bonding (does not compensate for deformations), the need for additional mechanical fastening of heavy elements until the adhesive sets (24-48 hours), and inability to work at temperatures below +5 degrees Celsius.
Epoxy adhesives are for extreme conditions. Two-component epoxy adhesives create a bond stronger than the material itself. They are completely waterproof, chemically resistant, and withstand any temperatures. They are rarely used due to high cost and complexity of application (requires precise dosing and mixing of components) but are indispensable for attaching decorative elements in areas of constant water contact—on plinths, around gutters, under eaves with large overhangs.
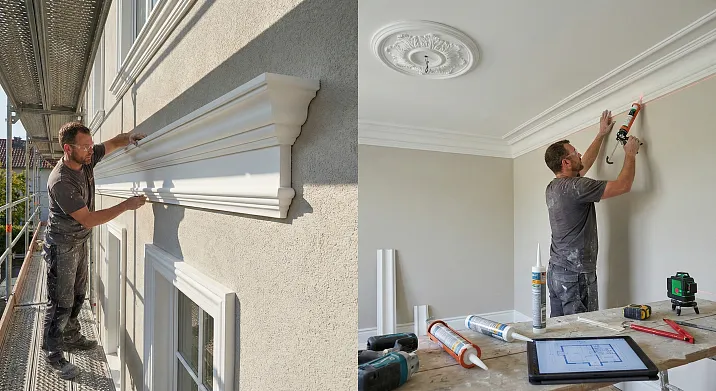
Step-by-step installation technology for interiors
Now, detailedinstallation guide for polyurethane moldingfor indoor work. Let's take the installation of a ceiling cornice as an example—the most common type of decorative element.
Step 1: Marking the position of elements
The cornice is installed under the ceiling, covering the joint between the wall and ceiling. First, determine the line of the cornice's lower edge. Measure down from the ceiling along the wall a distance equal to the height of the cornice (e.g., 80 millimeters for an 80 mm high cornice), mark points with a pencil at several locations around the room's perimeter. Using a laser level or a long straightedge with a bubble level, draw a horizontal line connecting these marks. This is the baseline—the lower edge of the cornice will align exactly with it.
Do not use the floor, baseboard, or existing ceiling molding as a reference—they may have uneven levels. Only precise leveling guarantees that the cornice will be perfectly horizontal. Even a deviation of 1-2 degrees is noticeable to the eye and ruins the appearance.
For wall moldings, the technique is the same: determine the installation height, draw a horizontal or vertical line using a level, and the edge of the molding will run along this line.
Step 2: Cutting elements and preparing corners
Polyurethane molding is supplied in strips of 2 or 2.4 meters in length. At room corners, strips need to be joined at a 45-degree angle. Use a miter box (a simple tool with guides for a saw) or a miter saw (a power tool for precise angled cuts).
Important nuance: most ceiling cornices are installed not flat against the wall but at an angle—one part of the profile presses against the wall, the other against the ceiling. When cutting in a miter box, position the cornice in the same orientation it will have on the wall—pressing it simultaneously against the base of the miter box (representing the ceiling) and the side wall (representing the wall). Only then will the cut be correct. If you cut the cornice lying flat on the base, the angle will be incorrect, and the joint will not align.
For straight joints (when two strips need to be joined lengthwise on a straight wall), the cut is perpendicular—exactly 90 degrees. The ends must be perfectly even, without chips or burrs. After cutting, check the joint: place the two cut pieces end-to-end on a flat surface—there should be no gap.
Internal room corners require special precision. Even a small gap in an internal corner is noticeable. Therefore, after cutting in the miter box, check the joint by fitting the pieces in place. If necessary, refine the ends with a sharp knife or sandpaper until they fit tightly.
Step 3: Applying adhesive
Adhesive is applied to the back of the element. For a ceiling cornice, this means two strips: one along the part adhering to the ceiling, the other along the part adhering to the wall. Use a mounting gun for even application. The adhesive strip width is 10-15 millimeters, applied as a continuous serpentine or dotted line with 3-5 centimeter intervals.
Do not apply adhesive too thickly—when pressed, it will squeeze out, stain the wall and ceiling, and require cleaning. A layer 2-3 millimeters thick is sufficient. For thin, lightweight moldings, a single adhesive strip along the center of the back is enough.
After applying the adhesive, let it rest for 1-2 minutes (refer to the adhesive manufacturer's instructions). During this time, volatile solvents partially evaporate, the adhesive thickens, and initial tack increases. If the element is applied immediately after adhesive application, it may slide under its own weight.
Important: do not apply adhesive to the ends where strips join! Adhesive on the ends will only hinder tight joining and squeeze into the seam, staining the front surface. Ends must be clean and dry.
Step 4: Installation and fixation
Place the element in the installation position exactly according to the markings. Initial pressing is light—fix the position, check alignment with the marked line. If adjustment is needed, do it now—once pressed, the element cannot be shifted, as this will disrupt the adhesive layer structure.
Once satisfied with the position, press the element firmly and evenly along its entire length. For long cornices, use both hands, pressing from the center toward the edges. Maintain pressure for 30-60 seconds—during this time, the adhesive sets enough that the element will no longer slide.
Excess adhesive squeezed out from under the element should be removed immediately with a damp sponge or cloth before it hardens. Dried adhesive is harder to remove and may damage the surface.
Long and heavy elements require additional fixation until the adhesive fully sets (24 hours). Use painter's tape: apply strips of tape from the decorative element to the wall/ceiling every 30-40 centimeters. The tape holds the element while the adhesive polymerizes. After 24 hours, remove the tape—the adhesive will already hold firmly.
Step 5: Treating joints and seams
After the adhesive has fully dried (usually 24 hours), proceed to filling the joints. Even perfectly cut elements have micro-gaps at joints—this is normal. Joints are filled with acrylic putty or acrylic sealant.
Apply putty with a narrow putty knife or finger, pressing it tightly into the gap, and remove excess. The goal is to fill the gap flush with the surface, creating a smooth transition. After the putty dries (2-4 hours), sand the joint with fine sandpaper until smooth.
For wide gaps (over 2 millimeters), it's better to use acrylic sealant—it is elastic, does not shrink, and prevents cracks. Apply a thin bead of sealant into the seam, smooth it with a wet finger or rubber spatula, and remove excess. After drying, the sealant can be painted.
Areas where the decorative element meets the wall or ceiling often also require refinement. If gaps exist due to surface unevenness, fill them with sealant to create a smooth transition.
Installation of molding on the facade: features of exterior work
Polyurethane molding installation on the facadehas its own specifics. Operating conditions are harsher: temperature fluctuations from -30 to +50 degrees, rain, snow, wind, ultraviolet radiation. Errors in technology will lead to the decoration peeling off during the first winter.
Facade preparation
The facade must be strong, dry, and clean. If the walls are insulated (a 'wet facade' system with polystyrene foam or mineral wool), the decoration is mounted on the finishing plaster after it has completely dried (at least 7 days after application). The plaster must be reinforced with mesh and have a thickness of at least 5 millimeters — a thin layer is not strong enough.
Old facades require inspection. Tap the plaster with a hammer — a dull sound indicates delamination; such areas need to be removed and re-plastered. Efflorescence (white salt stains) are scrubbed off with a brush, the surface is treated with an acid cleaner, neutralized, and rinsed.
Biological contamination (green algae, moss in shaded areas, black mold) is treated with fungicidal compounds, left according to instructions, and rinsed off with high-pressure water. After cleaning, the facade must dry for at least 3-5 days before installing the decoration.
Priming is mandatory. Use a deep-penetration facade primer (Ceresit CT17, Knauf Grund, equivalents). Apply with a roller or brush in one or two coats. The primer strengthens the base, reduces absorbency, and improves adhesive adhesion. Installation can begin 12-24 hours after priming.
Marking and installation of elements
The marking technology is the same as for interiors, but the accuracy requirements are even higher — any unevenness on the facade is visible from afar. Use a laser level or theodolite to create precise horizontal and vertical lines.
Adhesive for the facade — polyurethane foam or cement adhesive for insulation. Foam is applied in strips along the perimeter of the element and crosswise over the area (for large elements like pilasters, capitals). Cement adhesive is applied with a notched trowel (10 mm notch) over the entire surface or in strips 50-80 millimeters wide.
The element is placed against the wall according to the markings and pressed. For long cornices, this is done by two people. It is important to press evenly along the entire length — use a long straightedge or a flat batten, pressing through it. The setting time depends on the adhesive: foam sets in 20-30 minutes, cement adhesive requires fixing for up to 24 hours.
Mechanical fastening
Elements with a large projection from the wall (cornices wider than 300 millimeters, pilasters) require additional mechanical fastening. The adhesive holds against pulling off, but with a large lever arm, it may not withstand the load, especially in winter during icing.
Facade anchors 120-200 millimeters long are used (depending on the thickness of the insulation and plaster). The anchor must penetrate the load-bearing wall (brick, concrete, block) by at least 60 millimeters. The hole is drilled with a hammer drill through the element into the wall after gluing (when the adhesive has set but not fully cured — after 4-8 hours for foam, after 24-48 hours for cement adhesive).
Number of fastening points: for elements up to 1 meter long — 2 points at the edges, 1-2 meters long — 3 points (edges and center), more than 2 meters long — every 70-80 centimeters. The heads of anchors or screws are recessed 3-5 millimeters below the surface, the indentations are filled with acrylic facade putty, sanded, and painted — the fastening point becomes invisible.
Joining and waterproofing of seams
Seams on the facade are a critical area. Water can penetrate the seams, freeze, expand, and destroy the connection. Therefore, seams are not just filled with putty but sealed.
After installing the elements, the seams are filled with facade acrylic sealant. It is elastic, does not crack under thermal deformation, and is water-resistant. The sealant is squeezed into the seam, smoothed with a wet spatula, and excess is removed. After the sealant polymerizes (24 hours), the seam can be painted.
Horizontal surfaces of elements (top surfaces of cornices, pediments, window sills) are areas where water accumulates. For protection, an additional layer of water repellent — a composition that creates a water-repellent film — is applied to these surfaces after painting. Water rolls off in droplets without being absorbed, extending the service life.
Features of installation in Saint Petersburg and other regions
Why is it separately mentionedinstallation of polyurethane molding in Saint Petersburg? Because the climate of Saint Petersburg has its own specifics that affect the technology.
High humidity
Saint Petersburg is a city with a humid climate. The average relative humidity is 75-85 percent, reaching 90-95 percent in the autumn-winter period. This creates special conditions:
Plaster on facades and in unheated spaces (entrances, stairwells) may be constantly damp. Installation on a damp base is undesirable — the adhesive sets more slowly, and the connection becomes less strong. If the base moisture exceeds 10 percent, it is better to postpone installation or use special adhesives for damp bases.
Condensation on walls is a common occurrence in old houses with poor insulation. Installing decoration on walls where condensation regularly forms is pointless — it will fall off within a few months. First, the issue of insulation or ventilation must be resolved.
For humid conditions, choose moisture-resistant adhesives — polyurethane or epoxy. Acrylic and gypsum adhesives lose strength in a humid environment.
Temperature features
The Saint Petersburg winter is mild (average January temperature -5 to -7 degrees), but with frequent freeze-thaw cycles. This means multiple freezing-thawing cycles, which is harsher on materials than stable frost. Therefore, on facades in Saint Petersburg, it is critically important to use frost-resistant adhesives with a freeze-thaw cycle of at least 50 times.
Summer heat is moderate (+20 to +25 degrees), facades do not heat up to extreme temperatures, which reduces the requirements for adhesive heat resistance. But in autumn and spring, day-night temperature fluctuations can reach 15-20 degrees, so the adhesive must be elastic, compensating for thermal deformations.
Biological Factors
High humidity promotes the growth of mold, algae, and moss on facades, especially on the north side of buildings. Before installing the decor, the facade must be treated with an antiseptic that kills spores. After installing the decor, it is recommended to apply an additional layer of paint with fungicidal additives or a varnish with an antiseptic to the painted surface.
Common installation mistakes and how to avoid them
Even experienced craftsmen sometimes make mistakes. Here are the top problems and their solutions.
Mistake 1: Installing on an unprepared surface
The most common mistake is neglecting preparation. A dusty, dirty, loose surface lacks adhesion. The decor may hold for several months, but after six months to a year, it will start to fall off.
Solution: never skip the preparation stage. Cleaning, reinforcing weak areas if necessary, and mandatory priming are the foundation of durability.
Mistake 2: Insufficient amount of glue
Saving on adhesive leads to peeling. Adhesive applied in a thin, intermittent line results in insufficient contact area and a weak bond.
Solution: apply adhesive in a sufficient layer, ensuring contact across the entire mounting surface. For lightweight elements, a continuous strip down the center is enough; for heavy elements, use two to three strips or apply a solid layer with a notched trowel.
Mistake 3: Using unsuitable adhesive
Using interior adhesive on a facade, adhesive for dry rooms in a damp bathroom, or weak adhesive for heavy elements—all of this leads to peeling.
Solution: choose adhesive according to the operating conditions. For facades, use only facade compounds. For damp rooms, use moisture-resistant ones. For heavy elements, use high-strength adhesives or supplement with additional mechanical fasteners.
Mistake 4: Poor corner joining
Corners with gaps are a sign of unprofessional work. The cause is inaccurate cutting or incorrect placement of the element in the miter box when cutting.
Solution: cut the element in the miter box in the same position it will be on the wall. Check the quality of the joint before gluing, and refine the end with a knife if necessary. Keep in mind that room corners may not be exactly 90 degrees—measure the actual angle, divide it in half, and cut both planks at that angle.
Mistake 5: Lack of fixation until the adhesive sets
A heavy element is glued, released—and it slowly slides down under its own weight until the adhesive sets.
Solution: fix the element until the adhesive sets. For lightweight ones, press with your hands for 30-60 seconds. For heavy ones, use painter's tape, temporary supports, or assistants. For particularly heavy elements on facades, use additional mechanical fasteners with screws or anchors.
Mistake 6: Ignoring temperature limitations
Installation in freezing cold or extreme heat leads to problems. In cold weather, the adhesive does not polymerize, leaving the bond weak. In heat, the adhesive dries too quickly, failing to bond with the substrate.
Solution: work within the temperature range recommended by the adhesive manufacturer. Typically, this is +5 to +30 degrees Celsius. In winter, work in heated spaces. For facades, installation is best done in spring or autumn at moderate temperatures.
Mistake 7: Painting over undried adhesive or putty
Impatience is the enemy of quality. Painting before the adhesive is fully dry causes elements to shift when pressed with a brush. Painting over undried putty results in seams showing through the paint.
Solution: observe technological pauses. Adhesive dries in 24 hours, putty in 4-8 hours depending on layer thickness. Only after complete drying should you proceed to the next stage.
Finishing: painting and protection
Polyurethane molding is supplied white and primed. It can be left white or painted any color.
Paint Selection
For interiors, use interior paints—water-based acrylic, latex. They are odorless, dry quickly, and safe. Choose the sheen level to taste: matte hides minor surface imperfections, semi-matte provides a soft sheen, glossy gives a luxurious look but requires perfect preparation.
For facades, use only facade paints—acrylic, silicone, silicate. They form a vapor-permeable, elastic coating resistant to UV radiation, precipitation, and frost. Interior paints on a facade will deteriorate within one season.
Painting technology
Paint is applied with a brush (for relief decor) or a roller (for flat moldings) in two to three coats. The first coat is a base and may apply unevenly. The second evens out the color. The third (if needed) provides saturation and coating density.
Drying time between coats—according to the paint manufacturer's instructions, usually 2-4 hours. Don't rush—an insufficiently dry coat may become soggy and peel when the next coat is applied.
For decor in damp rooms or on facades, apply a protective varnish after painting—acrylic for interiors, polyurethane for facades. The varnish provides additional protection against moisture, dirt, and mechanical impact.
Features of installation on various bases
Drywall
Molding adheres easily to drywall — the surface is even, smooth, and sturdy. Use polymer mounting adhesives or acrylic sealant-adhesives. Gypsum adhesive also holds well on drywall.
Important nuance: heavy elements (wide cornices, large rosettes) are best secured with additional fastening using screws into the drywall frame profile or into pre-installed wooden backings. The drywall itself is thin (12.5 millimeters), fasteners hold poorly — the screw must go into the metal profile or into the wall behind the drywall.
Concrete
Concrete is a strong but dense, non-absorbent base. Regular primer works poorly on concrete. Use a special primer like 'Betonokontakt' — it contains quartz sand, creating a rough surface for the adhesive to grip mechanically.
For heavy elements on concrete ceilings, use combined fastening: adhesive plus anchors. Heavy decor on concrete may not hold with adhesive alone.
Wood
Wooden surfaces (cladding with paneling, OSB, plywood) require a special approach. Wood changes dimensions with humidity, which can cause rigidly glued decor to detach. Use elastic adhesives — polyurethane or acrylic sealant-adhesives. They compensate for wood deformation.
Before installation, the wooden base must be treated with an antiseptic (protection against mold and rot) and primed with an acrylic wood primer.
Painted walls
Old paint can become a weak link — the decor will fall off along with the paint. Check its strength: apply masking tape, then rip it off sharply. If the paint peels off with the tape — the base is not strong, the paint needs to be removed.
Glossy paints do not provide adhesion. Treat the surface with medium-grit sandpaper to create roughness (matting). After matting, remove dust, prime — now the adhesive will hold.
Delivery and Service: The Importance of Choosing a Reliable Supplier
Installation quality begins with material quality. Cheap molding made from low-density polyurethane without UV stabilizers will last 3-5 years, then yellow, crumble, and require replacement. High-quality molding from a trusted manufacturer lasts for decades.
STAVROS company has specialized in architectural decor for over 20 years. The range includes polyurethane molding for interior and facade: cornices, moldings, baseboards, rosettes, columns, pilasters, architraves, rustication — over 500 models in various styles from classic to modern.
All products are made from high-density polyurethane (density 300-400 kilograms per cubic meter) with clear relief, precise geometry, and a white primed surface ready for painting. Facade molding has enhanced UV stabilization and frost resistance of over 200 cycles — withstands any Russian climatic conditions.
Important advantage: delivery not only across Russia but also to Eurasian Economic Union countries — Belarus, Kazakhstan, Armenia, Kyrgyzstan. EAEU goods move without customs duties (single customs territory), meaning: product price plus delivery by a transport company, without additional taxes or customs clearance.
Delivery times to EAEU countries: Belarus 3-7 days (Moscow-Minsk 700 kilometers, fast logistics), Kazakhstan 7-14 days (Moscow-Almaty 3500 kilometers, Moscow-Astana 2700 kilometers), Armenia 7-10 days, Kyrgyzstan 10-14 days. Delivery is organized through trusted transport companies SDEK, DPD, or any transport company convenient for the customer.
Technical support at all stages: consultations on element selection, assistance in material calculation, installation recommendations, answering questions. For professional craftsmen and designers — special cooperation terms.
Visit STAVROS showrooms in Moscow and St. Petersburg to see the products in person, assess material quality, and get professional advice. Or explore the catalog on the website — detailed photos, precise dimensions, and descriptions will help you make the right choice.
Answers to Popular Questions: FAQ on Molding Installation
Can molding be glued onto wallpaper?
Lightweight moldings weighing up to 100 grams per meter can be glued over well-adhered non-woven or vinyl wallpaper. Heavy cornices, wide moldings, ceiling rosettes are better secured to the wall, cutting the wallpaper along the installation line — this guarantees reliability.
What is the adhesive consumption for installing molding?
One 310-milliliter tube of polymer mounting adhesive provides installation for 5-8 linear meters of medium-sized molding (50-100 millimeters wide). For heavy cornices, consumption is higher — 3-5 meters per tube. For calculation: multiply the room perimeter by the number of decor rows, divide by 5-7, to get the number of tubes with a margin.
Is additional priming of polyurethane molding necessary before painting?
High-quality molding is supplied primed with white primer. Additional priming is not required; you can paint immediately after installation and adhesive drying. If an element gets dirty during installation, wipe with a damp cloth, let dry, then prime with acrylic primer.
How long after installation can the decor be painted?
It is necessary to wait for the adhesive to dry completely — usually 24 hours at room temperature. If painted earlier, elements may shift when pressed with a brush or roller. After filling joints with putty, allow an additional 4-8 hours for the putty to dry before painting.
How to install molding on uneven walls?
Minor unevenness (up to 5 millimeters) is compensated by the thickness of the adhesive layer — apply adhesive thicker in depressions. Significant unevenness requires either leveling with plaster, or using flexible moldings that can follow wall curvature, or point fastening with screws where it pulls away from the wall, filling the holes with putty.
Does the installation of facade and interior molding differ?
Yes, fundamentally.Installation of polyurethane molding for facadeRequires frost-resistant, moisture-resistant adhesives, mandatory waterproofing of seams with sealant, often additional mechanical fastening with dowels for heavy elements. Painting only with facade paints with UV protection. Interior molding is installed using standard mounting adhesives without additional fastening, seams are filled with putty, painted with interior paints.
Can molding be installed in winter?
In heated rooms — yes, without restrictions. On the facade — with limitations. Most adhesives work at temperatures not lower than +5 degrees Celsius. In cold conditions, the adhesive does not polymerize, resulting in a weak bond. There are special winter adhesives that work down to -10 degrees, but it is better to postpone facade work until spring.
How much does the installation of polyurethane molding cost?
Price of polyurethane molding installationDepends on the region and complexity of the work. In 2026, the average cost in Moscow and St. Petersburg: installation of a simple-profile ceiling cornice — 350-500 rubles per linear meter, complex ornamented — 500-700 rubles. Installation of wall moldings and panel creation — 400-600 rubles per meter. Installation of ceiling rosettes — 800-1500 rubles per piece. Painting adds 150-300 rubles per meter. In the regions, prices are 20-30 percent lower.
Is maintenance required for polyurethane molding?
Minimal. Dust is removed with a dry soft cloth or a vacuum cleaner with a soft attachment. Stains are washed off with a damp cloth and neutral detergent. Polyurethane is not afraid of moisture, wet cleaning is allowed. Do not use abrasive cleaners and solvents — they can damage the paint. Facade decor is recommended to be washed with water under moderate pressure once every 2-3 years to remove accumulated dirt.
Can polyurethane molding be bent for arches?
Thin moldings with a small cross-section (up to 30 mm in height) have a certain flexibility and can be bent along smooth curves with a radius of 1 meter or more. Thick profiles are rigid and cannot be bent — they will break. For arches and curved surfaces, there are special flexible moldings made of elastic polyurethane that can bend to any radius.
Conclusion: Mastery in the Details
Polyurethane molding on facade installationand installation of interior decor — this is not magic available only to the chosen few. It is a technology that anyone can master who is willing to follow the sequence of steps, choose the right materials, and not rush.
Thorough surface preparation, correct choice of adhesive for operating conditions, precise marking and careful joining, patience during the drying stage — these are the components of success. Saving time on preparation results in rework in six months. Saving on adhesive leads to decor peeling off. Rushing to paint over uncured adhesive ruins the result.
But when everything is done correctly, the result exceeds expectations. An ordinary room gains architectural logic, space becomes structured, rhythm, accents, and completeness appear. A facade transforms from a bland box into a building with character, style, and individuality.
Choose quality materials from trusted manufacturers. STAVROS offers European-quality polyurethane molding for Russian conditions. High material density, clear relief, precise geometry, enhanced UV stabilization for facade elements, frost resistance of over 200 cycles. More than 500 models in the catalog — from laconic modern profiles to luxurious classic ornaments.
Delivery throughout Russia and to Eurasian Economic Union countries — Belarus, Kazakhstan, Armenia, Kyrgyzstan — without customs duties and additional fees. Professional consultations on selection and installation. Technical support at all stages. Quality guarantee — 5 years on all products.
Visit STAVROS showrooms in Moscow and St. Petersburg or explore the catalog on the website. Create interiors and facades that amaze. Transform spaces into architecture. With quality molding and proper installation technology, this is accessible to everyone.
Your project begins with material selection. Trust the proven — trust STAVROS.


