


Article Contents:
- Philosophy of Modern Installation: Invisible Perfection
- Round Handrail: Ergonomics and Technical Specifications
- Types of Round Handrails by Construction
- Modern Brackets: From Function to Aesthetics
- Invisible Brackets: Minimalist Mounting
- Decorative Brackets: When Mounting Becomes Decoration
- Calculation of Bracket Quantity and Placement
- Hidden Mounting: The Art of Invisible Connections
- Shank Connection: Tradition and Reliability
- Connection Using Metal Screws
- System of Hidden Screws: Professional Standard
- Adhesive Connections: Chemical Strength
- Integration of Handrail with Balusters: Creating a Unified System
- Direct Mounting Method
- Mounting Method Through a Baluster Support
- Mounting Method Using Support Posts
- Assembly Technology: Step-by-Step Guide
- Stage 1: Preparation and Marking
- Stage 2: Installation of Balusters
- Stage 3: Preparation of Handrail
- Stage 4: Installation of Brackets (if used)
- Stage 5: Installation of Handrail
- Stage 6: Final Finishing
- Common Mistakes and How to Avoid Them
- Tools and Materials for Professional Installation
- Modern Trends in Installation: What’s New in 2026
- Company STAVROS: Craftsmanship, Time-Tested
- Frequently Asked Questions

Imagine the moment when a perfectly designed staircase transforms from a collection of separate elements into a single whole. This moment occurs during installation — when the craftsman connects steps, balusters, and handrails into a structure that serves not only functionally but also visually impresses. In 2026, installation technologiesround handrailshave reached new heights: modern brackets provide invisible support, hidden fastenings create the illusion of handrails floating in the air, and integration methods with balusters guarantee a monolithic structure for decades.
Why installation is so important? Even the highest-quality components made from noble wood species will not reveal their potential if installed incorrectly. Poor installation leads to creaking, loosening, and premature wear. Professionalinstallation of balusters and handrailstransforms the staircase into a safe, reliable, and elegant structure. Modern fastening methods allow achieving a result visually indistinguishable from the work of past master carpenters, yet surpassing them in strength and durability due to the use of innovative materials and technologies.
In this article, we will reveal all the secrets of professional installation of round handrails in 2026. You will learn about modern types of brackets — from minimalist invisible systems to decorative metal holders. We will thoroughly examine hidden fastening methods that allow creating a visually clean structure without visible screws or bolts. Special attention will be paid to integration of handrail with balusters — it is precisely here that the key to creating a truly monolithic handrail system lies. Ready to dive into the world of professional carpentry craftsmanship?


Philosophy of Modern Installation: Invisible Perfection
The evolution of wooden staircase installation technology has traveled a long path from crude nail connections to elegant hidden fastening systems. In 2026, the philosophy of 'invisible perfection' dominates — when all technical elements are hidden from view, and only the pure beauty of natural wood is revealed. This concept requires from the craftsman not only technical skills but also artistic sensitivity: every connection must be designed to ensure maximum strength with minimal visual intrusion.
Installation of Wooden Handrails and BalustersIn modern understanding — this is a multi-stage process where each step affects the final result. Starting from precise marking and ending with final finishing of connection points, the craftsman must consider dozens of factors: wood species, room humidity, expected load, aesthetic requirements, interior style. An error at any stage may result not only in aesthetic disappointment but also in a safety hazard.
Modern construction standards impose strict requirements on the strength of staircase railings. Handrails must withstand a horizontal load of at least 100 kg without deformation. This means that connections between elements must be designed with a safety factor. That is why in 2026, more and more craftsmen are abandoning simple nail or self-tapping screw connections in favor of combined systems, where mechanical fastening is supplemented with adhesive, and wooden elements are reinforced with hidden metal inserts.


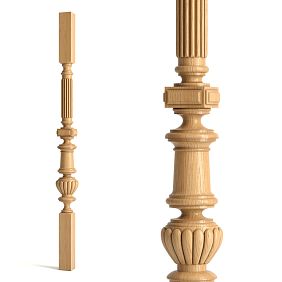
Round Handrail: Ergonomics and Technical Specifications
Before discussing installation, it is important to understand the characteristics of the object being installed.Round Handrailis not just a round stick, but a carefully designed ergonomic element. The standard 50 mm diameter was chosen not by chance: this size ensures comfortable grip for an average-sized adult’s hand. A too thin handrail (less than 40 mm) does not provide a sense of reliable support, while a too thick one (more than 60 mm) cannot be fully grasped by hand.
The surface of the round handrail must be perfectly smooth, without any imperfections that could injure skin or snag clothing. This is achieved through multi-stage sanding — from coarse grinding with grit 80 to final polishing with grit 320–400. After sanding, a protective coating is applied: oil, wax, or varnish. Oil finish preserves the tactile warmth of wood, creates a silky surface, but requires periodic renewal. Varnish finish is more durable, but creates a cold, film-like surface to the touch.
An important technical parameter — wood moisture. For indoor staircases, it should be 8–10%. If the handrail is installed with moisture above the norm, it will dry out during operation, leading to weakened connections and cracking. Professional manufacturers, such as STAVROS, carefully control moisture at all production stages, using calibrated drying chambers. This guarantees that after installation, elements will not deform.
Our factory also produces:


Types of round handrails by construction
Solid handrails are made from a single piece of wood without joints. The maximum length of a solid handrail is limited by the size of the original blank and usually amounts to 2.5–3 meters. Solid handrails are valued for their continuous grain, absence of glue joints, but they are more susceptible to deformation with changes in humidity and require careful selection of wood without internal stresses.
Screwed handrails are created by gluing short blocks (lamellas) 300–500 mm long. Gluing is done on a dovetail joint under pressure using water-resistant polyurethane glue. Connection points are practically invisible to the naked eye. Screwed handrails are more stable, do not warp, and can be manufactured to any length. In modern practice, they have almost completely replaced solid handrails due to their superior operational characteristics.
Glued handrails consist of several layers (lamellas) glued by thickness. Fibers in different layers are oriented in the same direction, but wood with different characteristics is used, which compensates for internal stresses. Glued handrails are the most stable, do not crack or deform even with significant humidity fluctuations. They are ideal for rooms with unstable microclimate.
Bent handrails are used on spiral staircases and staircases with curved sections. They are manufactured in two ways: by bending steamed wood (mainly beech, oak) or by gluing thin lamellas on a special mold. The second method is preferable, as it ensures shape retention without risk of reverse deformation.
Get Consultation
Modern brackets: from function to aesthetics
Brackets are elements that fix the handrail to the wall or other load-bearing structures. In 2026, brackets have evolved from purely functional parts to full-fledged design objects. The choice of bracket type is determined not only by technical requirements but also by interior style.
Invisible brackets: minimalist mounting
The most modern solution — fully hidden brackets, mounted inside the handrail and invisible from the outside. This is achieved in several ways. Internal metal inserts — a groove is milled into the handrail, into which a steel plate or tube is inserted. The ends of the plate protrude outward and are secured to the wall with anchor bolts. After installation, the groove is covered with a wooden overlay precisely matched in texture and color. The connection point is practically invisible.
Point fastenings — holes are drilled from the inside of the handrail. Metal threaded rods are inserted into the holes, passing through the wall and secured on the opposite side with nuts. Only the smooth surface of the handrail is visible from the outside, without any signs of fastening. Such a system requires perfect manufacturing and installation accuracy, but the result is impressive — the handrail appears to float in the air.
Magnetic systems — an innovative solution using powerful neodymium magnets. Magnetic elements are embedded into the handrail and into the bracket attached to the wall. During installation, the handrail is attracted to the brackets with a force of up to 50 kg per mounting point. Advantage — possibility of quick disassembly for maintenance or replacement. Disadvantage — high cost and need for precise positioning.
Decorative brackets: when mounting becomes decoration
For interiors in classic, vintage, or loft style, open decorative brackets are suitable, becoming part of the design concept. Forged brackets made by hand — are works of art. Twisted elements, plant motifs, geometric patterns make each bracket unique. Forged brackets are made of steel, coated with anti-corrosion compound and decorative paint (black, bronze, patinated).
Minimalist metal brackets — sleek forms in black matte metal, ideal for modern interiors. Simple L-shaped or U-shaped profiles, without excess. Matte powder coating does not produce glare, does not collect fingerprints. Such brackets emphasize the beauty of wood, not competing with it for attention.
Wooden brackets — a solution for interiors where metal is inappropriate. Made from the same wood species as the handrail, often with carving or turning. Wooden brackets visually blend with the handrail, creating a sense of monolithism. However, they require a more substantial design to ensure necessary strength.
Calculation of bracket quantity and placement
Bracket spacing is a critically important parameter. Too large a distance will cause the handrail to sag under load, too small a distance will result in excessive visual clutter. The standard spacing for a 50 mm diameter handrail made of oak or beech is 800–1000 mm. For softer woods (pine), the spacing reduces to 600–800 mm. For reinforced structures with an internal metal frame, the spacing may increase to 1200–1500 mm.
Brackets are installed so as not to coincide with handrail section joints. Ideally, the joint should be located between two brackets, equidistant from each. The first and last brackets are installed at distances of 150–200 mm from the beginning and end of the handrail, respectively. This ensures stability of the end sections, which often experience higher loads.
Hidden fastening: the art of invisible connections
Hidden fastening is the pinnacle ofbaluster and railing installation. The goal is to create a structure where all technical elements are concealed, and connections appear monolithic, as if carved from a single piece of wood. This is achieved through several methods.
Dowel joint: tradition and reliability
Dowels (wooden cylindrical pins) — an ancient method of joining wooden elements that has not lost its relevance. Whenattaching the handrail to balustersA dowel hole with a diameter of 8–10 mm and depth of 40–50 mm is drilled at the top of the baluster. A similar hole is drilled at the bottom of the handrail, precisely at the location of the baluster.
A dowel is inserted into the baluster hole (using polyurethane or epoxy glue) and protrudes 30–40 mm. When installing the handrail, the protruding part of the dowel enters the handrail hole, creating a strong connection. Glue is also applied to the handrail hole. After the glue fully cures (24–48 hours), the connection becomes monolithic and capable of withstanding significant bending and torsional loads.
Advantages of dowel joint: completely hidden from view, very strong, no metal elements that may corrode. Disadvantage — labor-intensive (requires precise hole positioning), not disassemblable without damaging the connection. To ease positioning, special guides — devices ensuring alignment of holes in the handrail and baluster — are used.
Connection using metal bolts
A more modern option — using threaded metal bolts. A bolt of M8 or M10 is screwed into the baluster from below, protruding 50–60 mm. A hole with a diameter of 8–10 mm (depending on bolt diameter) and depth of 60–70 mm is drilled into the tread. The baluster is installed by screwing the bolt into the hole. Adhesive is used for reinforcement.
Similarly, the handrail is attached to the top of the baluster: the bolt is screwed into the baluster from above, protruding 40–50 mm, and enters the hole in the handrail. Advantage of the method — high strength, possibility of adjusting element positions during installation. Disadvantage — presence of metal in the structure, which may be undesirable from an aesthetic standpoint or for certain styles (eco, natural).
System of hidden screws: professional standard
The most common method in professional practice — using screws or self-tapping screws installed hidden. When attaching a baluster to a tread, a screw is screwed through a pre-drilled hole in the base of the baluster at an angle of 45–60 degrees. It enters simultaneously into the wood of the baluster and tread, firmly connecting them. The entry hole is located on the side surface of the baluster near the base, where it is practically invisible.
When attaching the handrail to balusters, the "bottom-up" method is used: the screw is screwed through the top of the baluster into the handrail. For this, a guide hole with a diameter smaller than the screw by 1–2 mm is drilled at the top of the baluster. The screw is screwed in so that its head is recessed 3–5 mm into the top. Then the hole is sealed with a wooden plug (plug) precisely matched in color and texture. After sanding and applying finish, the attachment point becomes practically invisible.
Adhesive joints: chemical strength
Modern polyurethane adhesives provide joint strength exceeding the strength of the wood itself. When applied correctly, an adhesive joint does not fail even if the surrounding wood is damaged. For maximum effectiveness, adhesive must be applied to clean, dry, slightly rough surfaces. The clamping pressure during bonding should be 0.5–1.0 MPa, achieved using clamps or special presses.
Adhesive is never used as the sole method of fastening for loaded joints. It always complements mechanical fastening (dowels, bolts, screws), creating a dual safety system. Even if mechanical fastening weakens, the adhesive joint will continue to hold the elements. Conversely, if the adhesive loses its properties (which is unlikely with quality adhesives), mechanical fastening will ensure safety.
Integration of handrail with balusters: creating a unified system
The most responsible stage of installation — connecting the handrail tobalusters. It is here that the staircase's strength and durability are determined — whether it will remain sturdy and long-lasting or start creaking and loosening within a few months of use.How to attach railings to balusters— a question that concerns both home craftsmen and professionals striving for perfection.
Direct attachment method
The simplest but most demanding method in terms of accuracy — direct attachment of the handrail to the ends of balusters without intermediate elements. The upper ends of the balusters must be perfectly flat and aligned in one plane. Even a deviation of 1–2 mm will cause problems during handrail installation. A long straightedge or laser level is used for control, applied to the ends of all balusters. Protruding balusters are trimmed, recessed ones are extended with thin wooden shims.
Marking points for baluster placement on the underside of the handrail. The marking must be absolutely precise — use a template made according to the actual placement of installed balusters. Holes for dowels or bolts (if such a method is used) or pilot holes for screws are drilled at contact points.
The handrail is installed in place 'dry' (without glue) to check the alignment of all contact points. This fitting is critically important — any discrepancies found are corrected before final installation. After successful fitting, glue is applied to the ends of the balusters and/or into the handrail holes, and the handrail is installed permanently. Temporary supports or clamps are used to ensure even pressing along the entire length. The curing time for the glue until full hardening — at least 24 hours.
Handrail mounting method using a baluster support
A baluster support (also called a baluster rail or baluster bracket) is a horizontal plank installed over the balusters. Balusters are attached to the support, and the handrail is attached to the support. This method has several advantages: baluster alignment is simplified (they must be at the same height, but the precision of their placement in the plane is less critical), handrail installation is simplified, and it becomes possible to replace individual balusters without dismantling the entire structure.
The baluster support is made from the same wood species as the other elements. Its cross-section is usually 30×50 mm or 40×60 mm. Balusters are attached to the support from below using screws through previously drilled holes. Each baluster requires 2 screws, positioned offset to avoid splitting the support.
A groove is milled on the underside of the handrail, corresponding to the width of the baluster support. The groove depth is 15–20 mm. The handrail is placed over the support, glue is applied to the groove and the top surface of the support. Additional fixation is achieved by screws, which are screwed in from below through the support into the handrail at an angle. Screw heads are countersunk and covered with wooden plugs or filled with putty.
Handrail mounting method using support posts
On staircases with posts (at the start and end of the flight, at turns), the handrail is attached to the posts, and balusters serve more as filler elements. Posts are the main load-bearing elements, taking on most of the load. The handrail is inserted into the posts using a straight or angled tenon joint. A groove (slot) is milled into the post, and a tenon is formed at the end of the handrail, which fits into the groove. The joint is strengthened with glue and a through bolt (the bolt passes through the post and handrail, clamping them together).
Balusters between posts are installed using any of the methods described above. It is important that the upper ends of the balusters contact the handrail — even if they do not bear the main load, contact provides additional rigidity to the system and prevents handrail sagging between posts. Some designs provide a small gap (1–2 mm) between the ends of the balusters and the handrail, if the balusters serve purely decorative purposes.
Assembly technology: step-by-step guide
Professionalinstallation of balusters and handrailsRequires not only theoretical knowledge but also practical skills. Let's consider the installation process of a round handrail from start to finish.
Step 1: Preparation and marking
Before starting work, all wooden elements must be acclimated — left in the room where installation will take place for at least 5–7 days. This allows the wood to adapt to the humidity and temperature of the room. Check all elements for defects, discard any with cracks, chips, or excessive knots.
Marking begins with determining the installation line of the handrail. The handrail height from the edge of the step — 900–950 mm for residential spaces, 1200 mm for children's facilities. A horizontal line at this height is marked on the wall or support posts. A laser level is used to ensure perfect horizontal alignment.
Marking points for baluster installation on the steps. Standardly — 2 balusters per step, positioned 100–150 mm from the edges of the step. For wide staircases (over 1200 mm) 3 balusters per step may be required. Baluster centers are marked with a center punch or awl. If support posts are used, they are installed first, then a string is stretched between them to control the baluster line.
Stage 2: Installing balusters
Installation begins with the end balusters (at the posts) or the first baluster of the flight. Holes for fasteners are drilled at marked centers. The diameter and depth depend on the chosen mounting method: for M8 bolts — 8 mm diameter, 60 mm deep holes; for 10 mm dowels — 10 mm diameter, 50 mm deep holes.
If using bolt mounting, the bolt is screwed into the lower end of the baluster so that it protrudes 50–60 mm. The thread must enter the baluster by at least 40 mm for secure fixation. Glue is applied to the thread and into the step hole. The baluster is installed by screwing the bolt into the hole. For this, the baluster is rotated around its axis. It is important to monitor vertical alignment at all stages of installation — a level is applied from two perpendicular sides.
When using screw mounting, screws are screwed into the baluster base into the step at a 45–60 degree angle. Each baluster requires 2–4 screws depending on its diameter and wood species. Pre-drilling pilot holes is mandatory for hardwoods (oak, ash) and recommended for medium-hardwoods (beech). This prevents splitting the wood.
After installing all balusters, their vertical alignment and the alignment of upper ends in one plane are checked. A long straightedge is used, applied to the ends of balusters along the entire length of the flight. Deviations are corrected: protruding balusters are trimmed, recessed ones are extended with thin shims. The allowable deviation — no more than 1 mm along the entire length.
Stage 3: Preparing the handrail
The handrail is prepared for installation: its length is checked (it should match the flight length, accounting for the mounting method to posts), ends are trimmed at the required angle for fitting to posts or forming end elements. If using the baluster support method, a groove of appropriate dimensions is milled on the underside of the handrail.
Marking points for baluster placement on the underside of the handrail. For precise marking, a template is made — a long straightedge with centers of all installed balusters marked. The template is applied to the handrail, and marks are transferred. Holes are drilled at contact points (for dowel or bolt connections) or pilot holes for screws.
If the handrail has joints (for long flights), connection elements are prepared. These can be metal couplings (tubes inserted into the handrail to connect sections) or wooden tenons. Joint locations should be between balusters, equidistant from the nearest supports.
Stage 4: Installing brackets (if used)
If the handrail is mounted to the wall using brackets, brackets are installed first. Points for mounting are marked on the wall at 800–1000 mm intervals. The first bracket is placed 150–200 mm from the start of the handrail, the last one — the same distance from the end. Holes are drilled in the wall for anchor bolts (for concrete or brick) or strong screws (for wooden walls).
Brackets are installed and aligned horizontally and vertically. All brackets must be at the same height (deviation no more than 1 mm) and in the same vertical plane. After installing the brackets, the handrail is placed on them for fitting. Contact tightness and absence of gaps are checked. Adjustments are made if necessary.
Stage 5: Installing the handrail
This is the climax of the entire process. If using direct mounting to balusters with dowels, dowels are glued into the upper ends of balusters, protruding 30–40 mm. Glue is applied to the handrail holes. The handrail is carefully placed over the dowels of all balusters simultaneously. This requires assistance — one person holds the handrail, the other checks alignment of holes and dowels.
After seating, the handrail is pressed against the ends of the balusters. Clamps or temporary supports are used to ensure even pressing along the entire length. The handrail can be gently tapped with a rubber mallet to fully seat it on the dowels. Glue protruding at connection points is immediately wiped away with a damp cloth — after curing, it will be difficult to remove.
If using screw mounting, screws are screwed in from below through the ends of balusters into the handrail. Screws must enter the handrail to a depth of at least 30–40 mm. For hardwoods, screws with partial threads are used, ensuring clamping of the joint. Screw heads are countersunk 3–5 mm and covered with wooden plugs.
Railing is laid onto brackets and secured. The method of fixation depends on the bracket design: it may involve screws driven from below through the bracket into the railing, or hidden clamps. It is important that the railing has no play on the brackets.
Stage 6: Final Processing
After the adhesive has fully cured (24–48 hours), final processing is performed. Connection points are inspected and, if necessary, sanded with fine sandpaper (grit 220–320). Wooden plugs covering screw holes are trimmed flush with the surface and sanded.
The entire structure is wiped clean of dust. If the components were supplied with a finish, connection and processing areas are coated with the same material (oil, varnish) to match tone. If components were supplied without finish, a finish is applied to the entire structure — this ensures uniform color and texture.
Final inspection of the reliability of all connections is performed. The railing must not have play or squeaking under load. Balusters must stand strictly vertically, without wobbling. The entire structure must withstand a horizontal load of 100 kg without visible deformation.
Typical mistakes and how to avoid them
Even experienced craftsmen sometimes make mistakes that can ruin the result or reduce the reliability of the structure. Let’s consider the most common ones.
Error 1: Inaccurate marking. Even a 5 mm deviation in marking the installation positions of balusters may result in the railing not fitting properly. Solution: use precise measuring tools (laser level, metal tape measure), check each mark twice, and fabricate templates to transfer markings from steps to the railing.
Error 2: Using green wood. If the wood moisture content exceeds 12%, it will dry out during use, leading to weakened connections and cracks. Solution: purchase components only from reputable manufacturers that guarantee kiln-dried wood. Allow elements to acclimate in the installation space for at least one week before mounting.
Error 3: Insufficient adhesive fixation. Some craftsmen rely solely on mechanical fastening (screws, dowels), ignoring adhesive. This reduces connection strength. Solution: always use quality woodworking adhesive in addition to mechanical fastening. This creates a dual safety system.
Error 4: Over-tightening screws. When driving screws into hardwood, over-tightening may cause splitting or excessive sinking of the screw head. Solution: use a drill driver with torque adjustment, pre-drill pilot holes, and control the depth of insertion.
Error 5: Ignoring thermal expansion. Wood expands and contracts with changes in humidity. Rigidly fixing long railing sections without compensating gaps may lead to deformation. Solution: for railings longer than 3 meters, provide joint connections with 1–2 mm gaps, and use sliding brackets.
Tools and materials for professional installation
To perform quality work, a specific set of tools and materials is required.
Measuring tools: laser level (for marking horizontal and vertical lines), 600–1000 mm bubble level, 5–10 m metal tape measure, square, caliper (for precise measurements of hole diameters).
Cutting tools: circular saw (for trimming railing and balusters at precise angles), jigsaw, electric hacksaw with fine teeth.
Drilling tools: electric or battery-powered drill with power of at least 800 W, set of wood drill bits 6–12 mm in diameter, auger bits 20–50 mm (for drilling large holes), drill press or dowel guides (for precise vertical drilling).
Fastening tools: drill driver with torque adjustment, set of bits (cross and hex), wrenches (for tightening bolts), clamps of various sizes (for holding elements during gluing).
Processing tools: sander (orbital, belt, or vibratory), set of sandpaper grits from 80 to 320, hand plane, chisels of various widths.
Materials: woodworking adhesive (PVA, polyurethane, or epoxy), wood screws of various lengths (40–80 mm), wooden dowels 8–10 mm in diameter, metal bolts M8–M10, anchor bolts (for mounting brackets to walls), wood putty (for filling holes), oil or varnish for final finish.
Modern trends in installation: what’s new in 2026
The industry of wooden stair installation is not standing still. In 2026, several innovative trends are emerging.
Digital design. More and more professionals use 3D modeling and calculation programs to design stairs before starting work. This allows identifying potential problems, optimizing element placement, and calculating exact material quantities. Some programs generate 1:1 scale markings that can be printed and used as templates.
CNC machining. CNC milling machines allow manufacturing elements with precision down to 0.1 mm. This simplifies installation, as all parts fit together perfectly. This is especially important for complex joints (dovetails, slots, shaped cutouts).
Modular systems. Ready-made modular railing systems are emerging, where all elements are standardized and easily connect to each other. The manufacturer supplies balusters, handrails, posts, fasteners — everything needed for installation. Elements have pre-machined mounting points, simplifying assembly to a level of a constructor.
Composite materials. Although natural wood remains the favorite, composite materials based on wood fibers and polymers are emerging. They are resistant to rot, do not deform, and require minimal maintenance. They are visually indistinguishable from natural wood.
Smart systems. Integration of LED lighting into handrails, touch-sensitive elements that turn on lights upon contact, and heated handrails for comfort in winter. These solutions are still exotic but are gaining popularity in the premium segment.
When it comes to creating a staircase that will serve for decades and delight with beauty every day, it is important to choose a reliable partner. The company STAVROS is synonymous with quality in the world of wooden products. For more than twenty years, STAVROS has produced
, which are installed in thousands of homes throughout Russia.staircase componentsSTAVROS production is equipped with modern equipment: CNC lathes ensure identical balusters in each batch, milling centers cut complex grooves and tenons with precision down to tenths of a millimeter, multi-stage polishing creates mirror-smooth surfaces. At the same time, STAVROS preserves the traditions of handcrafting: final finishing, quality control of each item, and the possibility of creating exclusive carved elements according to the customer's sketches.
STAVROS offers a complete range of elements for installation: round handrails in oak, beech, ash of various diameters and lengths, balusters turned and carved in dozens of models, posts, brackets, fastening systems. All products are made from carefully selected wood, kiln-dried to a moisture content of 8–10%. This guarantees that after installation, elements will not deform or crack.
The company offers not only the sale of components but also comprehensive services: professional consultations on selecting elements and installation methods, calculation of required materials, staircase project development, and installation services performed by experienced crews. STAVROS specialists are proficient in all modern installation methods — from traditional to innovative — and will find the optimal solution for your project.
Choosing STAVROS, you get not just high-quality materials, but also confidence in the result. Thousands of installed staircases, positive customer reviews, quality guarantees — all of this makes STAVROS the leader in the market of wooden products. Your staircase, assembled from STAVROS components and installed according to professional standards, will become a reliable, safe, and beautiful part of your home for many decades.
By choosing STAVROS, you get not just high-quality materials, but also confidence in the result. Thousands of installed staircases, positive customer reviews, quality guarantees — all of this makes STAVROS the leader in the market of wooden products. Your staircase, assembled from STAVROS components and installed according to professional standards, will become a reliable, safe, and beautiful part of your home for many decades.
Frequently asked questions
Can a round handrail be installed independently without experience in carpentry?
It is theoretically possible if you have basic skills with tools and are willing to learn. However, installation requires precision and attention to detail. Mistakes may result in damage to expensive materials. If you are unsure of your abilities, it is better to invite a professional for consultation or to handle critical stages (marking, installation of support elements). Simple straight staircases are easier to install, while complex spiral or turning staircases are better left to specialists.
What is the most reliable method of attaching the handrail to balusters?
The most reliable method is a combined approach: dowel or bolted connections reinforced with glue and additionally secured with self-tapping screws. This creates a triple safety system. Purely glued connections are sufficiently strong when properly executed, but the presence of mechanical fasteners provides greater psychological confidence. For critical zones (start and end of the stair run, areas of maximum load), use reinforced methods.
How long does it take to fully install a round handrail with balusters?
For an experienced crew of two people, installing handrails on a standard 14-step staircase takes 1–2 working days. This includes installing balusters, mounting the handrail, and final finishing. Complex structures (spiral staircases, non-standard shapes) may require 3–5 days. Self-installation without experience will take 2–3 times longer, as you will need to troubleshoot, recheck, and possibly redo work.
Do you need to apply additional protective coating to connection points?
If the main elements already have a finish, connection points, cut areas must be coated with the same material. This ensures color uniformity and prevents moisture from entering unprotected wood. If installation is performed using uncoated elements, the entire structure is coated with a finish after completion of installation and final sanding. Use oil, wax, or lacquer depending on the desired result.
How to fix an error if the handrail is installed incorrectly?
If the error is detected before the glue fully cures (within 1–2 hours after installation), you can carefully remove the handrail, remove the glue, adjust the position of the elements, and reinstall. After the glue has cured, disassembly without damage is practically impossible — you will need to cut the connections, which may damage the balusters or handrail. In this case, better evaluate the criticality of the error: if it is purely visual and does not affect safety, it may be left as is. If safety is compromised or the error is very noticeable, replacement of damaged elements will be required.
Can ordinary nails be used instead of self-tapping screws for fastening?
Technically possible, but not recommended. Nails hold less securely than self-tapping screws, especially against pull-out. As wood dries, nailed joints weaken faster. Additionally, hammering nails may split thin elements. Modern wood screws are specifically designed for such connections: they have threads ensuring secure holding, thin shanks reducing the risk of splitting, and concealed heads for hidden installation. Use quality screws — this is a guarantee of longevity.
What is the optimal distance between brackets for a 50 mm diameter beech handrail?
For a beech handrail with a 50 mm diameter, the optimal distance between brackets is 800–1000 mm. At this spacing, deflection under a 100 kg load will not exceed 5 mm, which meets standards. For oak, which is stronger, the spacing can be increased to 1200 mm. For pine, a softer wood, it is better to reduce to 600–800 mm. If the handrail has internal metal reinforcement, the spacing can be increased to 1500 mm.
How to ensure all balusters are perfectly vertical?
Check the verticality of each baluster during installation. Use a bubble level, placing it on two perpendicular sides of the baluster. Some craftsmen use magnetic levels that attach to the baluster, freeing their hands. For even greater accuracy, use a laser level that creates a vertical plane. After preliminary fixation, check verticality again — sometimes a baluster shifts when tightening fasteners. If deviation is detected, correct it before the glue fully cures.
Do you need to prime the wood before applying the finish?
For oil and wax finishes, priming is not required — they are applied directly to the wood. For lacquer finishes, especially water-based ones, using a primer is recommended. It equalizes the wood’s absorption, improves lacquer adhesion, and allows reducing the number of finish coats. Some modern lacquers have priming properties and do not require separate priming — consult the manufacturer’s instructions.
How to check the quality of the completed installation?
Perform a visual inspection: all balusters must be perfectly vertical, evenly spaced, and the handrail must be perfectly straight (or smoothly curved on spiral staircases) without visible bends. Check for secure fastening: grasp the handrail and try to rock it — there should be no play, creaking, or sensation of instability. Apply a horizontal load of about 50 kg — the handrail should not visibly bend or shift. Run your hand along the handrail — the surface should be perfectly smooth, without steps at connection points, or roughness. If everything is in order — the installation is of high quality.


