


Article Contents:
- Types of Lighting Scenarios: How Light Shapes Space
- Horizontal Wall Division
- Niche and Opening Framing
- Vertical Light Lines
- Accent Lighting for Art Objects
- Zoning of open space
- LED Profiles: Materials, Constructions, Characteristics
- Polystyrene Molding: Accessibility and Lightness
- Duroplastic Molding: Strength and Durability
- Polyurethane Molding: Flexibility and Moisture Resistance
- Aluminum Profiles: Professional Solution
- Structural Features of Profiles
- Niche Placement: Designing Lighting Zones
- Height of Horizontal Molding
- Distance from Ceiling and Floor
- Niche: Depth and Proportions
- Vertical Compositions
- Mounting to Wall and Ceiling: Structural Reliability
- Surface Preparation
- Installing Lightweight Polystyrene Molding
- Installing Heavy Duroplastic Molding
- Mounting to Ceiling
- Mounting in Niches
- Jointing and Sealing: Invisible Connections
- Cutting moldings
- Profile Fitting
- Gap filling
- Sealing in Humid Areas
- Painting After Installation: Final Finish
- Preparation for painting
- Choosing paint
- Painting technique
- Painting with Decorative Effects
- Frequently Asked Questions
- What Power LED Strip to Choose for Molding?
- Can Molding with Lighting Be Installed by Yourself?
- How much does it cost to install molding with backlighting?
- How often should LED strips be replaced?
- Can RGB strips be used?
- What distance should be between the molding and the wall for backlighting?
- Is it necessary to prime moldings before painting?
- How to care for moldings with backlighting?
- Can moldings be mounted on wallpaper?
- What to do if the molding has peeled off?
- Conclusion: Light as part of architecture
A typical interior. Walls are painted, furniture is arranged, lighting is working. But something is missing. The room looks flat, devoid of volume, impersonal. No visual accents, no sense of space depth, no atmosphere. Standard ceiling lighting evenly illuminates the room, but creates nothing special.
Now imagine: a horizontal line of light appears on the wall. A molding, illuminated from within by an LED strip, divides the wall into zones, creating an architectural rhythm. A niche is softly lit — its contents become an exhibition. Vertical light lines frame a doorway, making it a striking interior element. The space gains depth, volume, character.
Molding for backlighting — this is not just a decorative strip with an embedded light bulb. It is an architectural modeling tool that allows you to control the perception of space through light. Properly placed light moldings can transform even the most modest interior, creating a sense of thoughtfulness and professional approach. We will examine types of lighting scenarios, profile selection, installation technology — from the first measurement to the final paint job.


Types of lighting scenarios: how light shapes space
Hidden backlighting in moldings works not as primary lighting, but as a tool for creating atmosphere and revealing architecture. Different scenarios solve different tasks.


Horizontal wall division
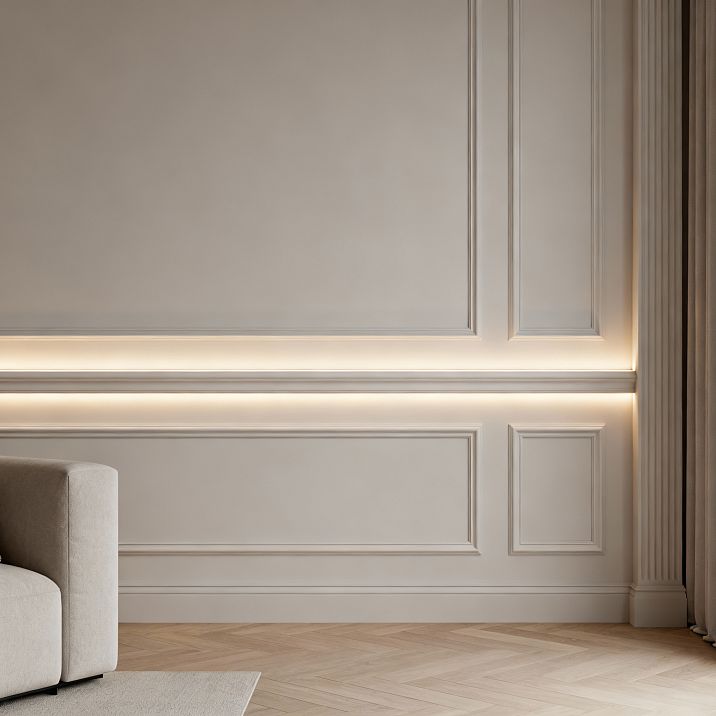
Molding for LED stripInstalled horizontally at a height of 80-120 cm from the floor, visually divides the wall into two parts. The lower part is perceived as a panel, the upper part as the main space. This is a classic technique used in architecture for centuries.
Backlighting the molding from above or below enhances the effect of division. Light directed upward emphasizes the upper part of the wall, making the ceiling visually higher. Light directed downward highlights the lower panel, creating a sense of solidity and stability.
Double-sided backlighting — light both upward and downward simultaneously — creates a floating effect. The molding seems to detach from the wall, hanging in the air. This technique works especially effectively with wide moldings 80-120 mm, where there is room to place LED strips on both sides.
The height of molding installation determines the perception of room proportions. Low placement at 60-80 cm creates a sense of protection and coziness, suitable for bedrooms. Medium height at 100-120 cm is universal and works in most interiors. High placement at 150-180 cm visually elongates the space, suitable for rooms with high ceilings.
Our factory also produces:


Niche and opening framing
Niches in walls, door and window openings are framed with backlighting moldings to stand out from the general space.
Moldings for ceiling backlighting The same principle is applied to walls — light reveals form and draws attention.
A niche with illuminated framing becomes an exhibition space. Books, decor, collections receive lighting design, becoming the center of attention. Backlighting can be inside the niche, around the perimeter, or combined — each option creates its own effect.
Doorways framed with glowing moldings look like architectural portals. Light emphasizes geometry, making the opening a striking element. Especially effective in long corridors, where a sequence of lit openings creates rhythm and perspective.
Window casings with backlighting compensate for the lack of natural light at night. The window remains a visual center even in the evening, when darkness lies beyond it. Soft lighting around the perimeter creates a sense of day continuing.
Get Consultation
Vertical light lines
Moldings installed vertically from floor to ceiling create vertical division of space. This visually raises the ceiling, making the room appear higher. Especially effective in apartments with standard ceilings of 2.5-2.7 m, where every visual centimeter of height counts.
Light columns in the corners of the room structure the space, creating a visual frame. A room transforms from an amorphous volume into a clearly organized space with defined geometry. Four light verticals at the corners — a simple yet powerful architectural technique.
Symmetrical verticals on both sides of the central element — TV, fireplace, bed — create a majestic frame. This works like a picture frame, focusing attention on the central object. Lighting enhances the effect, adding a light accent.
Accent lighting for art objects
Paintings, sculptures, collections require special lighting.
Molding for hidden backlightingInstalled above the object or around its perimeter, it creates directional lighting without visible fixtures.
Backlighting from above mimics natural lighting, to which the eye is accustomed. Paintings are perceived naturally, colors are rendered correctly. Molding is mounted horizontally above the object at a distance of 30-50 cm, LED strip directed downward.
Edge lighting — molding around the perimeter of the object — separates it from the wall, creating a floating effect. A painting or panel seems to hang in mid-air. Narrow moldings 20-30 mm with inward-facing light are used.
Color temperature of light is critical for proper perception of art. For painting, use warm white 2700-3000K, close to museum lighting. For contemporary art and photography, neutral 4000-4500K provides objective color rendering.
Zoning of open space
In studios and open-plan apartments, light moldings work as spatial dividers without physical barriers. A light line on the ceiling or wall marks the boundary of functional zones — living room, dining room, kitchen.
Different lighting intensity in different zones enhances the effect. Bright lighting in the working kitchen zone, medium in the dining area, dim in the relaxation zone. Light directs attention, guides movement, and creates spatial hierarchy.
Color zoning with RGB strips adds flexibility. Each zone can have its own backlight color, changing depending on time of day or usage scenario. During the day, everything is neutral; in the evening, colored accents are activated.
LED profiles: materials, constructions, characteristics
Not every molding is suitable for integrating LED backlighting. A special construction with a shelf or channel for placing LED strips is required.
Polystyrene moldings: accessibility and lightness
polystyrene molding on the wall — the most accessible option. Made by extrusion of expanded polystyrene, density 30-45 kg/m³, minimal weight. A two-meter plank 80 mm high weighs 100-150 grams.
The construction of specialized profiles includes a shelf for LED strips 20-40 mm wide. The shelf can be open or with edges holding the strip. The front part of the profile hides the LEDs from direct view, directing light in the desired direction.
Advantages of polystyrene — low cost (150-400 rubles/m), easy installation (sticks to adhesive without additional fasteners), ability to paint with any color using water-based paints. Disadvantages — brittleness, low heat resistance (up to 80°C), tendency to yellow under UV exposure.
For decorative backlighting with power 5-7 W/m, polystyrene is ideal. For high-power strips 14-18 W/m, it’s better to choose a more heat-resistant material — duroplastic or aluminum.
Duroplastic moldings: strength and durability
Duroplastic — compressed polystyrene processed under pressure and temperature. Density 350-420 kg/m³, 10 times higher than regular polystyrene. A two-meter profile of the same height weighs 800-1200 grams.
The rigidity of duroplastic ensures perfect geometry over long spans. Profiles do not sag and maintain a straight line over distances of 5-7 meters without intermediate fasteners. This is critical for creating continuous light lines.
Heat resistance up to 90-110°C allows using powerful LED strips without fear of deformation. Prolonged heat exposure does not affect the profile’s shape. The smooth, dense surface reflects light more efficiently than porous polystyrene.
The price of duroplastic moldings is 600-1200 rubles/m, 2-4 times higher than polystyrene. But the durability of 25-30 years versus 10-15 years offsets the difference. For premium interiors, commercial spaces, and powerful backlighting — duroplastic is optimal.
Polyurethane moldings: flexibility and moisture resistance
Polyurethane has elasticity, which polystyrene and duroplastic lack. Flexible polyurethane profiles can be bent to decorate curved surfaces — arches, bay windows, columns. Bend radius from 50 cm depending on profile size.
Absolute moisture resistance makes polyurethane ideal for humid areas. Bathrooms, saunas, pool areas — polyurethane moldings with backlighting last decades without losing properties. Heat resistance up to 110-130°C allows use in hot zones.
The price of polyurethane moldings is 800-1500 rubles/m, the highest among synthetic materials. But for non-standard tasks — curved surfaces, extreme conditions — there are no alternatives.
Aluminum profiles: professional solution
Aluminum profiles — a separate category. These are not decorative moldings, but functional items for installing LED strips. They are aluminum boxes with a slot for the strip and a diffuser made of matte plastic or glass.
Advantages of aluminum — excellent heat dissipation (critical for powerful strips), strength, durability of 30-50 years, variety of configurations. Profiles can be surface-mounted, recessed, corner, round — for any task.
Aluminum profiles with diffuser cost 400-1200 rubles/meter depending on size and quality. Visually, they are more technologically advanced than classic moldings, suitable for modern minimalist interiors, technical rooms, and commercial spaces.
Structural features of profiles
Light direction is determined by the profile's construction. Single-sided profiles direct light in one direction — upward or downward. Double-sided profiles emit light in both directions, creating a floating effect. The choice depends on the desired effect and installation location.
The width of the LED strip channel varies from 15 mm for compact strips to 50 mm for two-row powerful strips. Narrow channels are suitable for decorative lighting, while wide ones are for functional lighting. When selecting a profile, check that the channel width matches the strip width.
Profile height affects visual expressiveness. Low 30-50 mm moldings are delicate and almost invisible, functioning as clean light lines. High 80-150 mm moldings create architectural volume, serving both as decorative elements and light sources.
Niche placement: designing lighting zones
Correct placement of lighting moldings determines the success of the entire lighting scenario. Designing requires understanding of space and lighting objectives.
Height of horizontal moldings
Classic height of panel molding — one-third of wall height. For ceilings 2.7 m high, this is 90 cm from the floor. This proportion is harmonious for most interiors, proven by centuries of architectural practice.
Alternative heights create different effects. Low 60-70 cm heights suit bedrooms, creating coziness and protection. Medium 100-120 cm heights are universal for living rooms and dining rooms. High 150-180 cm heights elongate space and are used in rooms with ceilings 3 m and higher.
Aligning with furniture height creates visual continuity. Molding at the level of the sofa back, table edge, or cabinet top integrates furniture into architecture. The space is perceived as cohesive and thoughtfully designed.
Distance from ceiling and floor
Ceiling moldings are installed with a 7-15 cm setback from the ceiling to create a floating plane effect. A smaller setback creates a bright, concentrated strip, while a larger one produces soft, diffused glow. Optimal gap: 10-12 cm.
Floor moldings with backlighting are mounted 5-10 cm from the floor. The light line at the base of the wall creates a floating effect, visually expanding the room. In hallways, it functions as night orientation lighting.
Symmetry between upper and lower moldings creates a visual frame for the wall. Ceiling molding 10 cm from the ceiling, floor molding 10 cm from the floor — the wall appears within a light frame. Enhances vertical perception and suits high rooms.
Niche: depth and proportions
Niche walls for decorative placement are designed with backlighting in mind. Depth of 15-25 cm is sufficient for most items. Height and width depend on contents — books, vases, figurines.
Backlighting in niches is installed differently. Top lighting — molding at the top of the niche, light directed downward. Contour lighting — molding around the perimeter, light inward. Back lighting — LED strip on the back wall behind transparent shelves, creating an internal glow effect.
Multiple niches are arranged according to rhythm. Even spacing creates a calm rhythm, asymmetrical spacing creates dynamism. Niche sizes can be identical or varied, depending on the concept.
Vertical compositions
Vertical light lines from floor to ceiling require straightness. Even a millimeter deviation from vertical is noticeable to the eye. Use a laser level for marking, and check verticality at every stage of installation.
Distance between vertical moldings determines visual impression. Frequent placement (every 50-80 cm) creates rhythm, suitable for long walls. Sparse placement (every 150-200 cm) emphasizes individual zones, works well in small rooms.
Combining horizontal and vertical moldings creates a grid of divisions. This is a classic architectural technique used in historical interiors. Intersections of light lines — compositional focal points — attract attention.
Mounting to walls and ceilings: structural reliability
Correct installation guarantees the longevity of the lighting system. The technology depends on the molding material and base surface.
Surface preparation
The base must be flat, clean, dry, and strong. Remove peeling coatings, wash away dust, and ensure humidity no more than 10%. Level any irregularities over 5 mm with putty — moldings will replicate all wall waves.
Priming improves adhesive bond. Use acrylic deep-penetration primer for porous bases — plaster, drywall, aerated concrete. Concrete walls do not require priming, but it is recommended.
Marking determines the result. For horizontal moldings, draw a strictly horizontal line across the entire length using a laser level. For vertical moldings, use a plumb bob or laser level in vertical mode. Accuracy ±1 mm per meter.
Mounting lightweight polystyrene moldings
Polystyrene moldings adhere to the surface using glue without additional fasteners due to their low weight. Use polymer adhesives or water-based acrylic sealants. Organic solvents will damage the material.
Apply adhesive to the back of the molding in a zigzag or dot pattern with a spacing of 10-15 cm. For moldings with large contact areas, apply a thin layer over the entire surface using a notched trowel.
Attach the molding to the wall along the marked line, pressing firmly along its entire length. Hold for 30-60 seconds until the adhesive sets. Immediately wipe away any excess adhesive squeezed out from under the profile using a damp cloth.
For long sections over 3 meters, install in pairs. One person holds the start, while the other gradually presses the profile against the wall. This prevents misalignment and uneven adhesion.
Installation of heavy duro-polymer moldings
Duro-polymer moldings are heavier; one adhesive is insufficient. Additional mechanical fastening is mandatory. Use self-tapping screws or finishing nails with a spacing of 40-50 cm on straight sections, 20-30 cm at corners.
Pre-drill holes in the molding using a drill bit slightly smaller than the screw. This prevents material cracking. Drill holes in the wall for anchors of the corresponding size.
Drive screw heads 2-3 mm below the profile surface. Fill the holes with acrylic putty, then sand smooth with fine-grit sandpaper after drying. After painting, the fastening points will be invisible.
Apply adhesive generously — duro-polymer is heavy, requiring secure fixation. Press and secure with screws, remove excess adhesive. Allow the adhesive to fully dry for 24 hours before proceeding with further work.
Mounting to the ceiling
Ceiling moldings experience significant loads due to the vector of gravity. Even for light profiles, adhesive alone is insufficient. Mechanical fastening is mandatory.
For concrete ceilings, use anchors and screws. For gypsum board ceilings, use screws with wide threads, specifically designed for GKL. A spacing of 30-40 cm ensures reliability.
If the molding is installed with a setback from the ceiling to create a light gap, mount it only to the wall. A setback of 7-15 cm from the ceiling allows the molding to rest on the wall, directing light upward and reflecting off the ceiling.
Mounting in niches
Moldings in niches are mounted along the perimeter of the inner space. Use adhesive and screws for upper and side sections. Bottom moldings are held by adhesive, but additional fastening is recommended for reliability.
Difficulty in corner joints within the niche. Cutting at 45 degrees in confined space requires precision. Use a miter saw for clean cuts, and adjust on-site if necessary.
Jointing and sealing: invisible joints
The quality of joints determines the visual impression. Gaps, height differences, and mismatched relief — all of these break the illusion of a single light line.
Cutting moldings
Cut straight joints at 90 degrees. Use a miter saw for duro-polymer, a fine-tooth hacksaw or a utility knife for polystyrene. The cut must be strictly perpendicular, without chips or dents.
Corner joints require cutting at 45 degrees. Use a miter saw for polystyrene, a miter saw for duro-polymer. Check the angle accuracy on scrap pieces before cutting the finished profiles. An error of 1-2 degrees will result in a noticeable gap.
Complex angles — not 90 degrees — require calculation. Measure the angle between walls with a protractor, divide it in half — this gives the cutting angle. For a 120-degree angle, cut at 60 degrees. Adjust on-site to achieve a tight joint.
Profile fitting
Place both profiles against the corner, check the joint tightness. A gap over 0.5 mm is visible to the eye and requires adjustment. Trim one profile to achieve perfect alignment.
Level differences should be sanded out. If one profile protrudes over another, sand it down with fine-grit sandpaper until level. A difference over 1 mm is noticeable, especially with backlighting.
Relief moldings require matching ornamentation. The pattern must continue across the joint without breaks. This requires precise trimming and sometimes selecting profiles from the same batch, where dimensions are stable.
Gap Filling
Fill gaps up to 1 mm with acrylic sealant for painting. Extrude a thin bead into the gap, smooth with a damp finger. Immediately wipe away excess with a damp cloth. After drying and painting, the joint will be invisible.
Gaps of 1-3 mm require filling with putty. Use fine-grit acrylic putty. Fill the gap, smooth with a trowel, let dry. Sand smooth, then paint. The joint will be visible up close but invisible from a distance.
Gaps over 3 mm — a mounting error. Recut the profiles to achieve a tight joint. Attempting to fill a large gap with putty will result in a visible seam that ruins the entire work.
Sealing in wet areas
In wet areas, additionally seal joints with silicone sealant. Acrylic sealant is not waterproof and may delaminate in humid environments. Silicone creates an elastic, waterproof joint.
Use transparent or white silicone depending on the molding color. Apply in a thin bead at the joint, smooth with a damp finger. Silicone does not paint, so the color must match initially.
Seal the molding junction with tile or other finishes along the entire length. This prevents water from seeping under the profile, mold formation, and delamination. Moisture protection is critical for longevity in wet areas.
Painting after installation: finishing touch
Painting moldings — the final stage, determining the visual impression. Proper preparation and painting technique yield a professional result.
Preparation for painting
Fill all joints and mounting points with acrylic putty. Smooth with a damp putty knife, let dry 2-4 hours. Sand with fine-grit sandpaper (180-220) until perfectly smooth.
Remove dust after sanding with a dry cloth or vacuum with a soft attachment. Dust under paint creates roughness and ruins the finish. Wipe with a damp cloth and let dry.
Priming is not required for duro-polymer, but recommended for polystyrene. Acrylic primer seals pores, ensures even paint absorption, and improves final color. Primer dries in 1-2 hours.
Paint Selection
For polystyrene, use only water-based paints — emulsion, acrylic, latex. Organic solvents will damage the material. For duro-polymer, any paint can be used, but water-based paints are more convenient.
Matte paints hide minor surface defects and do not create glare. Semi-gloss and satin finishes provide a soft sheen, highlighting the quality of the finish. Glossy paints reveal all imperfections and require perfect preparation.
Paint quality affects the result. Cheap paints require 3-4 coats for coverage, expensive ones cover in 2. Premium paints provide a smoother finish, are easier to clean, and retain color longer.
Painting Technique
Paint smooth moldings with a roller, textured ones with a brush. A roller gives a smooth surface without brush marks, a brush penetrates into recesses. Use quality tools — cheap rollers and brushes leave bristles.
First coat — primer, thin. Dilute paint with water 10-15% for better penetration into pores. Apply evenly, without streaks. Let dry 2-4 hours.
Second coat — base coat. Do not dilute paint, apply thinly and evenly. Work quickly, do not repaint dried areas — streaks will form. Check results after 2-4 hours.
Third layer if needed. If the base is visible after the second layer, apply a third. Three thin layers give better results than two thick ones. The final layer determines the coating quality.
Painting with decorative effects
Patina is created by dark paint in recesses. Apply dark paint (brown, gray, black) over the entire surface. While wet, wipe raised parts with a damp cloth. Paint remains in recesses, creating an aged effect.
Metallic finish mimics noble metals. After base coat, apply metallic paint (gold, silver, bronze, copper) with a dry brush to raised parts of the relief. Achieves a gold effect without using real metal.
Two-tone painting creates contrast. Molding one color, wall another. Or molding different colors on top and bottom. Use painter’s tape for clean edges, paint sequentially with each color drying completely.
Frequently asked questions
What LED strip power to choose for moldings?
For decorative lighting, 5-7 W/m is sufficient. For accent lighting, 10-12 W/m is needed. For functional lighting of niches, 12-14 W/m. Consider heat — powerful strips require heat-resistant profiles.
Can moldings with lighting be installed by oneself?
Yes, installing moldings is accessible for a homeowner with basic skills. Cutting, gluing, and securing with self-tapping screws require no special experience. Electrical part (connecting LED strips) requires basic understanding but is also not complicated.
How much does it cost to organize lighting with moldings?
For 10 meters of moldings: profiles 6000-12000 rubles (duropolymer) or 1500-4000 rubles (polystyrene), LED strip 1500-3000 rubles, power supply 1000-2000 rubles, small items 500-1000 rubles. Total materials 9000-18000 rubles or 4500-10000 rubles respectively.
How often should LED strips be replaced?
Quality strips last 30-50 thousand hours — 10-20 years with daily use of 4-8 hours. Luminosity degradation begins after 70% of lifespan. Replacement is simple — remove old, apply new, connect.
Can RGB strips be used?
Yes, RGB strips allow changing the lighting color. An RGB controller is needed for control (1500-5000 rubles). Color lighting is effective for parties and events, but for everyday use, most prefer white light.
What distance should be between molding and wall for lighting?
For directional lighting, 0-2 cm gap is sufficient. For diffused lighting, 3-5 cm is needed. For floating effect, make a 5-10 cm gap. Distance affects light quality — the greater the distance, the softer the light.
Is priming moldings necessary before painting?
Priming is not required for duro-polymer — the dense surface holds paint well. For polystyrene, priming is recommended — it seals pores and improves color. Use water-based acrylic primers.
Wipe dust with a dry or slightly damp soft cloth. Do not use abrasives or aggressive chemicals on painted surfaces. Do not touch the LED strip inside the profile — it is protected by the construction.
Wipe dust with a dry or slightly damp soft cloth. Do not use abrasives or aggressive chemicals on painted surfaces. Do not touch the LED strip inside the profile — it is protected by the construction.
Can moldings be mounted on wallpaper?
Better on plastered or painted surfaces. Wallpaper may peel under the weight of the molding. If mounting on wallpaper is unavoidable, use non-woven — they are stronger than paper ones. Apply minimal adhesive to avoid soaking the wallpaper.
What to do if the molding has peeled off?
Remove the peeled-off section, clean both surfaces of old adhesive. Apply fresh adhesive, press firmly, and secure with self-tapping screws if the profile is heavy. Hold until the adhesive sets. The cause of peeling is poor preparation or weak adhesive.
Conclusion: Light as part of architecture
Molding for LED strip Transformed decorative strips into functional elements of light architecture. This is not just wall decoration, but a tool for controlling spatial perception through integrating light into the structure.
Various lighting scenarios allow solving any task — from zoning space to highlighting art objects. Horizontal wall divisions, niche framing, vertical light lines, contour lighting — each technique creates its own effect.
Moldings for ceiling backlighting Walls and ceilings are available in different materials. Polystyrene is economical for decorative purposes. Duroplastic is long-lasting for premium projects. Polyurethane is flexible for curved surfaces. Aluminum is professional for technical installations.
Correct installation guarantees longevity and effectiveness. Foundation preparation, precise marking, secure fastening, quality jointing, final painting — each stage is critical for the result. Errors at any stage will spoil the overall impression.
Company STAVROS offers a full range of
moldings for hidden lighting. Profiles of various sizes, configurations, materials — from budget polystyrene to premium duroplastic. Wide selection allows implementing any designer concept.
Professional consultants will help select optimal profiles for your project. Material quantity calculation, LED strip power selection, electrical component choice, installation recommendations — receive expert support at every stage.
Quality guarantee, certified products from leading manufacturers, competitive prices, delivery across Russia.
Molding for LED strip From STAVROS — this is quality proven over time, and technologies that redefine lighting concepts.
Transform your interior by integrating light into architecture. Create a space with scenario-based lighting, adaptable to your needs.
polystyrene molding on the wall or duroplastic profile — choose a solution matching your concept and budget.
Light moldings are the language of modern architecture, where light becomes a material equal to stone and wood. Master this language, create spaces that surprise, inspire, and transform alongside you.


