


Article Contents:
- What is a Furniture Frame and Why is it Needed
- Advantages of Working with Ready-Made Frames
- Types of Furniture Frames
- Frame Materials
- Choosing a Frame for Your Project
- Sizes and proportions
- Carving Styles
- Constructive features
- Complementing the Frame with Decor: Overlays and Balusters
- Carved Overlays on Rails
- Replacing or Adding Legs
- Corner Blocks and Capitals
- Choosing a Tabletop: Materials and Finishing
- Wood: Continuation of the Frame
- Marble: Luxury and Durability
- Glass: Modernity and Lightness
- Final Finishing of the Frame: Painting, Patina, Varnishing
- Painting: Color and Technique Selection
- Patination: effect of time
- Varnishing: Protection and Shine
- Furniture Assembly: Step-by-Step Guide
- Component preparation
- Installing Overlays and Additional Decor
- Mounting the tabletop
- Project Ideas: What You Can Create
- Dining Table with Marble Tabletop
- Console for the Hallway with Mirror Tabletop
- Coffee Table with Glass Tabletop
- Chest of Drawers with Colored Fronts
- Practical Tips and Common Mistakes
- Error: Incorrect Tabletop Size
- Error: Painting an Assembled Frame
- Error: Insufficient Finish Protection
- Tip: Test the Finish on a Sample
- Tip: use a quality tool
- Questions and Answers
- Can a ready-made frame be used to create a writing desk?
- How to attach overlays if the frame is already painted?
- Is it necessary to prime wood before painting?
- What glue should be used to attach overlays?
- How to care for furniture created by yourself?
- Can furniture be disassembled for transportation?
- Conclusion

Creating furniture yourself doesn't mean sawing boards and struggling with a router in the garage. The modern approach to independent furniture creativity is based on combining professionally manufactured components —furniture, carved overlays, balusters, decorative elements. You get a ready-made base made of solid oak or beech, created on high-precision equipment, and then complement it with a tabletop,furniture decor, finishing, creating an item that fully matches your interior, your dimensions, your vision of beauty.
Why does this make sense? Factory furniture often doesn't fit the dimensions — too long or short, too high or low. Or the style is unsatisfactory — you want more or less carving, a different color, a different leg shape. Custom-made furniture from scratch is expensive, production times are long, and the result is unpredictable. The approach with ready-made frames is a compromise that saves time and money but preserves individuality. You buy a professionally manufactured table base, add a tabletop made from a material you chose yourself — oak, walnut, marble, glass — install carved overlays, patinate, paint, and get a table that no one else has.


What is a furniture frame and why is it needed
furniture frames— is the structural basis of furniture, a table base, a frame for a chest of drawers, cabinet, console, made of solid wood, without a tabletop, doors, drawers. It's the skeleton on which you put the shell — the tabletop, facades, which you can select separately, creating a unique combination.


Advantages of working with ready-made frames
First — quality of joints. Professional furniture frames are made with tenons, dowels, dovetails, glued, and withstand serious loads. It's difficult to make such joints yourself without experience and equipment; the result is often wobbly, unreliable. A ready-made frame guarantees strength, geometry, durability.
Second — complex carving and turning.Carved frameswith shaped legs, rails with ornamentation, carved corner blocks are created on CNC machines, ensuring precision, repeatability, depth of carving that is impossible to achieve by hand without years of carver experience. Buying a ready-made carved frame, you get professional work for a reasonable price.
Third — time saving. Making a table frame from scratch is days of work if you have tools and skills. Buying a ready-made frame — minutes to place an order, a few days for delivery. You spend time on the creative part — choosing the tabletop, decor, finishing — not on routine carpentry operations.
Our factory also produces:


Types of furniture frames
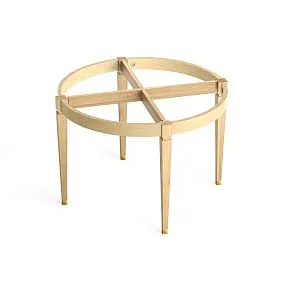
Table bases — the most popular type of frames. They come in different shapes — rectangular, square, round, oval — for corresponding tabletops. Designs vary — four legs at the corners, a central support with a wide base, two bases at the ends for long tables. Stylistics from strict classic to lush baroque are determined by the shape of the legs, presence of carving, proportions.
Chest of drawers frames include side walls, back, bottom base, sometimes a top frame for the tabletop, but without drawer fronts, which can be ordered separately or made yourself. A console frame — narrow, on high legs, for a tabletop depth of 30-40 cm, for placement against a wall in a hallway, living room. Cabinet, bench, stool frames — compact, for various functions.
Get Consultation
Frame materials
Oak — a classic choice forof solid wood, durable, with expressive texture, long-lasting. The density of oak ensures resistance to loads, scratches, impacts. Color from light yellow to brown depends on the age of the tree, region of growth. Oak frames are heavy, massive, create a sense of reliability, monumentality.
Beech — lighter than oak, with fine uniform texture, without pronounced annual rings. The density of beech is comparable to oak, but beech is softer to process, carving comes out cleaner, more detailed. Beech color is pinkish, creamy, which creates a warm feeling. Beech frames are lighter than oak, but no less strong, suitable for furniture where delicacy of carving is important.
The choice between oak and beech depends on aesthetic preferences and the function of the furniture. For a large dining table that will bear a heavy stone tabletop, oak is preferable — its strength will ensure stability. For a console, coffee table with a light glass tabletop, beech is sufficient, its light color and clean carving will be more noticeable.
Choosing a frame for your project
Before buying a frame, determine what exactly you are creating — a dining table, coffee table, console, chest of drawers — and which parameters are critical.
Dimensions and Proportions
The size of the base must correspond to the planned tabletop. If the tabletop is 180×90 cm, the base should be slightly smaller — 160×70 cm — leaving tabletop overhangs of 10 cm on each side, which creates visual lightness and allows comfortable placement of knees under the table. Too large a base — the tabletop looks thin, disproportionate. Too small — the table is wobbly, unstable.
The frame height determines the final item's height. Standard dining table height is 75-76 cm, so if the tabletop thickness is 4 cm, the under-table frame height should be 71-72 cm. For a bar table, height is 100-110 cm, under-table frame 96-106 cm. For a coffee table, height is 40-50 cm, under-table frame 36-46 cm. Consider the thickness of the tabletop you plan to use.
Carving style
The frame style should match the interior where the furniture will be placed. A classic under-table frame with straight tapered legs, minimal carving, and clean lines suits neoclassical interiors where restraint is important. A Baroque under-table frame with curved cabriole legs, rich acanthus leaf carving, and volutes on the aprons suits opulent interiors where decoration is welcome.
Rococo — flowing lines, asymmetrical scrolls, floral motifs — for light, airy interiors. Empire — strict columns, pilasters, geometric ornaments, lion's paw feet — for solemn, monumental spaces. Art Nouveau — flowing organic forms, plant-based ornaments without excessive detailing — for interiors where naturalness and fluidity of lines are important.
Choose a frame whose carving echoes existing furniture, wall moldings, and door decor. This creates compositional unity and the impression of a well-thought-out interior, not a random collection of items.
Structural Features
Pay attention to the type of leg-to-apron connection. Mortise and tenon joint — classic, reliable, glued, ensures strength for decades. Connection with metal brackets — easier to assemble, allows furniture disassembly for transport, but less aesthetic, fasteners are visible.
The presence of stretchers — horizontal crossbars between legs at the bottom — adds rigidity, especially important for tall tables, but visually weighs it down and occupies legroom. A frame without stretchers is visually lighter, more modern, but requires thicker legs and stronger connections to ensure stability.
The ability to adjust height via glides on the legs is useful if the floor is uneven. Metal or plastic glides allow leveling the table, prevent wobbling, without needing to prop up a leg with cardboard.
Enhancing the frame with decor: overlays and balusters
A ready-made frame is a base that can be enhanced, enriched, and personalized by adding carved overlays, replacing legs, or installing additional decorative elements.
Carved overlays on aprons
Aprons — horizontal planks connecting the legs of the under-table frame — are often smooth on standard frames. Addingof furniture decorin the form of carved overlays turns a simple frame into a luxurious one. Overlays can be central — one rosette or cartouche in the middle of the apron — or corner — at the edges where the apron meets the leg.
The size of overlays should be proportionate to the apron's width and height. On an apron 10 cm wide, an overlay 6-8 cm high looks proportional, not overloaded. Too small an overlay gets lost, too large doesn't fit, protrudes beyond the apron. Overlay length 15-30 cm for central, 5-10 cm for corner — typical sizes.
The carving style of overlays should match or complement the carving already present on the frame's legs. If legs have a plant-based ornament, overlays also with leaves, scrolls. If legs are geometric, overlays with geometry — meander, rosettes with symmetrical patterns.
Replacing or adding legs
Some frames are sold with basic legs that can be replaced with more decorative ones. Or the frame is supplied without legs, with mounts where you install chosen balusters. This allows customizing leg height, style, and shape to your needs.
Balusters — turned or carved posts used as furniture legs or stair railings — come in dozens of forms. Simple cylindrical, classic with turned details, complex with carved elements, Baroque with lush carving. The choice of baluster determines the character of the entire furniture — a delicate thin baluster creates lightness, a massive carved one — monumentality.
Installing balusters on a frame requires precise connection. The baluster's top end must fit tightly into the mortise on the apron, the bottom — rest on the floor, possibly via a glide. Gluing, additional fixation with screws from inside ensure strength. If unsure of your skills, entrust installation to a master carpenter who will ensure connection reliability.
Corner blocks and capitals
Carved corner blocks are installed at leg-to-apron joints, strengthening the structure and adding decorativeness. A block with carving — rosette, cartouche, plant motif — hides the joint, creates visual reinforcement of the corner, makes the frame more complex, interesting.
Capitals — decorative overlays on the upper parts of legs, imitating architectural columns — are appropriate in classical styles, especially Empire. A capital of Ionic, Corinthian, or Composite order turns a simple leg into a column, creating monumentality, a connection with ancient architecture.
Installing corner blocks and capitals requires care — they must be precisely aligned, symmetrical on all corners. Gluing with special wood glue ensures reliability, additional fixation with small headless nails or screws from inside — if the structure allows.
Choosing a tabletop: materials and processing
The tabletop — the visible, functional part of the table — determines its character, practicality, durability. The choice of material, thickness, and edge processing is critical for the final result.
Wood: continuation of the frame
A wooden tabletop from the same solid wood as the frame — oak or beech — creates material unity, a classic look. A solid laminated panel from glued boards ensures strength, resistance to warping, which is possible with a solid plank. Tabletop thickness 30-50 mm — standard for dining tables, ensures strength, visual massiveness.
Processing the tabletop edge adds character. A straight milled edge — strict, modern. Rounded — safe, pleasant to touch. Shaped with milling — classic, echoing the frame's carving. The end edge can be veneered with the same wood, hiding the panel layers, or left visible, showing the structure.
Final finish of a wooden tabletop — oil, wax, varnish. Oil penetrates the wood, emphasizes the grain, creates a matte surface, pleasant to touch, but requires regular renewal. Varnish creates a protective film, resistant to moisture, stains, but hides the wood's tactility. Wax coating — a compromise, provides light protection, preserves naturalness.
Marble: luxury and durability
Marble countertop — a choice for luxurious interiors where the aesthetics of the stone, its cold beauty, and unique veining pattern are important. The thickness of a marble countertop is 20-30 mm for small tables, 30-40 mm for large dining tables, ensuring strength and visual massiveness.
Marble edge processing — polishing creates a smooth, shiny surface that is pleasant to the touch. A bevel on the top edge softens the corner, making the edge less sharp and safer. Decorative edge processing — classic French nose, Roman profile — adds ornamentation but increases the cost.
Marble requires care — it is porous, absorbs liquids, and stains from wine, coffee, or lemon juice can become permanent. Sealing with special compounds reduces the risk but does not eliminate it completely. Marble can be scratched by sharp objects, which must be considered during use — cutting boards are mandatory, and heavy items should be placed carefully.
Glass: Modernity and Lightness
Glass countertop made of tempered glass, 10-15 mm thick — a choice for modern interiors where visual lightness, transparency, and the ability to see the carved frame from below are important. Clear glass does not hide the under-table structure, allowing admiration of the carving and turned legs. Frosted or tinted glass adds privacy, softness, and conceals items on the lower shelf, if present.
Glass edge processing — polishing creates a smooth, safe edge. A facet — a beveled edge along the perimeter — adds light play, makes the glass thickness more noticeable, and creates a frame. The edge can be straight or shaped, following the countertop's form if it is not rectangular.
Attaching a glass countertop to the frame via suction cups or rubber pads ensures stability and prevents slipping. Glass is slippery and resonant — dishes should be placed carefully; using coasters or placemats softens the sound and protects against scratches.
Frame finishing: Painting, patina, varnishing
The purchased frame is usually supplied unfinished — sanded wood without coating — or with a basic coating. Finishing is your creative part, where you determine the color, gloss, aging effects, creating furniture that precisely matches the interior.
Painting: Color and technique selection
Painting the frame in white, cream, gray, black, or colored shades allows integration into any palette. White paint is a classic choice for French, Scandinavian, or shabby chic styles, creating airiness and visually expanding the space. Black is dramatic, graphic, suitable for contrasting interiors where strictness and elegance are important.
Paint type — acrylic water-based, alkyd enamel, chalk paint — determines the final effect. Acrylic dries quickly, is odorless, and creates a matte or semi-matte surface. Alkyd is more durable, resistant to wear, but dries slower and has an odor. Chalk paint creates a velvety matte surface, popular in vintage styles, is easy to work with but requires a final wax coating for protection.
Application technique — brush, roller, spray gun. A brush allows painting into carving recesses and hard-to-reach areas but may leave bristle marks if the brush is low-quality. A roller creates an even coating on smooth surfaces but does not penetrate carvings. A spray gun is a professional tool, providing a perfectly even coating without marks but requires skill, a ventilated area, and protective masks.
Patina: effect of time
Patina — toning the recesses of carvings, joints, and edges with a contrasting color — creates a noble aging effect, emphasizes relief, and adds depth. On white-painted furniture, gray, brown, or golden patina fills the recesses, leaving the raised areas light, creating volume.
Patina technique — apply the patina composition with a brush or sponge over the entire surface, then partially wipe it off with a soft cloth from the raised areas, leaving it in the recesses. The degree of wiping regulates the effect's intensity — minimal wiping creates a dark, saturated patina; intensive wiping creates a delicate, barely noticeable one.
Patina color determines the furniture's character. Golden patina on white — luxury, baroque, palace-like. Silver — cold elegance, neoclassical, modernity. Gray — neutral, restrained, suitable for Scandinavian, minimalist interiors. Brown — warm, vintage, shabby chic, Provence.
Varnishing: Protection and gloss
Final varnish coating protects the paint, patina, and the wood itself from moisture, dirt, and mechanical damage. Varnish can be matte — no glare, creating a natural look — semi-matte — light satin sheen — or glossy — strong shine that emphasizes color and carving but is more prone to showing marks.
Varnish type — water-based or solvent-based. Water-based varnish is eco-friendly, odorless, dries quickly, does not yellow over time, suitable for white furniture where color preservation is important. Solvent-based varnish is more durable, resistant to wear and water, but has an odor, requires ventilation, and may yellow slightly over years, which is unnoticeable on dark furniture.
Number of varnish layers — minimum two, optimally three to four — ensures reliable protection. Light sanding with fine 320-400 grit sandpaper between layers removes raised fibers and creates roughness for better adhesion of the next layer. The final layer is not sanded, left smooth and ready for use.
Furniture assembly: Step-by-step guide
How to create furniture with your own handsfrom ready-made components — a process that requires care but no specialized skills. The main steps are universal for most projects.
Component Preparation
Inspect the frame received from the manufacturer for defects, chips, or cracks. If finishing is incomplete, perform final sanding with fine sandpaper, remove dust with a dry cloth or vacuum. If you plan to paint or apply patina — do this before assembly, while all surfaces are accessible and easy to work with.
Prepare the countertop similarly — sanding, edge processing, and final coating should be completed before installation on the frame. Carved overlays, if added, should also be painted, patinated, and varnished in advance. Working with already assembled furniture is more difficult — hard-to-reach areas, risk of damaging adjacent parts.
Installing overlays and additional decor
Carved overlays are attached with wood glue — PVA or specialized for wood. Apply a thin layer of glue to the back of the overlay, press it to the apron or frame, hold for several minutes until it sets. Remove excess glue immediately with a damp cloth, without waiting for it to dry, otherwise it will leave marks.
For reliability, large overlays are additionally secured with small headless nails — finishing nails — which are hammered into inconspicuous places, recesses of the carving. Nail holes are filled with wood or paint-colored putty, sanded, and become invisible.
Balusters, if installed as legs, are attached via tenons or metal fasteners. A tenon on the baluster end fits into a mortise on the apron, is glued, ensuring strength. Metal brackets or strips are attached from the inside with screws, hiding the fasteners from view and allowing disassembly of the structure.
Attaching the countertop
The tabletop is attached to the frame using corner brackets and strips that are recessed into the inner aprons. The fastening method must account for wood expansion due to humidity—wood is a living material that changes dimensions. Rigid fastening with screws driven straight through will cause the tabletop to crack over time. The correct method is a sliding fastening using elongated holes with screws and washers, which allow the tabletop to move.
For marble or glass tabletops, use rubber pads, silicone dots, or suction cups that prevent slipping, dampen vibrations, and do not require rigid fastening. A stone tabletop is heavy and stays in place due to its own weight; additional fixation is not needed, except perhaps for transportation.
Leveling the tabletop is critical—it must be parallel to the floor and not wobble. Use a level, adjust the glides on the frame legs to achieve a perfect horizontal plane. The gaps between the tabletop and the aprons should be uniform around the perimeter, ensuring symmetry and aesthetics.
Project ideas: what you can create
Ready-made frames open up wide possibilities for creativity. Here are several project examples that you can implement on your own.
Dining table with a marble tabletop
ClassicCarved apronAn oak frame with Baroque cabriole legs and carved aprons can be complemented with a white Carrara marble tabletop with gray veining. The contrast between warm wood and cold stone creates an elegant composition. Paint the frame in a natural tone and cover it with a matte varnish that highlights the oak's texture. Seal the marble tabletop and install it on the frame using rubber pads. The result is a unique dining table that will become the centerpiece of the dining room.
Console table for the hallway with a mirrored tabletop
A narrow console frame on tall turned legs can be complemented with a tabletop made of tinted gray mirror glass. Paint the frame in a graphite-gray color and patina it with silver, creating a cold elegance. Install carved cartouche overlays on the aprons, painted to match the frame. The mirrored tabletop visually expands the narrow hallway, reflects light, and makes the space feel lighter. Place woven baskets for storing small items on the lower shelf of the frame under the tabletop.
Coffee table with glass top
A compact square frame measuring 80×80 cm on four carved balusters can be complemented with thick tempered glass with a beveled edge. Paint the frame white and patina it with gold, creating a classic luxury. The glass allows you to see the carving on the balusters and the stretchers with ornamentation, making the table feel light and weightless despite the solidity of the wood. Place a stack of art albums on the lower shelf between the stretchers to create a decorative composition.
Chest of drawers with colored fronts
A beech frame for a chest of drawers can be complemented with drawer fronts made of plywood, painted in different pastel colors—mint, lavender, peach, blue—creating a playful, rainbow-like composition. Paint the frame white and leave it matte. Install identical brass push-button handles on the fronts. Make the tabletop from the same beech, painted white, to create unity with the frame. The result is a chest of drawers suitable for a child's room or bedroom, adding color and joy.
Practical tips and common mistakes
Mistake: incorrect tabletop size
A common mistake is ordering a tabletop exactly the size of the frame, without overhangs. The tabletop should be larger than the frame by 10-15 cm on each side for dining tables, and 5-10 cm for coffee tables and consoles. Overhangs create visual lightness and allow for comfortable knee placement and chair tucking. Excessively large overhangs cause the tabletop to overbalance, making the table unstable and posing a tipping risk if pressure is applied to the edge.
Mistake: painting an assembled frame
Painting an already assembled frame is difficult—hard-to-reach areas, recesses in carvings, and joints remain unpainted and stand out as light spots. The correct approach is to disassemble the frame into parts if the design allows, paint each component separately, and then reassemble. If the frame is non-disassemblable, paint it before installing overlays and the tabletop, when all surfaces are accessible.
Mistake: insufficient finish protection
One coat of varnish is insufficient to protect furniture that will be used daily. A minimum of two to three coats with intermediate sanding ensures durability. Skimping on the final finish will lead to rapid wear, scuffs, and the need for restoration within a year or two.
Tip: test the finish on a sample
Before painting the entire frame, test the chosen color, patina, and varnish on a sample—a scrap piece of the same wood or a carved overlay that won't be used. The color on the sample after drying may differ from the color in the can; the patina may be darker or lighter than expected. Testing allows you to adjust the shade and application technique before starting work on the frame.
Tip: use high-quality tools
High-quality brushes, rollers, and sandpaper cost more, but the result is better. Cheap brushes leave bristles on the painted surface, rollers create unevenness, and coarse sandpaper scratches the wood. Investing in good tools pays off in the quality of the final finish.
Questions and answers
Can a ready-made frame be used to create a writing desk?
Yes, a table base for a dining table is suitable for a writing desk. Add a wooden or glass tabletop of the required size—typically 120-140 cm in length and 60-70 cm in depth—which is sufficient for placing a computer and documents. For comfortable work, the tabletop height should be 75 cm; keep this in mind when selecting a frame.
How to attach overlays if the frame is already painted?
Wood glue works on painted surfaces, but the adhesion is weaker than on bare wood. For reliability, lightly sand the gluing area with fine-grit sandpaper, remove dust, and apply glue. Additional fixation with finishing nails is mandatory for large overlays.
Is it necessary to prime wood before painting?
Primer improves paint adhesion and evens out absorbency, especially on porous woods like oak. Acrylic wood primer is applied with a brush, dries in 1-2 hours, then is sanded with fine-grit sandpaper, dust is removed, and paint is applied. Primer is not mandatory but is recommended for an ideal result.
What glue should be used to attach overlays?
PVA wood glue — a classic choice, inexpensive, safe, strong when dry. Polyurethane glue — stronger, waterproof, but expensive, foams when drying, requires clamping. Epoxy — super strong, for critical joints, but tricky to work with, takes long to dry. For most tasks, PVA is sufficient.
How to care for furniture you've made yourself?
Regular dry cleaning with a soft cloth removes dust. Wet cleaning with a mild soap solution — as needed, then wipe dry. Avoid harsh chemicals, abrasives. Renew the protective coating once a year — polish, wax, oil — depending on the type of finish. Protect from direct sunlight, excessive humidity, and sudden temperature changes.
Can furniture be disassembled for transport?
Depends on the type of joints. If the frame is assembled with mortise and tenon joints and glue — it cannot be disassembled without damage. If assembled with bolts, brackets — it disassembles easily. The tabletop can always be removed if it's not glued. When planning furniture that will need to be transported, choose frames with detachable joints or plan to transport it assembled.
Conclusion
Creating furniture from ready-madefurniture framesandof solid wood— is a creative process where professional-quality components combine with your individuality, your vision of beauty. You don't start from scratch, you don't spend years mastering woodworking, you don't buy expensive equipment. You take a ready-made, sturdy base, created on professional machines from solid oak or beech, and complement it with a tabletop that perfectly fits in size, material, style. AddFurniture decor— carved overlays, balusters, corner blocks — which transform a simple frame into a luxurious piece. You paint, patinate, varnish, creating a finish that exactly matches your interior's color palette.
The result — unique furniture that no one else has. Not mass-produced factory stamping, not expensive custom work with unpredictable results, but your creation, where every detail is chosen, every color is considered, every overlay is installed with love. Furniture that perfectly fits your interior in size, style, function. Furniture in whose creation you participated, which creates an emotional connection, pride in the result, and enjoyment in use.
The process is accessible even to beginners. No specialized skills are needed — basic skills with a brush, screwdriver, sandpaper are sufficient. No workshop is needed — work is done at home, on the balcony, in the garage. Time from idea to completion — weeks, not months. The cost is lower than custom furniture, but the quality is professional thanks to the use of ready-made components.
The company STAVROS manufacturesfurniture framesmade of solid oak and beech — underframes for dining, coffee, console tables, frames for dressers, cabinets, benches — ready to be complemented with your tabletop, fronts, decor. Each frame is manufactured on modern CNC equipment, ensuring joint precision, part repeatability, and high carving quality. Hand finishing by craftsmen — sanding, fitting, strength checking — guarantees no defects, readiness for use.Carved frameswith Baroque, Classical, Empire, Art Nouveau patterns allow you to choose a style that matches your interior. Frames are supplied assembled with mortise and tenon joints, glued, ready to bear load, or disassembled with fasteners for self-assembly.Furniture decorSTAVROS — carved rosette overlays, corner elements, linear panels, balusters of various shapes and styles — allows you to enrich a simple frame, create a unique piece. All decorative elements are made from the same solid wood as the frames, ensuring material unity and perfect combination after painting. Consultations with professional designers help you choose the frame, decor, tabletop, plan the finish, and avoid mistakes. Delivery across Russia and CIS, packaging in rigid boxes prevents damage during transport. Product warranty, possibility of return or replacement if the frame doesn't suit, ensures a comfortable purchase. By choosing STAVROS, you choose the quality of natural wood, the craftsmanship of carving, the possibility for creativity, and pride in the result. Let your home be filled with furniture created by your hands, let every item tell the story of your choice, your taste, your love for beauty. Create, craft, enjoy the process and the result.


