Article Contents:
- Why Wall Molding is Needed — Decorative and Zoning Functions
- Molding Changes the Perception of Space — and That's Not an Exaggeration
- Molding Decor as a Style Tool
- Types of Wall Molding: Pilasters, Panels, Rosettes, Borders
- Pilasters — Vertical Wall Architecture
- Decorative Panels — Wall in Style
- Moldings and Borders — Horizontal Rhythm
- Wall Rosettes — Point Accents
- Corner Elements and Connectors
- How to Properly Glue Molding to the Wall — Adhesive, Primer, Seams
- Tools and Materials: What to Prepare in Advance
- Surface Preparation: Nothing Sticks Without It
- Marking: The Key to a Smooth Result
- Applying Adhesive: The Technique That Determines the Result
- Seams: How to Achieve Invisible Joints
- Molding in Interior: Classic, Neoclassical, Modern Style
- Classic and Baroque: Boundless Opulence
- Neoclassical: Balance of Strictness and Luxury
- Provence and Shabby Chic: Aged Molding
- Minimalism: Molding as the Sole Accent
- Painting and Finishing of Molding Decor
- Why Polyurethane is the Perfect Base for Any Coating
- Painting to Match the Wall: Architectural Relief Effect
- White Molding on a Colored Wall: Contrasting Decor
- Patina and Gilding: Antique Imitation
- FAQ: Answers to Popular Questions
- About the Company STAVROS

A wall is not just a partition between rooms. It is a surface that looks at you every day. And what you see — bare plaster, wallpaper, or living relief — shapes your sense of space, coziness, and status. That is why wall molding is returning to interiors so confidently today: not as a tribute to nostalgia for palace halls, but as a conscious tool of modern design.
Wall moldingPolyurethane molding is lightweight, moisture-resistant, precisely cast decor that can be installed without special skills and costs incomparably less than its plaster or stone prototype. Rosettes, pilasters, panels, borders, overlays — each element carries the idea: to turn an ordinary plane into an architectural statement.
This article is your practical guide. Which molding to choose for walls, how to properly glue it, in which style it is organic, and how to finish it — here you will find an answer to every question.


Why Wall Molding is Needed — Decorative and Zoning Functions


Molding changes the perception of space — and that's not an exaggeration
Try this thought experiment. Imagine a living room with white walls, neutral furniture, standard windows. Now add moldings along the perimeter of the walls — rectangular frames with a simple profile. That's it. Nothing else has changed. But the room already looks different: it has become structured, with character, with 'architecture'.
This is precisely the first functionmoldings for walls— spatial. Decoration on vertical surfaces structures perception: it breaks a homogeneous plane into zones, creates rhythm, adds depth. The eye catches the relief, the brain reads 'order' — and the space feels more expensive, more thoughtful.
The second function is visual correction of space. Low ceiling? Vertical pilasters on the walls optically stretch the room upward. A long narrow corridor? Horizontal moldings on the walls reduce the tunnel-like feeling. A too-wide wall without accents? Several decorative panels create rhythm and break up the monotony.
The third function is zoning without partitions. Molded frames made of moldings, dividing the wall into upper and lower parts, are a virtual zoning line. The lower part of the wall 'reads' as a plinth zone, the upper part as the main one. This technique is actively used in classical and neoclassical projects — and does not require drywall or demolition.
Our factory also produces:


Molded decor as a style tool
Relief Decorationon the wall is primarily a design decision. It defines the style of a room faster than furniture or wall color. One pilaster with a Corinthian capital — and the space immediately acquires a classical character. Several horizontal moldings with a geometric profile — and it's already Art Deco. Diamond-shaped frames made of flat moldings covering the entire wall — modern neoclassicism.
At the same time, molding does not limit style but accentuates it. It can be white on a white wall — barely noticeable, purely tactile. It can be contrasting — dark on light, gold on gray. It can imitate plaster, marble, antique stone. The range is wider than it seems at first glance.
Get Consultation
Types of wall molding: pilasters, panels, rosettes, borders
Pilasters — the vertical architecture of the wall
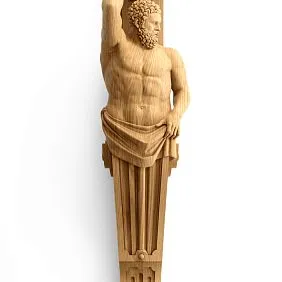
A pilaster is a flat column 'embedded' in a wall. In classical architecture, it served a structural function. In modern interiors — exclusively decorative, but no less significant for that.
A polyurethane pilaster is mounted on the wall vertically: from the baseboard level to the cornice or molding under the ceiling. It consists of several elements: a base (lower foundation), a body (shaft), and a capital (upper finish). Each element is a separate product, allowing the overall height of the pilaster to be adapted to the height of any room.
In the STAVROS catalog, capitals are presented in several styles — from strict Doric to lush Corinthian. This allows for building a precise stylistic accent: a Corinthian capital — for Baroque and high-level classicism, Doric — for neoclassicism and Empire style, Ionic — for moderate classicism.
Pilasters are placed:
-
At wall corners, creating visual 'piers' in openings
-
On both sides of a fireplace or doorway, framing it
-
At regular intervals along a long wall, breaking it into equal 'bays'
-
Under a ceiling beam, imitating its architectural support
Decorative panels — a wall in style
A decorative wall panel made of polyurethane is a rectangular relief element with various ornaments. They come in small sizes (30×40 cm) — for spot accents — and large sizes (80×120 cm and more) — for covering a significant wall area.
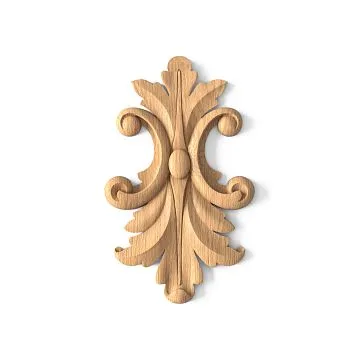
In the STAVROS catalog, panel NPU.VRS-006 (29,320 rub.) is a large-scale vertical decorative overlay with a rich floral ornament. This is a product that itself becomes a 'painting' on the wall: just one panel on a key wall in the living room is enough for the interior to acquire a core.
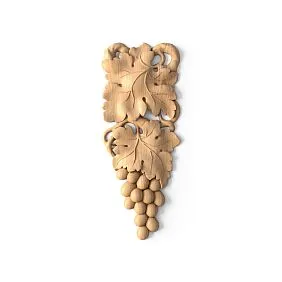
More laconic models — NPU.VRS-012 (1,190 rub.) and NPU.VRS-002-3 (2,570 rub.) — are small overlays for arranging in rows or for spot accents. They are intended for regular placement: in a checkerboard pattern on a paneled wall zone, along the contour of a niche, around a window.
Moldings and borders — horizontal rhythm
A molding is a horizontal decorative strip with a profiled cross-section. This is the most universal typemoldings for walls: moldings divide walls into zones, frame panels, create frames, mask seams.
Several key applications of moldings on walls:
Top/bottom dividing line — a molding at a height of 90–110 cm from the floor separates the plinth zone from the main one. The lower zone is painted darker or covered with different wallpaper — resulting in a two-level wall finish without demolition or reconstruction.
Frames — four moldings in a rectangle form a decorative frame. Inside the frame — a different color, patterned wallpaper, or simply the same color as outside, but surrounded by a profile. This technique is a neoclassical standard: regular molding frames on a wall — an instant 'palatial' effect with affordable means.
Under the cornice — a molding along the perimeter of the wall right under the ceiling serves the function of a ceiling baseboard, but on a vertical plane. It 'closes' the transition from wall to ceiling and adds a horizontal accent.
A border is a type of molding with ornamentation: leaves, meanders, egg-shaped profiles, ionics. Borders are used where not just a dividing line is needed, but a decorative strip with a pronounced pattern.
Wall rosettes are point accents.
Ceiling rosettes are well-known—they frame a chandelier. But wall rosettes are an element that is less commonly known. These are decorative round or rectangular overlays that are mounted on the wall as independent accents: in the center of a wall section, in the middle of a decorative frame, above a fireplace, between two pilasters.
A wall rosette is a focal point. It draws the eye, creating a center of composition on the wall plane. In a classic interior, a central rosette above a sofa is a canonical technique: the furniture group receives a 'crown,' and the wall ceases to be just a background.
In the STAVROS catalog, wall rosettes are presented in the section stucco decoration in a wide range—from small, modest overlays to large, multi-level rosettes with a diameter of 40–60 cm.
Corner elements and connectors
Professional installation of molding on a wall is impossible without corner elements. Molding that wraps around a room corner requires either a 45° miter cut (which is technically complex and requires precise tools) or a special corner connector.
Polyurethane corner blocks—'cove blocks'—are ready-made rectangular blocks with a profile that matches the molding profile. They are mounted in the corner, and the moldings are joined to them end-to-end at a right angle. The result is precise and neat joining without gaps or visible seams.
How to properly glue molding to a wall—glue, primer, seams
Tools and materials: what to prepare in advance
Installationmolding on the wall—is a task that can realistically be done independently even without finishing experience. Polyurethane is lightweight: a large decorative panel weighs 400–800 g. This means the glue can handle holding it on its own, without additional mechanical fastening.
Required tools:
-
Tape measure, level (water or laser), pencil
-
Painter's tape
-
Putty knife and glue gun (if the glue is in a cartridge)
-
Fine-abrasive sponge (grit 180–220) for processing ends
-
Sharp knife or fine-toothed saw for miter cutting
-
Damp cloth for immediate removal of excess glue
Glue: special acrylic glue for polyurethane products. Solvent-based glues are strictly prohibited: they dissolve the polyurethane structure, leaving craters and deformations. Water-based liquid nails are an acceptable option, but specialized acrylic glue provides faster setting and better adhesion.
Surface preparation: nothing will hold without it
This is the most important stage, which is most often skipped—and then people wonder why the molding came off the wall after a year.
The wall must be:
-
Clean: free of dust, grease, and paint residues with poor adhesion
-
Dry: humidity no more than 8–10%
-
Primed: deep-penetration primer applied 12–24 hours before installation
Primer is especially important for walls covered with wallpaper: if you install molding over wallpaper, ensure the wallpaper is securely glued and not 'bubbling.' Otherwise, when pressure is applied to the molding, the wallpaper may come off with it. The best option is installation on a clean painted or plastered wall.
Marking: the key to a neat result
Marking is always done before applying glue. The position of each element is marked with a pencil and level. For horizontal moldings—a strictly horizontal line is snapped along the entire wall length. For frames—the corners of rectangles are marked. For pilasters—a vertical line from floor to ceiling, checked with a level.
A small professional tip: apply painter's tape along the marking line. Glue the piece flush against the tape. After installation, remove the tape—the border will be perfectly sharp, without glue marks on the wall.
Applying glue: the technique that determines the result
Glue is applied to the back side of the decorative molding—not to the wall. This is important: on the rough back surface of polyurethane, the glue holds better than on a smooth plastered wall.
For long moldings: apply glue in a zigzag or dotted pattern with a spacing of 15–20 cm. There's no need to cover the entire surface with a continuous layer: excess glue will seep out at the edges and require immediate removal.
For large panels: apply adhesive around the perimeter + 2–3 dots in the center. The contact area should be at least 30% of the back surface.
For corner connectors: apply a thin, even layer over the entire back surface.
After applying the adhesive, wait 1–2 minutes (for initial set — depends on the adhesive manufacturer's recommendations), then press the element against the wall and hold for 30–60 seconds. Immediately wipe away any adhesive beads with a damp cloth — it is much harder to remove once dry.
Seams: How to achieve invisible joints
Joints between molding fragments are the most vulnerable point in any molding installation. There are two approaches here.
First approach: butt joint. Molding ends are cut strictly at 90° with a fine-toothed saw. The end is sanded with 180-grit sponge, degreased. The gap in the joint after installation is filled with white acrylic sealant, smoothed with a finger moistened with water. After drying — light sanding, painting.
Second approach: corner block. Moldings do not butt in corners — they abut against a special corner block (internal or external). This is an industrial solution where there are no end cuts or complex mitering in principle.
For long straight moldings at the joints of parts (each 2 m long), the gap should not exceed 0.5 mm. If the gap is wider — fill it with sealant. Never leave a joint unfilled: it will still be visible under paint.
Molding in interior design: Classic, Neoclassical, Contemporary style
Classic and Baroque: opulence without limits
A classic interior is the natural habitat for lavishfor molding in interiors. Here, the concept of 'too much' does not exist: multiple tiers of wall moldings, pilasters with Corinthian capitals, decorative panels with floral patterns, ceiling borders — all work in unison, creating a space where every detail continues a conversation with its neighbor.
Key principles of classic wall molding design:
-
Symmetry. Everything is placed in pairs and mirrored.
-
Hierarchy. The main wall (with fireplace, central sofa) is richer than secondary ones.
-
Profile unity. All moldings in a room are from the same profile family, only in different scales.
-
White color. Traditionally, molding in a classic interior is white — on white or light cream walls.
In a living room with ceiling heights of 3.2 m or more, the classic scheme looks like this: 100–120 mm baseboard, horizontal molding at 90 cm height (dado rail), vertical pilasters spaced 120–180 cm apart, molding frames between pilasters, cornice under the ceiling. This scheme was used in 19th-century noble mansions and remains absolutely relevant today.
Neoclassical: balance of rigor and luxury
Modern Neoclassical — perhaps the most sought-after style for wall molding in the last decade. Unlike classic, it does not strive for maximum saturation. Here, decor is targeted and deliberate. A few molding frames on the wall — yes. Pilasters on either side of the fireplace — yes. Ceiling border — yes. But everything else is clean, simple, without excess.
Neoclassical palette: neutral tones — gray, warm white, cashmere, taupe. Molding the same color as the wall — 'tone-on-tone'. Or a slight contrast: moldings slightly whiter than the wall, creating a soft play of light and shadow.
For this style, geometric decorative overlays are especially fitting — rectangular frames, panels with Greek meanders, strict pilasters with Doric capitals. Nothing superfluous — only architectural precision.
Provence and Shabby Chic: aged molding
Provence is a style where creating a sense of 'lived-in' patina of time is important. Molding decor in this style is usually painted not in pure white, but in a slightly 'aged' tone: cream, linen, slightly 'dirty' white with patina in the recesses.
For the Provence style, plant-based ornaments are appropriate — leaves, floral garlands, vines. Small wall rosettes above a console table or dresser. Light borders with floral motifs in the transition zone from the dado to the main wall.
Technique for 'aging' molding: base coat of white enamel, then — a thin layer of dark wax (umber, dark brown) rubbed into the recesses. Excess is removed from the raised parts — and the pattern immediately gains 'age'.
Minimalism: molding as the sole accent
It might seem that minimalism and molding are incompatible concepts. Actually — no. One large decorative panel on an accent wall in a minimalist living room creates a powerful visual focus in the complete absence of other decorative elements. Contrast — that's the key: a rich pattern on an ascetic background reads as maximally expressive.
For minimalist projects, choose either very large single elements or extremely simple geometric moldings — a rectangle without a profile, a simple frame, a horizontal strip without ornament.
Painting and finishing of molding decor
Why polyurethane is the ideal base for any coating
Polyurethane does not absorb paint as greedily as plaster. This means paint consumption is minimal, and the result is predictable and reproducible. Two coats of acrylic enamel on polyurethane molding give the same result as three to four coats on plaster.
The surface of polyurethane is smooth, with slight roughness sufficient for good adhesion. No special primer is required before painting—unless you want to drastically change the color (e.g., from white to dark). In this case, an acrylic blocking primer will prevent the light surface from showing through the dark paint.
Painting to match the wall: the effect of architectural relief
The most popular solution for molding in a modern interior is to paint it the same color as the wall. The decor becomes 'invisible' in color but visible in relief: in side lighting, it creates a complex play of shadows that cannot be reproduced by other means.
Application technique: apply paint with a brush—not a roller. A roller cannot reach the recesses of the profile, leaving them unpainted. A brush with soft synthetic bristles, 25–30 mm wide, ensures complete coverage of the entire relief. Move along the profile, applying light pressure in the recesses.
White molding on a colored wall: contrasting decor
White molding on a colored wall is a contrasting technique. The molding 'comes forward,' becoming an independent decorative element. This is the language of both traditional classicism and modern neoclassicism.
For this effect, the molding is installed before painting the wall (so the border between the decor and the wall will be perfectly sharp) or painted afterward—using painter's tape to protect the wall from white enamel.
Patina and gilding: imitation of antiques
Patination of molding is a technique used to create an 'aged' effect. The technology is the same as for patinating wooden parts: a dark base in the recesses, a light finish paint on the raised areas.
Gilding on molding—gold acrylic paint or gold leaf (in luxury projects). Gilded pilasters on a white wall are a classic palace technique that, in a modern interpretation, works in neoclassicism and art deco.
For details NPU.VRS-013, NPU.VRS-001, and CPU.VRS-057 from the STAVROS catalog—with rich relief and complex ornamentation—gilding or patina reveals all the richness of details that may not be noticeable with solid-color painting.
FAQ: Answers to popular questions
Can molding be glued over wallpaper?
Yes, if the wallpaper is securely glued and there are no bubbles. The wallpaper surface is treated with primer, and after drying, the molding is installed. Risk: with a high weight of the decorative element, the wallpaper may peel off the wall along with it. For heavy items (over 1 kg), additional fixation with long, thin self-tapping screws through the molding into the wall is recommended.
What glue is best for polyurethane molding?
Special acrylic glue for polyurethane products is the optimal choice. Water-based liquid nails (without solvents) are an acceptable option. Strictly prohibited: glues containing acetone, toluene, and other organic solvents—they dissolve polyurethane.
How to remove molding without damaging the wall?
Heating with a construction heat gun softens the glue, and the molding comes off the wall with moderate force. Remaining glue is scraped off with a putty knife; traces are removed with a fine sanding sponge. Minor damage to the putty after removal is inevitable but easily repaired.
Is it necessary to prime the surface of polyurethane molding before painting?
Not necessary when painting white or similar light tones: acrylic enamel adheres to polyurethane without primer. For dark and saturated tones—an acrylic blocking primer prevents show-through and reduces paint consumption.
How to calculate the amount of molding for frames on a wall?
Determine the desired frame size (e.g., 60×80 cm). Perimeter of one frame: (60+80)×2 = 280 cm. Multiply by the number of frames. Add 10–15% for reserve (for cuts and fitting). Convert to linear meters.
What is the correct height for placing horizontal molding on a wall?
The standard 'baseboard line' is 80–110 cm from the floor. This is approximately countertop or windowsill level. A higher line (120–140 cm) creates a 'high baseboard' and is appropriate for ceilings 3 m and higher. For standard ceilings of 2.5–2.7 m—80–90 cm is optimal.
Molding in the bathroom—is it possible?
Yes. Polyurethane is moisture-resistant—it does not rot, swell, or delaminate with constant exposure to steam and moisture. The only condition: the glue must be moisture-resistant (acrylic waterproof), and all seams must be sealed with silicone sealant, not acrylic.
Can molding from different manufacturers be combined?
Technically—yes. But practically, achieving stylistic unity of profiles from different brands is difficult: profile height, bevel radii, and ornament detailing differ. The optimal approach is to use elements from one series of one manufacturer within a single room.
About the company STAVROS
Molding is not a purchase 'for today.' It is a decision you will live with for many years. That is why it is important that behind the product stands a manufacturer with clear quality standards and a transparent range.
STAVROS — manufacturer and supplierpolyurethane molding decorationfor walls, ceilings, facades, and furniture. The catalog includes over 200 items: decorative overlays from NPU and CPU series, moldings, rosettes, cornices, pilasters, capitals, and brackets. Price range: from 530 rubles for compact NPU.VRS-002-4R overlays to 51,490 rubles for large decorative CPU.VRS-062 panels.
All STAVROS products are made from European polyurethane with a density that ensures accurate reproduction of ornamental details, impact resistance, and moisture resistance. The surface is ready for installation and painting without preliminary treatment. Delivery is available throughout Russia and CIS countries. Shipment of in-stock items is on the day of order.
STAVROS is a manufacturer that understands: a beautiful interior begins with the right detail. And that detail must be flawless.