Article Contents:
- Types of ceiling molding: functions and aesthetics
- Ceiling cornices: border and transition
- Ceiling rosettes: framing the center
- Moldings: lines and frames on the ceiling
- Corner elements and ornaments
- Ceiling cornices: proportions and size selection
- Proportion rule: ceiling height determines width
- Room area: size adjustment
- Cornices for stretch ceilings: technological features
- Rosettes for chandeliers: diameter and style selection
- Formula for selecting rosette diameter
- Table of rosette diameters by room area
- Rosette styles: from minimalist to luxurious
- Rosette installation: technical nuances
- Coffered ceilings: architecture from moldings
- Principle of creating coffers
- Coffer design options
- Coffer installation: work sequence
- Installing ceiling molding: step-by-step instructions
- Tools and Materials
- Installation of ceiling cornice
- Features of installation on a stretch ceiling
- Creating the effect of high ceilings: visual techniques
- Technique 1: Cornice painted in ceiling color
- Technique 2: Hidden perimeter lighting
- Technique 3: Vertical lines on walls
- Technique 4: Minimizing ceiling decor
- Hidden lighting in cornices: light architecture
- Types of cornices for lighting
- Choosing LED strip
- Lighting installation
- Frequently Asked Questions
- Conclusion: the ceiling as a work of architecture
The ceiling is the fifth wall, a forgotten plane, the white space above our heads. Most interiors ignore the ceiling: paint, a stretch fabric, at most some recessed lights around the perimeter. But the architecture of classical eras knew differently—the ceiling as a canvas for decoration, a compositional element, an extension of the wall's style.Polyurethane ceiling moldingIt brings a forgotten tradition back into modern interiors. Cornices ranging from five to twenty-five centimeters in width finish the walls, create a transition from vertical to horizontal, conceal technical gaps in stretch ceiling constructions, and integrate hidden lighting—a perimeter of light that visually raises the ceiling by twenty to thirty centimeters. Ceiling medallions with diameters from thirty to one hundred twenty centimeters frame chandeliers, transforming a utilitarian light source into a compositional center, a focal point of the ceiling plane. Coffers—a grid of moldings dividing the ceiling into rectangular or square cells—create rhythm, structure, and architectural depth where there was once flat emptiness.
polyurethane ceiling moldingIt is installed more easily than baseboards. Polyurethane weighs three hundred to six hundred grams per linear meter (for a ten-centimeter wide cornice)—it holds with adhesive without additional fasteners. Installing a cornice in a twenty-square-meter room (with an eighteen-meter perimeter) takes one person four to six hours—marking, mitering corners, gluing, sealing joints. A medallion for a chandelier is installed in twenty minutes—marking the center, applying adhesive, pressing, and routing wires through the central hole. A coffered ceiling is more complex (requiring precise grid layout, multiple molding joints) but is achievable by a DIY enthusiast over a weekend. The result—the ceiling ceases to be a background, becomes an architectural element, enhances the interior's style, adds volume, light, and visual height.


Types of Ceiling Molding: Function and Aesthetics
Ceiling decor is not monolithic. Different elements solve different tasks—from technical to purely decorative.


Ceiling Cornices: Boundary and Transition
A cornice (also called a cove, coving, or crown molding) is a profiled strip installed at the junction of the wall and ceiling. It conceals the corner, masks unevenness, cracks, and technical gaps. Visually, it finishes the wall, creating a smooth transition from the vertical plane to the horizontal.
The cornice profile has two adjoining planes: vertical (glued to the wall) and horizontal (glued to the ceiling), with the face (visible from the room) between them, decorated with relief or left smooth. The width of a cornice is measured along the face—from the wall corner to the protruding point. Typical widths: five to eight centimeters (minimalist cornices for modern interiors), ten to fifteen (classical interiors, standard ceiling heights of 2.40–2.70 meters), eighteen to twenty-five (high ceilings from three meters, formal living rooms, palace styles).
The cornice relief varies from smooth geometric profiles (coves, ogees, straight angles) to ornamented ones (egg-and-dart, dentils, acanthus leaves, meanders). The choice of relief is determined by the interior style. Minimalism, Scandinavian style, contemporary—smooth cornices. Classicism, neoclassicism—cornices with moderate ornamentation (one or two rows of decor). Baroque, Empire, Rococo—rich, multi-tiered reliefs.
Cornices with a shelf for lighting—a special profile where there is a protruding shelf, two to five centimeters wide, between the vertical part (wall) and the horizontal part (ceiling). An LED strip is placed on the shelf, with light directed upwards (onto the ceiling) or downwards (onto the wall). This creates hidden lighting—the light source is invisible, only the illuminated surface is seen. The effect of a floating ceiling—it appears as if the ceiling is hanging in the air, not touching the walls.
Our factory also produces:


Ceiling Medallions: Framing the Center
A medallion is a round (less often oval, square) decorative element installed on the ceiling at the chandelier mounting point. Functions:
Masking technical elements. The chandelier's mounting box, wires, and mounting plate often look untidy—gaps between the chandelier base and the ceiling are visible, wires protrude. The medallion covers this area—its diameter is larger than the chandelier base, all technical details are hidden beneath the decor.
Visual enhancement of composition. A chandelier on a bare ceiling looks lonely, especially if the ceiling is large (twenty to thirty square meters). A medallion creates a decorative frame, connects the chandelier to the ceiling, and increases the visual scale of the composition. A fifty-centimeter diameter chandelier on an eighty-centimeter medallion looks more significant than the same chandelier on a bare ceiling.
Architectural accent. The medallion is the focal point of the ceiling, attracts the eye, organizes the space. In a room with a coffered ceiling, a medallion in the center of the main coffer enhances symmetry and emphasizes the hierarchy of elements.
Medallion relief: from simple concentric circles (smooth or with shallow grooves) to complex multi-level compositions (floral ornaments—acanthus, laurel, grapevine; geometric patterns—meanders, rosettes, stars; sculptural elements—putti, masks, garlands). Relief depth—from five millimeters (flat medallions) to three to four centimeters (high-relief Baroque).
Medallion sizes: diameter from twenty centimeters (for small chandeliers in hallways, bathrooms) to one hundred fifty centimeters (for formal chandeliers in living rooms of fifty square meters or more). Choosing the diameter is a separate topic requiring proportional calculation.
Get Consultation
Moldings: Lines and Frames on the Ceiling
A molding is a narrow strip with relief, installed on the flat surface of the ceiling (not at a junction like a cornice). Functions of moldings:
Dividing the plane. The ceiling is divided into zones—central (above the dining table, seating area), peripheral (along the walls). Moldings frame the central zone with a rectangle or oval, creating a visual hierarchy.
Creating coffers. Moldings form a grid—parallel and perpendicular lines divide the ceiling into square or rectangular cells. Each cell is a coffer (from Italian 'cassone'—chest)—a recessed panel. Visually, the ceiling gains architectural structure, volume, and rhythm.
Framing decor. Moldings frame frescoes, paintings, panels, or contrasting-colored stretch fabric inserts on the ceiling. A molding frame enhances the perception of the decor, highlighting it like a picture.
Width of ceiling moldings—three to ten centimeters. Narrow moldings (three to five) are used for thin lines, detailed coffer grids. Wide ones (eight to ten)—for framing large zones, creating massive frames.
Corner Elements and Ornaments
In addition to linear elements (cornices, moldings) and central ones (medallions), there are corner and applied details:
Corner inserts for cornices. Pre-made corner elements (ninety degrees, external and internal) with decoration matching the cornice relief. Installed in corners instead of joining two cornices mitered at forty-five degrees. Simplify installation (no precise mitering needed), add a decorative accent in corners.
Applied ornaments. Carved elements—cartouches, wreaths, small-diameter rosettes, corner scrolls—glued onto the ceiling as separate pieces. Used to enhance the decor of coffers (one ornament in the center of each cell), create symmetrical compositions (four corner scrolls at the corners of the ceiling's central zone).
Ceiling Cornices: Proportions and Size Selection
How to determine the width of a cornice for a specific room? There are architectural rules linking the cornice size to the ceiling height and room area.
Proportion rule: ceiling height determines width
Classical architecture uses the ratio: the width of the cornice is one twentieth to one fifteenth of the wall height. For standard ceilings:
-
Ceiling height 2.4 meters (240 cm). Cornice width = 240 / 20 = 12 cm (minimum) to 240 / 15 = 16 cm (optimal).
-
Height 2.7 meters. Cornice 13.5-18 cm.
-
Height 3.0 meters. Cornice 15-20 cm.
-
Height 3.5 meters. Cornice 17.5-23 cm.
These calculations provide a visually balanced result — the cornice is neither lost (too narrow) nor oppressive (too wide), and is proportional to the wall.
For minimalist interiors with minimal decor, cornices narrower than recommended can be used — five to eight centimeters even with a height of two seventy. Visually perceived as a thin line finishing the wall without emphasis.
For palace, baroque styles, the width increases — up to twenty-five to thirty centimeters even with a height of three meters. A massive cornice reduces the visual height (the ceiling appears lower) but enhances the sense of monumentality and luxury.
Room area: size adjustment
Ceiling height is the main parameter, but room area also influences:
Small rooms (ten to fifteen square meters) — bedrooms, children's rooms, studies. A wide cornice (fifteen to twenty centimeters) visually reduces the room — the cornice occupies a significant portion of the wall area, making the space feel cramped. Optimal is eight to twelve centimeters — finishes the wall without overloading.
Medium rooms (twenty to thirty square meters) — living rooms, dining rooms. Use the calculation based on ceiling height without adjustment. A cornice of twelve to eighteen centimeters is balanced.
Large rooms (forty square meters and above) — formal living rooms, halls. A cornice calculated solely by height may appear too thin — the space is large, the cornice gets lost. Increase the width by twenty to thirty percent. For a height of three meters, instead of fifteen to twenty, use eighteen to twenty-five centimeters.
Cornices for stretch ceilings: technical features
A stretch ceiling — PVC or fabric membrane stretched onto a profile, secured to walls or ceiling three to eight centimeters below the base ceiling. The technical gap between the profile and the wall (or between the membrane and the wall) is covered by a decorative trim (narrow plastic insert) or a polyurethane cornice.
A ceiling with polyurethane moldingwith a stretch membrane requires special installation. The cornice is glued to the wall BEFORE installing the stretch ceiling. Sequence:
-
Mark the cornice level on the wall (three to eight centimeters below the base ceiling — depends on the height of the stretch system profile).
-
Install the cornice on the wall according to the markings. The cornice is glued with its horizontal part (which should adhere to the ceiling) to the wall. The vertical part remains free, facing downward.
-
Installation of the stretch ceiling. The profile is attached to the wall behind the cornice (above the cornice). The membrane is stretched, tucked into the profile, and the edge of the membrane ends up behind the horizontal part of the cornice (between the cornice and the wall).
-
Result: the stretch ceiling membrane is hidden behind the cornice, only the cornice and the ceiling plane of the membrane are visible. The technical gap is masked.
Minimum cornice width for a stretch ceiling — five to six centimeters (covers a standard profile height of three centimeters plus a gap). Optimal — eight to twelve (visually sufficient, doesn't look like a narrow strip).
Cornices with hidden lighting for stretch ceilings are installed similarly, but with an increased gap (eight to twelve centimeters from the base ceiling) — an LED strip is placed in the gap, light is directed onto the stretch membrane. The membrane diffuses the light, creating a glowing ceiling effect.
Ceiling medallions for chandeliers: choosing diameter and style
A ceiling medallion for a chandelier is not just decor, but an element requiring precise size calculation.
Formula for choosing medallion diameter
The diameter of the medallion depends on three parameters: chandelier size, ceiling height, room area.
Ratio to the chandelier. The medallion diameter should be one and a half to two times larger than the diameter of the chandelier base (the part adjacent to the ceiling). If the chandelier base is thirty centimeters, the medallion is forty-five to sixty. If the base is fifty, the medallion is seventy-five to one hundred. A medallion smaller than the chandelier base is a mistake — the chandelier covers the medallion, losing its purpose. A medallion equal to the base — they visually merge, no framing effect.
Ratio to room area. Empirical formula: medallion diameter in centimeters is approximately equal to the square root of the room area in square meters multiplied by ten. For a room of twenty square meters: √20 ≈ 4.5, multiply by 10 = 45 cm. For thirty square meters: √30 ≈ 5.5, diameter 55 cm. For fifty: √50 ≈ 7, diameter 70 cm.
This formula provides a guideline. Adjustment depends on ceiling height: with low ceilings (two forty), reduce the diameter by ten percent (otherwise the medallion visually overwhelms); with high ceilings (three to three fifty), increase by ten to twenty percent (otherwise it gets lost at the height).
Proportion to style. Minimalist interiors use small-diameter rosettes (thirty to forty centimeters) or do without rosettes altogether. Classic interiors — medium and large rosettes (fifty to eighty). Palace, Baroque — large and very large (eighty to one hundred twenty, sometimes up to one hundred fifty).
Table of rosette diameters by room area
| Room area, m² | Recommended rosette diameter, cm | Room Type |
|---|---|---|
| 10-15 | 35-45 | Bedroom, study, children's room |
| 16-25 | 45-60 | Small living room, dining room |
| 26-35 | 60-75 | Medium living room |
| 36-50 | 75-90 | Large living room, hall |
| 51-70 | 90-110 | Formal living room, foyer |
| 71 and above | 110-150 | Halls, banquet rooms |
These values are recommendations, not dogma. Visual perception is individual — install a rosette that you like, as long as it doesn't defy common sense (not two meters in diameter in a twenty-square-meter room).
Rosette styles: from laconic to luxurious
Smooth rosettes. Concentric circles without ornament or with simple grooves (flutes, coves). Diameter thirty to sixty centimeters. Style: minimalism, Scandinavian, contemporary. Neutral, do not overload the ceiling, suitable for modern chandeliers with simple shapes.
Geometric rosettes. Ornament of repeating geometric elements — meanders, squares, rhombuses, rays from the center to the periphery. Medium detail. Diameter forty to eighty. Style: neoclassical, art deco, modern. Strict, symmetrical, graphic.
Floral rosettes. Ornament of leaves (acanthus, laurel, oak), flowers (roses, lilies), grapevines. High detail, deep relief (two to four centimeters). Diameter sixty to one hundred twenty. Style: classicism, baroque, rococo. Lush, decorative, eye-catching.
Sculptural rosettes. Include not only floral elements but also figures — putti (winged infants), masks (theatrical, lion), birds, garlands. Maximum detail, multi-level relief. Diameter eighty to one hundred fifty. Style: baroque, empire, palace interiors. Works of art, dominating the ceiling.
Installing a rosette: technical nuances
The center of the rosette must align with the point where the chandelier wires exit. Marking:
-
If the chandelier is already installed, remove it, mark the center of the mounting box on the ceiling.
-
If wiring is only planned, determine the center of the ceiling geometrically (intersection of diagonals from room corners) or compositionally (center of the area to be illuminated by the chandelier — not always the same as the geometric center).
A hole five to ten centimeters in diameter is drilled or cut in the center of the rosette (depending on the size of the chandelier's mounting box, thickness of wires). The hole is made before installing the rosette on the ceiling — cutting after gluing is more difficult.
Apply adhesive to the back of the rosette (the side facing the ceiling) along the perimeter (one to two centimeters from the edge) and with several lines or dots across the diameter. Do not cover the entire area with adhesive — excess adhesive will squeeze out when pressed, ruining the front surface.
Place the rosette against the ceiling, align the central hole with the wire exit point, press evenly across the entire area. For large rosettes (diameter over eighty), an assistant is needed — holding the rosette pressed to the ceiling for two to three minutes until the adhesive sets is difficult alone.
Chandelier wires are passed through the central hole of the rosette, the chandelier is mounted over the rosette. The chandelier base covers the hole, the rosette is visible as a decorative frame.
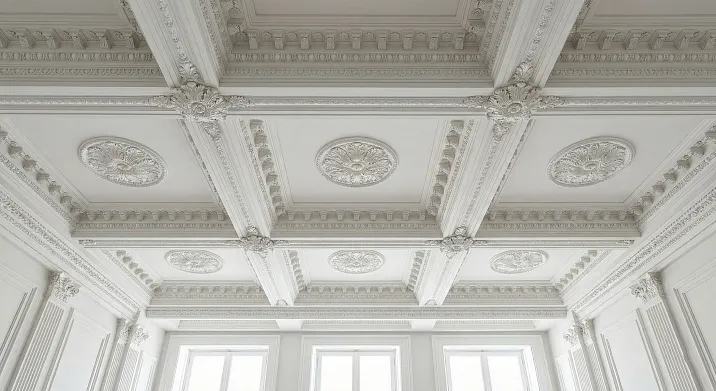
Coffered ceilings: architecture from moldings
A coffer is a traditional element of classical architecture, a recessed panel in a ceiling or vault. Historically, coffers were made of stone, wood, plaster — labor-intensive, expensive.Ceilings made of polyurethane plasterallow creating an imitation of coffers by mounting moldings on a flat surface.
Principle of creating coffers
The ceiling is marked with a grid—parallel and perpendicular lines divide the plane into rectangles or squares. The cell size depends on the ceiling area and the desired scale of the coffers. Typically:
-
Small coffers: cells measuring sixty by sixty or eighty by eighty centimeters. Used for small ceilings (fifteen to twenty-five square meters), they create a detailed grid with numerous cells.
-
Medium coffers: cells measuring one meter by one meter or one meter by one meter twenty. Standard for ceilings of twenty-five to forty square meters.
-
Large coffers: cells measuring one meter fifty by one meter fifty, one meter eighty by one meter eighty. For large ceilings (fifty square meters and above), monumental, with a small number of cells.
Moldings are glued along the marked lines—creating a visual grid. The cells between the moldings are the coffers. They are visually perceived as recesses (although the ceiling is physically flat) because the moldings protrude five to fifteen millimeters above the plane, casting shadows.
Coffer design options
Simple coffers. The ceiling and coffers are the same color (usually white or light). The relief of the moldings creates a play of light and shadow—this is sufficient to perceive the structure. Minimalistic, elegant.
Contrasting coffers. The inner plane of the cells is painted in a color different from the moldings. Options:
-
Cells darker than the moldings (moldings white, cells gray, beige, blue)—enhances depth, creates the impression that the cells are actually recessed.
-
Cells lighter than the moldings (moldings gray, cells white or light gray)—the opposite effect, cells visually protrude.
Coffers with interior decoration. In the center of each cell (or in the centers of the main cells—depending on the composition) a decorative element is glued—a small rosette (diameter twenty to thirty centimeters), an ornament (cartouche, wreath, star). Adds detailing, luxury.
Coffers with lighting. An LED strip is installed along the perimeter of the coffers (behind the moldings or inside the cells). The light is directed into the cells (illuminating the ceiling plane within the cell) or outward (from the cells toward the center of the room). The effect of floating or glowing coffers—a modern interpretation of the classic form.
Coffer installation: work sequence
Stage 1: Grid marking. Lines forming a grid are drawn on the ceiling. A laser level (projects lines onto the ceiling) or a chalk line (stretched, snapped—leaves a line) is used. Important: the grid is symmetrical relative to the center of the room or the compositional center (area above the table, sofa). Cells at the edges may be narrower or wider than the central ones—depends on how the room perimeter is divided into equal segments.
Stage 2: Molding cutting. Moldings are cut to the length of the cells. Joint corners are cut at ninety degrees (butt joint) or at forty-five (if the moldings form a frame). For grids, butt joints (molding ends meet without mitering) or ready-made corner elements (corners, crosses—connect four moldings at one point) are typically used.
Stage 3: Gluing moldings. Moldings are glued to the ceiling along the marked lines. Adhesive is applied to the back side of the molding (adjacent to the ceiling), the molding is placed against the line, and pressed. Start with the perimeter (framing the entire ceiling), then glue the internal grid lines.
Stage 4: Sealing joints. Molding joints are filled with acrylic sealant, smoothed. After drying (four to six hours), joints are sanded with fine sandpaper.
Stage 5: Painting. If the coffers are contrasting, the cells (inner planes between moldings) are painted first—using painter's tape to protect the moldings from paint. After drying, the moldings are painted (if their color differs from the base primer).
The timeframe for creating a coffered ceiling with an area of twenty-five square meters (grid four by five meters, cells one meter by one meter) is two to three days (marking, cutting, installation, sealing, painting).
Installing ceiling molding: step-by-step instructions
Installationpolyurethane molding on the ceilingis accessible to a DIYer. The process does not require special skills or expensive tools.
Tools and materials
Tools:
-
Tape measure, pencil, level (water or laser)—marking.
-
Miter box (tool for cutting angles) and a fine-toothed saw or miter saw—cutting elements.
-
Adhesive gun (if adhesive is in cartridges).
-
Rubber spatula (for smoothing sealant in joints).
-
Stepladder or sawhorses—access to the ceiling.
-
Painter's tape, damp sponge (for removing excess adhesive).
Materials:
-
Molding elements (cornices, rosettes, moldings)—calculate the footage with a ten percent surplus (for cutting, errors).
-
Polyurethane adhesive—specialized polymer adhesive (sold in cartridges of three hundred to five hundred milliliters or buckets of one to five liters). Consumption: a three-hundred-milliliter cartridge for five to eight meters of cornice (depends on cornice width, thickness of applied layer).
-
Acrylic sealant white — for sealing joints (300 ml tube for twenty to thirty meters of joints).
-
Acrylic paint (if painting is needed) — consumption fifty to one hundred grams per square meter of molding (two coats).
Ceiling cornice installation
Step 1: Marking. Determine the lower edge of the cornice. Measure the width of the vertical part of the cornice (the part adjacent to the wall) — typically four to eight centimeters. Measure this distance down from the ceiling, mark it on the wall in the corner. Repeat in the other corner, draw a horizontal line between the points (use a level — the line must be strictly horizontal). This line serves as a guide for the lower edge of the cornice.
Step 2: Cutting corners. Room corners (internal ninety degrees) require joining two cornices at a forty-five degree angle each. Use a miter box — place the cornice in the miter box so that the vertical part rests against the side wall of the box, and the horizontal part rests against the bottom. Cut at a forty-five degree angle. For the right corner, the cut goes from left to right downwards; for the left corner — from right to left.
Step 3: Applying adhesive. Apply adhesive to both adjacent planes of the cornice (vertical and horizontal) in a zigzag or dotted line. Keep a one to one and a half centimeter margin from the edges (if applied to the edge, the adhesive will squeeze out onto the front when pressed).
Step 4: Installation. Lift the cornice to the installation location, align its bottom edge with the marked line, press it against the wall and ceiling simultaneously. Apply even pressure along the entire length (use both hands or an assistant). Hold for two to three minutes until the adhesive sets.
Step 5: Continuing along the perimeter. Install the second cornice element, joining it with the first (in a corner or in a straight line if the wall length exceeds the length of one cornice element). Ensure the joints are tight (gap no more than one millimeter).
Step 6: Sealing joints. After the adhesive dries (twelve to twenty-four hours), fill the joints with acrylic sealant. Squeeze the sealant into the gap, smooth it with a wet finger or rubber spatula. Remove excess immediately with a damp sponge.
Step 7: Painting (if necessary). Twenty-four hours after sealing the joints, the cornice can be painted. Apply acrylic paint with a roller or brush in two coats (intercoat drying time two to four hours).
Features of installation on a stretch ceiling
If a stretch ceiling is planned for the room,Polyurethane moldings for ceilingsit is installed BEFORE stretching the fabric. Sequence:
-
Mark the level of the stretch ceiling (usually three to eight centimeters below the base ceiling).
-
Mark the position of the cornice — the bottom edge of the cornice at or slightly below the level of the future fabric.
-
Install the cornice. The horizontal part of the cornice (which should be adjacent to the ceiling) is glued to the WALL (not to the ceiling) — positioned vertically or at an angle. The vertical part of the cornice faces downwards along the wall.
-
Installation of the stretch ceiling. The profile is attached to the wall above the cornice, the fabric is stretched and tucked in. The edge of the fabric ends up behind the cornice (between the cornice and the wall).
-
Result: the cornice conceals the technical gap, the stretch ceiling fabric visually starts from the cornice.
Creating the effect of high ceilings: visual techniques
Low ceilings (two forty and below) create a feeling of cramped space.Polyurethane ceiling moldingcan visually raise the ceiling.
Technique 1: Cornice painted to match the ceiling color
Typically, the cornice is painted to match the wall color or left white (walls are colored). The wall-ceiling boundary is distinct, the ceiling is perceived at the level of the cornice's bottom edge.
Technique: paint the cornice to match the ceiling color (usually white or light). Paint the walls up to the bottom edge of the cornice (the wall-ceiling boundary runs along the bottom edge of the cornice). Visually, the ceiling starts from the bottom edge of the cornice — the perceived height increases by the width of the cornice (ten to fifteen centimeters).
The effect is enhanced if the walls are dark (gray, blue, green) and the ceiling with the cornice are white — the contrast emphasizes the boundary, making the ceiling appear higher.
Technique 2: Hidden perimeter lighting
A cornice with a shelf for lighting is installed at a distance of eight to twelve centimeters from the ceiling. An LED strip on the shelf is directed upwards, illuminating the ceiling. The light creates a glowing perimeter — a band of light between the cornice and the ceiling along the entire room perimeter.
The effect of a floating ceiling — it seems the ceiling does not touch the walls, but hangs in the air. Visually, the height increases by twenty to thirty centimeters (depends on lighting brightness, ceiling color). Especially effective with stretch ceilings (the fabric reflects light evenly, without spots).
Technique 3: Vertical lines on walls
Tall pilasters or moldings installed vertically from floor to ceiling cornice create vertical lines — the gaze moves upward, making the ceiling appear higher. Especially effective if the pilasters are narrow (eight to ten centimeters wide), tall (from floor to ceiling without breaks), painted in contrast to the walls (white pilasters on a colored wall).
Technique 4: Minimizing ceiling decor
The more decor on the ceiling (large rosettes, numerous moldings, coffers), the lower the ceiling appears — decor attracts the eye, accentuates the ceiling plane, emphasizing its proximity. For low ceilings, minimize decor — a narrow cornice (five to eight centimeters), no rosette (or a small diameter one — thirty centimeters), no coffers. The ceiling remains flat, light, does not attract attention — visually recedes.
Hidden lighting in cornices: light architecture
Hidden lighting is a modern technology integrated into Polyurethane moldings on the ceiling. Creates soft, diffused lighting without visible light sources.
Types of cornices for lighting
Cornice with upward-facing shelf. The cornice shelf (a protrusion two to five centimeters wide) faces upward, toward the ceiling. The LED strip is attached to the shelf, with light directed at the ceiling. The ceiling reflects the light, dispersing it into the room. Effect: glowing ceiling, floating effect (the ceiling appears separated from the walls by light).
Cornice with downward-facing shelf. The shelf faces downward, toward the floor. The strip is attached to the shelf, with light directed at the wall (downward from the cornice). The wall is illuminated, creating a light strip along the wall. Effect: soft background lighting, highlighting wall texture (wallpaper, decorative plaster).
Cornice with double shelf. Shelves face upward and downward simultaneously. Two strips—one illuminates the ceiling, the other the wall. Effect: maximum light saturation, ceiling and walls glow simultaneously. Suitable for dark interiors, windowless rooms (hallways, walk-in closets).
Choosing LED strip
Voltage. Use 12V or 24V strip (requires a power supply—step-down transformer). 220V strip is not suitable—segments are visible (strip lights unevenly, in dots), flickering, unsafe in damp areas.
Power. For decorative lighting (supplement to main lighting), a strip of 4.8-7.2W per meter (60-90 LEDs per meter) is sufficient. For functional lighting (replacing part of the main lighting), a strip of 10-14.4W per meter (120-180 LEDs per meter) is needed. The denser the LEDs, the more uniform the light.
Color. Warm white (2700-3000K)—cozy, homely light, suitable for living rooms (living rooms, bedrooms). Neutral white (4000-4500K)—office light, suitable for work areas (studies, kitchens). Cool white (5000-6500K)—bright, harsh, rarely used (bathrooms, technical rooms). RGB strip (multicolor)—color control via remote, creating lighting scenarios (blue light in the evening, yellow in the morning).
Protection. For dry rooms, a strip without protection (IP20) is sufficient. For damp areas (kitchen above work area, bathroom), use a moisture-protected strip (IP65—silicone coating protects against splashes).
Lighting installation
Step 1: Installing the cornice. The cornice with a shelf for lighting is installed on the wall at a distance of eight to twelve centimeters from the ceiling (for upward lighting) or flush with the ceiling (for downward lighting). Adhesive is applied to the part of the cornice adjacent to the wall, the cornice is pressed and fixed.
Step 2: Laying the strip. After the adhesive dries (twelve to twenty-four hours), the LED strip is attached to the cornice shelf. The strip has an adhesive layer on the back (protected by film)—remove the film, attach the strip to the shelf, directing the LEDs in the desired direction (upward for ceiling lighting, downward for the wall).
Step 3: Connection. The strip is connected to the power supply (transformer). The power supply is connected to a 220V outlet. The power supply is hidden behind the cornice or in a niche—should not be visible. Wires from the strip to the power supply are laid concealed (behind the cornice, in wall grooves, under a stretch ceiling).
Step 4: Control. The lighting is turned on by a switch (like a regular lamp) or a remote control (for dimmable strips, RGB). Can be integrated into a smart home system—control brightness, color, scheduling via smartphone.
Frequently asked questions
Can polyurethane molding be installed on the ceiling independently or are specialists needed?
Installationpolyurethane molding on ceilings is accessible to a DIYer with minimal skills. The process does not require special tools (except a miter box for cutting corners, but it can be done without it using ready-made corner elements). Manufacturer instructions are detailed, video tutorials are available. Typical beginner mistakes—inaccurate corner cutting (joint not tight), uneven adhesive application (element detaches)—are easily corrected. The first cornice will take four to six hours, subsequent ones are installed faster (two to three hours per room). For complex projects (coffered ceilings, lighting integration), it makes sense to hire a specialist—saves time, guarantees results.
Will the ceiling support the weight of polyurethane molding?
Polyurethane weighs three hundred to seven hundred grams per linear meter (depends on cornice width and thickness). A cornice with a perimeter of eighteen meters (a twenty-square-meter room) weighs six to twelve kilograms. A rosette with a diameter of eighty centimeters weighs one to two kilograms. Any ceiling (concrete, wood, drywall) supports this weight without issues—adhesive provides adhesion of two to three kilograms per square centimeter, the contact area of the element with the ceiling is hundreds of square centimeters, safety margin is tenfold. Additional fastening (screws, dowels) is not required.
What to do if the ceiling is uneven—will the molding detach?
Minor unevenness (up to two to three millimeters) is compensated by the adhesive—the adhesive is elastic, fills micro-gaps. If unevenness is greater (waves, dips five to ten millimeters deep), options:
-
Level the ceiling with putty before installing the molding (optimal, labor-intensive).
-
Use elastic molding elements (flexible cornices made of soft polyurethane)—bend, follow unevenness.
-
Install the molding as is, fill gaps between the molding and ceiling with sealant (quick, but thick sealant seams at the joint are visible—not aesthetically ideal).
How long does the adhesive take to dry and when can it be painted?
Polyurethane adhesive sets in two to three minutes (element holds on the ceiling without support). Full drying (adhesive reaches maximum strength)—twelve to twenty-four hours (depends on temperature, humidity, adhesive layer thickness). Can be painted twenty-four hours after installation—adhesive is completely dry, elements will not shift during paint application (roller, brush pressure).
Can molding be installed on a stretch ceiling after its installation?
Molding is not attached directly to the stretch fabric—the fabric is thin (0.2-0.4 millimeters), elastic, does not support weight. Molding is attached to the wall near the fabric (cornice around the perimeter covers the gap between the fabric and wall) or to the base ceiling through the fabric (if the fabric is textile, durable—rare, requires special adhesive). Optimal—install molding BEFORE installing the stretch ceiling. If the ceiling is already stretched, molding is installed only around the perimeter (cornice on the wall), ceiling elements (rosettes, coffers) are not accessible.
What is the cost of ceiling molding and installation?
Cost of materials (approximate prices, depend on manufacturer, region):
-
Ceiling cornice ten centimeters wide — three hundred to eight hundred rubles per linear meter (simple relief is cheaper, complex is more expensive).
-
Cornice with a shelf for lighting — five hundred to one thousand two hundred rubles per meter.
-
Rosette sixty centimeters in diameter — one and a half to four thousand rubles (simple-complex).
-
Molding for coffers five centimeters wide — two hundred to five hundred rubles per meter.
-
Polyurethane adhesive — three hundred to six hundred rubles per three hundred milliliter tube (for five to eight meters of cornice).
Installation cost (if hiring a crew):
-
Installation of ceiling cornice — two hundred to four hundred rubles per linear meter.
-
Installation of a rosette — five hundred to one thousand five hundred rubles per piece (depends on diameter).
-
Creation of a coffered ceiling — one thousand to two and a half thousand rubles per square meter (depends on grid complexity, number of elements).
Example: a room of twenty square meters, perimeter eighteen meters, installation of a cornice twelve centimeters wide. Materials: cornice 18 m × 500 rub = 9000 rub, adhesive 3 tubes × 400 rub = 1200 rub, sealant 1 tube = 200 rub. Total materials: 10400 rub. Installation: 18 m × 300 rub = 5400 rub. Total cost: 15800 rubles.
How to care for ceiling molding?
Polyurethane molding does not require special care. Dust is removed with a dry soft cloth or a long-bristled brush (every three to six months). Painted molding (coated with acrylic paint) is wiped with a damp sponge (water with a drop of detergent) — stains (insect marks, candle soot) wash off easily. Molding lasts for decades without changing shape, color (if quality paint is used), does not crack, does not crumble (unlike gypsum).
Conclusion: the ceiling as a work of architecture
Polyurethane ceiling moldingtransforms a forgotten plane into an active element of the interior. Cornices complete walls, create a transition to the ceiling, integrate lighting scenarios — floating ceilings, glowing perimeters, soft hidden lighting. Rosettes frame chandeliers, enhance the compositional center, add scale, decorativeness. Coffers structure the plane, create rhythm, architectural depth, refer to classical traditions. Installation is accessible, cost is moderate, the result is durable — a combination of factors making polyurethane ceiling molding an optimal solution for interiors striving for completeness, stylistic integrity, architectural expressiveness.
The company STAVROS offers a full range of polyurethane ceiling molding. The catalog includes over one hundred and fifty profiles of ceiling cornices — from minimalist smooth ones five centimeters wide to ceremonial ornamented ones twenty-five centimeters wide. Twenty models of cornices with shelves for hidden lighting — shelves from two to five centimeters wide, directed upwards (for ceiling lighting) or downwards (for wall lighting). Flexible cornices made of elastic polyurethane — bend to radius, used for curved ceilings, domes, arches.
Rosettes for chandeliers — seventy-five models, diameters from twenty to one hundred and fifty centimeters. Styles from laconic geometric (concentric circles, radial patterns) to luxurious sculptural (floral ornaments, putti, garlands, masks). All rosettes have a central hole for chandelier wires (diameter five to ten centimeters, expanded on-site if necessary). Rosettes with ready-made finish — white, gilded, patinated — do not require additional finishing, installed immediately.
Moldings for creating coffers — thirty profiles, width from three to ten centimeters. Relief from smooth to detailed (ionics, dentils, acanthus leaves, meanders). Ready-made corner elements and crosses — connect moldings into a grid without complex angle cutting (four moldings meet at one point, corner element covers the joint). Simplify creation of coffered ceilings, speed up installation.
The STAVROS consulting service helps design ceiling decor. Provide room dimensions, ceiling height, interior photo, description of desired style — the designer will propose a layout scheme (which elements, where, in what quantity), calculate footage, select profiles from the catalog. Visualization in your interior (photomontage) will show how the ceiling will look with the chosen molding. Consultation is free, footage calculation is accurate — you buy exactly as much as needed, without overpaying for excess.
Installation services are available in Moscow, Moscow Region, St. Petersburg, Leningrad Region. STAVROS crews install cornices, rosettes, create coffered ceilings, integrate hidden lighting — full cycle from marking to painting. Installation cost is transparent — price list on the website, calculation by footage, no hidden fees. Installation warranty twenty-four months — if molding peels off, deforms (due to poor-quality installation) — the crew will return, fix the defect free of charge.
Training materials for self-installation — video instructions on the STAVROS YouTube channel, text guides on the website. All stages shown — marking cornice, cutting angles in a miter box, applying adhesive, pressing element, sealing joints with sealant, painting. Detailing installation of rosettes (cutting central hole, routing chandelier wires), creating coffers (marking grid, sequence of molding installation), integrating lighting (selecting tape, connecting power supply, brightness control). Thousands of customers have implemented ceiling molding projects themselves — saving on installation, gaining experience, creating interiors with their own hands.
STAVROS comprehensive solutions include everything needed for ceiling design. The 'Classical Ceiling' kit — cornice around the perimeter plus a rosette for a chandelier (matching rosette diameter to room area, stylistic correspondence of cornice and rosette, calculation of cornice footage, adhesive, sealant). The 'Ceiling with Lighting' kit — cornice with a shelf for lighting, LED strip, power supply, dimmer, connection instructions. The 'Coffered Ceiling' kit — moldings for the grid, corner elements, overlay ornaments for coffer centers (if decorated option chosen), adhesive, sealant, layout scheme. Kit cost is five to fifteen percent lower than buying elements separately — savings, compatibility guarantee, ready-made solution.
Painting and decorative finishing — additional STAVROS service. Molding is supplied primed white — ready for installation or painting. If color, patina, gilding is needed — the STAVROS workshop will paint elements before shipping. Tinting to any color from the RAL catalog (three thousand shades), patination (gold, silver, bronze, copper, black patina — imitation aging), gilding accents (cornice capitals, protruding rosette elements), Venetian plaster, marble, wood effects. Painted molding arrives ready — you install, the result is final.
Choosing STAVROS for designingpolyurethane molding ceilings, the customer gets a partner with nineteen years of experience, own full-cycle production, assortment covering ninety percent of tasks, consulting support from design to installation, guarantees of product and work quality. The ceiling ceases to be a white space overhead — becomes an architectural plane, carrying style, light, compositional completeness, transforming the interior from a set of furniture into an integral space, where every surface — walls, floor, ceiling — works to create atmosphere, harmony, aesthetic perfection.