Article Contents:
- What Makes a Ceiling 'Formal': The Philosophy of Architectural Decor
- Key Features of a Formal Ceiling
- Perception Psychology
- Ceiling Cornices: A Frame for the Celestial Canvas
- Functions of ceiling cornice
- Choosing Cornice Profile
- Materials and Practical Considerations
- Ceiling Rosettes: Framing Light
- Size and Proportions
- Styles and Ornaments
- Installation and Integration with a Chandelier
- Friezes and Borders: Rhythmic Organization
- Functions of a Frieze in Ceiling Composition
- Choosing a Frieze
- Placement on the Ceiling
- Coffers: architecture of depth
- Structure and Effect
- Scale and Modularity
- Materials and Installation
- Corners and Corner Elements: Completing the Details
- Corner elements for cornices
- External and Internal Corners
- Lighting: How Light Brings Molding to Life
- Central Lighting with a Chandelier
- Contour Lighting
- Accent Lighting
- Color Solutions: From Snow-White to Contrasts
- Monochromatic in Different Tones
- Contrasting solutions
- Colored Ceilings
- Patination and gilding
- Stylistic Directions of Formal Ceilings
- Classical Empire
- Baroque: Theatrical Grandeur
- Neoclassic: Reserved Elegance
- Art Deco: Geometric Luxury
- Practical Considerations: Installation and Maintenance
- Preparing the ceiling
- Installation of Elements
- Maintenance and Durability
- Cost of a Formal Ceiling
- Frequently Asked Questions About Formal Ceilings
- Conclusion: from idea to implementation
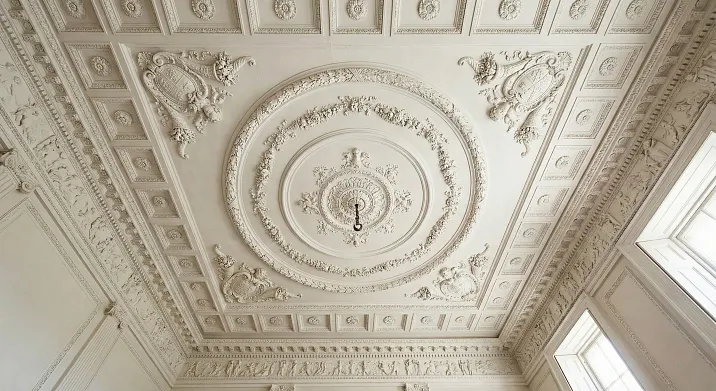
The Ceiling. We rarely look at it consciously, don't we? And yet, it is precisely what can turn an ordinary room into a hall with character, into a space that is memorable. Have you ever wondered why in old mansions and palaces, ceilings capture attention no less than walls or furniture? The secret is simple — it's Ceiling moldingthat creates architectural depth, a play of light and shadow, transforming a flat surface into a three-dimensional composition.
Today we'll figure out what ceiling decorations are needed to create a truly formal, representative ceiling — the kind that elicits an admiring sigh from those entering the room. We'll talk about rosettes and cornices, coffers and friezes, about how these elements work together and separately. And most importantly — how not to make a mistake in the choice, so that the ceiling becomes an interior decoration, not museum-like clutter.
Ready to start the journey from the fifth dimension of your home? Then onward — to formal ceilings worthy of royal halls, yet quite accessible for modern apartments and houses.


What Makes a Ceiling 'Formal': The Philosophy of Architectural Decor
Before diving into the details of choosing specific elements, let's understand the very concept of a 'formal ceiling'. What is it? It's not just a ceiling with decor. It's an architectural statement that transforms the perception of the entire space.
Formality is a sense of significance, solemnity, ceremoniousness. When you enter a room with a formal ceiling, you subconsciously feel: important events happen here, esteemed guests are received here, every detail is thought out. This is not random decor, but an architectural system where each element plays its role.


Key Features of a Formal Ceiling
What distinguishes a formal ceiling from an ordinary one? Several key characteristics:
First, compositional integrity. All elements are interconnected, forming a unified ensemble. A rosette doesn't hang by itself — it is supported by cornices around the perimeter, possibly friezes or additional moldings creating a framing structure.
Second, pronounced centrality. A formal ceiling has a clearly defined compositional center — usually the chandelier area, highlighted by a rosette or coffered structure. The gaze is automatically directed to this center, then spreads to the peripheral elements.
Third, play of height and depth. A flat ceiling, even decorated, does not create a formal effect. A volumetric play is needed — relief cornices, recessed coffers, protruding rosettes. This three-dimensionality creates drama, especially with proper lighting.
Fourth, proportionality to the room's scale. A formal ceiling is always proportional to the room's dimensions. In a small room, it will be restrained, with one or two expressive details. In a spacious hall — large-scale, with multiple elements forming a complex composition.
Our factory also produces:


Psychology of Perception
Why do we react this way to decorated ceilings? It's about the psychology of space perception. Most of the time, our gaze is directed at eye level and below — we look at people, objects, screens. The ceiling is in our peripheral vision, creating a background impression.
When the ceiling is decorated with expressive elements, this impression becomes active. We subconsciously read: this space requires attention to detail, everything here is thought out to the smallest detail. This creates a sense of the place's and moment's significance.
Interesting fact: research shows that people perceive rooms with decorated ceilings as more spacious, even if the actual area is the same. A relief ceiling creates an illusion of additional height and volume.
Get Consultation
Ceiling Cornices: The Frame for the Celestial Canvas
Let's start with the perimeter.Ceiling corniceA ceiling cornice is not just a decorative strip at the wall-ceiling junction. It is an architectural frame that visually separates the ceiling from the walls, creating an independent compositional plane.
Functions of a ceiling valance
Cornices perform several important tasks. The first is compositional. They outline the ceiling's boundary, making it a separate interior element, not just an extension of the walls. This is especially important if the walls and ceiling are painted in similar tones — without a cornice, the boundary blurs, and the composition loses clarity.
The second function is masking. The cornice conceals an imperfect wall-ceiling joint, covers technological gaps in stretch ceilings, hides wiring and mounting elements.
The third is lighting. Behind a wide cornice, you can place hidden LED lighting, creating a floating ceiling effect or soft diffused light, as if emanating from within the architectural structure.
The fourth function is scaling. A cornice visually alters the room's proportions. A wide, massive cornice makes the ceiling appear lower, creating a sense of coziness and intimacy. A narrow, laconic one, on the contrary, doesn't 'eat up' height, preserving the space's airiness.
Choosing the cornice profile
The cornice profile — its cross-sectional shape — is critically important for the overall stylistic solution. There are several basic types:
Simple geometric profiles are rectangular or slightly profiled strips without ornament. They suit modern and minimalist interiors, where formality is achieved not by decorativeness, but by scale and proportions. The width of such cornices is usually 5-10 cm.
Classical profiles with beads are cornices with alternating convex and concave elements, creating expressive chiaroscuro. They are ideal for neoclassical and classical interiors. Width — 8-15 cm. Such profiles already create a sense of architectural significance.
Ornamented cornices are elements with floral motifs, rosettes, meanders, acanthus leaves. They suit full-fledged palace interiors, where every detail must be adorned. Width can reach 20-25 cm. This is the most expressive option, requiring appropriate surroundings.
Multi-tiered composite cornices are a combination of several profiles of different widths and reliefs, installed one above the other. They create maximum depth and complexity, suitable for rooms with very high ceilings (from 3.5 meters).
Materials and Practical Considerations
ModernPolyurethane Ceiling MoldingsPolyurethane solved a problem that had plagued architects and builders for centuries. Traditional plaster cornices are heavy, fragile, difficult to install, and expensive to produce. Polyurethane analogs weigh 6-8 times less, yet are visually indistinguishable from plaster after quality painting.
Polyurethane is not afraid of moisture — it can be used in bathrooms and kitchens without risk of deformation or mold. It doesn't crack from building settlement, doesn't crumble over time, and is easy to clean. Installation is done with ordinary polymer adhesive, without complex fastenings or supports.
Important point: choose cornices made of high-density polyurethane (density not less than 250 kg/m³). Cheap porous analogs sag over time, their relief is blurred, and joints are noticeable. High-quality polyurethane produces a ringing sound when tapped, not a dull one, and has a smooth, dense surface without bubbles or cavities.
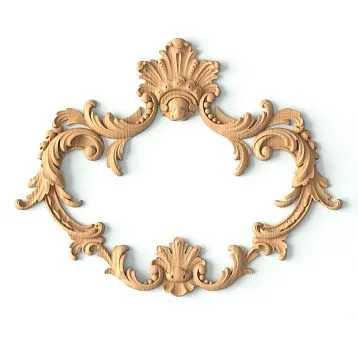
Ceiling Rosettes: Framing the Light
If the cornice is the frame of the ceiling, thenCeiling rosette— it is its jewel, the central medallion around which the entire composition is built. A ceiling rosette for a chandelier is not just a way to conceal the fixture's mounting point; it is an architectural accent that greatly enhances the visual impact of the lighting.
Size and proportions
The main mistake when choosing a rosette is the wrong size. A rosette that is too small gets lost against the ceiling and fails to fulfill its compositional role. One that is too large overwhelms the space, creating a sense of heaviness.
There is an empirical rule: the diameter of the rosette should be 1/3 to 1/5 of the room's width or length (whichever is smaller). For a room 4×5 meters, the optimal rosette is 80-100 cm in diameter. For a spacious hall 7×9 meters — 120-150 cm.
The second rule concerns the ratio between the rosette and the chandelier. The diameter of the rosette should be 1.5 to 2.5 times larger than the diameter of the chandelier. If the chandelier is 60 cm in diameter, the rosette should be 90-150 cm. This creates visual integrity: the chandelier is perceived as an extension of the rosette, not a separate suspended object.
An important nuance: if the ceiling is lower than 2.8 meters, avoid rosettes with a diameter over 60 cm — they will visually 'press down'. For low ceilings, it's better to limit yourself to simple cornices, leaving the center free.
Styles and Ornaments
Rosettes differ not only in size but also in the style of ornamentation. There are several basic directions:
Classical rosettes with acanthus and rosettes — these are traditional motifs from antiquity and the Renaissance. Acanthus leaves, laurel wreaths, roses, geometric meanders — all of this creates a sense of historical continuity, a connection with great architectural traditions. Such rosettes are ideal for classical and neoclassical interiors.
Baroque rosettes with lush relief — this is maximum decorativeness, multiple layers of ornamentation, deep relief, often asymmetrical elements. They are suitable for luxurious interiors where decorative excess is not feared. Important: Baroque rosettes require appropriate surroundings — massive furniture, heavy drapes, rich finishing materials.
Art Nouveau rosettes with plant motifs — these are flowing lines, stylized flowers and leaves, asymmetrical composition. They are less formal than classical ones but more decorative than minimalist ones. Suitable for eclectic interiors where different eras and styles are mixed.
Geometric rosettes — these are concentric circles, squares, polygons, creating a strict rhythmic pattern. They work excellently in Art Deco interiors, in modern classicism, where geometric clarity is valued.
Minimalist rosettes — these are smooth round or square strips without ornamentation, working solely to create relief and framing. They are suitable for modern interiors where grandeur is achieved through scale and proportions, not decorativeness.
Installation and Integration with the Chandelier
Ceiling medallion for a chandelierrequires careful planning. The rosette is mounted before installing the chandelier — this is obvious, but many forget to consider the weight of the fixture and its mounting method.
If the chandelier is heavy (over 10 kg), a reliable hook or mounting bracket secured directly to the ceiling slab is needed. A polyurethane rosette is not a load-bearing element — it is purely decorative. The wiring is routed through the central hole of the rosette, which is then covered by the chandelier's decorative cap.
An important point: the rosette must be perfectly centered relative to the room. Even a shift of 5-10 cm is immediately noticeable to the eye and creates a sense of imbalance. Use a laser level and careful measurements to determine the center of the ceiling before installation.
After installing the rosette and chandelier, evaluate the composition. If the chandelier seems small relative to the rosette, you can add additional candles or pendants. If, on the contrary, the rosette gets lost — perhaps it's worth adding concentric moldings around it, creating additional frames.
Friezes and Borders: Rhythmic Organization
A frieze is a horizontal strip with a repeating pattern, which in classical architecture was located between the architrave and the cornice. In interiors, a frieze is usually placed at the junction of the wall and ceiling, just below the cornice, or directly on the ceiling, creating a decorative frame.
Functions of a frieze in a ceiling composition
Frieze— creates a rhythmic structure, breaking the monotony of the plane into repeating elements. This can be a plant ornament, a geometric meander, alternating rosettes and palmettes — the options are countless.
In a formal ceiling, the frieze performs several tasks. First, it enhances the cornice, making the transition from wall to ceiling more expressive and rich. Second, it creates an additional decorative layer, increasing the overall complexity of the composition. Third, it helps visually connect different elements of the ceiling decor into a unified whole.
Choosing a frieze
When choosing a frieze, consider several factors. First, stylistic compatibility. The frieze should match the style of the cornice and rosette. A classical cornice with Ionic motifs requires a corresponding frieze with palmettes or a meander. A simple geometric cornice — a laconic border without lush ornamentation.
Second, the scale of the pattern. An ornament that is too fine will get lost at ceiling height, turning into an indistinct stripe. One that is too large can look crude and overwhelming. The optimal size of the repeat (repeating element) is 15-30 cm for standard rooms.
Third, the height of the frieze. It should be proportional to the width of the cornice. Usually, the frieze is 60-80% of the cornice width. If the cornice is 12 cm, the frieze is 7-10 cm. A frieze that is too tall will compete with the cornice; one that is too short will get lost against it.
Placement on the ceiling
A frieze can be placed not only at the wall-ceiling junction but also directly on the ceiling plane, creating an inner frame. For example, a frieze strip runs at a distance of 40-60 cm from the edge of the ceiling, framing the central zone with the rosette.
This solution creates the effect of a multi-level ceiling without actual height variations. Visually, a central "platform" is formed, highlighted by a frieze, and a peripheral zone between the frieze and the cornice. This adds compositional complexity and depth.
Another option is a cross-shaped placement of friezes, dividing the ceiling into four sectors with a central rosette at the intersection point. This is a classic scheme for large formal halls where it is necessary to structure an extensive ceiling plane.
Coffers: architecture of depth
Coffers are recessed cells in the ceiling, framed by protruding beams or moldings. This is one of the oldest architectural techniques, known since the times of Ancient Rome, where the coffered vaults of the Pantheon still amaze with their mathematical precision and beauty.
Structure and Effect
A coffered ceiling creates maximum three-dimensionality. Instead of a flat surface with applied elements, we get a relief structure with alternating protruding beams and recessed fields. This creates a powerful architectural effect, turning the ceiling into an independent architectural work.
Coffers can be rectangular, square, rhombic, hexagonal — the geometry is determined by the style and dimensions of the room. Classic square coffers are suitable for strict, symmetrical halls. Rectangular ones — for elongated rooms where it is necessary to emphasize the longitudinal or transverse axis. Complex polygonal ones — for exclusive designer projects.
Inside each coffer, additional decor can be placed — a rosette, an ornamental overlay, a cartouche. This further enhances the decorative effect, turning the ceiling into a collection of miniature architectural compositions.
Scale and Modularity
The size of the coffers depends on the area and height of the room. For a standard room of 20-25 sq.m, optimal coffers are 60×60 or 80×80 cm. For a large hall of 50-70 sq.m — 100×100 or 120×120 cm. Too small coffers will create visual noise, too large ones will break down into separate fragments without unity.
It is important to maintain modularity: the number of coffers along the length and width of the room should be whole or create meaningful symmetry. Ideally, the central coffer is located exactly in the center of the ceiling, and along the edges — an equal number of full or half coffers.
The depth of coffers is usually 5-10 cm for decorative polyurethane systems and 15-30 cm for structural wooden ones. The deeper the coffer, the more dramatic the play of light and shadow, but the more the room's height is "eaten up".
Materials and Installation
Traditionally, coffers were created from wood or plaster, which required serious construction work and significant costs. Modern polyurethane systems allow imitating a coffered ceiling without actual recesses.
A visual effect is created: moldings forming a grid of "beams" are mounted onto a flat ceiling. The inner fields of the cells are painted in a different shade or wallpapered, creating an illusion of depth. With proper lighting and precise color selection, the effect can be very convincing.
An alternative option is truly recessed coffers, created during the installation of a multi-level drywall ceiling. This is more labor-intensive but provides real three-dimensionality. Recessed spotlights or LED strips are installed in the recesses, creating soft internal lighting for each cell.
Corners and Corner Elements: Completeness of Details
An often forgotten but critically important detail of a formal ceiling is the corners. How do cornices join in the corners of a room? How is the angle between friezes resolved? These seemingly technical points actually determine the overall impression of the quality and thoughtfulness of the decor.
Corner elements for cornices
The simplest way to join cornices is cutting at a 45° angle and direct connection. For simple profiles, this works excellently. But for complex ornamented cornices, straight cutting often gives an unsatisfactory result: the ornament on the two strips does not align precisely, forming a noticeable seam.
The solution is special corner elements. These are ready-made parts in which the ornament is composed to create a smooth transition from one wall to another. A corner element can be symmetrical (for standard 90-degree angles) or asymmetrical (for non-standard angles found in old buildings).
High-quality corner elements have additional central decor — a rosette, wreath, cartouche — which becomes an accent in the corner of the room. This turns a technical joint into a decorative detail, enhancing the overall impression of thoughtfulness.
External and Internal Corners
Don't forget: rooms have not only internal corners (where walls meet) but also external ones (on protrusions, niches, columns). Separate corner elements are required for them, forming a protruding corner.
External corners are high-risk areas for damage. Polyurethane is quite durable, but a sharp impact can chip a piece of the ornament. Therefore, for external corners, it sometimes makes sense to use reinforced elements or even metal overlays painted to match the stucco.
Lighting: How Light Brings Stucco to Life
The most beautiful ceiling stucco will remain unnoticed without proper lighting. Relief lives in the play of light and shadow. Flat, diffused light kills volume, turning three-dimensional elements into flat silhouettes. Directed light, on the contrary, reveals every detail, every curl of the ornament.
Central Lighting with a Chandelier
A traditional formal chandelier is not only a light source but also the compositional center of the ceiling. When choosing a chandelier, consider not only its design but also the nature of the light it provides.
Chandeliers with shades directed upward create soft reflected light from the ceiling. This is ideal forceiling moldings, as the light glides over the relief of cornices and rosettes, revealing their volume. However, such light may be insufficient for functional room lighting.
Chandeliers with shades directed downward provide brighter targeted lighting, but the ceiling ends up in shadow. A compromise is combined chandeliers, where some shades are directed upward, some downward. Or multi-tiered chandeliers, where the upper tier illuminates the ceiling, and the lower tier — the room space.
Contour lighting
A revolutionary solution in recent years is hidden LED lighting behind cornices. An LED strip is placed in the niche formed between a wide ceiling cornice and the ceiling itself. The light is directed upward onto the ceiling, creating a floating plane effect.
This lighting works on several levels. Firstly, it visually increases the height of the room—the ceiling appears separated from the walls, as if floating. Secondly, the soft, diffused light creates a comfortable atmosphere, perfect for the evening. Thirdly, the lighting accentuates the relief of central ceiling elements—rosettes, coffers, friezes.
Important nuance: for lighting, choose LED strips with warm white light (2700-3000K). Cool white (4000K and above) creates a feeling of an office or medical facility, killing the coziness of a formal interior.
Accent lighting
For coffered ceilings, accent lighting for each cell is ideal. Spotlights or an LED strip are placed in the center of the coffer or along its perimeter, creating internal illumination. This turns the ceiling into a glowing grid, especially effective in the evening.
You can use controllable RGB strips, allowing you to change the lighting color depending on mood or occasion. But be careful: colored lighting is a game on the edge, easily slipping into bad taste. Use color sparingly, for special occasions, leaving warm white light for the normal mode.
Color solutions: from snow-white to contrasts
Traditionally, ceiling molding is painted white. This is a classic, tested for centuries. White is universal, visually increases height, reflects maximum light, and suits any interior color scheme. But does this mean you should limit yourself to only white?
Monochrome in different tones
White is not one color, but a whole spectrum of shades. Cool white with a bluish undertone, warm white with a creamy one, milky, ivory, pearl—each creates its own mood. For northern rooms with cold light, choose warm shades of white; they compensate for the lack of sun. For southern rooms, cool ones are acceptable; they refresh.
An interesting technique is painting the ceiling and molding in different shades of white. The ceiling in a warmer shade, the molding in a cooler one, or vice versa. The contrast is barely noticeable but creates additional depth and highlights the relief.
Contrasting solutions
A bold step is contrasting molding. A dark ceiling (graphite, dark blue, deep green) and white molding. Or vice versa: a white ceiling and dark molding. This works in spacious rooms with high ceilings, where there is space capable of bearing such visual weight.
Contrast creates drama, making the molding the main hero of the interior. But it requires appropriate surroundings: furniture and wall finishes should be restrained so as not to compete with the ceiling. A contrasting ceiling is one strong accent in a room.
Colored ceilings
An even bolder solution is a fully colored ceiling. Sky blue with white molding creates a sky effect. Golden with white molding—palatial luxury. Deep emerald—dramatic elegance.
A colored ceiling works in rooms with a height of 3 meters or more. In low rooms, it will feel oppressive, creating a sense of heaviness. The overall color concept of the interior is also important: the ceiling color should echo other elements—textiles, accent walls, furniture.
Patination and gilding
For maximum luxury, you can use patination—artificial aging of molding with highlighting of the relief using gold, silver, or bronze paint. This is a complex technique requiring professional execution, but the result is stunning.
Patination creates an effect of antique value, as if this molding has survived centuries. Golden highlights in the recesses of the ornament, darkening on the protruding parts—this is the subtle play that turns new molding into a work of art.
Full gilding of molding is already the territory of palaces and mansions. For ordinary apartments, it can be excessive. But if you are creating a truly formal hall, where every detail speaks of luxury—why not?
Stylistic directions of formal ceilings
Formality can be expressed differently depending on the interior style. Let's consider the main directions.
Classical Empire
Empire is the style of emperors, maximum solemnity and symmetry. A ceiling in the Empire style is a large central rosette (often with eagles, laurel wreaths, imperial symbols), massive cornices with meanders and palmettes, possibly coffers with gilded rosettes inside.
Color palette: white with gold, or saturated colors (emerald, sapphire, purple) with abundant gilding of the molding. The chandelier is a multi-arm crystal one, maximally formal. This style is for large rooms with ceiling heights from 3.5 meters.
Baroque: Theatrical Opulence
Baroque loves abundance. A ceiling in the Baroque style is multiple layers of decor, asymmetrical elements, curved lines, floral motifs, putti (cherubs), complex cartouches.Sculptural decorationsHere it's not just a frame, but an entire sculptural composition.
Ceiling painting in combination with molding is permissible and even welcome. Molded frames surround painted panels with clouds and figures. This is the pinnacle of ceiling decor, requiring the work of professional artists and restorers.
Neoclassicism: Reserved Elegance
Neoclassicism is classical forms, cleansed of excess. A ceiling in the Neoclassical style is strict symmetrical compositions, laconic cornices with moderate relief, a central rosette without excessive pomp, possibly simple coffers or molding frames.
Colors are neutral: white, gray, beige, possibly with small golden accents. The chandelier is modern but with classical references. This style is for modern apartments and houses where elegance is desired without museum-like heaviness.
Art Deco: geometric luxury
Art Deco is geometry, symmetry, clear lines combined with luxurious materials. A ceiling in the Art Deco style is geometric rosettes (often octagonal or stepped), cornices with geometric ornamentation, possibly mirror or metal inserts.
Color palette: black with gold, white with silver, combinations of contrasting colors. Lighting is multi-level, emphasizing geometry. This is a style for connoisseurs of 1920s-1930s elegance.
Practical considerations: installation and maintenance
Creating a formal ceiling is not just about aesthetics, but also practicality. How to install the elements? How to maintain them? How much does it cost and how long does it take?
Ceiling preparation
Before installing ceiling molding, the ceiling must be prepared. It should be level (allowable deviations — no more than 2-3 mm per meter), clean, dry, and primed. If the ceiling has significant unevenness, it must be corrected with plaster or putty.
For stretch ceilings, options are limited: only a cornice can be installed along the perimeter on the wall (with a slight overlap onto the ceiling). Central elements — rosettes, coffers — cannot be installed on a stretch ceiling without special mounting blocks provided before stretching the fabric.
Installation of elements
Installation of polyurethane molding is done with special adhesive. The sequence is typically as follows:
-
Installation of perimeter cornices. The cornice is cut at a 45° angle in corners, joined butt-to-butt or via a corner element. Adhesive is applied to the back side, the cornice is placed against the wall and ceiling, and pressed. For long cornices, temporary fixation with painter's tape or thin nails may be required.
-
Installation of friezes (if provided). Similar to cornices, with corner joints.
-
Installation of the central rosette. The rosette must be precisely centered. Adhesive is applied over the entire back surface. Wiring for the chandelier is routed through the center of the rosette.
-
Installation of coffers or additional moldings. A grid or frame structure is created according to the design.
-
Sealing joints with acrylic putty, sanding after drying.
-
Priming all elements.
-
Painting in the chosen color (usually 2-3 coats).
The entire process for a standard room takes 3-5 days, accounting for drying time of adhesive, putty, and paint.
Care and longevity
Polyurethane molding is low-maintenance. Every few months, it's enough to wipe it with a dry cloth or vacuum with a soft brush attachment. If stains form, you can wipe with a damp sponge and mild detergent.
The molding does not fade, crack, or crumble. Service life is decades. The only thing that may be needed is periodic repainting to refresh the appearance (every 7-10 years).
If an element is damaged (chip, crack), repair is simple: the damaged area is filled with putty, the missing relief is shaped, sanded after drying, and touched up with paint.
Cost of a formal ceiling
How much does it cost to create a formal ceiling? Depends on room size, complexity of the composition, materials, and need for professional services.
Approximate rates for a 20 sq.m room with a 3-meter ceiling:
-
Ceiling cornice, 16 linear meters (perimeter): 8000-20000 rubles depending on the profile
-
Central rosette 80 cm in diameter: 3000-8000 rubles
-
Frieze (if needed), 16 meters: 5000-15000 rubles
-
Corner elements: 2000-6000 rubles
-
Adhesive, putty, primer, paint: 3000-5000 rubles
-
Master's labor (if not doing it yourself): 15000-30000 rubles
Total: from 36000 to 84000 rubles for a complete turnkey formal ceiling.
A coffered ceiling will be more expensive: from 60000 to 150000 rubles depending on the complexity of the structure and materials.
Yes, this is a significant amount. But in return, you get a ceiling that will last for decades without losing its appearance, and that will radically change the perception of the entire room.
Frequently asked questions about formal ceilings
Is it possible to create a formal ceiling in an apartment with a height of 2.6 meters?
Yes, but with limitations. Avoid massive cornices (no more than 8-10 cm), large rosettes (up to 60 cm), coffers (they will visually lower the ceiling even more). Use concise profiles, light colors, hidden lighting that creates a floating effect. Formality is achieved not by massiveness, but by the elegance of details.
How to combine a formal ceiling with modern furniture?
Choose molding with restrained profiles, without excessive ornamentation. Paint everything white or in neutral tones. Modern furniture combines excellently with neoclassical molding, creating an interesting contrast of eras.
Is it possible to make a formal ceiling in only one room?
Yes, and this is often the best solution. A formal ceiling in the living room or dining room, simpler ceilings in bedrooms and the study — this is a logical hierarchy corresponding to the functional purpose of the rooms.
How to choose between polyurethane and plaster?
For most cases, polyurethane is the optimal choice. It is lighter, cheaper, easier to install, and not afraid of moisture. Plaster makes sense only for exclusive projects where individual molding of elements or maximum depth of relief is required.
Can molding be installed by oneself?
Yes, if you are careful and skilled with your hands. Installing polyurethane molding does not require special skills. You need basic tools (level, miter box, saw), patience, and precision. The most difficult part is the corner joints of cornices, but this is also solvable with corner elements.
How long does ceiling molding last?
With quality installation and materials — decades. Polyurethane does not age, yellow, or crack. The only thing that may be required is repainting to refresh the appearance, but this is an aesthetic, not a structural issue.
How does molding affect the acoustics of a room?
A relief ceiling improves acoustics by scattering sound waves and reducing echo. Coffered ceilings are especially effective — the cells work as resonators, absorbing certain frequencies. This makes formal ceilings not only beautiful but also functional.
Can molding be used in humid rooms?
Polyurethane — yes, without restrictions. It is not afraid of moisture, does not swell, does not mold. In bathrooms and kitchens, polyurethane molding lasts just as long as in the living room. It is important to use moisture-resistant adhesive and washable paint.
Conclusion: From idea to implementation
We have gone from the general philosophy of a formal ceiling to specific details of selecting and installing elements. So what is the main thing?
A formal ceiling is not a set of beautiful details, but a well-thought-out architectural composition. Each element has its place and function. Cornices frame, the rosette accents the center, friezes create rhythm, coffers add depth. Everything works together, creating a sense of solemnity and significance of the space.
Do not be afraid of formality. Many believe that such ceilings are appropriate only in mansions and palaces. This is not true. A properly designed formal ceiling will decorate any room — from a city apartment to a country house. The main thing is to observe proportions, not overload the space, and choose elements that correspond to the style of the interior.
Modern materials have made the creation of formal ceilings accessible.polyurethane moldingsPolyurethane molding from trusted manufacturers gives a result visually indistinguishable from traditional plaster, with significantly less expenditure of time, effort, and money.
If you are ready to transform your ceiling, contact professionals. The company STAVROS has been creating elements for formal interiors for over two decades, offering the widest selection of cornices, rosettes, friezes, coffers, and decorative elements.
STAVROS products feature European manufacturing quality, dimensional accuracy, clarity of relief, and material durability. The catalog presents solutions for any style — from classical Empire to modern neoclassicism. High-density polyurethane (density 280-300 kg/m³) ensures geometric stability and absence of sagging even for long cornices.
STAVROS works with designers, construction companies, and private clients throughout Russia. Professional consultants will help select elements for your project, calculate the required amount of materials, and provide recommendations for installation and finishing. Their own warehouse ensures availability of popular items and fast shipping.
Visit STAVROS showrooms in Moscow and St. Petersburg to see the elements in person, assess the quality of relief and material, and get inspiration for your project. Or explore the catalog on the website — detailed photos, precise dimensions, and style descriptions will help you make the right choice.
Create ceilings that amaze. Turn ordinary rooms into formal halls. Realize dreams of the perfect interior. With STAVROS materials, this is not just possible — it is realistic, affordable, and durable.
Your formal ceiling awaits. Start your journey to it today.