Article Contents:
- Anatomy of a Kitchen Cornice: Why It's Needed
- Visual Completeness of the Composition
- Visual Lifting of Ceilings
- Stylistic Identification of the Interior
- Kitchen Cornice Profiles: From Minimalism to Baroque
- Simple Rectangular Profile: Modern Restraint
- Single-Step Profile with Fillet: Classic Without Excess
- Multi-Step Classic Profile: Baroque and Empire
- Carved Cornice: Exclusive and Handmade
- Kitchen Cornice Installation: Error-Free Mounting Technology
- Preparation: Measurements and Material Calculation
- Cutting and Fitting of Elements
- Mounting on Upper Cabinets
- Corner Joining and Seam Sealing
- Cornice Painting: Color as a Design Tool
- Matching the Facades: Monolithic Composition
- Contrast Solution: Highlighting Architecture
- Patination and aging effects
- Wood-Like: Solid Wood Imitation
- Design Examples: Kitchens with STAVROS Cornices
- Classic White Kitchen with Multi-Step Cornice
- Modern Gray Kitchen with Laconic Cornice
- Neoclassical Beige Kitchen with Contrast Cornice
- Frequently Asked Questions
- Conclusion: Cornice as an Investment in Visual Quality

Why do some kitchens look finished and expensive, while others resemble an unfinished project from a budget store catalog? The difference often lies not in the cost of the facades or countertop, but in one detail measuring just five to ten centimeters. The upper cornice of a kitchen set is an element that professional designers never overlook, but ordinary people often ignore. And completely in vain. The absence of a cornice turns even expensive cabinets into a set of boxes hanging on the wall. The presence of a properly selectedMDF kitchen cornice for paintingtransforms the same kitchen, adding architectural completeness, visual ceiling height, and stylistic definition. For a few thousand rubles, you get an effect comparable to replacing all facades with more expensive ones. Sounds like marketing exaggeration? Compare before and after photos—skepticism will evaporate instantly.
Kitchen cornices made of MDF combine affordable price, ease of installation, profile variability, and absolute compatibility with any facade materials. Wood, MDF, plastic, painted or veneered surfaces—MDF Cornices for Paintingunify the composition, creating visual harmony. Today, we'll explore why a cornice is needed, how to choose a profile for a specific style, install it correctly, and paint it so the result looks professional.


Anatomy of a Kitchen Cornice: Why It's Needed


Visual completeness of composition
Imagine a painting in a frame and the same painting without a frame, leaning against a wall. The content is the same, but the perception is diametrically opposite. The frame creates a boundary, completeness, turning the image into an art object. A kitchen set without a cornice is a painting without a frame. The upper cabinets abruptly end at the ceiling, creating a sense of incompleteness and temporariness.
The cornice serves the function of architectural completion. It creates a smooth transition from the furniture to the ceiling, visually uniting individual cabinets into a single composition. The eye perceives a set with a cornice as a solid object, not a collection of elements. The psychology of perception is based on the completeness of forms—the human brain experiences discomfort from incomplete objects and pleasure from harmoniously finished ones.
Kitchen interior decoris built on details. The cornice is not a decorative excess but a functional element of the visual architecture of space. It works just like a baseboard on the floor or a door casing—it creates a frame, a boundary, a completion.
Our factory also produces:


Visual raising of ceilings
Professional design technique: to visually raise low ceilings, use vertical lines and place decorative elements above eye level. A cornice installed on the upper cabinets of a kitchen draws a horizontal line right under the ceiling. This line becomes a new visual level from which the eye measures the height of the room.
The higher this line is placed, the higher the ceilings are perceived. A kitchen with a set height of 240 centimeters plus an 8-10 centimeter cornice creates a visual height of 250 centimeters. The real ceiling remains in place, but the perception of space has changed. In a room with 270-centimeter ceilings, the effect is especially noticeable—a gap of only 20 centimeters between the cornice and the ceiling creates the feeling that the furniture reaches the ceiling, filling the space completely.
Additional effect: the cornice hides technical elements—fastenings, ceiling irregularities, gaps between cabinets and the wall. Everything that could spoil the impression is hidden behind an architectural element.
Get Consultation
Stylistic identification of the interior
The cornice profile is one of the main markers of a kitchen's stylistic affiliation. A classic cornice with beads, carved elements, and a multi-step profile clearly signals: this is classic. A laconic rectangular cornice 5-7 centimeters high without decoration—this is modern minimalism or Scandinavian style. A cornice of medium complexity with one or two profile steps—neoclassical, a transitional style between tradition and modernity.
Without a cornice, the kitchen's style is blurred, undefined. With a properly selected cornice, the style is instantly readable. This is especially important in open-plan kitchen-living rooms, where the kitchen set is visible from all points of the space.MDF Hangers for Furniture for Paintingallow creating stylistic unity with the entire interior through color and profile.
Kitchen cornice profiles: from minimalism to baroque
Simple rectangular profile: modern restraint
The most laconic option—a rectangular plank 50-80 millimeters high, 15-20 millimeters thick, without any shaped curves. This is maximally clean geometry, working for visual completeness without decorative excesses.MDF furniture cornice for paintingof rectangular cross-section is ideal for modern styles: minimalism, high-tech, Scandinavian, industrial loft.
Advantages of a simple profile: versatility, ease of installation, minimal material consumption when cutting corners, visual compatibility with any fronts. Painted in the color of the fronts, such a cornice creates a monolithic effect—the set is perceived as a single object from floor to ceiling.
Usage option: a white kitchen with smooth fronts, a white rectangular cornice, a white ceiling—a composition in monochrome, where form is more important than decoration. Or a contrasting solution: dark gray fronts, a black rectangular cornice—graphic quality, strictness, a masculine character of the interior.
Technically, a simple profile is cut with a regular miter saw without chipping, glued with liquid nails or mounting adhesive, and does not require complex fitting. This is the choice for those installing a cornice themselves for the first time.
Single-step profile with bead: classic without excess
A profile with one step and a small bead (concave or convex arc)—the golden mean between minimalism and classic. The height of such a cornice is usually 60-90 millimeters, the profile has a base part of rectangular cross-section and a decorative element—a bead 15-25 millimeters wide.
This profile suits neoclassical kitchens, traditional interiors, transitional styles. It adds architectural detailing but does not overload the composition. The bead creates a play of light and shadow, adds volume, makes the cornice a noticeable element, not just a plank.
Color solutions: a cornice a shade lighter than the fronts creates the effect of classic molding. A cornice in the color of the fronts preserves monolithicity but adds texture through relief. A cornice in a contrasting color (e.g., white on gray) highlights the upper tier, creating horizontal division of space.
Installing a single-step profile requires precision in cutting corners—the bead must join without gaps. Use a miter box or a miter saw with an accurate 45-degree angle setting.
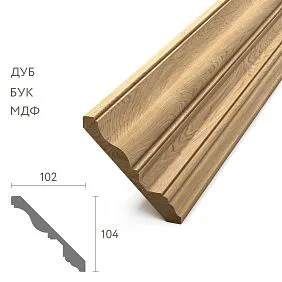
Multi-step classic profile: baroque and empire
For classic kitchens with carved fronts, pilasters, capitals, a cornice of corresponding complexity is needed. A multi-step profile 100-150 millimeters high with several beads, protrusions, and recesses creates architectural power inherent to classical orders.
Such a cornice is often combined with dentils—small rectangular protrusions imitating beam ends. Dentils add rhythm, enhance classical stylistics. The profile can include up to four or five different elements—a base plank, several beads of different radii, a protruding cornice, dentils.
A complex profile requires appropriate surroundings. If the kitchen fronts are smooth and modern, a massive carved cornice will look absurd. But in an ensemble with carved overlays on the fronts, classic handles, a stone countertop, and a marble backsplash, a complex cornice becomes a logical completion of the composition.
Installing a multi-step cornice is a task for an experienced craftsman. Joining corners requires jeweler-like precision; the slightest gap is noticeable. Mounting a massive cornice requires reinforced fixation—adhesive is not enough; additional self-tapping screws hidden in the profile relief are needed.
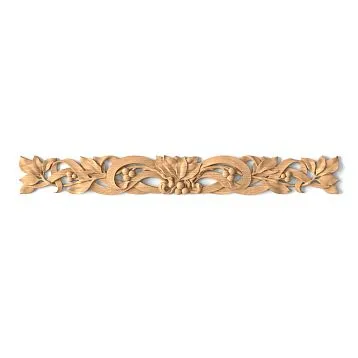
Carved Cornice: Exclusive and Handcrafted
The pinnacle of kitchen decor is a carved cornice with floral ornaments, volutes, and rosettes. This is a unique piece, often custom-made for a specific project. A carved cornice is suitable for elite kitchens in Baroque, Rococo, and Classicism styles, where every element is a piece of furniture art.
The carving can cover the entire cornice with a continuous pattern or be placed in sections—on corners, in central parts. The carving depth varies from shallow relief of 3-5 millimeters to voluminous sculptural carving of 15-20 millimeters.
A carved cornice made of solid wood is an expensive pleasure. An alternative isMDF cornice for paintingwith a milled pattern that imitates carving. Modern CNC milling machines create reliefs visually indistinguishable from hand carving, but the cost is five to seven times lower.
Painting a carved cornice is a separate art. A classic technique: a base color of ivory, with gold or silver patina in the recesses of the carving. This creates an antique furniture effect, emphasizing every curl of the ornament.
Kitchen Cornice Installation: Flawless Mounting Technology
Preparation: Measurements and Material Calculation
The first step is to accurately measure the length of all sides of the upper cabinets where the cornice will be installed. Measure along the top edge of the cabinets, taking into account all protrusions, corners, and non-standard sections. Draw a top-view diagram of the kitchen, marking all dimensions.
Material calculation: sum up the lengths of all sides, add a 10-15 percent reserve for cutting corners and possible errors. Cornice is sold by linear meters, the standard plank length is 2-3 meters. Calculate how many planks are needed to minimize joints—the fewer joints, the more monolithic the result looks.
Corners are the most difficult part. For each internal or external corner, two planks are needed, cut at a 45-degree angle. When cutting, 5 to 15 centimeters of material is lost for each corner, depending on the cornice height. Account for this in your calculations.
Tools for installation: miter saw or miter box for cutting corners, mounting adhesive like liquid nails, painter's tape for fixation, tape measure, square, pencil, adhesive spatula, acrylic sealant for sealing joints, finishing nails (optional).
Cutting corners at 45° for corner joints. Set the saw blade at 45°, place the cornice on the table with the front side up (or in working position for complex profiles), clamp it to the fence, and cut. Check the cut piece with a square — the angle must be exactly 45°.
Cutting the cornice starts with straight sections. Measure the length of the straight section between corners, transfer the measurement to the cornice plank, cut at a right angle (90 degrees). Straight cuts are made with a regular wood saw or a miter saw.
Corners require a 45-degree cut. Use a miter box or a miter saw with precise angle setting. It is critically important: the cutting direction for the left and right planks of the corner is opposite. An error in direction means a ruined element.
Joint check: after cutting the two corner elements, dry-fit them on a flat surface, check the joint tightness. A gap larger than 0.5 millimeters requires adjustment—trimming the end with a fine saw or sanding with sandpaper on a block.
MDF cuts cleanly, without chips, if the saw is sharp and has fine teeth. Use a blade for fine wood cutting. Cut at a moderate speed—rushing leads to chips on the front surface.
Mounting on Upper Cabinets
Mounting begins from the most visible spot—usually the central part of the kitchen, visible from the entrance. Apply mounting adhesive to the back of the cornice in a zigzag line or dots every 15-20 centimeters. Do not overdo the amount—excess will squeeze out when pressed.
Place the cornice against the top edge of the cabinets strictly horizontally. Use a level for control—even a slight tilt of the cornice is visually noticeable, creating a sense of curvature in the entire set. Press the cornice evenly along its entire length, hold for 1-2 minutes until the adhesive initially sets.
Fixation with painter's tape: tape the cornice to the cabinets every 30-40 centimeters, remove the tape after 3-4 hours once the adhesive has fully set. This ensures the cornice remains immobile while the adhesive dries.
For heavy cornices with complex profiles, reinforce the adhesive mounting with finishing nails. Nails 30-40 millimeters long are driven through the cornice into the cabinet body in inconspicuous places—in the profile recesses. Nail heads are countersunk by 1-2 millimeters, and the holes are filled with putty.
Joining Corners and Sealing Seams
Corner joints are where work quality is tested. Two elements cut at 45 degrees should meet perfectly, creating a single profile line without gaps or steps. Apply adhesive to the end of one element, join it with the end of the second, press.
If a micro-gap forms (up to 1 millimeter), fill it with acrylic sealant. Apply the sealant in a thin bead into the gap, smooth it with a wet finger. Remove excess immediately with a damp cloth. After drying, the sealant is sanded with fine sandpaper, becoming invisible under paint.
Joints on straight sections (if one plank length is insufficient) are made at a 90-degree angle in inconspicuous areas—in room corners, behind the refrigerator. The ends of both planks are cut perfectly straight, joined tightly, and glued. The joint is puttied and sanded.
External corners (if the kitchen has protrusions) are joined similarly at 45 degrees, but the joint is more visible—it's in plain sight. Maximum cutting precision is required. A professional technique: after joining an external corner, reinforce it with a finishing nail driven at an angle through both elements—this prevents the joint from separating over time.
Cornice Painting: Color as a Design Tool
Matching the Facades: A Monolithic Composition
A classic solution is to paint the cornice the same color as the kitchen facades. This creates visual unity and a monolithic composition. The set is perceived as a single object, and the cornice is seen as an architectural element, not a separate detail.
White facades—white cornice. Gray facades—gray cornice to match. Colored facades (blue, green, beige)—cornice of the same shade. Achieving a perfect color match is simple: use the same paint used for the facades. If the facades are factory-made, ask the manufacturer for the color code and have the paint tinted at the store to match exactly.
Painting to match the color is performed after the cornice is installed. All joints are filled with putty and sanded, and the surface is primed. Paint is applied with a roller on flat sections and with a brush in the profile relief. Two to three thin coats with intermediate drying provide an even, drip-free finish.
The monolithic effect is particularly strong when using a high-hiding enamel—glossy or matte. Gloss creates a sense of expensive factory-made furniture, while matte enamel creates a modern Scandinavian aesthetic.
Contrast solution: highlighting the architecture
The opposite approach is a cornice in a contrasting color, highlighting the upper tier of the cabinet set. A classic combination: dark fronts (graphite, anthracite, black) and a white cornice. The white strip under the ceiling visually raises it, lightens the massiveness of the dark furniture, and creates a graphic effect.
Reverse combination: light fronts (white, beige, gray) and a dark cornice (black, dark brown). The dark line under the ceiling creates a clear boundary, a finishing touch, and works as an architectural accent. This technique is characteristic of neoclassical interiors.
Color contrast: blue fronts and a white cornice, green fronts and a cream cornice. The contrast can be tonal (within the same color of different saturation) or color (different colors).
Contrast painting requires care. If the cornice is already installed on the cabinets and the color is different, the fronts need to be protected with painter's tape. The tape is applied along the joint line of the cornice and cabinet, the cornice is painted, and after drying, the tape is removed, leaving a clear color boundary.
Patina and aging effects
For classic and neoclassical kitchens, the patination technique is popular—creating an effect of noble aging. The base color of the cornice is light (ivory, beige, light gray), and patina—a dark paint or special patinating compound—is applied into the recesses of the profile.
Technology: the cornice is painted with the base color in two coats and allowed to dry completely. The patinating compound is applied with a brush into the recesses and onto the raised parts of the profile. After 5-10 minutes, while the patina is still wet, the excess is wiped off the raised parts with a cloth. The patina remains in the recesses, creating an effect of accumulated time and emphasizing the relief.
Gold or silver patina is a classic of the genre. A base color of ivory with gold patina in the flutes and recesses of the carving creates the luxury of palace interiors. Silver patina on a gray base color is a more restrained elegance.
Patination is performed before the cornice is installed or after, but always before installation in the kitchen if there is a risk of staining the fronts. The work requires care and artistic sense—excess patina looks vulgar, while insufficient patina gets lost.
Wood-like: imitation of solid wood
MDF Cornices for Paintingcan be painted to imitate wood texture. This is achieved in several ways: veneering with natural wood veneer followed by varnishing, staining with a stain to reveal an artificial texture, or using special paints with a wood effect.
Veneering is the highest quality but also the most complex method. Thin veneer of oak, ash, or walnut is glued onto the surface of the MDF cornice, sanded, and coated with varnish or oil. The result is visually indistinguishable from solid wood. Used for premium kitchens where the fronts are made of solid wood or veneered.
Staining MDF provides a limited effect—MDF lacks wood texture, and stain colors it in an even tone without a grain pattern. However, in combination with special gels that create stripes, a simple texture can be imitated. Suitable for kitchens in country, Provence styles, where a wood effect is desired but authenticity is not critical.
Paints with a wood effect are modern compounds that imitate the color and light texture of wood. Applied like regular paint, they create colors like oak, walnut, wenge without revealing the fiber structure. This is a compromise solution—not natural wood, but not a solid-color enamel either.
Design examples: kitchens with STAVROS cornices
Classic white kitchen with a multi-step cornice
Kitchen in classic style: white fronts with milling, brass handles, marble countertop. Upper cabinets 900 millimeters high are finished with a cornice 120 millimeters high of a multi-step profile. Three flutes of different radii, an overhanging visor, and dentils create a complex architectural form.
The cornice is painted the same white color as the fronts—creating a monolithic composition. But the cornice relief creates a play of light and shadow, adding volume. The ceiling height in the room is 280 centimeters, and the cabinet set with cabinets and cornice rises to 250 centimeters. The gap to the ceiling of only 30 centimeters creates a feeling that the furniture fills the space from floor to ceiling.
Visual effect: the kitchen is perceived as a custom-made furniture ensemble of museum quality. Reality: the fronts are factory-made, the corniceMDF for painting from STAVROS, installed and painted by a local craftsman. The budget for the cornice with installation and painting is about 35 thousand rubles for a 12-square-meter kitchen. The visual effect is an added 300 thousand to the perceived cost of the cabinet set in the eyes of guests.
Modern gray kitchen with a laconic cornice
Kitchen in modern minimalist style: smooth matte gray fronts, hidden handles, quartz agglomerate countertop. A rectangular profile cornice 70 millimeters high, painted the same gray color. No flutes, carvings, or decorations—pure geometry of the line.
Effect: the cornice does not attract attention on its own but creates completeness. The upper cabinets do not end abruptly under the ceiling but are finished with a clear horizontal line. The visual ceiling height is increased by 7 centimeters, making the space feel taller.
Additional technique: an LED strip is hidden behind the cornice, providing soft upward lighting on the ceiling. The cornice protrudes 30 millimeters forward relative to the cabinets, creating a niche for the light. In the evening, the lighting turns on, the ceiling is illuminated with soft light, and the kitchen acquires a floating lightness.
Budget: MDF cornice of rectangular profile costs 250-300 rubles per linear meter. For a kitchen perimeter of 8 meters—2400 rubles for material, self-installation, painting with the same paint as the fronts. The effect of visually raising the ceilings and hidden lighting is priceless.
Neoclassical beige kitchen with a contrasting cornice
Kitchen in neoclassical style: beige fronts with light milling, bronze handles, light quartz countertop. A single-step profile cornice with a flute 80 millimeters high is painted not in beige, but in a creamy white color two tones lighter than the fronts.
Contrast effect: the white cornice strip stands out against the beige cabinets, creating a horizontal division and serving as an architectural accent. This is a classic neoclassical technique—playing with tonal contrasts within a light palette.
Addition: the floor skirting is also cream-white, and the door trims are the same color. The cornice, skirting, and trims create a unified visual code of white architectural elements framing the beige furniture and walls. The composition reads as cohesive, thoughtful, and harmonious.
Budget:MDF cornice for furniture, ready for paintingSingle-step profile—350-400 rubles per meter. Kitchen perimeter 10 meters—4000 rubles for material, painting with special cream enamel—2000 rubles, installation by a professional—3000 rubles. Total 9000 rubles. The visual effect of a completed neoclassical interior—achieved.
Frequently asked questions
Is it mandatory to install a cornice on a kitchen set, or can it be omitted?
Technically, it can be omitted—the set without a cornice is functional. But visually, it looks unfinished and budget. The cornice is an element that completes the composition, adding architectural detailing. The cost of the cornice is 3-5 percent of the set's cost, while the visual effect adds 20-30 percent of perceived value. Economically and aesthetically, installing a cornice is justified.
What height should the cornice be for a standard kitchen with 270-centimeter ceilings?
Optimal cornice height for standard kitchens is 60-100 millimeters. For modern styles, 60-80 millimeters; for classic styles, 80-120 millimeters. A cornice that is too low (less than 50 millimeters) gets lost and doesn't create a visual effect. One that is too high (over 150 millimeters) looks bulky and weighs down the composition. The sweet spot is 70-90 millimeters.
Can the cornice be installed independently, or is a professional necessary?
Installing a simple or medium-profile cornice is accessible for DIY with basic tool skills. You'll need a miter saw or miter box for cutting corners, mounting adhesive, a level, and patience. Complex multi-step or carved cornices are better entrusted to a professional—corner joining requires experience. But straight sections are manageable for any careful person.
Is the cornice installed before or after painting the kitchen?
Depends on the kitchen painting technology. If the fronts are removed and painted separately (factory or workshop painting), the cornice is installed after the set is in place and painted on-site. If the kitchen is painted entirely on-site (rare), the cornice is installed before painting and painted along with the fronts. For pre-painted fronts, the cornice is installed after the kitchen is set up and painted separately.
How to hide lighting behind a kitchen cornice?
The cornice is installed with a forward overhang relative to the fronts by 25-40 millimeters. An aluminum profile with an LED strip is attached to the top surface of the cabinets, near the back wall. The strip faces upward, light goes to the ceiling, reflects, creating soft ambient lighting. The cornice hides the strip from direct view. The lighting is switched on separately, creating an evening atmosphere.
How to fill a small gap at the cornice joint in a corner?
White acrylic sealant or sealant matching the cornice color is the best solution. Apply a thin bead into the gap from a tube with a fine nozzle, smooth with a wet finger, and remove excess. Once dry, the sealant is elastic, doesn't crack, and can be painted with any paint. Wood filler also works but is less elastic and may crack with temperature changes.
Can polyurethane cornice be used instead of MDF in the kitchen?
Yes, polyurethane has several advantages for kitchens: absolute moisture resistance, unaffected by steam and condensation, and lightweight, simplifying installation. But polyurethane cornices typically have complex classic profiles, not suitable for all styles. For modern minimalist kitchens, MDF is preferable—easier to find a simple profile. For classic kitchens, polyurethane is an excellent choice.
How long does it take to install a cornice on a medium-sized kitchen?
With prepared material (cornice cut to size, corners mitered), installation on a kitchen with an 8-10 meter perimeter takes a professional 3-4 hours. DIY installation for the first time might take a full day, including time for marking, cutting, and fitting. Painting the cornice after installation adds another 2-3 hours plus drying time between coats (usually two days).
Conclusion: cornice as an investment in visual quality
Kitchen cornice is an element most people forget when planning a renovation. And completely in vain. Spending 3-5 percent of the kitchen budget on a qualityMDF cornice for paintingyou get an effect far exceeding the investment. Visual completeness, raised ceilings, stylistic definition, hidden lighting possibilities—all this from one architectural element just a few centimeters high.
Choosing the cornice profile isn't a matter of taste but of matching the kitchen style. Modern minimalism requires simple rectangular forms, classic styles need multi-step profiles with beads, neoclassicism—the golden mean.Kitchen interior decorshould be planned comprehensively—cornices, skirting, trims, overlays work together, creating a cohesive composition.
Installing a cornice is accessible for DIY if you're willing to spend time learning corner-cutting techniques. Or entrust the work to a professional—the installation cost pays off in result quality. The main thing—don't skimp on material. A cheap cornice made of porous MDF with an uneven profile will ruin the impression even of an expensive kitchen.
Painting the cornice is a creative process. Matching the fronts or contrasting, with patina or without, wood-like or solid enamel—the choice defines the interior's character. Experiment with color, but remember moderation. Classic styles tolerate complexity and patina, modernity demands simplicity and color purity.
Company STAVROS produces the widest range ofMDF crown molding for paintingfor kitchen furniture. From simplest rectangular profiles 50 millimeters high to complex multi-step cornices 200 millimeters high with dentils and carved elements. Own production in St. Petersburg on European equipment ensures perfect profile geometry, clean milling, and consistent quality.
High-density MDF 750-820 kg/m³ from verified suppliers, precision processing on CNC milling machines, multi-stage sanding, factory-applied primer — STAVROS production technology guarantees professional results.Painting-ready furniture cornicesSupplied in linear meters, standard lengths of 2.0, 2.4, 2.8 meters, custom lengths available upon request.
The STAVROS range includes profiles for all styles: minimalist rectangular for modern kitchens, single-step with bead for neoclassical, multi-step with dentils for classic interiors, carved with ornaments for exclusive projects. Consultants will help select a profile for your specific kitchen and calculate material quantity considering corners and joints.
Working with kitchen furniture manufacturers, designers, and private clients — STAVROS understands the specifics of each segment. Wholesale orders for furniture factories — discounts and production priority. For private clients — retail sales from one linear meter, delivery across Saint Petersburg and all of Russia via transport companies.
The quality of STAVROS products has been proven by thousands of completed kitchen projects.Painting-ready MDF kitchen cornicesSTAVROS MDF cornices are an investment in the visual quality of your kitchen, paying off with admiring glances from guests and your own satisfaction from a perfectly finished interior. Complete the upper tier of your cabinet correctly — and your kitchen will shine with new colors.