Article Contents:
- Types of polystyrene crown molding: from simple to multifunctional
- Smooth crown moldings: minimalism and versatility
- Decorative crown moldings: classic style and ornamentation
- Crown moldings with recessed lighting
- Flexible crown moldings for curved surfaces
- Corner and joining elements
- Multi-level composite profiles
- How to choose crown molding height and overhang: the mathematics of proportions
- Dependence on ceiling height
- Influence of room area and proportions
- Crown molding overhang: how far it extends
- Color and visual perception of size
- Combining crown molding with baseboards and moldings: creating harmony
- Style Unity
- Proportions and scale
- Color Harmony
- Wall panels made of moldings
- Cutting inside and outside corners: precision to the degree
- Cutting tools
- Cutting inside corners (in room corner)
- Cutting outside corners (projecting wall corner)
- Angles other than 90 degrees
- Secrets of perfect angles
- Joining crown moldings without gaps: professional techniques
- Surface Preparation
- Marking the installation line
- Applying adhesive
- Pressing and fixing
- Filling joints with putty
- Masking imperfect joints
- Adhesives and primers: chemistry of reliable bonding
- Acrylic construction adhesives
- Water-based polymer adhesives
- Liquid nails
- Gypsum putty
- Primers (undercoats)
- What NOT to use
- Painting cornices with water-dispersible paints
- When to paint: before or after installation
- Types of paint for polystyrene
- Priming Before Painting
- Painting technique with a brush
- Painting with a roller
- Decorative techniques
- Protecting painted cornices
- Care for cornices and longevity
- Regular dust cleaning
- Stain Removal
- Repair of damage
- Service life and wear factors
- When to replace the cornice
- Conclusion
The first thing that catches the eye upon entering a room is not furniture or even walls. It is the boundary between vertical and horizontal, that delicate line where the wall meets the ceiling. And it is here that the main intrigue of interior design unfolds: will this junction be a rough, utilitarian seam or an elegant decorative element that sets the tone for the entire space? A polystyrene cornice transforms an inevitable technical necessity into an aesthetic advantage — easy, accessible, and remarkably effective.
Over the past two decades, polystyrene cornices have evolved from cheap imitations of plaster molding to full-fledged design tools. Modern manufacturing technologies allow creating profiles of incredible complexity and precision, which, after proper painting, are indistinguishable from real plaster molding. The material's lightness and ease of installation make it accessible to anyone who wants to transform their home without the help of professional decorators.
But behind this apparent simplicity lies a multitude of subtleties. How to choose the right profile height for a room with 2.7-meter ceilings? Why is a 15 cm cornice ideal for a living room but disastrous for a bedroom? How to achieve a perfect 45-degree angle at the junction without a professional miter saw? Which adhesive will permanently fix the cornice, and which will cause it to slide off within a week? Answers to these questions determine the difference between a flawless result and disappointment.


Types of polystyrene cornices: from simple to multifunctional
The modern market offers such a variety of polystyrene cornices that an unprepared buyer easily gets lost among hundreds of articles. Let's examine the classification and find the logic behind this diversity of shapes and sizes.


Smooth cornices: minimalism and universality
The simplest category — cornices without decorative relief, with a flat surface. The cross-section may vary from a basic triangle to a complex broken line, but they are united by the absence of ornaments and protruding details.
Smooth cornices — a choice for modern interiors: minimalism, Scandinavian style, contemporary, high-tech. They do not draw attention to themselves, but delicately outline the architecture of the room. The width of such profiles is usually from 3 to 12 cm — wider ones without relief appear bulky and featureless.
The main advantage of smooth profiles — universality. They match any wall and ceiling finishes equally well, do not conflict with furniture or decor. Painting such a cornice takes minimal time — paint lays evenly, without streaks in the relief indentations. Maintenance is also simple — just wipe with a damp cloth; dust does not accumulate in decorative elements.
Our factory also produces:


Decorative cornices: classic and ornamental
The opposite of smooth profiles — cornices with pronounced relief and ornamentation. Here, manufacturers' imagination is limitless: plant motifs with acanthus leaves and grapevines, geometric patterns in the form of meanders and Ionic, architectural elements of classical orders.
Relief can be shallow — 2-4 mm, creating a subtle play of light and shadow. Or pronounced — up to 15-20 mm, with dramatic protrusions and deep recesses. The more complex the relief, the richer the cornice looks, but the more difficult it is to join at corners and clean from dust.
Decorative cornices — a classic choice for traditional interiors. Classic, neoclassic, baroque, rococo, empire, Provence — everywhere where historical authenticity and ornamentation are valued, decorativePolystyrene Cornicebecomes an organic part of the composition.
The width of decorative profiles starts at 5-6 cm and can reach 30-40 cm for monumental interiors. Narrow ones suit standard apartments; wide ones require high ceilings and spacious rooms.
Get Consultation
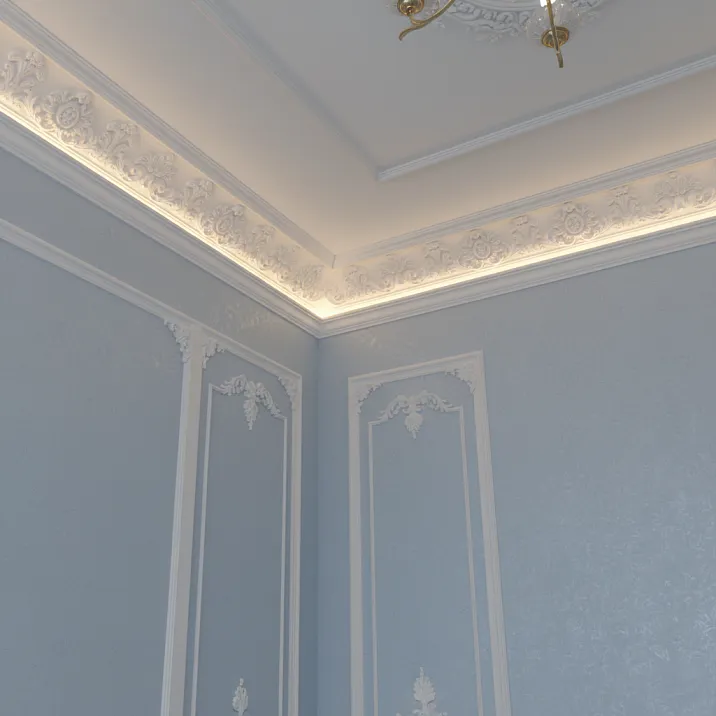
Cornices with a niche for backlighting
A separate category — profiles with a special shelf for mounting LED strips. This is not just decoration, but a functional element of the lighting system. The construction of such cornices is designed to hide the light source from direct view, directing the light beam toward the ceiling or wall.
The niche can be open at the top — then the light goes to the ceiling, creating a floating ceiling effect. Or closed with a lip — then you get a directional beam of light. The depth of the niche is usually 4-10 cm, the width of the shelf 3-6 cm. The height of the lip hiding the strip — 3-5 cm.
LED cornices are especially popular in modern interiors. Hidden backlighting visually lifts the ceiling, creates soft ambient lighting, and shapes the space. At the same time, the light source remains invisible — only the play of light on the surface is visible.
SuchCeiling MoldingThey require precise installation: the distance from the lip to the ceiling should be optimal (8-15 cm) to ensure even light distribution, without gaps or overexposure.
Flexible cornices for curved surfaces
Standard polystyrene — a rigid material that does not bend. But for decorating arches, bay windows, columns, and curved walls, manufacturers produce special flexible profiles. They are made of modified polyurethane or polystyrene with additives that impart elasticity.
Flexible cornices can be bent into a desired radius and fixed with adhesive. After drying, they retain their shape. The bending radius depends on the thickness and profile construction—usually from 50 cm to 2-3 meters. For sharper bends, special segmental elements are available—pre-made arcs of specific radius.
Flexible cornices are 2-3 times more expensive than standard ones, but for complex architectural forms they are indispensable. An alternative is to assemble a radius using short straight sections, but this is labor-intensive, creates many joints, and is suitable only for smooth curves.
Corner and joint elements
To simplify installation, manufacturers offer pre-made corner elements—internal and external. They precisely match the cornice profile and are installed at room corners without cutting strips at 45 degrees. Straight sections of cornice are simply brought to the corner—resulting in a perfect joint with no effort.
Connection elements for joining straight strips on long walls are also available. They feature decorative relief that conceals the joint, turning a technical necessity into a design feature. End caps cover cut ends of cornice if it does not run along the entire perimeter (e.g., at doorways).
Multi-level Composite Profiles
To create the most expressive decoration, multi-level cornices are used. They consist of several parallel strips of different widths and relief, positioned at different levels relative to the wall and ceiling.
Such a profile creates an illusion of architectural complexity, volume, and multi-layered depth. It becomes a dominant interior feature, drawing attention and setting the tone for the entire space. The width of composite cornices ranges from 15 to 50 cm; they require high ceilings (minimum 3 meters) and spacious rooms.
Installing such profiles is more complex—you must precisely level them, securely fix them (they are heavier than standard ones), and carefully join all elements. But the result is impressive—a budget polystyrene cornice, after proper installation and painting, looks like expensive professional plasterwork.
How to choose cornice height and overhang: the mathematics of proportions
The most common mistake when choosing a cornice is focusing exclusively on the profile’s external attractiveness. "It’s beautiful!"—the buyer decides and picks a wide, ornate cornice. But after installation, it turns out that it presses down visually, lowering an already low ceiling and making the room feel cramped.
Dependence on Ceiling Height
The main parameter when choosing a cornice is the ceiling height in the room. There are approximate proportions, tested by practice in thousands of projects:
Ceilings 2.5–2.7 m (standard): cornices 3–8 cm wide. These are the most common heights in standard apartments. A narrow cornice delicately outlines the boundary without consuming precious centimeters. A wider cornice visually lowers the ceiling, making the room appear low.
Ceilings 2.7–3.0 m: cornices 7–12 cm. Here, there is room for experimentation. A medium-width profile will look proportionate, neither overpowering nor disappearing.
Ceilings 3.0–3.5 m: cornices 12–18 cm. High ceilings require appropriate decoration. A narrow cornice will disappear and not be noticeable. A wide one is ideal—it balances the proportions.
Ceilings above 3.5 m: cornices 18 cm and wider. Here, monumental multi-level profiles and complex compositions can be used. The room’s scale allows it.
These numbers are guidelines, not dogma. Much depends on room area, proportions, interior style, and personal preferences. But deviating from them by more than 20–30% is risky.
Influence of room area and proportions
Ceiling height is not the only factor. Room area and shape also matter.
Small rooms (up to 12 m²): even with relatively high ceilings (2.7–2.8 m), it’s better to choose narrow cornices (4–7 cm). A wide cornice will visually press down and "take up" space. A small room should breathe, not be overloaded with decoration.
Medium-sized rooms (12–20 m²): standard recommendations for cornice width-to-ceiling height ratios apply without adjustments.
Large rooms (over 20 m²): you can choose cornices 1–2 cm wider than recommended. In spacious rooms, a narrow cornice may disappear and fail to provide the desired visual weight.
Stretched rectangular rooms: if the room is narrow and long (hallway, gallery), a wide cornice will intensify the tunnel-like feeling. It’s better to choose a narrow profile or even omit cornices on long walls, leaving them only on end walls.
Square rooms: classic proportions apply here, and standard ratios work without adjustments.
Cornice overhang: how far it extends
In addition to height (width) of the profile, overhang is important—how far the cornice extends from the wall. This parameter varies among profiles from 2–3 cm to 10–15 cm.
Small overhang (2–4 cm) creates a delicate decorative strip that does not dominate but neatly emphasizes the boundary. Suitable for minimalist interiors and small rooms.
Medium overhang (5–8 cm)—a universal option. The cornice is sufficiently noticeable, creates a clear graphic line, but does not overload the space.
Large overhang (9–15 cm)—for expressive classical interiors in spacious rooms. Such a cornice projects over the room, creating an architectural volume and molding effect.
When choosing, consider furniture placement. If tall cabinets or shelves are planned under the ceiling, a wide cornice with large overhang will conflict with them. In such cases, a narrow profile with minimal overhang is preferable.
Color and visual perception of size
An interesting nuance: the perceived size of the crown depends on its color relative to the walls and ceiling.
A crown in the color of the ceiling visually merges with it, appearing as part of the ceiling plane. The ceiling visually 'extends' downward by the width of the crown, which can be advantageous in high rooms (making them cozier) and disadvantageous in low rooms (lowering the ceiling).
A crown in the color of the walls visually extends the walls upward. The ceiling appears higher. This technique is used to visually increase the height of the room.
A contrasting crown (e.g., white against colorful walls and ceiling) clearly reads as a standalone element. It appears wider than it actually is. If you want a striking decoration — this is your choice. If you need subtlety — better to match the color exactly.
Combining crown with baseboards and moldings: creating harmony
A ceiling crown rarely exists in an interior on its own. Usually, it is part of a decorative system that includes baseboards, wall moldings, and door casings. For the interior to look cohesive, all these elements must complement each other.
Style Unity
The first rule — decorative elements must be consistent in style. IfCeiling cornicewith a classical ornament featuring plant motifs, the baseboard should not be ultra-modern and smooth. Conversely, a minimalist smooth crown is not suitable for a baseboard with baroque scrolls.
The ideal option — elements from the same manufacturer's collection. Designers initially plan their compatibility: consistent relief style, proportions, scale of details. Even if the ornaments differ, they harmonize with each other.
If the collection does not offer a complete set of elements, combine carefully. Place samples next to each other and observe how they match. Main criteria: similar relief complexity (do not mix complex ornaments with smooth profiles), similar 'era' of decoration (antique motifs with antique, art deco with art deco).
Proportions and Scale
The second rule — proportionality of elements. A wide ceiling crown requires a corresponding baseboard. If the profile under the ceiling is 15 cm wide, and the baseboard below is thin and 5 cm high — the composition falls apart and appears unbalanced.
Approximate proportions:
-
Crown 3-5 cm — baseboard 5-7 cm
-
Crown 6-10 cm — baseboard 8-12 cm
-
Crown 12-15 cm — baseboard 12-18 cm
-
Crown over 15 cm — baseboard from 15 cm
Wall moldings (if used) should be narrower than both the crown and the baseboard. They serve as connecting elements, not dominating. Usually 3-7 cm wide.
Color Harmony
The third rule — color harmony. Options:
All in white: a classic solution. Crown, baseboard, moldings, casings — all painted white. Universally applicable, works in any style, visually unifies the space.
Crown and baseboard in the color of the ceiling and floor: crown merges with the ceiling, baseboard with the floor. Decoration subtly integrates into the finish, not drawing attention. Good for minimalist interiors.
Crown and baseboard in the color of the walls: visually extend walls from floor to ceiling, making the room appear higher. Decoration is almost unnoticed, functions as a technical detail rather than decoration.
Contrasting scheme: decoration contrasts with the finish. For example, a white crown and baseboard against gray walls and light-gray ceiling. Decoration clearly stands out, becoming a graphic element of the interior.
Two-color scheme: crown one color, baseboard another. A risky approach requiring precise color sense. May work in eclectic interiors, but is usually avoided in classic styles.
Wall panels using moldings
A popular technique in classical interiors — dividing walls into panels using moldings. Vertical and horizontal strips form rectangular frames, within which the wall is painted a different color or covered with wallpaper.
In such a composition, the ceiling crown plays the role of the upper boundary, and the baseboard — the lower one. Wall moldings should be narrower than both the crown and the baseboard, but consistent in style.
Classic scheme: the wall is divided horizontally into three zones. Lower (plinth) — up to 80-100 cm from the floor, distinguished by a darker color, framed by baseboard and horizontal molding. Middle — main part of the wall, may be divided vertically into rectangles by moldings. Upper (frieze) — under the ceiling, 20-40 cm, distinguished by another shade, framed by crown.
Such a composition visually complicates the space, adds depth, and makes the interior more noble. But requires high ceilings (minimum 2.8 m) and a good sense of proportions.
Cutting internal and external corners: precision to the degree
Joining crowns at corners — the most critical moment of installation. The ideal angle is the master’s pride; a curved joint — an eye sore that no putty can mask. We will examine the technology thoroughly.
Cutting Tools
Miter gauge: a device for cutting at fixed angles. It consists of a slot with slots guiding the saw. A standard miter gauge has slots for 45 and 90 degrees. For cutting cornices, you need the 45-degree angle.
Miter gauges come in simple plastic (300-500 rubles) and professional adjustable ones allowing any angle setting (from 2000 rubles). For home repairs, a simple but quality one is sufficient — with clear slots and no play.
Handsaw: for cutting polystyrene, use a handsaw with fine teeth — metal or plastic-specific. Large teeth (wood-type) will tear the material, leaving ragged edges. The blade must be rigid, not bend — otherwise, the cut will be crooked.
Construction knife: for thin cornices (up to 5 cm wide), you can use a sharp construction knife. Cut in several passes with gradually increasing pressure. The cut will be clean, but requires a firm hand.
Jigsaw: for thick and wide profiles, a jigsaw with a blade for soft materials is convenient. Medium speed, without a reciprocating motion — to avoid tearing the material. A jigsaw can cut without a miter gauge, setting the base angle to 45 degrees.
Cutting internal angles (corner of a room)
Internal angle — the most common, found in every room. Here, two cornice strips meet, forming an inward angle.
Cutting sequence:
-
Place the cornice strip in the miter gauge so that the part that will contact the ceiling lies on the bottom of the miter gauge. The part contacting the wall rests on the side wall of the miter gauge.
-
For the left strip (which goes left from the corner), cut through the slot running from left to right, top to bottom. For the right strip — from right to left, top to bottom.
-
Hold the saw strictly within the slot, without deviation. Cut smoothly without heavy pressure — polystyrene cuts easily.
-
After cutting, check the cut — it should be flat, without chips. If there are burrs, sand them with fine sandpaper.
-
Fit the two strips together "dry" (without glue) — they should fit tightly, forming a straight angle without gaps.
Typical mistakes:
-
The strip was placed in the miter gauge with the wrong side down — the angle is formed, but at the opposite end of the strip, not where needed.
-
Left and right cuts were swapped — the strips do not fit together.
-
The saw drifted off course, the cut is not at 45 degrees but at another angle — a gap in the joint.
-
Material chips during cutting — dull saw, too large teeth, or excessive pressure.
Cutting external angles (wall protrusion)
External angles occur less often — where there are protrusions, columns, niches. Here, the cornice wraps around the protruding corner.
Cutting sequence:
-
Placement in the miter gauge is the same — ceiling part on the bottom, wall part on the side wall.
-
For the left strip, cut from right to left, top to bottom (opposite to the internal angle). For the right strip — from left to right, top to bottom.
-
Cutting technique is the same — smoothly, without pressure, strictly within the slot.
-
Dry-fit joint check.
External angles are harder to fit — if an internal angle can be slightly "pushed" together by fitting the strips tighter, an external angle does not allow this. Even the slightest cutting error results in a visible gap. Therefore, precision is especially important here.
Angles other than 90 degrees
In real rooms, angles are often not straight — 87, 93, 95 degrees. This is due to construction inaccuracies or room layout peculiarities. If cutting such angles standardly at 45 degrees, a gap will result.
Solutions:
Manual adjustment: after standard cutting, dry-fit the strips. If there is a gap, determine exactly where (top, bottom, center). Trim the cut with a knife or sandpaper, removing excess material. Re-fit again. Repeat until achieving a perfect joint.
Using an adjustable miter gauge: if you have a professional miter gauge with angle adjustment, measure the actual room angle with a protractor or small angle gauge. Divide it in half (e.g., 94° angle — cut at 47°). Set the miter gauge to the required angle and cut both strips.
Pre-cut corner elements: the simplest solution — buy a pre-cut corner element for your profile. It compensates for minor deviations from 90 degrees and is adjusted during installation. Straight strips are connected to it without angled cutting.
Secrets of perfect angles
Accurate marking: before cutting, precisely measure where the corner will be. Mark the board. Remember: the board length is measured along the long side (for internal corners) or the short side (for external corners).
Allowance for fitting: if unsure about cutting accuracy, leave a 1-2 cm allowance. It's better to slightly trim later than to discover the board is too short.
Quality tool: a new sharp saw gives a clean cut on the first pass. A dull saw tears the material, requires multiple passes, and increases the risk of error.
Clean work area: sawdust and shavings under the board in the sawhorse lift it up and alter the cutting angle. Clean the sawhorse before each cut.
Check before gluing: never glue boards without first checking the joint "dry". First, lay them together to ensure tight fit, then glue.
Crown molding joints without gaps: professional techniques
Cutting is half the job. The other half of success is proper board alignment during installation. Even perfectly cut elements can be ruined by improper installation.
Surface preparation
The crown will hold as securely as the base is strong and clean. Preparation is mandatory:
Cleaning: remove dust, dirt, old paint or peeling plaster. You can vacuum, wipe with a damp cloth, and let it dry.
De-greasing: if there are greasy spots on the wall or ceiling (common in kitchens), wipe them with alcohol or a specialized degreaser. Grease prevents adhesive bonding.
Priming: if the base is loose and highly absorbent (old plaster, porous concrete), treat it with a penetrating primer. This strengthens the surface and improves adhesion.
Leveling: if the wall is very uneven, with bumps and dips over 5 mm, the crown will replicate all irregularities or hang with gaps. Ideally, level the wall with plaster. If impossible, choose a wider, heavier crown—it will conceal part of the irregularities.
Marking the installation line
Professionals do not glue crown "by eye"; they pre-mark the installation line.
Using a level: mark on the wall at several points the distance from the ceiling where the bottom edge of the crown will run (usually 0-5 mm from the ceiling). Connect the points with a line using a long level or laser level.
Using a string: drive two nails into the corners of the room at the desired height. Stretch a chalked string between them. Pull the string taut and release it—it will strike the wall, leaving a straight chalk line.
Marking is especially important if the ceiling is uneven or wavy. Along the line, you’ll immediately see where the crown will fit tightly against the ceiling and where gaps will remain. In areas with large gaps (over 3-5 mm), you’ll either need to adjust the installation line or fill the gaps with putty.
Applying adhesive
Polystyrene adhesive is applied to the back of the crown—the surfaces that will contact the wall and ceiling.
Application methods:
Serpentine: adhesive is extruded from the tube as a continuous wavy line along the entire length of the crown’s leg. The adhesive bead width is 5-7 mm, height 3-5 mm. Distance from the leg edge is 5-10 mm (to prevent adhesive from oozing onto the front side upon pressing).
Dots: adhesive is applied in large dots (drops) spaced 5-10 cm apart. This method is more economical but holds less securely—suitable for narrow, lightweight crowns.
Solid strip: for heavy, widedecorative profilesadhesive is applied as a continuous strip along the entire length of the leg. This provides maximum contact area and secure attachment.
Amount of adhesive: better to use more than less. Excess adhesive, squeezed out during pressing, can easily be wiped away with a damp cloth. Insufficient adhesive will cause the crown to detach within a week or month.
Adhesive on ends: when joining two boards, apply adhesive not only to the legs but also to the end of the board being joined. When pressed, the adhesive will fill microscopic gaps in the joint, creating a monolithic bond.
Pressing and Fixation
After applying adhesive, the crown board is placed against the wall according to the marking and pressed. It seems simple, but there are nuances:
Leveling: before pressing firmly, ensure the crown stands straight according to the marking. Adjust its position if needed. After strong pressing, it will be difficult to change the position—the adhesive has already set.
Even pressing: press the crown evenly along its entire length. If pressed heavily in the center and lightly at the edges, gaps will remain against the wall. Run your hand along the entire board, pressing each section.
Pressing time: hold the crown pressed for at least 30-60 seconds. The adhesive must set enough to hold the element under its own weight. For heavy crowns, increase the time to 2-3 minutes.
Temporary fixation: if the crown is heavy or the adhesive sets slowly, temporarily fix the board with temporary fasteners. Options:
-
Painters' tape - apply tape strips from the cornice to the ceiling or wall.
-
Braces - rails that rest against the cornice from below and the floor.
-
Screws - drive temporary screws into the wall, supporting the cornice from below.
After 12-24 hours, when the adhesive is fully cured, remove the temporary fasteners.
Removing excess adhesive: wipe away any adhesive that has squeezed out from under the cornice or joint immediately with a damp cloth or putty knife. Do not wait until it dries — it will be harder to remove and may damage the surface.
Filling joints with putty.
Even with perfect trimming at joints, micro-gaps of 0.5-1 mm remain. These must be filled with putty.
Putty drying time: not earlier than one day after installation. The adhesive must be fully dry, and the cornice must hold firmly. If you apply putty too early, the cornice may shift slightly, causing the putty to crack.
Material: ready-to-use acrylic putty. Gypsum putty is also suitable, but less elastic.
Technique: use a small rubber or metal putty knife to press the putty into the joint, spread it along, and remove excess. For joints on decorative profiles, use a thin tool (toothpick, glass) — restore the ornament lines at the joint.
Sanding: after drying (4-12 hours for acrylic putty), sand the joint with fine-grit sandpaper (grit 120-180). Goal — make the transition from putty to polystyrene invisible.
Second coat of putty: if micro-cracks remain after sanding, apply a second layer, let it dry again, and sand it.
Masking imperfect joints.
If, despite all efforts, the joint is not perfect, there are ways to mask the defect:
Gold stripe: paint the joint with gold or silver paint. It will appear as a decorative stripe, perceived as an intentional design element rather than a defect.
Overlay decoration: at the joint, stick a small decorative element — a rose, a cover — that will cover the joint.
Additional molding: if the joint runs across the middle of a wall (not in a corner), mask it with a vertical molding running from the cornice downward. This will create an imitation of a pilaster or simply a decorative insert.
Adhesives and primers: chemistry of reliable mounting.
The choice of adhesive determines whether the cornice will hang for decades or fall off within a month. The market offers dozens of options — let’s figure out what actually works.
Acrylic mounting adhesives.
This is the gold standard for mounting polystyrene. Adhesives based on acrylic polymers in water dispersion. Available in tubes of 280-310 ml for mounting guns.
Advantages:
-
Do not contain solvents — do not damage polystyrene.
-
Fast setting — 30-60 seconds.
-
High adhesion to most surfaces.
-
No strong odor.
-
Become hard after drying, hold securely.
-
Can be painted or puttied.
Disadvantages:
-
Relatively expensive (200-400 rubles per tube).
-
Requires a mounting gun.
-
Do not adhere to glossy surfaces (oil paint, glazed tiles).
Popular brands: "Moment Montazh", "Titan", "Quelyd", "Eko-Gum". Choose adhesives labeled "for polystyrene", "for expanded polystyrene", "for lightweight materials".
Consumption: one 310 ml tube covers 15-20 linear meters of a curtain rail up to 10 cm wide. For wider profiles, consumption is higher.
Water-based polymer adhesives
More budget-friendly option - polymer adhesives in jars or buckets. They are thicker than sour cream and are applied with a trowel or comb.
Advantages:
-
Cheaper than acrylic adhesives in tubes (1 liter - 200-350 rubles)
-
Large volume is convenient for large-scale projects
-
Good adhesion
-
No solvents
Disadvantages:
-
Longer setting time - up to 2-3 minutes
-
Less convenient application
-
Thicken quickly after opening (2-3 months)
Popular brands: "Anserglob", "Krass", "Dragon". Look for adhesives "for polystyrene panels", "for decorative elements".
Consumption: one liter covers 25-35 linear meters of a curtain rail.
Liquid nails
Strong mounting adhesives for heavy elements. Available in water-based and solvent-based versions. ONLY water-based adhesives are suitable for polystyrene!
Advantages:
-
Very high bonding strength
-
Hold even on poorly prepared surfaces
-
Compensate for minor surface irregularities
Disadvantages:
-
Long setting time - 5-10 minutes
-
Requires prolonged fixation of the curtain rail
-
Expensive (310 ml tube - 300-500 rubles)
Brands: "Moment Montazh Superstrong", "Liquid Nails", "Makroflex". Check that it is labeled "water-based" or "for expanded polystyrene".
Gypsum plaster
Old, proven method of professional plasterers. Finish gypsum plaster is mixed to a thick sour cream consistency and used instead of adhesive.
Advantages:
-
Cheap (5 kg bag - 200-300 rubles, enough for an entire house)
-
Simultaneous mounting and joint sealing
-
Holds well, proven over decades
-
Not afraid of solvents - can be painted with any paints later
Disadvantages:
-
Needs to be mixed, work quickly (sets in 30-40 minutes)
-
Messy work - plaster drips and stains
-
Dries for a long time - up to full hardening
-
Skill required
Technique: putty is applied to the crown's legs, the plank is pressed against the wall. Excess material is immediately scraped off with a trowel and used to fill joints and gaps. Results in a monolithic finish.
Primers (undercoats)
Primer is a primer that improves adhesive bond to the substrate. For polystyrene, primer is not mandatory (the adhesive holds well anyway), but it can be useful in some cases:
Loose substrates: old plaster that flakes off, porous concrete. Deep-penetration primer strengthens the surface, binds particles, and creates a strong base for adhesive.
Glossy surfaces: oil paint, glazed tiles. Primer creates a rough layer that adhesive can grip onto.
Wallpaper: if you're installing a crown on wallpaper, primer will strengthen it and reduce the risk of it peeling off along with the crown.
Types of primers:
-
Acrylic deep-penetration primers - for loose substrates
-
Betonkontakt - for smooth, dense surfaces (concrete, glossy paint)
-
Universal primers - compromise for different substrate types
Application: apply with a brush or roller to a cleaned surface. Dries in 2-4 hours. After drying, install the crown normally.
What NOT to use
Silicone sealants: hold poorly, polystyrene will eventually peel off. Sealants are meant for sealing, not bonding.
Solvent-based adhesives: "Moment", "88", polyurethane adhesives like "Titebond". They dissolve polystyrene, leaving holes.
Hot glue (thermal adhesive): melts polystyrene when heated. Only suitable for temporary fixation of small parts.
PVA: holds poorly, yellows over time, softens in humidity. Not for installation, only for crafts.
Painting crowns with water-dispersible paints
White polystyrene crown is good, but painting opens up new possibilities. Coloredinterior decorationintegrates into the overall interior palette, a contrasting crown becomes an accent, and patina and gilding techniques transform budget material into luxurious molding.
When to paint: before or after installation
Both options are viable.
Painting before installation:
Pros: convenient - planks lie on the floor or table, easy to reach all areas, no need to protect walls and ceiling.
Cons: inevitable scratches, scuffs, finger marks during installation. Joints and seams will still need touch-ups after filling.
When to use: if painting in a complex color (gold, patina, gradient) that is hard to replicate during touch-ups. Apply main coat before installation, touch up seams afterward.
Painting after installation:
Pros: crown is already installed, all joints and seams are filled and sanded. Paint once, and it's done. No scratches from installation.
Cons: need to protect walls and ceiling with painter's tape. Brushing under the ceiling is less convenient.
When to use: for painting in a simple solid color. This is a universal and most popular option.
Types of paint for polystyrene
The main rule does not change: only water-based paints, no solvents.
Water-emulsion paints: the most affordable option. Based on PVA, they provide a matte finish. Easy to apply, dry quickly, and have no odor. The downside is they are not very resistant to abrasion and moisture. Suitable for dry rooms where the cornice will not be touched by hands or washed.
Acrylic paints: higher quality finish. They create a semi-matte or semi-gloss film that is resistant to washing. They do not fade in sunlight and retain color for years. More expensive than water-emulsion by 30-50%, but the result is better.
Latex paints: premium segment. They provide a dense, elastic finish with a slight silk-like sheen. They withstand wet cleaning, are not afraid of steam and splashes. Ideal for kitchens, bathrooms, and children's rooms. Price is 2-3 times higher than regular water-emulsion.
Ceiling paints: often used for cornices. They create a perfectly matte finish, hiding minor surface defects. If you want the cornice to blend with the ceiling, this is an excellent choice.
Colored vs white: white paint is the base. If you need a colored cornice, either buy tinted paint (the store will add pigment of the desired shade), or buy white base + tint separately (you mix it yourself at home).
Priming before painting
Priming is not mandatory — paint adheres well to polystyrene. But it is desirable for an ideal result.
Why prime?
-
Levelizes surface absorption — paint lays more evenly
-
Improves paint adhesion
-
Paint consumption is reduced (primer is cheaper than paint)
-
Minor defects (scratches, pores) are filled
Type of primer: water-based acrylic primer. Universal or special "for plastic". Sold in cans or sprays.
Application: primer is applied in a thin layer with a brush or small roller. One layer. Dries in 2-4 hours. After drying, lightly sand with fine sandpaper (grit 180-220) — this improves paint adhesion.
Brush painting technique
Painting the cornice with a brush — the main method for home conditions.
Brush selection: soft synthetic or mixed brush, 4-6 cm wide. For narrow areas and relief — brush 2-3 cm. The brush must be of good quality, not shedding bristles.
Paint preparation: stir the paint, optionally slightly thin it with water (no more than 5-10%). Consistency — like liquid sour cream.
Applying the first layer: dip the brush into paint up to one-third of the bristle length, lightly squeeze out excess paint at the can’s edge. Apply paint along the length of the cornice with light strokes. Do not press the brush hard, do not apply a thick layer — better two thin layers than one thick one.
On decorative profiles, carefully paint all recesses and protrusions. Paint should not accumulate in recesses — wipe off excess with a dry brush or cloth.
Drying: water-emulsion and acrylic paints dry "to the touch" in 2-4 hours, fully in 12-24 hours. Do not apply the second layer until the first is completely dry.
Second layer: applied the same way as the first. After the second layer, the finish should be even, dense, without gaps.
Third layer: needed if the base is visible or there are uncoated areas after two layers. Usually, two layers are sufficient for light shades, while dark and saturated colors may require three.
Roller painting
For smooth cornices without relief, a roller is more convenient — it paints faster and more evenly than a brush.
Roller type: small velvet or foam roller, 5-10 cm wide. Velvet gives a smoother finish without bubbles.
Technique: pour paint into a tray. Dip the roller, roll it over the textured surface of the tray to evenly distribute the paint. Roll the roller along the cornice with slight pressure. For recessed and hard-to-reach areas, use a brush.
Layers: same as when painting with a brush — two to three thin layers with intermediate drying.
Decorative Techniques
Patina effect: first layer — light paint (white, cream, beige). After drying — second layer with dark paint (brown, black, green). While the paint is still wet, wipe it off from raised parts of the relief with a dry cloth. The dark paint remains in the recesses, creating an aged effect.
Dry brush (dry brush) technique: for imitating gilded or patinated moldings. Base layer — main color. After drying, take a minimum amount of paint (gold, bronze, silver) on a stiff brush. Wipe the brush almost dry on paper. With a half-dry brush, lightly stroke raised parts of the relief. This creates a light gilding that highlights details.
Two-tone painting: different profile elements are painted in different colors. Use painter's tape to separate areas. For example, the main part is white, the ornament is gold. First, paint the entire cornice with the base color. After drying, cover the ornament with tape and the rest with paper. Then paint the ornament with the second color. Remove the tape.
Pearl and metallic: special paints with pearl or metallic pigments. Applied over the base layer. They create an elegant shimmering effect and reflect light. Suitable for decorative interiors.
Protection of painted cornice
In rooms with high humidity or where the cornice may get dirty (kitchen, hallway), it is advisable to protect the painted surface with a finishing coating.
Water-based acrylic lacquer: creates a transparent protective film. Available in matte, satin, or semi-gloss finishes. For cornices, matte or satin finishes are preferable — gloss creates unnatural glare. Apply with a soft brush in 1–2 layers over fully dried paint. Protects against moisture and dirt, and simplifies maintenance.
Wax: special wax compositions for decorative finishing. Applied with a soft cloth and rubbed in. Creates a light silk-like sheen, protects the surface, and enhances relief. Primarily used for patinated and gilded cornices.
When protection is mandatory: in the kitchen (grease, soot, moisture), in the bathroom (steam, splashes), in the hallway (dust, street dirt), in the children's room (cornices may be touched by hands and soiled).
Care for cornices and longevity
Proper care extends the life of the cornice and preserves its original appearance for many years.
Regular dust cleaning
Dust is the main enemy of cornices, especially those with deep relief. It accumulates in ornament recesses, making the decoration dull and unclean.
Dry cleaning: once a month to twice, gently brush the cornice with a vacuum cleaner on low power. Alternatively, use a special microfiber broom — it attracts dust without dispersing it into the air. For high cornices, use a telescopic handle.
Wet wiping: painted and lacquered cornices can be wiped with a slightly damp soft cloth. Not soaking wet — water may seep under the cornice and weaken the adhesive bond. Unpainted polystyrene should be cleaned only dry.
Cleaning relief: for deep recesses, use a soft toothbrush or artist’s brush. Gently sweep dust out of hard-to-reach areas.
Removing stains
Grease stains on the kitchen, insect marks, accidental splashes — all of these spoil the appearance of the cornice.
Soap solution: mix a little liquid soap or dishwashing detergent in warm water. Dampen a soft cloth, wring it out well, and wipe the stained area. Then wipe with a clean damp cloth (to remove soap) and dry thoroughly.
Alcohol: for stubborn stains (tape marks, grease) use isopropyl alcohol. It does not harm polystyrene and effectively dissolves organic stains. Apply to a cotton pad, wipe the stain, then dry thoroughly.
Forbidden substances: abrasive powders (scratch), solvents (acetone, white spirit — will degrade polystyrene), chlorine-containing bleach (may fade paint).
Repair of damage
A random impact, careless movement while rearranging furniture — and a dent or chip appears on the cornice. Minor damage can be easily repaired yourself.
Dents: if the dent is shallow (up to 2 mm), fill it with acrylic putty. Apply a thin layer, let it dry, sand with fine-grit sandpaper, and repaint to match the cornice color.
Chips: for more serious damage, use epoxy putty or a mixture of acrylic putty with fine polystyrene shavings (leftover from cutting). Fill the chip, shape the profile, let dry, sand, and repaint.
Cracks: if the cornice cracks (can happen from a strong impact or temperature deformation), glue the parts together with acrylic glue. On the back side, attach a piece of fiberglass mesh for reinforcement. Fill the seam with putty, sand, and repaint.
Detached sections: if the cornice has detached from the wall on a small area, gently lift it, apply fresh glue, press it down, and secure with painter’s tape for 24 hours.
Service life and wear factors
With proper installation and care, polystyrene cornices last 20–30 years or more. Manufacturers provide a 10–15-year warranty, but practice shows the material lasts longer.
Factors affecting durability:
Material quality: dense polystyrene from reputable manufacturers lasts longer than cheap, loose polystyrene.
Installation quality: a well-adhered cornice on a properly prepared base lasts for decades. Poor installation — and problems may arise within a year or two.
Operating conditions: in dry, heated rooms with normal humidity, polystyrene practically does not age. In damp conditions, with sharp temperature fluctuations, or under direct sunlight, service life is reduced.
Painting: a painted cornice lasts longer than an unpainted one. Paint protects against ultraviolet light (the main destroyer of polystyrene), moisture, and mechanical damage.
Regular care: a cornice regularly cleaned of dust and dirt retains its appearance and lasts longer.
When to replace the cornice
Yellowing: if the white polystyrene has turned yellow due to age or sun exposure, you can try repainting. If the yellowing has penetrated deeply into the material and is visible even through the paint — it’s time to replace it.
Brittleness: old polystyrene becomes brittle and crumbles at the slightest touch. This is a sign of deep material degradation — it cannot be repaired and must be replaced.
Deformation: if the cornice has sagged, bent, or twisted — this is due to poor-quality material or incorrect installation. It cannot be straightened, and replacement is required.
Multiple damages: if the cornice is covered with cracks, chips, and dents along its entire length — it’s easier to replace than repair.
Moral obsolescence: sometimes the cornice is in excellent condition but has become outdated aesthetically — it no longer matches the new design after renovation. In such cases, replacement is a matter of taste and desire to refresh the interior.
Conclusion
Polystyrene cornice has evolved from a simple technical element to a full-fledged interior design tool. Modern manufacturing technologies allow creating profiles of any complexity — from minimalist smooth ones to luxurious ornate ones with intricate detailing. The material’s lightness, affordable price, and ease of installation make polystyrene cornices a choice for millions of homeowners worldwide.
But behind this apparent simplicity lie numerous nuances. Correct selection of profile height for a specific room, precise 45-degree angle cuts, reliable joints without gaps, proper painting — each stage requires knowledge and care. Mistakes at any stage can ruin the result and turn a potential interior decoration into a source of disappointment.
That’s why it’s so important to work with proven materials from reliable suppliers. The company STAVROS offers a wide range of high-qualitycornices made of polystyrenefor any interior design solutions — from strict classic to bold modern. Professional consultants will help you select the optimal profile for your project, calculate the exact amount of material and fittings, and provide recommendations for installation and finishing. With quality materials and the right approach, your interior will achieve completeness and elegance that will delight your eyes for years!