


Article Contents:
- What makes wooden cornice indispensable in interior architecture
- History of cornice: from temples to living spaces
- Functions of ceiling cornice
- Cornice profiles: from classic to minimalism
- Wood species for cornices: material selection
- Oak — the standard of strength and nobility
- Beech — uniformity and formability
- Ash — contrast and elasticity
- High-density MDF — alternative to solid wood
- Cornice size range: how to choose height
- Cornices for standard rooms: height up to one hundred millimeters
- Cornices for high rooms: height over one hundred millimeters
- Proportion rule: cornice and room height
- Round wooden molding: complement to cornice system
- Diameters and application of round molding
- Combining cornice and round molding
- Installation of wooden cornices: technology and nuances
- Surface Preparation
- Adhesive-mechanical fastening
- Corner joints
- Installation features with stretch ceilings
- Finishing treatment of wooden cornices
- Lacquering: protection and gloss
- Enamel painting
- Tinting and patination
- Interior styles and cornice selection
- Classicism: symmetry and order
- Baroque and Rococo: luxury and carving
- Neoclassic: Reserved Elegance
- Minimalism and Modern Style
- Scandinavian style: naturalness and light
- Loft: contrasts and industrialism
- Frequently asked questions about wooden crowns
- What cornice height is optimal for a standard apartment?
- Can wooden cornice be installed independently?
- Which wood species is better for a crown?
- How to care for wooden cornice?
- Can wooden cornice be combined with polyurethane decor?
- Which cornice to choose for stretch ceiling?
- How much does wooden cornice installation cost?
- STAVROS Company: The Benchmark for Wooden Molding Quality
Have you ever noticed that in a room with perfect renovation, your gaze involuntarily rises to the ceiling? There, at the junction of the wall and the ceiling plane, runs a clear horizontal line—the cornice, which crowns the wall composition like the cornice of an ancient temple. This element seems insignificant until you see a room without it—suddenly the walls lose their completeness, the space becomes flat, devoid of architectural depth.
Wooden cornicenot only conceals the technological gap between the wall and the ceiling—it shapes the architectural resonance of the interior, creates a visual pause separating the vertical plane from the horizontal. And in combination withwooden round molding, which is used for handrails, decorative railings, and structural elements, a cohesive wooden finishing system is created, uniting the ceiling, walls, and functional elements into a harmonious ensemble.


What makes a wooden cornice indispensable in interior architecture


The History of the Cornice: From Temples to Living Spaces
The cornice is one of the oldest architectural elements. In ancient architecture, the cornice crowned the entablature—the upper part of the columnar order. Its protruding form protected the facade from rain, and decorative elements—dentils, modillions, carved consoles—showcased the builders' craftsmanship. This tradition transitioned into the interior spaces of buildings, where the ceiling cornice became an essential element of ceremonial halls, palaces, and mansions.
Whywooden valances for curtainsremain relevant in the 21st century, when polyurethane and gypsum alternatives are available? Because wood possesses unique properties—texture, warmth, the ability to be restored, and eco-friendliness. A wooden cornice can be sanded, repainted, and tinted multiple times. In fifty years, it will look just as noble as on the day of installation, which cannot be said for polymer imitations.
Our factory also produces:


Functions of a ceiling valance
The first and obvious function is decorative.ceiling cornice woodencreates a transition between the wall and the ceiling, adding architectural complexity to the room. It introduces a horizontal line that stops the gaze, sets a rhythm, and structures the space.
The second function is visual proportion correction. A cornice painted the color of the wall visually raises the ceiling—the boundary between the wall and ceiling blurs, making the room appear taller. A cornice painted the color of the ceiling, on the contrary, visually lowers the ceiling, making a tall room more intimate and cozy.
The third function is concealing technological imperfections. The joint between the wall and ceiling is rarely perfectly even. A stretch ceiling leaves a technological gap. Plaster can have micro-cracks. The cornice conceals all these defects, creating an illusion of perfect geometry.
The fourth function is lighting integration. An LED strip can be hidden behind the cornice, creating soft contour lighting for the ceiling. The light, reflecting off the ceiling, disperses throughout the room, creating a floating effect. The wooden cornice becomes not just a decorative element, but part of the lighting system.
Get Consultation
Cornice Profiles: From Classic to Minimalism
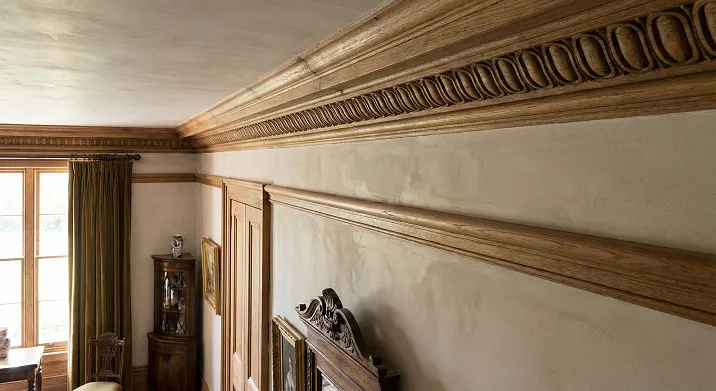
The cornice profile determines its style and visual impact. A classic cornice has a complex multi-tiered profile with decorative elements—beads, coves, and ogees. It can include five to seven different elements, creating a play of light and shadow. Such a cornice suits high-ceilinged rooms with classic or neoclassical design.
A modern cornice has a concise profile—one or two geometric elements, clear lines, minimal decoration. It can be rectangular, with a chamfer, or with a single cove. Such a profile suits standard apartments with ceilings of two sixty to two eighty centimeters, and for modern and Scandinavian interiors.
Carved wooden cornice—this is the pinnacle of decorativeness. Hand carving creates a unique ornament—floral motifs, geometric patterns, antique elements. A carved cornice becomes a work of art that sets the tone for the entire interior. Such cornices are custom-made, require significant time investment, but the result justifies the cost.
Wood Species for Cornices: Material Selection
Oak — the Standard of Strength and Elegance
Oak cornices are the choice for those who value durability and prestige. Oak density reaches seven hundred fifty kilograms per cubic meter, ensuring exceptional strength. An oak cornice does not deform under its own weight even at lengths of four to five meters.
Oak texture is expressive—clear annual rings, medullary rays creating a characteristic 'mirror' sheen on a radial cut. Oak color varies from light honey to dark brown. Light oak suits modern interiors, dark stained oak suits classic ones.
Oak takes stains easily, accepting any shade—from bleached gray to black wenge. The high tannin content in oak wood provides natural protection against moisture, fungus, and insects. Oak cornices can even be used in bathrooms with proper treatment.
Beech—Uniformity and Formability
Beech is distinguished by a fine-pored, uniform structure and a delicate pinkish hue. Beech texture is calm, without pronounced rings—this creates a visually monolithic cornice surface that does not draw attention to itself.
Beech density is comparable to oak—about six hundred eighty kilograms per cubic meter. Beech cornices are strong, stable, and hold their shape well. Beech is excellent for processing—it can be sanded to perfect smoothness and absorbs stains evenly.
A feature of beech is its ability to bend after steaming. If a radius cornice is needed for a bay window, semi-circular room, or arch—beech blanks are ideal. After steaming at one hundred degrees Celsius, beech becomes pliable and can be bent to a radius several times smaller than its length.
The downside of beech is its hygroscopicity. It actively reacts to humidity fluctuations. Therefore, beech cornices require a stable microclimate—humidity forty-five to sixty-five percent, temperature eighteen to twenty-four degrees Celsius.
Ash—Contrast and Elasticity
Ash is close to oak in hardness but has a more contrasting texture—light and dark stripes alternate, creating a dynamic pattern. Ash color varies from light gray to olive-brown. Ash cornices pair well with metal, concrete, glass—ideal for loft interiors.
The elasticity of ash makes it preferable for long cornices that should not sag. A four-meter-long ash cornice maintains perfect straightness without intermediate fasteners.
High-density MDF is an alternative to solid wood.
For those seeking a compromise between the aesthetics of wood and budget constraints, there are cornices made of high-density MDF. The material density of seven hundred fifty to eight hundred fifty kilograms per cubic meter allows for milling complex profiles with fine details.
MDF is absolutely stable — it does not react to fluctuations in humidity and temperature, does not warp, does not crack. The homogeneity of its structure allows for creating sharp profile transitions that are difficult to achieve in solid wood.
MDF cornices are painted with enamel — white, colored, with a patina effect. The perfectly smooth painted surface is indistinguishable from solid wood coated with enamel. At the same time, the cost of an MDF cornice is one and a half to two times lower than that of an oak one.
Cornice size range: how to choose the height
Cornices for standard rooms: height up to one hundred millimeters
For apartments with ceilings of two sixty to two eighty centimeters, cornices with a height of fifty to one hundred millimeters are optimal. They create a noticeable decorative effect without overloading the space.Buy wooden cornicesThis height is a universal solution for most living spaces.
A height of fifty to sixty millimeters is the minimum for a ceiling cornice. Such cornices are suitable for small rooms, hallways, bathrooms, where a massive cornice would visually lower an already low ceiling. The profile is compact, usually two-step.
A height of seventy to ninety millimeters is the standard for living rooms, bedrooms, and studies. Cornices of this height create a distinct horizontal line, clearly visible from any point in the room. The profile can be three- or four-step, with decorative elements.
Cornices for high rooms: height over one hundred millimeters
For rooms with ceilings of three meters and above, cornices with a height of one hundred twenty to two hundred millimeters or more are suitable. They match the scale of the room, create monumentality, and emphasize the height of the ceilings.
A height of one hundred twenty to one hundred fifty millimeters is the choice for spacious living rooms, dining rooms, and halls in private houses. The profile is complex, multi-step, and may include carved elements. Such a cornice becomes an architectural dominant, defining the style of the entire interior.
A height of one hundred sixty to two hundred millimeters or more is the choice for representative rooms with ceilings of three fifty to four meters. These are classic estates, palaces, museums, and ceremonial halls. Cornices of this height are often copies of historical samples, recreated from archival drawings.
Rule of proportions: cornice and room height
There is a classic rule: the height of the cornice should be one-eighth to one-tenth of the room's height. For ceilings of two seventy centimeters, the optimal cornice height is twenty-seven to thirty-four centimeters — that is, seventy to ninety millimeters. For ceilings of three twenty to thirty-two — one hundred millimeters.
This rule is not absolute — one can deliberately use a large cornice in a low room to create an effect of significance. Or conversely, a thin cornice in a high room to emphasize verticality. But as a starting point, this rule works flawlessly.
Round wooden molding: an addition to the cornice system
Diameters and applications of round molding
solid round balustradeThese are cylindrical wooden blanks of constant diameter, used for handrails, decorative railings, balusters, and furniture parts. The diameter varies from twenty to one hundred fifty millimeters, length from one to six meters.
Thin molding with a diameter of twenty to thirty millimeters is used for decorative strips that can be fixed under the cornice, creating additional relief. Such strips are installed horizontally, at a distance of five to ten centimeters from the cornice, forming a two-level composition.
A medium diameter of forty to fifty millimeters is the standard for stair handrails. But round strips of this diameter can also be used as wall railings, which harmonize with the ceiling cornice, creating a unified wooden system in the interior.
A large diameter of seventy to one hundred millimeters is for decorative columns, pilasters, and support posts. They can be installed in room corners, along walls, framing doorways, creating vertical accents that combine with the horizontal line of the cornice.
Combining cornice and round molding
An interesting designer technique is installing round molding of a small diameter (thirty to forty millimeters) directly under the cornice at a distance of five to ten centimeters. The round strip creates an additional line, enhancing the architectural expressiveness of the wall-ceiling junction.
If the cornice is wooden and the round molding is made of the same species with the same finish — visual integrity is created. If the species or finish differ — an interesting contrast arises. For example, a light beech cornice and dark oak molding create a graphic two-color composition.
buy round moldingIt can also be used to create decorative brackets supporting the cornice. Short segments fifteen to twenty centimeters long are cut from round molding with a diameter of fifty to seventy millimeters and installed vertically under the cornice at intervals of fifty to eighty centimeters. Such pseudo-corbels do not bear real load but create a classic architectural image.
Installing wooden cornices: technology and nuances
Surface preparation
Quality installation begins with preparing the wall surface in the area where the cornice will be attached. The wall must be even — permissible unevenness is no more than two millimeters per meter. If the wall is wavy, the cornice will not fit tightly, gaps will form, which will spoil the appearance.
Marking is done with a laser level. A horizontal line is drawn along the entire perimeter of the room at a distance of five to ten centimeters from the ceiling (depending on the height of the cornice). It is important that the line is strictly horizontal—even a slight slope will be noticeable.
The surface is cleaned of dust and primed with a deep-penetration compound. The primer improves the adhesion of the glue, strengthens the surface layer of plaster, and prevents crumbling.
Adhesive-mechanical fastening
The main method of fastening wooden cornices is adhesive-mechanical. The cornice is glued to the wall with polyurethane glue or liquid nails and additionally secured with mechanical fasteners—screws or finishing nails.
Glue is applied to the back of the cornice in a zigzag strip. The cornice is placed against the wall along the marking and pressed for ten to fifteen seconds. The glue sets quickly but reaches full strength within 24 hours.
Additionally, the cornice is fastened with screws spaced forty to fifty centimeters apart. Screws with a diameter of four to five millimeters and a length of sixty to eighty millimeters are used. Holes for the screws are pre-drilled to prevent the wood from splitting.
The screw heads are countersunk two to three millimeters below the surface of the cornice. The holes are filled with wooden plugs glued with PVA or wood filler. After drying, the fastening points are sanded flush and coated with a finishing compound.
Corner Joints
The most complex stage of installation is the corner joints. The cornices are cut at a forty-five-degree angle on a miter saw. Cutting accuracy is critical—even a deviation of half a degree will create a visible gap.
The ends are coated with glue, joined, and pressed. If the cornice profile is complex, small nails or pins are used for additional fixation of the joint. Nails are driven in places where they will be invisible—in the recesses of the profile, on the lower plane.
For external corners, which are more noticeable, it is recommended to use ready-made corner elements—wooden corners specially made for the specific cornice profile. They ensure perfect joining without cutting.
Features of installation with stretch ceilings
If a stretch ceiling is installed in the room, mounting the cornice has its peculiarities. The stretch fabric cannot bear the load from the cornice, so a mounting block is needed—a wooden beam or metal profile fixed to the base ceiling before installing the stretch fabric.
The mounting block is installed at a distance corresponding to the height of the cornice. The stretch fabric is attached to the wall, leaving a gap between the fabric and the wall. The cornice is mounted to the mounting block through the stretch fabric or next to it, covering the technological gap.
An alternative option is to install the cornice not on the ceiling but on the wall, at a distance of five to ten centimeters from the ceiling. Such a 'floating' cornice does not touch the stretch fabric and allows for hidden lighting to be installed behind it.
Finishing treatment of wooden cornices
Lacquering: Protection and Shine
Varnished cornices are a classic choice for interiors where it is important to emphasize the wood texture. Polyurethane varnishes are used—the most durable and wear-resistant; water-based acrylic varnishes—odorless and fast-drying; alkyd varnishes—a compromise option.
Varnish is applied in two to three coats with intermediate sanding. The first coat is a primer, which raises the wood grain. After drying, the surface is sanded with 320 to 400 grit abrasive, and the second coat is applied. The third coat is the finish, which determines the degree of gloss—gloss, semi-matte, or matte.
Gloss varnish creates a bright, mirror-like surface, maximally emphasizing the wood texture. However, it shows any defects—scratches, dents, unevenness. Matte varnish creates a restrained surface, visually more noble. Semi-matte is the golden mean.
Painting with enamel
Painted cornices are a choice for classic interiors where white or colored decor is required. Enamel completely hides the wood texture, creating a perfectly smooth, uniform surface.
Before painting, the cornice is primed with white acrylic primer. The primer fills the wood pores, evens out the absorbency, and creates a base for the paint. After the primer dries, the surface is sanded with fine abrasive—450 to 600 grit.
Paint is applied with a spray gun or brush in two to three coats. Intermediate sanding between coats is mandatory—it removes minor unevenness, dust particles, and creates a matte surface for better adhesion of the next coat. The final coat is not sanded—it remains smooth and shiny.
Toning and patination
Staining changes the color of the wood while preserving its texture. Stains on a water, alcohol, or oil basis are used. The stain penetrates the wood, coloring it to the desired shade. The depth of color depends on the concentration of the stain and the number of coats.
Popular staining shades for cornices are gray tones for Scandinavian interiors, dark brown for classic styles, black for contrasting modern spaces. After staining, a protective coating—oil or varnish—must be applied.
Patination is an artificial aging technique that creates the effect of an antique piece. The cornice is painted in the base color (usually dark), then a contrasting color (light—gold, silver, ivory) is applied to the protruding parts of the profile. After partial drying, the contrasting paint is wiped off the protrusions, remaining in the recesses. This creates an effect of wear and noble antiquity.
Interior styles and cornice selection
Classicism: symmetry and order
A classic interior requires a cornice with a complex profile and decorative elements. Characteristic features include dentils—rows of small rectangular teeth, ovolos—egg-shaped convexities, cavettos—concave curvilinear elements, modillions—carved consoles supporting the cornice.
The height of the cornice in a classic interior is one hundred twenty to two hundred millimeters. Color—white, ivory, with gilding or patina. The cornice should match the wall moldings, door trims, and baseboards—all elements are executed in a unified style.
Baroque and Rococo: luxury and carving
Baroque interiors require maximally decorative cornices. A carved cornice with plant ornaments, scrolls, mascaron, cherubs. The profile is complex, multi-tiered, with deep relief.
Color — gold on white or colored background. Technique — gesso covered with gold leaf or gold paint. Gilding can be solid or local — only on the protruding elements of the carving. Patination creates the effect of antique gilding.
Neoclassicism: Reserved Elegance
Neoclassical interior combines classical proportions with modern restraint. The cornice has a classical profile, but simplified — without excessive decoration. Height eighty — one hundred twenty millimeters, profile three-four-step.
Color — white, gray, natural wood. Finish — matte paint or varnish. Gilding and patina are used minimally or not at all. Purity of lines, correctness of proportions, quality of execution are important.
Minimalism and modern style
Minimalist interior uses a laconic cornice — rectangular profile, one-two steps, no decoration. Height fifty — eighty millimeters. Color — white, matching the ceiling or walls.
The cornice in minimalism should not attract attention — it performs the utilitarian function of closing the joint, without claiming decorativeness. Perfectly even installation, invisible joints, absence of visible fasteners.
Scandinavian style: naturalness and light
Scandinavian interior values natural materials and light tones. Cornice made of light wood — beech, ash, light oak — with natural or bleached finish. Height sixty — ninety millimeters, profile simple, with soft roundings.
Finish — white oil or matte varnish, preserving the wood texture. The cornice should be warm to the touch, tactile, emphasizing the naturalness of the material. Combines with wooden slats on walls, wooden floor, wooden furniture.
Loft: contrasts and industrialism
Loft combines rough industrial materials with the nobility of wood. Wooden cornice in a loft — dark stained oak or ash, contrasting with concrete walls or exposed brickwork.
The cornice can be deliberately rough — with preserved traces of processing, uneven edges. Or vice versa — perfectly smooth, creating a contrast with the roughness of the walls. Fasteners can be exposed — black screws, metal brackets.
Frequently asked questions about wooden cornices
What cornice height is optimal for a standard apartment?
For apartments with ceilings two sixty — two eighty centimeters, a cornice height of seventy — ninety millimeters is optimal. This creates a noticeable decorative effect without overloading the space. For lower ceilings, choose a cornice fifty — sixty millimeters.
Can a wooden cornice be installed independently?
Yes, with basic woodworking skills and tools. Minimum required: miter saw for precise angle cutting, drill or screwdriver, laser level for marking. The most difficult part — corner joints, they require high precision.
If you have no experience, it is recommended to start with simple straight sections — for example, install the cornice only on one wall without corners. After mastering the technique, you can move on to more complex configurations.
What type of wood is best for cornices?
For classic interiors, the best choice is oak. Strength, noble texture, durability. For modern interiors, beech is suitable — uniform texture, possibility of radius elements, affordable price. For wet rooms — larch with its natural moisture resistance.
If the budget is limited but a quality result is needed — choose high-density MDF with enamel painting. Visually indistinguishable from painted solid wood, cost one and a half to two times lower.
How to care for a wooden cornice?
Regular dry cleaning with a soft cloth or vacuum with a soft brush attachment once a month. Varnished cornices can be wiped with a damp cloth. Painted cornices are less demanding — wet cleaning with mild detergents is allowed.
Avoid abrasive agents, aggressive chemicals, excessive moisture. Every five — seven years, coating renewal is recommended — re-varnishing or repainting. This extends the service life of the cornice to fifty or more years.
Can a wooden cornice be combined with polyurethane decor?
Yes, such a combination is practiced. The main cornice is made of wood, and additional decorative elements — rosettes, corner overlays, carved inserts — are made of polyurethane. Polyurethane is painted to match the wood color, creating visual integrity at lower costs.
But it is important to maintain balance — if the main cornice is wooden, it should dominate, and polyurethane elements should complement, not draw attention.
Which cornice to choose for a stretch ceiling?
For stretch ceilings, light cornices are suitable — up to five kilograms per linear meter. These are cornices made of MDF, thin wooden profiles, polyurethane. Heavy massive oak cornices require reinforced fastening to embedded elements.
Alternative — installation of the cornice on the wall, at a distance from the ceiling. Such a 'floating' cornice does not contact the stretch fabric, allows installation of hidden lighting behind it.
How much does installation of a wooden cornice cost?
Material cost — from four hundred rubles per linear meter for a simple MDF profile to three thousand rubles per meter for a carved oak cornice. Installation work — from three hundred to one thousand rubles per linear meter, depending on the complexity of the profile and room configuration.
Self-installation reduces costs by half. But if there is no experience working with wood, it is better to entrust the installation to professionals — the price of a mistake (ruined cornice, uneven installation) may exceed the cost of the work.
STAVROS Company: The Gold Standard of Wooden Molding Quality
STAVROS is a leading Russian manufacturer of solid wood molding products. With over fifteen years of experience, we operate our own high-tech production facility and maintain strict quality control at every stage—from wood selection to final finishing.
STAVROS production facilities are equipped with modern German and Italian machinery, ensuring the highest precision in product geometry. Chamber drying of wood to 8–12% moisture content prevents subsequent deformation. Multi-stage sanding guarantees a perfectly smooth surface.
STAVROS offers over five hundred molding profiles: ceiling cornices ranging from compact 50 mm to impressive 200 mm, wall moldings, floor skirting boards, door architraves, decorative battens, and round molding with diameters from 20 to 150 mm.
Products are crafted from oak, beech, ash, and larch—wood species renowned for their reliability and durability. Various finishing options are available: untreated (for custom finishing), oil finish, varnish finish, enamel paint, and tinting in any shade.
STAVROS offers custom molding production to individual sizes and drawings. Minimum order for non-standard profiles starts from 50 linear meters. Lead time for standard items is 3–5 business days; for custom items, 10–14 days.
STAVROS specialists provide professional consultations to help you choose the optimal solution for your project, considering room specifics, interior style, and budget constraints. Delivery is available to Moscow, St. Petersburg, and all regions of Russia.
Choosing STAVROS products means investing in the quality, durability, and eco-friendliness of natural wood. Each item is crafted with respect for woodworking traditions and the application of advanced technologies. Wooden cornices and round molding from STAVROS are solutions that will last for decades, preserving their original beauty and creating a unique atmosphere in your home.


