


Article Contents:
- Why restore old furniture instead of buying new?
- Saving money and getting quality
- Ecology and mindful consumption
- Uniqueness and soul of the interior
- Diagnosis: assessing furniture condition before restoration
- Inspecting construction: strength and integrity
- Surface assessment: damage and defects
- Checking functional elements: drawers, doors, hardware
- Identifying material: solid wood, veneer, chipboard, MDF
- Preparation: tools and materials for the job
- Tools for mechanical processing
- Materials for surface preparation
- Materials for finishing coating
- Solid wood decorative elements
- Step-by-step guide: from old furniture to modern look
- Stage 1: Disassembly and preparation
- Stage 2: Removing old coating
- Stage 3: Repairing damage
- Stage 4: Priming
- Stage 5: Painting
- Stage 6: Adding decorative elements
- Stage 7: Installing new handles
- Stage 8: Final protection (optional)
- Result: dresser 'before and after'
- Examples of restoring different types of furniture
- Old wardrobe: from drab to elegant
- Coffee table: accent for the living room
- Dining chairs: set instead of trash
- Bookshelf: modernity from the past
- Restoration Mistakes: What to Avoid
- Insufficient Surface Preparation
- Thick Paint Layers
- Inappropriate materials
- Excessive Decor
- Ignoring Interior Style
- Rushing into Use
- Frequently Asked Questions About Furniture Restoration
- Can Particle Board Furniture Be Restored?
- How Long Does Restoration Take?
- Is It Necessary to Completely Remove the Old Finish?
- What Paint Color Should I Choose?
- Are Special Skills Needed for Restoration?
- Where to Buy Quality Furniture Decor?
- How to Care for Restored Furniture?
- Is It Worth Restoring Antique Furniture Yourself?
- Can Upholstered Furniture Be Restored?
- Which Solid Wood Items to Choose for a First Project?
- Conclusion: Furniture as a canvas for creativity
An old dresser sits in the corner — paint peeling, handles lost their shine, fronts scratched. It's a shame to throw away, but how to bring it back to life is unclear. Meanwhile,how to fix furniture, know thousands of people who have turned restoration into a hobby, and sometimes — a profession. The main secret isn't in magical tools and expensive materials, but in understanding a simple story: any furniture can be brought to a modern look if you know the sequence of actions and have access to quality decorative elements.
Imagine: you take an old Soviet wardrobe, remove the plastic handles from the stagnation era, sand the surface, apply fresh paint in a noble gray color, screw on newFurniture Handlesmade of solid oak, add carved overlays to the fronts — and here before you is a completely different piece, which looks more expensive than new furniture from mass-market stores. This isn't fantasy, it's reality, accessible to anyone willing to spend a weekend and invest a little in materials.
In this article, we'll break everything down: where to start, what tools are needed, how to remove old finishes, how to repaint correctly, whatSolid Wood Itemsto add so the furniture gains new life. 'Before and after' examples using elements from the company STAVROS will prove: restoration isn't for the chosen few, but for everyone who wants to see their home beautiful without overpaying for new furniture.


Why Restore Old Furniture Instead of Buying New?
A reasonable question. Why bother with restoration when you can go to a store and buy something ready-made? There are several answers, and each is substantial.


Saving Money and Getting Quality
New quality solid wood furniture is expensive. A dresser made of oak with carved fronts from a showroom will cost hundreds of thousands of rubles. But an old Soviet-era dresser inherited from a grandmother is made of the same solid wood, only coated with half-century-old varnish. Remove that varnish, repaint, add modern decorative elements — and you get a piece that won't be inferior to new in quality, but will cost ten times less.
Soviet furniture was made conscientiously — from solid wood, with mortise and tenon joints, without particle board or MDF. The frame is sturdy, the construction well thought out. The only problem is the appearance, which is easily fixed. Buying new furniture from mass-market stores, you get veneered particle board with plastic handles that falls apart in five years. Restoring old furniture, you get solid wood that will last another half-century.
Our factory also produces:


Eco-Friendliness and Conscious Consumption
Every discarded wardrobe or dresser is tons of wood in a landfill, it's cut-down forests, resources spent on production, transportation, disposal. Furniture restoration is a contribution to ecology, to reducing consumption of new resources. The trendy word 'upcycling' is exactly about giving old things new life without generating waste.
Moreover, old furniture has already passed the stage of emitting harmful substances — formaldehyde from particle board, volatile compounds from glues and varnishes have long evaporated. New furniture, especially budget options, can emit harmful chemicals for years. Restored old furniture with a new water-based finish is safety for you and your children.
Get Consultation
Uniqueness and the Soul of an Interior
Mass-market churns out identical items by the millions. Your IKEA dresser is the same as your neighbors', your friends', half the city's. Restored furniture, decorated withfurniture decorhandmade details, is unique. You choose the color, carving style, handle shape—creating an item of which there is no second.
Old furniture holds history. A grandmother's dresser remembers several generations of your family. Throwing it away means losing a connection to the past. Restoring it means preserving memory, but in a modern, relevant form. This is the soul of an interior, which you can't buy in a store.
Diagnostics: Assessing Furniture Condition Before Restoration
Before picking up tools, you need to honestly assess the furniture's condition. Not every item is worth restoring—sometimes the damage is so severe it's easier to buy new. But in most cases, old solid wood furniture can be repaired.
Inspecting the Structure: Strength and Integrity
First, check if the furniture is wobbly. Shake the dresser, try to wobble the wardrobe. If the structure is sturdy, the tenons aren't loose, the joints are tight—everything is fine. Minor play in joints can be fixed by tightening screws, adding glue, replacing fasteners.
If the furniture is falling apart, legs are coming off, sides are separating—serious repair involving disassembly, regluing, and reinforcing the structure will be needed. This is more complex but doable. The main thing is the integrity of the main elements. If a tabletop is cracked in half, a door is broken, a side panel is destroyed—restoration might cost more than buying new.
Surface Assessment: Damage and Defects
Surface assessment: damage and defects
Scratches, scuffs, stains, peeling paint—these are cosmetic issues solved by sanding and repainting. Deep dents, chips, cracks require filling but are also fixable. See how deep the damage goes into the solid wood—if only the top layer of varnish or paint is affected, the problem is easily solved.
If the furniture is veneered, check its condition. Delaminated veneer can be glued back, but if it has come off in pieces or cracked—you'll either have to remove it completely and sand the base, or apply new veneer, which requires special skills and equipment.
Checking Functional Elements: Drawers, Doors, Hardware
Open all drawers, doors, check how they move. Sticking? Warped? Hinges rusty? Drawer runners worn out? All this can be fixed. Hinges are replaced with new ones, runners can also be replaced with modern ball-bearing ones that operate smoothly and quietly.
Handles, locks, latches—small details that are changed first. Old plastic handles look shabby even if the furniture is repainted. Replacing them with qualityFurniture Handlessolid wood ones instantly elevates the item's status, makes it look more solid, more expensive.
Identifying the Material: Solid Wood, Veneer, Particleboard, MDF
It's important to understand what the furniture is made of. Solid wood is the ideal material for restoration; it can be sanded, painted, accepts any finish. Veneered furniture can also be restored, but working with veneer requires care. Particleboard and MDF are less forgiving materials—they don't hold fasteners well after disassembly, are afraid of moisture, but with careful work they can also be brought to a decent appearance.
A simple way to identify the material is to look at the edges, hinge mounting points, and the inner surfaces of drawers. Solid wood has a natural wood grain, annual rings are visible. Particleboard is pressed chips, a layered structure is visible. MDF is more uniform, dense, without large particles. Veneer is a thin layer of natural wood glued onto a base; you can see the pattern repeating, like wallpaper.
Preparation: Tools and Materials for the Job
Furniture restoration doesn't require a professional workshop, but a basic set of tools and materials is necessary. Most can be bought at a hardware store, and specialized decorative elements—in the STAVROS company catalog.
Tools for Mechanical Processing
A sander is the main tool. A random orbital sander is universal, suitable for flat surfaces and complex shapes. A power of 200-300 W is sufficient for home jobs. If you don't have a sander, you can manage with hand sanding—a block wrapped in sandpaper—but it's longer and harder.
A set of sandpaper of different grits: coarse P80-P120 for removing old finish, medium P150-P240 for leveling, fine P320-P400 for final sanding before painting. Sandpaper runs out quickly, get extra.
Putty knives of different widths—for applying filler, removing old paint. Metal stiff ones for removing finish, rubber flexible ones for filling. Screwdrivers, a drill/driver—for disassembling and assembling hardware. Brushes of different sizes—wide flat brushes for large surfaces, thin ones for detailing, carvings, hard-to-reach places.
Materials for Surface Preparation
Paint stripper for old paint—a chemical compound that softens multi-layer finishes, making them easier to remove. Works fast but requires ventilation and hand protection. An alternative is a heat gun, which heats the paint, after which it's scraped off with a putty knife. A heat gun is safer than chemicals but requires care not to char the wood.
Wood filler—for filling cracks, chips, dents. Choose filler suitable for painting; it should sand well and not shrink. Color isn't important if painting is planned, but for clear finishes, filler matching the wood tone is needed.
Primer—a mandatory step before painting. It improves paint adhesion, evens out surface absorbency, creates a protective layer. Acrylic water-based primer is universal, dries quickly, odorless. For problematic surfaces—particleboard, laminate—an adhesion primer is needed, which ensures bonding with smooth materials.
Finishing Materials
Paint is the main element of transformation. Water-based acrylic paint is eco-friendly, odorless, easy to apply with a brush or roller, dries quickly, and creates a durable coating. The color is chosen to match the interior — white, gray, beige for neoclassical, dark blue, emerald, graphite for modern styles. Matte paint hides minor surface imperfections, glossy paint is more striking but highlights flaws.
Varnish is for transparent coatings when you want to preserve the wood texture. Water-based acrylic varnish does not yellow, is odorless, and creates a durable film. Polyurethane varnish is stronger, more resistant to abrasion, but has an odor and takes longer to dry. Oil-wax is a modern alternative to varnish, creates a matte finish, highlights the wood grain, is easy to apply, does not form a film, and allows the wood to breathe.
Patina is a decorative material that creates an antique effect, emphasizing the relief of carvings and moldings. Gold, silver, copper, graphite — the choice depends on the style. Patina is applied to dried paint, rubbed into recesses, excess is wiped off, creating accents.
Solid wood decorative elements
Furniture decor— this is what turns simply repainted furniture into a work of art. Carved overlays, rosettes, corner elements, moldings are glued onto the facades, creating volume, complexity, and status. The choice is vast — from classical acanthus leaves to geometric modern forms.
Furniture Handlesmade of solid oak, beech, ash — functional decor that changes first. The shapes are diverse — classic handles, mushroom knobs, carved handles with ornamentation. Handles can be painted to match the furniture, patinated, oiled, left in the natural wood color — it all depends on the intended style.
Furniture legs — if the old legs are damaged, have lost their appearance, or simply do not match the intended style, they can be replaced. Turned legs of various shapes — conical, balusters, cabriole — change the appearance of the furniture dramatically. A Soviet chest of drawers on simple block legs, placed on carved balusters, turns into an elegant piece in the neoclassical style.
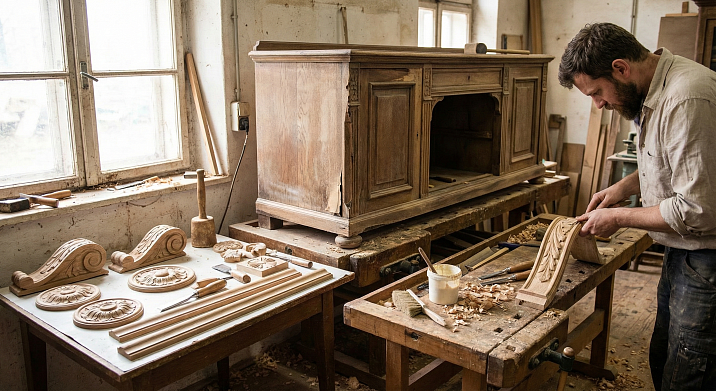
Step-by-step guide: from old furniture to a modern look
Theory without practice is nothing. Let's break down the restoration process using the example of a typical Soviet chest of drawers: five drawers, solid wood, covered with darkened varnish, with plastic handles and worn corners. The goal is to turn it into a stylish piece for a modern bedroom in the neoclassical style.
Stage 1: Disassembly and preparation
Remove all drawers, take off handles, hardware — hinges if there are doors, drawer slides, locks. Work carefully, put fasteners in a box — some may come in handy. If the handles are plastic and shabby, throw them away without hesitation, they are not needed.
Inspect the chest of drawers for damage. Note cracks, chips, deep scratches — they will need to be filled with putty. If joints are loose, tighten them with screws or glue them. If legs are wobbly, reinforce the fastening, add glue to the sockets.
Protect the floor and surrounding objects with plastic or newspapers — the work is dusty and dirty. Ensure ventilation, especially if working indoors. A respirator, gloves, and safety glasses are mandatory for sanding and working with chemicals.
Stage 2: Removing the old finish
Old varnish or paint needs to be removed so that the new coating goes on evenly and adheres firmly. Three methods: mechanical (sanding), chemical (stripping), thermal (heat gun). A combination yields the best result.
Apply stripper in a thick layer to the surface, wait 15-30 minutes (read the manufacturer's instructions). The varnish softens, bubbles, and separates from the wood. Remove it with a scraper, work carefully to avoid scratching the solid wood. Stripper does not always remove the coating in one go — repeat the process on areas where varnish remains.
After stripping, the surface is rough, with varnish residue in the pores. Take a sander with coarse sandpaper P80-P120 and go over all flat surfaces. Work along the grain, do not linger in one spot to avoid creating dips. Sand corners, carvings, hard-to-reach areas by hand with a sanding block or abrasive sponge.
After coarse sanding, switch to medium sandpaper P150-P240, go over it again, leveling the surface. Wipe with a damp cloth, let it dry — the wood grain will rise. Sand with fine sandpaper P320-P400, achieving smoothness. Remove dust with a vacuum, then with a damp cloth.
Stage 3: Repairing damage
Cracks, chips, deep scratches are filled with wood putty. Apply putty with a rubber spatula, pressing it into the defect, filling it completely. Remove excess, leaving a small bump — putty shrinks as it dries.
Let the putty dry (time indicated on the package, usually 2-6 hours). Sand the puttied areas with sandpaper P240-P320 until completely level with the main surface. If dips remain after sanding — repeat puttying and sanding.
If the corners of the chest of drawers are severely damaged, chipped, you can reinforce them with metal corner brackets inside or glue wooden overlays on the outside. Overlays will serve not only as repair but also as decor — carved corner elements will hide defects and decorate the furniture.
Stage 4: Priming
Primer is a mandatory step that many skip and later regret. It creates an intermediate layer between the wood and the paint, improves adhesion, evens out absorbency, and saves paint.
Apply acrylic primer with a brush or roller in a thin, even layer. Work quickly, avoiding drips and thick spots. Primer dries in 2-4 hours. After drying, the surface will become slightly rough — this is normal. Lightly go over it with fine sandpaper P400, remove dust.
If the wood is very absorbent, apply a second coat of primer. For light paints, especially white, two coats of primer are mandatory — they prevent dark wood spots from showing through the paint.
Stage 5: Painting
The chosen color is noble gray, medium saturation, matte. Water-based acrylic paint, for furniture, with increased wear resistance. The first layer is the base, covering layer. Apply with a brush or roller evenly, without drips. Paint corners, carvings, hard-to-reach areas with a thin brush.
The first layer dries in 4-6 hours (read the manufacturer's instructions). After drying, lightly go over it with fine sandpaper P400-P600, removing the raised grain and minor imperfections. Remove dust with a tack cloth or vacuum.
The second coat of paint is the finish coat. Apply it as carefully as the first. The second coat provides color saturation, coverage density, and hides all imperfections of the first coat. If the paint is light, a third coat may be needed — don't skimp, it's better to apply three thin coats than two thick ones.
The paint dries completely in 24 hours, but reaches full strength in 7-14 days. During this time, handle the furniture carefully, do not place heavy objects on it, and do not rub the surface.
Step 6: Adding Decorative Elements
The dresser is painted but looks plain. Let's turn it into a work of art by addingFurniture decormade of solid wood.
Choose central carved overlays for the drawer fronts. Let them be classic rosettes with floral ornamentation, 8-10 cm in diameter. Place the overlay on the center of the front, mark its position with a pencil. Apply wood glue PVA or mounting adhesive "liquid nails" to the back of the overlay, place it on the front, and press for a few seconds. For reliability, you can secure it with painter's tape while it dries.
Overlays are glued to all five fronts — the dresser has gained volume and decorative appeal. But overlays in the same color as the front are not noticeable. Contrast is needed. Take gold patina, apply it with a thin brush into the recesses of the overlay carvings, let it dry slightly, wipe the raised parts with a soft cloth — the gold remains in the depths, emphasizing the relief. The overlays have come to life, becoming expressive and luxurious.
Step 7: Installing New Handles
Old plastic handles are thrown away. New onesFurniture Handlesmade of solid oak, shape — classic bracket, length 96 mm, finish — gold patina, like on the overlays, for style unity.
Measure the distance between the holes of the old handles — usually standard 96 or 128 mm. If the new handles have the same distance, use the old holes. If the distance is different, you will have to drill new holes and fill and repaint the old ones.
Attach the handles with the screws that come with them. Tighten carefully, do not overtighten — the wood may crack. All five drawers are equipped with new handles — functional and beautiful. Opening drawers is now pleasant — the wood is warm and pleasant to the touch, unlike cold plastic.
Step 8: Final Protection (Optional)
Acrylic paint itself creates a durable coating, but for furniture that is used intensively, you can apply a protective layer of clear varnish. Matte or semi-matte water-based acrylic varnish is applied in a thin layer over the paint, providing additional protection against scratches, moisture, and dirt.
Varnish is applied after the paint has completely dried — after 24 hours. One coat of varnish is enough. It dries in 4-6 hours, reaches full strength in a day. After varnishing, the surface can be wiped with a damp cloth, it is not afraid of accidental impacts, scratches from keys, or jewelry.
If high-quality furniture paint was used, varnishing is optional. Many manufacturers produce paints that already contain protective components and do not require additional coating.
Result: dresser 'before and after'
Before: a Soviet-era dresser darkened with time, with plastic handles, scratched, with peeling varnish, looking old and shabby, which you wanted to hide or throw away.
After: an elegant piece of furniture in the neoclassical style, painted in a noble gray color, with carved overlays decorated with gold patina, with handles made of solid oak, worthy of becoming the centerpiece of a bedroom, pleasant to look at, and something to be proud of.
Costs: paint, primer, filler, sandpaper — about 3000 rubles. Carved overlays — 5 pieces at 500 rubles each = 2500 rubles. Handles — 5 sets at 800 rubles each = 4000 rubles. Total materials — 9500 rubles. Work — two weekend days. Result — furniture that would cost 80-100 thousand rubles in a showroom.
Examples of restoring different types of furniture
Dresser — a simple example. Let's look at a few more typical cases to show the versatility of the method.
Old wardrobe: from dullness to elegance
A two-door wardrobe made of solid wood, typical for Soviet apartments. Problem — dark varnish, outdated appearance, bulkiness. Solution — repainting in a light color, adding decoration.
Remove the doors, disassemble the hardware. Remove varnish with stripper and sanding. Fill defects with filler. Prime. Paint in white or cream — three coats for density. On the doors, glue rectangular frames made of flat moldings, creating panels — a classic technique that adds architectural interest. Paint the moldings to match the wardrobe or in contrast — for example, wardrobe cream, moldings white with gold patina.
Replace the hinges with new ones, invisible or decorative. Install new handles — not small knobs, but full-sized 128 mm brackets, so the doors are convenient to open. The wardrobe is transformed — from a dark, bulky monster into a light, elegant piece that fits into a modern interior.
Coffee table: an accent for the living room
An old coffee table on thin legs, the tabletop scratched, the varnish cracked. A small item, but noticeable — it stands in the center of the living room. Restoration will take a day, the result is impressive.
Remove the varnish by sanding. If the tabletop is heavily damaged, you can make a bold move — paint it not solid, but with an effect. For example, base color — dark blue, and then go over it with a dry brush with gold paint, creating wear, an antique effect. Or use a stencil — apply a stencil with a geometric pattern to the tabletop, paint, remove the stencil — you get a decorative tabletop with a pattern.
Paint the legs in contrast — if the tabletop is dark, the legs are light or gold. The legs are thin, turned — ideal for patination. Gold or copper patina in the recesses of the carving emphasizes the shape and adds luxury.
On the lower shelf of the table (if present), you can apply a decorative overlay—a rosette or corner elements—to create an additional accent. The table transforms from inconspicuous into an art object that sets the tone for the entire living room.
Dining chairs: a set instead of trash
Six old dining chairs—carved backs, hard seats, worn-out upholstery, peeling varnish. It's a shame to throw them away—they're solid wood, sturdy. New chairs are expensive. Restoration is the obvious solution.
Disassemble the chairs—remove the seats if they are removable. Strip the old finish, sand. Paint in a uniform color—for example, white for a classic interior, graphite for a modern one. Highlight the carving on the backs with patina.
Seats—a separate story. Remove the old upholstery, replace the foam, cover with new fabric. Choose durable fabric—furniture velvet, burlap, jacquard. Color—neutral beige or contrasting to the frame. Secure the upholstery with a furniture stapler on the underside of the seat.
Six chairs, painted in a uniform color with new upholstery, look like a set, harmonize with each other and with the table. Costs—materials plus fabric—are many times less than buying new chairs.
Bookshelf: modernity from the past
An open bookshelf made of particleboard (chipboard) covered with veneer that has darkened over time. Particleboard is not solid wood, but it can also be restored if the structure is intact.
The problem with particleboard is poor coating adhesion. The solution is an adhesion primer that bonds to any smooth surfaces. Lightly sand all surfaces with sandpaper to create roughness. Remove dust, apply the adhesion primer.
After priming, paint with regular acrylic paint. The shelf is open, visible from all sides, so paint everything—sides, shelves, back panel. Color—any, to match the interior. A white shelf against a colored wall looks graphic and contrasting. A dark shelf in a light interior—an accent.
On the sides of the shelf, you can glue vertical moldings or carved overlays to create decoration. On the top part—a cornice that will turn a simple shelf into an architectural element. The particleboard shelf, seemingly hopeless, has become a stylish interior item.
Vertical moldings or carved overlays can be applied to the sides of the shelving unit to add decorative appeal. A cornice on the top will transform a simple shelving unit into an architectural element. What seemed like a hopeless chipboard shelving unit has become a stylish interior piece.
Restoration mistakes: what to avoid
Furniture restoration is a creative process, but there are typical mistakes that ruin the result. Knowing them makes it easier to avoid.
Insufficient surface preparation
The main mistake of beginners is rushing. Poorly removed old finish, poorly sanded, not primed—and the paint applies unevenly, peels, defects show through. Preparation is 80% of success. Don't skimp on time for sanding, priming—this is the foundation on which everything else rests.
Thick layers of paint
The desire to cover everything in one go leads to drips, long drying times, uneven surfaces. Two to three thin layers are better than one thick one. Each layer must dry completely before applying the next. Patience is the main virtue of a restorer.
Inappropriate materials
Wall paint is not for furniture. Furniture paint should be wear-resistant, elastic, durable. Paper glue is not for wood. Woodworking PVA or special furniture adhesives are what you need. Saving on materials results in poor quality that quickly deteriorates.
Excessive decor
The desire to use all overlays at once leads to overload. Furniture should remain furniture, not a museum exhibit. One or two carved overlays on the front are enough. Patina should highlight the relief, not turn furniture into a gold bar. Moderation is a sign of good taste.
Ignoring the interior style
Furniture restored in a Baroque style with lavish gilding looks absurd in a minimalist apartment. Neoclassical furniture in cold gray tones is alien in warm Provence. Restoration must consider the context—the style, color scheme, overall atmosphere of the interior where the furniture will live.
Rushing into use
The paint feels dry to the touch after a few hours, but reaches full strength in one to two weeks. Placing hot, heavy, or scratching items on a freshly painted tabletop means ruining the fresh finish. Let the furniture settle, mature. Handle it carefully for the first few weeks, and the finish will last for years.
Frequently asked questions about furniture restoration
Can particleboard (chipboard) furniture be restored?
Yes, but with limitations. Particleboard poorly holds fasteners after disassembly, so if the furniture is falling apart, reinforcing the structure is difficult. But if the frame is intact, particleboard can be painted after preparation with an adhesion primer. Laminated particleboard requires mandatory sanding before priming to create roughness, otherwise the coating won't adhere.
How long does restoration take?
Depends on the size of the furniture and the complexity of the work. A small chest of drawers or table—two weekend days, including drying time. A large wardrobe—a week. A set of chairs—three to four days. Most of the time is waiting for materials to dry; the actual work is not as long.
Is it necessary to completely remove the old finish?
Not always. If the old paint is holding firmly, not peeling, it can be left, sanded to a matte finish, primed, and painted over. But if the coating is cracking, blistering, it's better to remove it completely — new paint will replicate the defects of the old. Varnish is usually removed completely, as it is poorly compatible with modern paints.
What color paint to choose?
Universal colors — white, gray, beige — suit most interiors, never go out of style, and easily combine with other furniture. Dark colors — graphite, dark blue, emerald — are expressive, create an accent, but require a light environment, otherwise the interior becomes gloomy. Bright colors — yellow, red, turquoise — are risky and quickly become tiresome. Choose a color you are ready to live with for years.
Are special skills needed for restoration?
Basic skills — the ability to hold a brush, sand, tighten screws — are sufficient. Furniture restoration does not require professional education; the main things are care, patience, and a desire to learn. The first project may not be perfect, but each subsequent one gets better. Start with a simple item — a small table, a chair — gain experience, then tackle something complex.
Solid wood decor — carved overlays, handles, legs, moldings — in the STAVROS company catalog. Over 400 models of various styles, sizes, and shapes. Products made of oak and beech, manufactured on modern equipment with final hand finishing. Possibility of painting in any color from the RAL catalog, patination, oil coating. Delivery throughout Russia. Professional consultations will help select decor for a specific project.
interior decorationSolid wood items — carved overlays, handles, legs, moldings — are available in the STAVROS company catalog. Over 400 models in various styles, sizes, and shapes. Products made from oak and beech, manufactured on modern equipment with final hand finishing. Options include painting in any color from the RAL catalog, patination, and oil coating. Delivery throughout Russia. Professional consultations will help you select decor for your specific project.
How to care for restored furniture?
Acrylic coating is low-maintenance — wipe with a damp cloth, use mild detergents without abrasives. Do not place hot items without coasters, do not cut on the surface with a knife, do not strike with hard objects. Once a year, you can apply furniture wax or polish, which refreshes the coating, adds shine, and creates additional protection. With careful handling, restored furniture lasts for decades.
Is it worth restoring antique furniture yourself?
Antique furniture representing historical or artistic value requires professional restoration. Improper intervention can reduce its value, spoil the patina of time, and destroy the original finish. If the furniture is antique — consult a specialist. Soviet furniture from the 1960s-1980s is not antique; it can be restored independently without worry.
Can upholstered furniture be restored?
The frame of upholstered furniture is restored in the same way as case furniture — removing the finish, repair, painting. The complexity lies in the upholstery — replacing fabric, foam, springs requires special skills and tools. Upholstery is best entrusted to professional upholsterers, while the frame can be restored independently. Or choose furniture with minimal upholstery — wooden armchairs with cushions, benches, ottomans.
WhichSolid Wood Itemschoose for a first project?
For a first restoration experience, choose simple elements — flat rosette overlays, simple button handles, straight moldings. Complex three-dimensional overlays, carved handles, curved moldings require skill in gluing and fitting. As your experience grows, complicate the decor. The main thing is that the style of the decor matches the style of the furniture. Classic overlays — for classic furniture, geometric — for modern.
Conclusion: Furniture as a Canvas for Creativity
Furniture restoration is not repair in the usual sense; it is creativity, where an old chest of drawers turns into a canvas, paint into a brush, and carved overlays into brushstrokes that create a picture.how to fix furniture, as anyone who has tried it at least once knows — the process is addictive, you want to restore everything that comes to hand, search for old furniture at flea markets, see potential in it that others don't notice.
The economic benefit is obvious — restored furniture costs several times less than new furniture with comparable or even better quality. The environmental aspect is important — less waste in landfills, fewer forests cut down. The emotional effect is invaluable — pride in work done with your own hands, in creating something unique that no one else has.
Old solid wood furniture is a resource that is a sin not to use. The Soviet furniture industry made sturdy, solid things that have survived eras, fashions, styles. Throwing away such furniture means losing quality that is almost not produced today. Restoring it — giving it a second life, adapting it to modern tastes while preserving the strength and reliability of solid wood.
Furniture decorSolid wood decor is the key element of transformation. Without it, repainted furniture remains simply repainted. With it — it turns into a work of art. Carved overlays, handles, moldings add volume, complexity, status, turning the simple into the refined, the mass-produced into the unique.
Company STAVROS has been creatingSolid Wood ItemsWood decor — decorative elements for furniture and interiors that help craftsmen, designers, and simply restoration enthusiasts bring ideas to life. Over 400 models of overlays, rosettes, moldings, cornices, baseboards, handles, legs, balusters in different styles — classic, baroque, modern, contemporary geometry — allow you to select decor for any project. Manufacturing from selected oak and beech wood on high-precision equipment with final hand finishing ensures quality unattainable by mass production. Each element is hand-sanded, checked for compliance with standards, and packaged to reach the customer in perfect condition.
The possibility of custom painting elements in any color from the RAL catalog, patination with gold, silver, copper, graphite, coating with oil or wax allows you to get decor that fully matches your project. No need to paint overlays yourself, risking damage — STAVROS specialists will do it professionally, and you will receive a ready-made element that only needs to be glued on.
Professional consultations help select suitable decor. Don't know which overlays are best for your chest of drawers? Unsure about handle size? Not sure which style of moldings will suit? Contact STAVROS managers — they ask the right questions, clarify project details, offer options, and show examples of completed work. The experience of hundreds of successful projects allows them to give recommendations that work.
The stock program ensures quick shipment of popular models — orders are processed on the day of receipt, shipped the next day, and reach you within a week depending on the region. Custom manufacturing of elements in non-standard sizes, with exclusive carving, in custom painting takes 2-4 weeks, but the result is worth the wait — you get unique decor created specifically for your furniture.
Delivery throughout Russia by transport companies, courier services, Russian Post. Packaging is reliable — elements are protected from damage during transportation, arriving intact even to the most remote regions. Quality guarantee — if an element arrives with a defect, STAVROS will replace it free of charge.
Choosing STAVROS means choosing the quality of natural wood, the skill of carvers, the possibility of creating unique furniture with your own hands, saving money without sacrificing beauty, confidence that restored furniture will last for decades, pleasing the eye and warming the soul. Furniture restoration using STAVROS decor is an art accessible to everyone, transforming the old into the new, the simple into the refined, the mass-produced into the unique. Start your first project, and you will be surprised how easy it is to create beauty with your own hands.


