Article Contents:
- Anatomy of a baluster: from concept to realization
- Choosing wood species: between beauty and practicality
- Tools for lathe work: a craftsman's arsenal
- Flat balusters: graphics in wood
- Turned balusters: symmetry of rotation
- Rough turning: from square to cylinder
- Profile shaping: geometry and smoothness
- Finish machining and sanding on the lathe
- Using a CNC machine: industrial precision in a home workshop
- Making a round handrail: the finishing touch
- Attaching balusters to steps and handrails
- Final finishing: protection and beauty
- Mistakes to avoid
- Combined designs: wood and metal
- Calculating the Number of Balusters and Installation Spacing
- Alternative baluster forms: from classic to modern
- Features of installing balusters on different types of stairs
- Restoration and replacement of balusters: giving a staircase a second life
- Economics of DIY manufacturing
- Safety when working on a lathe
- Frequently Asked Questions
- Conclusion: craftsmanship as a path

Wooden balusters are not just a staircase railing element; they are vertical poetry of space embodied in solid wood. Making them by hand may seem like a task for the chosen few, but with the right tools, understanding of the technology, and respect for the material, this process becomes a creative adventure. Combined withround handrailhandcrafted work, your staircase will gain completeness, become an organic part of the interior, and last for decades.


Anatomy of a baluster: from concept to realization
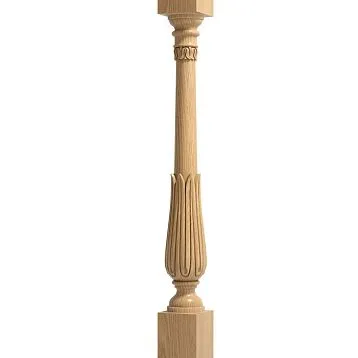
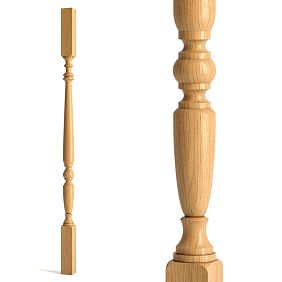
Before picking up a tool, it's important to understand the internal logic of this element. A baluster is a vertical support that holdsa round wooden handrailand forms the visual rhythm of the entire structure. Each baluster consists of three parts: the base (plinth), the central body, and the top part (handrail mounting platform). The base provides attachment to the step or stringer, the central body is responsible for aesthetics, and the top part serves to secure the handrail.
When designing a baluster, you need to consider the height of the future railing. The standard height from the step surface to the top of the handrail is 900 millimeters—an ergonomically verified distance comfortable for an average-height adult. From this value, you need to subtract the thickness of the handrail (usually 40-60 millimeters) to get the net height of the baluster. If you plan to use a handrail mounting strip, its thickness should also be taken into account.


Choosing wood species: between beauty and practicality
Wood is a living material, and each species has its own character. Not all types of wood are suitable forManufacturing balusters from woodThe optimal choice is hard deciduous species: oak, beech, ash. Oak is famous for its strength and expressive texture, it is resistant to moisture and mechanical damage, and over time acquires a noble dark shade. Beech has a uniform structure, is easy to work with, sands and stains beautifully, but requires thorough protection from moisture. Ash has flexibility and viscosity, making it ideal for balusters of complex shapes; its light wood with contrasting annual rings creates an impressive visual play.
Coniferous species, such as pine or larch, are also used forbalusters for staircase from wood by hand, especially when the budget is limited. Pine is affordable, easy to work with, but less durable and prone to chipping. Larch has natural resistance to decay due to its high resin content, but its processing requires sharper tools.
Wood moisture content is a critical parameter. Blanks must be dried to a moisture content of 8-12 percent. Using raw wood will inevitably lead to warping, cracking, and loss of geometry after installation. If you cannot kiln-dry the wood, purchase pre-dried material from trusted suppliers.
Our factory also produces:


Tools for lathe work: the craftsman's arsenal
how to make balusters from wood by hand requires a lathe — this is the foundation of the entire process. For a home workshop, a benchtop wood lathe with a distance between centers of at least 900 millimeters and the ability to mount workpieces up to 200 millimeters in diameter is suitable. The lathe must have adjustable spindle speed, as different stages of processing require different RPMs: from 500 to 2500 RPM.
A set of lathe chisels is the second most important element. You will need: a roughing gouge (semi-circular chisel) for roughing and removing edges from a square blank, a skew chisel (flat chisel) for finishing and forming cylindrical sections, a parting tool for trimming ends and creating clean transitions, and shaped cutters of various profiles for turning decorative elements. Quality chisels should be made of tool steel, have proper sharpening, and comfortable handles.
In addition to lathe equipment, you will need: a jigsaw for cutting flat balusters, a milling machine or handheld router for creating complex profiles and grooves, a sander or a set of sandpaper of different grits (from 80 to 320 grit), a drill for drilling mounting holes, calipers and a ruler for size control, templates and patterns for transferring the design onto the blank.
Get Consultation
Flat balusters: graphics in wood
If you don't have a lathe, you can start by making flat balusters. This is simpler, faster, and does not require specific lathe skills.Wooden baluster with your own hands of the flat type is created from a furniture panel or a wide board 30-50 millimeters thick.
The first step is developing a sketch. Draw the desired shape of the baluster on paper at full scale, considering proportions, symmetry, and aesthetics. Transfer the drawing onto the wooden blank using carbon paper or glue the sketch directly onto the surface. Ensure the direction of the wood grain runs along the long axis of the baluster — this will ensure maximum strength.
Cutting the contour is done with a jigsaw using a fine-toothed wood blade. Work slowly, especially on complex curves, to avoid chipping and deviations from the line. After cutting, proceed to sanding: first, use coarse sandpaper (80-100 grit) to remove burrs and smooth out unevenness, then medium (150-180) and finishing (220-320) to achieve a smooth surface. Pay special attention to the edges — round off sharp corners, create smooth transitions.
Flat balusters can be further decorated with milled ornaments, decorative cutouts, or inlay. The main thing is to maintain uniformity: all balusters must be identical in shape and size, otherwise the staircase will look sloppy.
Turned balusters: the symmetry of rotation
A turned baluster is a classic, proven over centuries. The process of creating it requires skill, but the result exceeds all expectations. Start by preparing the blank. The ideal option is a square-section block 60x60 or 70x70 millimeters, with a length 50-100 millimeters greater than the final height of the baluster (allowance for mounting in the lathe centers and subsequent end trimming).
Find the centers on the ends of the blank: draw diagonals from the corners, their intersection point will be the center. Mark the centers with a drill or awl to a depth of 3-5 millimeters — this will ensure secure fixation in the lathe centers. If your lathe has a chuck, you can additionally drill a center hole 10-12 millimeters in diameter and 20-30 millimeters deep on one end for more rigid fixation.
Mount the blank on the lathe, clamping it between the headstock center (or chuck) and the tailstock. Check the security of the mounting: the blank should not wobble or slip. Adjust the tool rest to a distance of 3-5 millimeters from the blank, at the level of the rotation center or slightly above.
Rough turning: from square to cylinder
Turn on the lathe at low speed (500-800 RPM) and begin rough turning. Take a roughing gouge (semi-circular chisel) and, holding it with both hands braced against the tool rest, start removing the corners from the rotating blank. Bring the chisel at an angle of approximately 45 degrees to the axis of rotation, with smooth movements from the middle to the edges. Don't rush, don't press too hard — the wood will come off as shavings on its own, your task is only to guide the tool.
The goal of rough turning is to turn the square block into a smooth cylinder of the required diameter. Periodically stop the lathe and check the diameter with calipers at several points: the cylinder should be uniform along its entire length. Once the blank has acquired a cylindrical shape, you can proceed to marking and forming decorative elements.
Forming the profile: geometry and smoothness
Now the most interesting part begins — creating the baluster profile. Mark the main nodes directly on the rotating blank with a pencil: mark the location of the base, neck, body, and handrail section. Use a pre-prepared drawing or template to ensure all wooden balusters DIY turn out identical.
Change the chisel to a skew chisel (flat chisel) and begin forming the profile. To create cylindrical sections, guide the skew chisel parallel to the axis of rotation, removing thin layers of wood until the desired diameter is reached. To form convex elements (beads, balls), use a roughing gouge, working from the edges towards the center of the convexity. Concave sections (coves, necks) are turned with a narrow chisel, which is carefully plunged into the wood, creating a smooth indentation.
A parting tool is indispensable for creating clean edges, trimming ends, and forming sharp transitions between elements. Hold it at a 45-60 degree angle to the axis of rotation, touching the wood only with the middle of the cutting edge — this will give a clean cut without chipping. Constantly control the dimensions: use calipers or special templates to ensure all balusters are identical.
Finishing and sanding on the lathe
After the baluster profile is fully formed, proceed to finishing. Increase the lathe speed to 1500-2000 RPM. Go over the entire surface with a roughing gouge or parting tool, removing the finest shavings — this will remove all minor irregularities and prepare the surface for sanding.
Sanding on the rotating lathe is the final stage of turning. Use sandpaper folded in several layers or wrapped around a wooden block. Start with 150 grit, then 220 and 320. Hold the sandpaper with both hands, pressing it against the rotating baluster with moderate force, constantly moving along the axis. Don't linger too long in one spot — you can wear down the wood locally and distort the geometry.
Pay special attention to sanding concave sections and complex transitions. For narrow coves, use strips of sandpaper 10-15 millimeters wide, wrapping them around the part and working like a saw. Don't rush: quality sanding is the key to the beautiful appearance of the finished wooden baluster made with your own hands from wood.
Using a CNC Machine: Industrial Precision in a Home Workshop
If you plan to make a large batch of balusters or want to create items of complex shape, it is worth considering the possibility of usinga machine for making wooden balusterswith numerical control (CNC). Modern CNC milling and turning machines allow you to create balusters of any complexity with absolute precision and repeatability.
The principle of operation of such a machine is as follows: the workpiece is clamped between rotating centers, as on a conventional lathe, and a milling head, controlled by a computer program, moves in three coordinates (along, across, and vertically), turning the specified profile. The operator only needs to load the workpiece, start the program, and wait for the processing to finish.
Machine for wooden balustersCNC opens up incredible possibilities: twisted columns, multi-start spirals, complex combined profiles, three-dimensional carving — all this becomes available. Moreover, the machine guarantees the identity of all balusters in a batch — the dimensional deviation does not exceed tenths of a millimeter. Of course, such equipment is expensive and requires skills in working with CAD/CAM programs, but for serial production or professional use, it is the optimal option.
Making a Round Handrail: The Final Touch
Balusters without a handrail are like verses without rhyme.Round Handrailis not just a functional element to hold onto when ascending, it is tactile contact with the staircase, a continuation of its lines, ergonomic perfection. Making a handrail yourself is possible but requires certain equipment and skills.
A round handrail is turned from a straight-grained blank on a lathe similarly to balusters, but here what matters is not decorativeness, but geometric accuracy and surface quality. The standard diameter of a round handrail for stairs is 50 millimeters: this is the optimal cross-section that comfortably fits an average-sized adult hand. The length of the handrail is determined by the configuration of the staircase; for a straight flight, it is the length of the span plus overhangs on the initial and final posts.
The manufacturing process: take a block with a cross-section of 60x60 millimeters, mount it on a lathe, turn it down to a diameter of 50 millimeters, and carefully sand the surface to perfect smoothness. If you need a handrail longer than your machine allows, use splicing technology: individual sections are joined with a miter joint, glued, and reinforced with a wooden dowel. The finisheda round wooden handrailhandrail is coated with a protective compound: oil, wax, or varnish.
Attaching Balusters to Steps and Handrail
Proper attachment is a guarantee of safety and durability of the structure. There are several methods for mounting balusters. The first and most reliable is on dowels (wooden pins). Holes with a diameter of 8-10 millimeters and a depth of 30-40 millimeters are drilled in the lower end of the baluster and in the step. A wooden dowel is glued into the baluster, which is then inserted into the hole in the step with glue pre-applied. This method provides a strong, invisible connection.
The second method is on threaded studs. A threaded stud with a diameter of 6-8 millimeters and a length of 80-100 millimeters is screwed into the baluster from below, half of which goes into the baluster, half into the step. A corresponding hole is drilled in the step, the baluster is installed in place and tightened from below with a nut through a pre-drilled hidden hole. The method is more labor-intensive but allows for the baluster to be dismantled if necessary.
Attaching balusters to around wooden handrailis also performed in several ways. The classic option is through a handrail plate: this is a flat board that is attached on top to the ends of the balusters, and the handrail is then fixed to it. The plate can be attached with screws followed by filling the holes with wooden plugs or with hidden metal ties. The handrail is fixed to the plate with glue and dowels or with screws from below through the plate.
An alternative method is direct attachment of balusters to the handrail. In this case, a groove is milled in the lower part of the handrail, into which the upper ends of the balusters fit. The balusters are fixed in the groove with glue and additionally reinforced with dowels or screws screwed in at an angle through the side wall of the handrail into the body of the baluster. This method is more aesthetically pleasing but technically more complex.
Final Finishing: Protection and Beauty
Wood is a living material, and without a protective coating, it will quickly lose its appearance, darken, and begin to absorb dirt and moisture. The final finishing of balusters and handrail is a mandatory step. Before applying the coating, make sure the surface is perfectly sanded, cleaned of dust, and degreased.
The first finishing option is clear varnish. It emphasizes the natural wood grain, creates a protective film resistant to abrasion and moisture. Use alkyd, polyurethane, or acrylic varnish for interior work. Apply thin coats with a brush or spray gun, sand each dried coat with fine sandpaper (320-400 grit) to remove raised fibers and ensure adhesion of the next coat. The optimal number of coats is 3-4.
The second option is oil or oil-wax. These compounds do not create a film on the surface but penetrate the wood structure, emphasizing its beauty, giving it a silky feel and pleasant tactility. Oil is applied generously, rubbed into the wood with a cloth pad, and excess is removed after 15-20 minutes. After drying (usually 24 hours), the surface is polished with a soft cloth to a light shine. Oil requires periodic renewal (every 1-2 years) but allows for local repair without complete re-sanding.
The third option is tinting followed by varnish coating. If you want to change the color of the wood, emphasize the grain, or even out the shade of different boards, use stain or tinting oil. Apply stain with a brush or pad along the grain, achieving an even tone. After complete drying, cover the surface with clear varnish for protection.
Mistakes to avoid
Even experienced craftsmen make mistakes, let alone beginners. Here is a list of the most common mistakes whenmaking wooden balusters by hand. First — using wet wood. Balusters made from under-dried wood will inevitably warp, develop cracks, and connections will weaken. Always check wood moisture with a moisture meter or buy already dried material.
Second — non-compliance with dimensions and proportions. If balusters turn out to be of different heights or diameters, the staircase will look amateurish. Use templates, constantly control dimensions during work. Third — poor sanding. A rough surface is not only unpleasant to the touch but also poorly accepts the final coating and gets dirty quickly. Don't skimp on time for sanding, bring the surface to perfect smoothness.
Fourth — weak attachment. Balusters bear serious loads, especially if an adult holds onto the handrail while ascending. Use reliable attachment methods, don't skimp on glue and fasteners. Fifth — lack of protective coating or its poor application. Unprotected wood quickly loses its appearance; varnish applied in a thick layer forms drips and bubbles. Apply the coating in thin layers, follow the technology.
Combined Structures: Wood and Metal
Modern design often involves combining different materials.Wooden staircase balusters DIYwhich are made from solid wood, may have a metal frame or metal decorative inserts. The combination of wood and metal creates an interesting visual contrast, allows for a lighter structure, and gives it a modern look.
One popular option is wooden balusters on a metal handrail base. A metal strip (usually made of stainless steel or painted metal) is attached on top of the balusters, and a wooden handrail is fixed to it.Round HandrailThis solution is technologically advanced, durable, and aesthetically pleasing.
Another option is metal balusters (tubes, rods, forged elements) with a wooden handrail. In this case, the metal posts are attached to the steps by welding or threaded connections, and a wooden handrail is mounted on top of them. Here, the wood serves as a tactile element—metal is not as pleasant to hold, especially in cold weather.
Calculating the number of balusters and installation spacing
Before starting production, it is necessary to accurately calculate how many balusters will be needed. The spacing of balusters is determined by safety requirements and aesthetic considerations. Building codes require that the distance between adjacent balusters (in the clear, i.e., excluding their thickness) does not exceed 150 millimeters—this prevents a child from falling between the posts.
In practice, two balusters are usually installed on each step, placing them at the edges. This results in a spacing of approximately 100-120 millimeters for a step width of 250-300 millimeters, which is safe and visually harmonious. For wide steps, three balusters can be installed: one in the center and two at the edges. Calculate the total number: multiply the number of steps by the number of balusters per step, and add balusters for landings and starting posts.Posts for staircase.
Alternative Baluster Forms: From Classic to Modern
We have examined in detail the production of traditional turned and flat balusters, but the world of forms is much broader. Modern design offers many variations. Twisted balusters are a real challenge for a craftsman. They are created on a lathe using special devices for spiral turning or on a milling machine with a rotary device. A spiral baluster looks luxurious, dynamic, and brings a sense of movement to the interior.
Carved balusters are custom work requiring artistic talent and patience. They can be decorated with floral ornaments, geometric patterns, or sculptural elements. Carving is done manually with a set of chisels or using an engraver after preliminary turning of the workpiece. Each such baluster is unique, turning the staircase into a work of art.
Flat balusters also have many variations: from strict rectangular to openwork, cut with a jigsaw with many through holes. The latter are particularly impressive but require careful manufacturing and installation, as they have less strength. Combined balusters, combining turned and flat elements, carved inserts, and smooth sections, allow for the creation of a truly original railing.
Features of Installing Balusters on Different Types of Stairs
wooden balusters DIYare installed differently depending on the staircase construction. On a stringer staircase, balusters are attached either directly to the stringer (if it is wide enough) or to the steps. In the first case, holes for dowels or studs are drilled in the stringer with spacing corresponding to the baluster placement. In the second case, the attachment is made to the tread (horizontal part of the step) similarly to a stringer staircase.
On spiral and winder stairs, installing balusters is more complicated due to the variable angle of inclination and fan-shaped arrangement of steps. Here, it is important to correctly calculate the angle for trimming the lower and upper ends of each baluster so that they stand strictly vertical and the handrail smoothly follows the turn. Usually, a cardboard or plywood template is made, according to which the balusters are marked and trimmed.
On stairs with turning landings, balusters are installed along the perimeter of the landing with the same spacing as on the flights, ensuring continuity of the railing. At the corners of landings, more massive support posts are usually installed,Posts for staircasewhich serve as nodal points and places for joining handrails.
Restoration and Replacement of Balusters: Giving a Staircase a Second Life
Sometimes, there is no need to build a new staircase—it is enough to update the balusters to completely transform the space. Restoration of old balusters begins with an assessment of their condition. If the wood is not affected by rot, has no through cracks, and retains its strength, the balusters can be restored. The old coating is removed mechanically (with a scraper, sandpaper) or chemically (with paint stripper). After cleaning, the balusters are sanded, minor defects are filled with putty if necessary, and then coated with a new protective compound.
If the balusters are seriously damaged or aesthetically outdated, they are replaced with new ones.A wooden baluster made by hand from woodcan be made exactly according to the pattern of the old one (if it is necessary to preserve the historical appearance) or in a new style (if the goal is to modernize the interior). Demolition of old balusters is performed carefully so as not to damage the steps and handrail. If the balusters were glued and doweled, they are knocked out with light hammer blows through a wooden spacer. If on studs—they are unscrewed from below, gaining access through a hole in the step.
Economics of Self-Manufacturing
Is it even worth taking onwood baluster manufacturingwith your own hands? Let's calculate. Ready-made balusters made of solid oak or beech cost from 300 to 1500 rubles per piece, depending on complexity. For a staircase with 15 steps (30 balusters), this is 9000-45000 rubles just for the balusters. Add the cost of the handrail (from 2000 rubles per linear meter), posts (from 3000 rubles per piece)—and the total amount becomes substantial.
Self-manufacturing allows saving 50-70 percent of this amount. You will need to buy wood (an oak block 60x60 mm costs about 200-300 rubles per linear meter), consumables (glue, sandpaper, coating), but the main costs are time and labor. If you already have a lathe and a basic set of tools, the cost of one baluster will not exceed 100-150 rubles. However, you need to realistically assess your skills and capabilities: manufacturing 30 balusters for a beginner may take several weeks.
Safety When Working on a Lathe
A lathe is potentially dangerous equipment, and neglecting safety rules can lead to serious injuries. Always work in safety glasses or a face shield—wood chips and small fragments fly at high speed and can damage your eyes. Do not wear loose clothing, ties, or jewelry—they can get caught on the rotating workpiece and pull you into the machine. Tie long hair under a head covering.
Before turning on the lathe, make sure the workpiece is securely fastened, the tool rest is adjusted to the required distance and fixed. Never adjust the tool rest or measure the workpiece while the lathe is running—always stop the rotation. Hold the chisel with both hands, resting it on the tool rest—this provides control and prevents the tool from being pulled out. Do not apply excessive force—the wood should be removed easily if the chisel is sharp and properly positioned.
Regularly sharpen the chisels—a dull tool is dangerous, it requires more force, slips, and tears the wood. Work in a well-ventilated area or use a dust extraction system—wood dust is harmful to the respiratory tract. Do not get distracted while working, maintain concentration.
Frequently Asked Questions
Is it possible to make balusters without a lathe? Yes, you can make flat balusters using only an electric jigsaw, router, and sander. Such balusters are not inferior in strength and beauty to turned ones, although they have a different visual character. For turned balusters, a lathe is mandatory.
What type of wood is best for balusters? The optimal choice is oak, beech, or ash. Oak is the strongest and most durable, beech is easier to work with, ash has a beautiful texture. For budget options, pine or larch are suitable.
How long does it take to make one baluster? An experienced craftsman takes 30-60 minutes for a medium-complexity turned baluster. A beginner may take 2-3 hours for their first balusters. Flat balusters are made faster — 15-30 minutes per piece.
Is it necessary to treat balusters with a protective compound? Absolutely. Unprotected wood quickly darkens, absorbs dirt and moisture, and loses strength. Minimum protection is 2-3 coats of varnish or oil impregnation.
What diameter should a round handrail be? The standard ergonomic diameter is 50 millimeters. For children, a handrail with a diameter of 40 millimeters can be made; for people with large hands — 60 millimeters.
At what distance should balusters be installed? The clear distance between balusters (minus their thickness) should not exceed 150 millimeters according to safety requirements. Usually, 2 balusters are installed per step.
Can laminated timber be used for balusters? Yes, laminated timber (furniture board) is even preferable to solid wood for some tasks — it is more stable, does not warp, and does not crack. It is important that the gluing is of high quality and the grain direction is correct.
How to achieve uniformity of all balusters? Use templates and constantly check dimensions with a caliper during processing. You can make a reference baluster and compare with it. Professionals use copying attachments for lathes.
What is the difference between a baluster and a post? A baluster is a thin vertical post that supports the handrail between support posts. A post is a more massive support element installed at the beginning and end of a flight, at turns, and bears the main load. Balusters are usually decorative, posts are structural.
Is a sub-rail needed? Not always. A sub-rail simplifies handrail installation and provides additional fastening area, making the structure stiffer. But it is possible to do without it by mortising balusters directly into the handrail groove — this is more aesthetically pleasing but technically more difficult.
Conclusion: Craftsmanship as a Path
how to make balusters from wood by hand— is more than a technical process. It is a dialogue with the material, a test of one's own capabilities, the embodiment of an idea into a tangible form. Each baluster that comes from under your chisel carries a particle of your labor, attention, and character. A staircase assembled from handcrafted elements possesses a special energy — it is not faceless, it is yours.
Of course, self-manufacturing requires time, tools, and skills. The first balusters may not be perfect, but with each subsequent one you will improve. If the task seems too difficult, or there is no opportunity to acquire equipment, turn to professionals. The company STAVROS has specialized in the production ofstaircase componentsfor over twenty years. The catalog featuresbalusters for staircases, posts, round handrailsand all necessary elements made of solid oak, beech, and ash. STAVROS products are distinguished by impeccable quality, precise geometry, and noble aesthetics — the result of the work of highly qualified craftsmen on modern European equipment. By choosing STAVROS products, you get not just components, but a ready-made solution for creating the staircase of your dreams — reliable, beautiful, and durable.