


Article Contents:
- Wooden Element Shaping
- Decorative Patterns: Creating Visual Waves
- Corner Patterns as an Accent Tool
- Decorative Wooden Molding — Three-Dimensional Finishing
- Wooden Batten by the Meter — Frames, Contours, Panels
- Oak Trim — Pointed Finishing
- Forming Complex Multi-Level Solutions
- Final Sculptural Wall Quality
- Technology for Creating Sculptural Walls
- Stylistic Application of Decorative Solutions
- Q&A: Practical Application of Decorative Solutions
- Conclusion: STAVROS System for Creating Sculptural Interiors
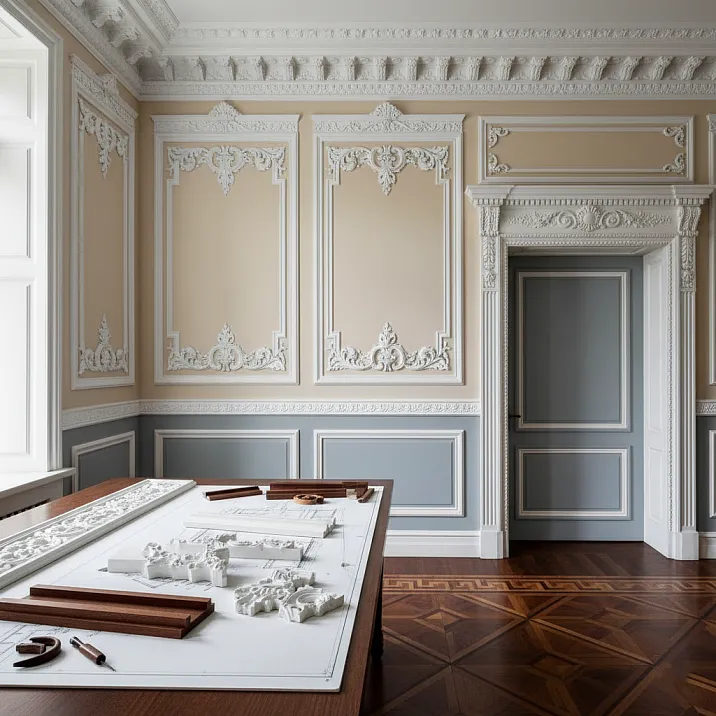
The wall ceases to be a flat surface when lines of varying cross-section — convex, concave, stepped, wavy — are applied to it.Decorative wooden moldings, wooden veneer with a decorative profile, Wooden corner veneer, Decorative wooden profile, wooden molding by the meter, Oak trimandwooden boards and beams— these are tools for transforming a two-dimensional surface into a three-dimensional composition, where light creates shadows and shadows form relief.


Wooden Element Shaping
What is shaping in the context of interior decoration? It is the material's ability to form volume through changes in cross-section, creating transitions from convex to flat, from thick to thin, from smooth to relief.Wooden moldings— possess natural plasticity, which manifests in two aspects: physical (the ability of wood to take shape during processing) and visual (the ability of profiled surfaces to interact with light).
The physical plasticity of wood is determined by its structure. Hardwoods — oak, beech, ash — are difficult to cut but retain sharp edges and fine profile details. Softwoods — linden, alder, pine — are easier to process, allowing for deep relief and complex curves, but require careful sanding due to their tendency to chip. The choice of wood species forwooden decorative moldingsdepends on the depth of relief and the scale of detail.
Visual plasticity is manifested in the interaction of the profile with light. The convex part of the molding (boss, semicircle, roundel) catches light, creating a bright stripe. The concave part (groove, cove, bevel) is immersed in shadow, forming a dark line. The alternation of light and shadow creates a sense of volume even with a shallow relief — a profile 15 millimeters thick with properly arranged cross-section geometry is perceived as a substantial element.
Plasticity is enhanced by using contrasting profile directions. A vertical molding with convexity on the right creates a shadow on the left, giving the impression of volume directed to the right. If a molding with mirrored geometry (convexity on the left) is placed next to it, a visual dialogue between the two elements creates an illusion of depth. This technique is actively used in classical interiors for pilasters, panel framing, and framed compositions.
Decorative wooden profilemay have a simple cross-section (one convexity or one concavity) or a complex multi-step (alternating several elements). A complex profile creates rich play of light and shadow, suitable for grand rooms with high ceilings. A simple profile works in intimate spaces where restraint and clarity of lines are important.


Decorative Patterns: Creating Visual Waves
wooden veneer with a decorative profile— this is a plank with a profiled surface that creates a wavy pattern when installed on a flat wall or furniture surface. Unlike a flat molding, which simply marks a boundary, a decorative molding creates a sculptural accent, transforming a technical function (covering joints) into a decorative one.
Types of decorative moldings differ by profile character. A beveled molding has a 45-degree angled edge, creating a transition from plane to edge. This is the simplest type of decorative profile, adding graphic effect without excessive ornamentation. A rounded molding (convexity) creates a soft transition, typical for classical interiors. A grooved molding (longitudinal groove) forms a shadow line, enhancing visual separation of sections.
How does a decorative molding form visual waves? Imagine a wall divided into rectangular sections by vertical and horizontal moldings. If the moldings are flat, you get a strict geometric grid. If the moldings are decorative, each grid line gains volume — a rhythm of convexities and concavities appears, creating a wavy movement across the wall surface.
The wave is perceived not as a literal line bend, but as a sequence of light accents. A vertical decorative molding with convexity, installed every 80 centimeters, creates a rhythm of light bands, perceived as a vertical wave, even if the moldings themselves are strictly straight. Horizontal decorative moldings at 30, 90, and 210 centimeters form horizontal waves intersecting with vertical ones and creating a complex spatial grid.
Decorative wooden moldingInstalling decorative moldings requires precise alignment at corners. Two moldings converging at a right angle are beveled at 45 degrees ("on the nose") so that the profile smoothly transitions from vertical to horizontal. Any deviation from the angle results in misalignment of the relief and destruction of visual continuity. Professional installation
Professional installationwooden patterned triminvolves using a laser-guided circular saw and pre-fitting elements "dry" before final fixation.
Our factory also produces:


Decorative moldings as accenting tools
Wooden corner veneeris a G-shaped or more complex profile designed for decorating internal and external corners. Unlike flat moldings, which are installed on a single plane, corner moldings cover two perpendicular surfaces, creating a spatial element.
Internal corners (where two walls or a wall meets the ceiling) are traditionally decorated with concave-profile moldings — a molding called a "gadroon". A gadroon creates a smooth transition between planes, visually softening the sharp right angle. The size of a gadroon varies from minimalist 20×20 millimeters to monumental 150×150 millimeters depending on room height and interior style.
External corners (projecting edge between two walls) are decorated with convex-profile moldings — corner moldings or protective corner pieces. The function of this element is dual: protection of the corner from mechanical damage and decorative accentuation of the vertical.wooden corner slaton external corners often contrasts with the main wall finish — dark oak on a light wall creates a clear vertical axis that structures the space.
How does corner molding work as an accenting tool? It marks the transition between planes, transforming a geometric boundary into an architectural element. A simple internal corner between wall and ceiling, decorated with a gadroon featuring a relief ornament, becomes a decorative cornice that draws the eye and completes the wall composition. An external corner framed by a pilaster (vertical molding with base and capital) becomes an architectural order, lending the room a monumental quality.
Corner moldings can be used not only on real corners but also to create false architectural elements. Two vertical corner moldings installed on a flat wall 40–60 centimeters apart create an illusion of a projecting pilaster or column. A horizontal corner molding running along the perimeter of the room at 90 centimeters height imitates an architectural plinth, dividing the wall into tiers.
Installing corner moldings requires accounting for the actual geometry of the corners. Theoretically, walls meet at 90 degrees, but in practice, deviations amount to 1–3 degrees, which at a molding length of 3 meters results in a discrepancy of up to 5–8 millimeters at the top. A professional approach involves measuring the actual angle with a protractor and trimming the molding to the actual, not theoretical, angle.
Get Consultation
Decorative wooden moldings — dimensional decoration
Decorative wooden moldingsare profiled strips of complex cross-section, designed to create dimensional compositions on walls, ceilings, and furniture. Unlike moldings, which primarily cover joints, moldings are independent decorative elements that form the surface's plasticity.
Classification of moldings by profile includes several basic types. A convex molding has a semicircular convex cross-section, creating a soft light reflection. A fluted molding has longitudinal grooves (flutes), characteristic of classical columns. A multi-step molding combines several convexities and concavities, creating a complex play of light and shadow. A carved molding has an ornamental surface with plant or geometric motifs.
Dimensional decoration usingwooden decorative moldingsis built on the principle of layering. On the base plane of the wall, the first layer of moldings is installed, forming a large structure — rectangular or square panels. Within each panel, a second layer of moldings with smaller cross-sections is mounted, creating additional divisions. The center of the panel may be filled with carved decoration, a contrasting wood veneer, or left empty, creating a frame around the painted surface.
Wall moldings are used in several functions. Horizontal moldings at 90–120 centimeters from the floor create a visual boundary between the plinth and main wall section — a technique characteristic of classical interiors. Vertical moldings divide long walls into proportional sections, preventing monotony. Diagonal moldings (rare but effective) create dynamic compositions characteristic of avant-garde interiors.
Ceiling moldings (cornices) complete the upper part of the wall, creating a transition to the ceiling.Wooden ceiling moldingmay have a simple triangular profile (gadroon) or a complex multi-step section with carved elements. A wide cornice 150–200 millimeters high visually lowers the room's height, creating a more intimate space. A narrow cornice 40–60 millimeters high emphasizes height without overloading the composition.
Furniture moldings are used to decorate cabinet, chest, and buffet facades.Wooden molding for furnitureis mounted on cabinet doors, creating a framed composition, or on the upper part of the cabinet (pediment), forming an architectural finish. Carved moldings with plant motifs are characteristic of classical furniture, while geometric profiles are typical of modern designs.
Wooden molding by the meter — frames, outlines, panels
wooden molding by the meteris a profiled strip used to create frames around paintings, mirrors, panels, as well as to decorate the outlines of wall panels and decorative inserts. The term "by the meter" indicates the method of sale — by linear meters — allowing you to order the exact amount of material for a specific project without needing to purchase pre-made frames of standard sizes.
The profile of the molding determines its visual impact. A flat molding with a bevel creates a minimalist frame suitable for modern interiors and graphics. A convex molding with a rounded cross-section forms a volumetric frame characteristic of classical painting and large mirrors. A concave molding (reverse bevel) creates a recess into which the image "sinks," enhancing the sense of depth.
The width of the molding varies from minimalist 20 millimeters to monumental 150 millimeters. The choice of width depends on the size of the framed object and interior context. A small watercolor painting 20×30 centimeters requires a thin frame 30–40 millimeters wide to avoid overpowering the image. A large mirror 150×200 centimeters requires a wide frame 80–120 millimeters wide to create sufficient visual weight.
Buy wooden molding by the meterand make the frame yourself — a process requiring precision. Four pieces of molding are beveled at 45 degrees using a miter box or circular saw. The ends are glued with carpenter's glue and clamped with corner clamps until fully dry. The back of the frame is reinforced with metal corner brackets or wooden dowels to prevent corner misalignment.
The outlines of wall panels are created using molding installed around designated zones. A rectangular wall section 100×150 centimeters is framed with molding, then painted in a contrasting color or covered with textured wallpaper. Such a composition functions as a wall panel, requiring no painted image — decoration is created by the frame itself and the contrast of textures.
Panel made of molding — is a composition entirely built on the geometry of frames. Several molding frames of different sizes are mounted on the wall, arranged symmetrically or asymmetrically. Mirrors, textiles, metal panels, or empty frames may be placed inside, creating a graphic composition from outlines. This technique is characteristic of eclectic interiors, where elements of different styles are mixed.
Oak stopper — point finish
Oak trimIt is a thin strip, usually 10×12 or 12×15 millimeters in cross-section, used to fix glass in window frames, door panels, furniture display cases. In the context of decorative solutions, the stopper serves as a point finish — it secures small details, creating a neat contour around glass or mirror inserts.
Why is the stopper made of oak? Oak has high density and strength, allowing thin profiles to be created without risk of deformation or cracking when nailed. An oak stopper does not bend when pressed against glass, ensuring even pressure along its entire length. The oak’s texture with pronounced growth rings creates a decorative effect even on a small scale — the stopper becomes not just a technical element, but part of the visual composition.
The stopper profile can be simple (rectangular cross-section with rounded front edge) or decorative (with bevel, chamfer, groove). A decorative stopper creates a more expressive contour around the glass, emphasizing the boundary and adding plasticity.Buy wooden cleatA decorative profile makes sense for furniture and doors, where it is at eye level and clearly visible.
Point finish means the stopper is applied where clean detailing is required. A glass insert in a buffet door, framed with an oak stopper, is perceived as a finished element — no gaps, no visible fasteners, only a neat contour that emphasizes the glass edge. A mirror inserted into a frame and secured with a stopper from the back holds firmly and looks professional.
In wall panels, the stopper is used to fix thin inserts (veneer, fabric, plywood), which fill the space inside molding and panel frames. The insert is placed into the frame groove, and the stopper secures it from the front, pressing it and simultaneously creating a decorative border. This is the classic technique for making boiserie — French wall panels, where each section is a frame with an insert.
wooden boards and beamsProfiles of larger cross-section (from 20×20 millimeters) are used as intermediate elements between large moldings and thin stoppers. The block creates a plane filling without overloading the composition with mass — a grid of 25×25 millimeter blocks installed at 100 millimeter intervals forms a transparent structure through which the background is visible.
Forming complex multi-level solutions
How to create a multi-level composition from a set of linear elements, where each layer has its own function and is perceived as part of the whole? The principle of hierarchy: large elements form the basic structure, medium-sized ones provide detailing, and small ones provide finishing.
First level — basic structure. LargeWooden moldingswith cross-section 60×80 or 80×100 millimeters, which divide the plane into large sections (panels of 80×120, 100×150 centimeters). These moldings are installed vertically and horizontally, forming a rectangular grid. The installation spacing is determined by room proportions — in high rooms panels may be larger, in low rooms — more compact.
Second level — detailing. Within each large panel, medium-sized moldings (40×50 or 50×60 millimeters cross-section) are mounted, creating additional division. One large panel is divided into four smaller ones, or a frame is formed inside, set back from the edge by 10–15 centimeters. This layer enhances visual complexity without overloading the composition.
Third level — finishing. Along the panel contours,decorative wooden moldingswith cross-section 20×30 or 30×40 millimeters, which create a thin graphic border. Where glass or mirror inserts require fixation,Oak trimare applied. Small details finalize the composition, adding precision and clean execution.
Multi-level solutions require profile consistency. If large moldings have a convex rounded profile, medium ones should have a similar but smaller convexity, and small moldings — a beveled chamfer (rounded edge), which corresponds to the overall theme of roundness. If the base profile is geometric (chamfers, steps), the entire system must be built on right angles and sharp edges.
Color gradation enhances the perception of levels. Large moldings are painted dark (dark oak, wenge), medium ones — in a medium tone (natural oak, walnut), small ones — light (white oak, bone). This gradation creates a sense of depth — dark elements appear closer, light ones — farther, enhancing the three-dimensionality of the flat wall.
Lighting is a key factor in multi-level compositions. Hidden backlighting installed behind protruding moldings creates contour lighting that emphasizes level boundaries. Directional lights (spotlights, wall sconces) placed at an angle to the wall cast shadows from the relief, enhancing plasticity. Under different lighting, the same composition is perceived differently — during daylight, natural wood texture dominates, while at night under artificial light, shadow play becomes prominent.
Final sculptural quality of the wall
decorative moldingsDecorative wooden moldings, Decorative moldings, corner profiles, molding, trimandstripsIt is the material from which this sculpture is molded.
Sculptural quality is achieved through layering elements of different depths. The base wall — zero level. The first layer of moldings protrudes 15–20 millimeters. The second layer adds another 10–15 millimeters. The third layer — final 5–10 millimeters. The final relief is 30–45 millimeters, which, under proper lighting, creates an impression of depth of several centimeters.
Sculptural quality is enhanced through texture contrast. Smooth moldings alternate with relief (carved, fluted) ones. Polished surfaces alternate with matte or brushed (with selected soft fibers) ones. Contrast in fiber direction — vertical elements with vertical texture, horizontal with horizontal — creates additional visual complexity.
A sculptural wall requires professional execution. Any joint inaccuracy, profile mismatch, or gap between elements destroys the illusion of unity.wood trim itemsThey must be manufactured with high precision, installed using professional tools, and finished uniformly for all elements.
Final sculptural quality is not an end in itself, but a means to create interiors of high complexity, where every detail has meaning and place. Such interiors are characteristic of formal rooms — living rooms, offices, dining rooms, libraries — where it is necessary to create an atmosphere of respectability and cultural richness. In bedrooms and children’s rooms, sculptural finishes are applied sparingly — accent wall behind the bed, framing the fireplace area, finishing built-in cabinets.
Sculptural Wall Creation Technology
Design phase. A grid of the future composition is marked on the wall plan, indicating all dimensions, profiles of elements, and mounting points. Material consumption is calculated with a 10–15 percent reserve for trimming and possible defects.
Foundation preparation. The wall is leveled with plaster or gypsum board to an ideal flatness — deviation no more than 2 millimeters per 2 meters. An uneven foundation will cause moldings to fit poorly, creating gaps between them and the wall.
Marking. Axes of future elements are marked on the wall using a laser level and a marking string. Verticals are checked with a plumb bob, horizontals with a 200-centimeter bubble level.
Installation of the first level. Large moldings forming the basic structure are installed. Mounting is done with adhesive (construction-grade PVA or polyurethane) and reinforced with hidden finish nails 40–50 millimeters long, driven at an angle. Nail heads are countersunk, and holes are filled with putty.
Installation of the second level. After the first layer adhesive dries (24 hours), medium-sized elements are installed. Joints with the first level are carefully sealed to prevent delamination.
Installation of the third level. Small panels and strips are fixed with finish nails 20–25 millimeters long or adhesive without additional fasteners (if element thickness is less than 10 millimeters).
Puttying. All joints, nail holes, and small gaps are filled with wood putty in the wood species color. After drying, the filled areas are sanded with 220–320 grit sandpaper.
Final finishing. The entire composition is coated with a single finish — oil, varnish, or paint — to ensure visual unity. The coating is applied in 2–3 layers with intermediate sanding.
Stylistic Application of Molded Solutions
Classic interiors (baroque, rococo, empire, classicism) imply active use ofwooden decorative moldingswith carved elements, complex multi-level profiles, and gilding. Walls are divided into panels, each framed by moldings and filled with relief or painted panels.
Modern classicism (neoclassicism) uses molded elements more restrainedly. Simple profiles without carving, single-color painting (usually white or light gray), minimal detailing. Emphasis is on line purity and proportionality, not decorative richness.
Minimalism allows molded solutions, but in an extremely simplified form.Flat wooden panelingwith beveled edges, monochromatic painting, no carving or complex profiles. Sculptural quality is achieved not through abundance of elements, but through play of light on minimal relief.
Scandinavian style appliesWooden moldingsin natural color (white oak, light beech, ash) with matte oil or wax. Profiles are simple, cross-sections small, compositions minimalist. Main goal — to highlight wood texture, not to create complex relief.
Loft and industrial styles usewooden molding by the meterrough processing — with visible saw marks, knots, cracks. Profiles are simple, often asymmetrical. Painting is dark (wenge, stained oak) or contrasting (black, graphite). Goal — to create a sense of ruggedness and materiality.
Questions and Answers: Practical Application of Molded Solutions
Can moldings from different wood species be combined in one composition?
dark moldings fromoakon a background of light moldings frombeechemphasize level boundaries. It is important to consider the difference in wood expansion coefficients — oak and beech have similar values, so they combine well. Combining species with significantly different densities (e.g., oak and pine) may cause joints to crack due to humidity changes.
How to choose molding width for a specific room?
Rule: molding height should be proportional to room height. For rooms with 2.5–2.7 meter ceilings, moldings 50–80 millimeters high are suitable. For high rooms (3–4 meters) — 100–150 millimeters. Too wide molding in a low room visually 'presses' down; too narrow in a high room — loses effect and fails to create the desired impact.
Is special wall preparation required for installing molded panels?
Yes,wooden veneer with a decorative profile8–12 millimeters thick will replicate all wall irregularities. If the surface has height differences exceeding 3 millimeters, the panel will fit poorly, creating gaps. Solution — plastering the wall or installing a gypsum board frame, onto which the panels are then mounted.
How to connect two moldings meeting at an angle so that the profile matches?
The "on the fly" method: both moldings are cut at 45 degrees using a circular saw. It is important that the cut is strictly perpendicular to the molding plane, otherwise the profiles will not match. After cutting, the ends are manually fitted using a fine file or sandpaper. The joint is glued, clamped with a vise, and then sanded after drying.
Which finish is better for decorative moldings — oil or varnish?
It depends on the usage conditions. Oil highlights the texture, preserves the tactile quality of wood, but requires periodic renewal (every 2–3 years). Varnish creates a protective film resistant to moisture and abrasion, but changes the color of the wood (making it more saturated) and provides gloss. Oil is suitable for living rooms and bedrooms, while varnish is better for kitchens and hallways.
Can decorative solutions be used in small apartments?
Yes, but in moderation. In a small space, an excess of moldings creates visual overload. The solution is to accent one wall (behind the sofa, behind the headboard) usingdecorative moldings, leaving the other walls smooth. Or use thin, light-colored moldings that structure the plane without overloading the space.
Conclusion: STAVROS system for creating sculptural interiors
Decorative solutions require not individual elements, but a coordinated system where each profile is selected according to scale, shape, and material. The company STAVROS offers a complete assortmentwooden decorative moldings, decorative profiles, corner profiles, wooden molding by the meter, oak trim piecesand other species,rails and battensfor creating complex decorative compositions.
Production of trim elementsAt STAVROS, you get not separate strips, but a system of elements coordinated by wood species, shade, and finish characteristics.
Buy wooden moldingsThey are supplied with final finish (oil, varnish, paint) or without it — for subsequent processing on-site.Decorative wooden moldingsThey can be delivered to Moscow and St. Petersburg. STAVROS offers consultation from specialists on profile selection, material calculation for a specific project, technical support during installation. Custom profiles can be manufactured according to individual sketches — for projects requiring unique solutions.
Beadboard can be purchased by the linear meter (hence the name), cut to required sizes for each specific object (a mirror frame 80×120 cm requires perimeter = 4 meters of beadboard, accounting for 45-degree corner cuts).Delivered to Moscow and St. Petersburg. STAVROS offers consultation from specialists for profile selection, material calculation for specific projects, technical support during installation. Custom profiles can be manufactured according to individual sketches — for projects requiring unique solutions.
Sculptural wall surfaces are not decorative excess, but architectural thinking, where space is formed through the plasticity of surfaces. STAVROS creates tools for such thinking, transformingwood trim itemsinto a material for creating interiors of the highest level of complexity and artistic expressiveness.


