Article Contents:
- Moldings: Universal Strips of Architectural Geometry
- What is Molding and Why Is It Needed
- Types of Moldings by Purpose
- Installation and Finishing of Moldings
- Cornices: Architectural Bridge Between Wall and Ceiling
- Functions and Types of Ceiling Cornices
- Choosing a Cornice by Room Size
- Rosettes: Ceiling Accents Under Chandeliers and Lamps
- Purpose and History of Ceiling Rosettes
- Size and Placement of Rosettes
- Brackets: Functional Beauty of Support
- What Are Decorative Brackets?
- Application of Brackets in Interior Design
- Capitals: Crown of Glory for Columns and Pilasters
- Architectural Orders and Types of Capitals
- Proportions and Installation of Capitals
- Pilasters and Half Columns: Vertical Architecture
- Differences and Functions of Vertical Elements
- Placement and Proportions
- Friezes and Borders: Horizontal Decorative Strips
- Purpose and Types of Friezes
- Ornaments and Stylistic Features of Friezes
- Corner Elements and Arches: Space Organization
- Corner Elements and Their Functions
- Arches and Their Decoration with Moldings
- Molding Materials: From Gypsum to Polyurethane
- Traditional Gypsum: Classicism and Complexities
- Polyurethane: Modern Alternative
- Polystyrene and Foam Board: Budget Solutions
- Stylistic combination of moldings
- Classic interiors: harmony of proportions
- Modern interiors: restrained elegance
- Eclecticism and fusion: bold combinations
- Practical recommendations for selection and installation
- Assessing the room: where to start
- Calculating Material Quantity
- Installation: step-by-step technology
- Painting and final finishing
- Care and restoration of moldings
- Regular care: preserving beauty
- Local Repair of Damage
- Conclusion: molding as a tool for transformation

Molding is the language of architecture through which a building tells its story. From the majestic palaces of Versailles to modern minimalist apartments, decorative molding has served for centuries as a tool to transform space from a mere box into a work of art. But what is molding in today's understanding? It is three-dimensional decorative elements that adorn ceilings, walls, door and window openings, creating visual accents and architectural depth.Polyurethane moldingsToday, it is accessible to anyone who wishes to add nobility and individuality to their interior.
In this systematic overview, we will thoroughly examine the main elements of decorative molding — from modest moldings to majestic capitals. You will learn what function each element performs, where it is appropriate to apply it, how to combine different details to create a harmonious composition. This is not merely a glossary of terms, but a practical guide for those planning renovation, working on a design project, or simply wishing to understand the architectural language of their home.


Moldings: universal strips of architectural geometry


What is molding and why is it needed
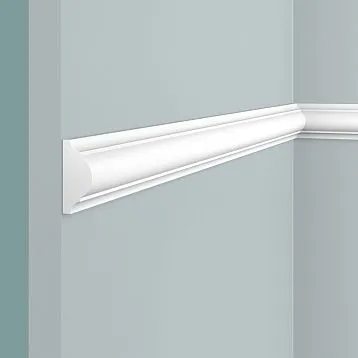
Molding is a three-dimensional decorative strip with a profiled cross-section, used to create visual boundaries, emphasize architectural elements, and mask material joints. Imagine a wall covered with wallpaper — it is flat, lacking depth. AddMoldings made of polyurethanecreating rectangular frames — and the wall acquires structure, rhythm, architectural expressiveness. Space is visually organized, and a sense of thoughtfulness and completeness emerges.
The functional purpose of moldings is equally important. They conceal joints between different materials — wallpaper and panels, ceiling and wall, various types of flooring. They protect corners from damage during furniture rearrangement. They cover gaps formed due to building settlement or poor installation.Moldings for walls to buyIt is worth not only for aesthetics, but also to solve practical tasks.
Molding profiles vary from simple rectangular to complex multi-step profiles with ornamentation. Smooth minimalist profiles suit modern interiors, where clean lines without decorative excess are important. Profiled with rounded edges, rolls, and shelves create play of light and shadow, adding classic elegance. Ornamented with floral motifs, meanders, and geometric patterns are suitable for historical styles — Baroque, Empire, Art Deco.
Our factory also produces:


Types of moldings by purpose
Wall moldings are the most extensive category. They divide the wall into zones — upper, middle, lower — creating a classic three-part composition. A horizontal molding at the height of the back of a chair (90-100 cm from the floor) separates lower wall panels from wallpaper or paint above. This is not only beautiful, but also practical — the lower part of the wall, more susceptible to dirt and damage, is covered with washable materials.Wall moldingsThey structure space.
Frame moldings create rectangular, square, or shaped panels on the wall, within which wallpaper, contrasting paint, decorative plaster, photo wallpaper, or mirrors are placed. A classic approach — symmetrical panels on both sides of a fireplace, sofa, or bed. A modern approach — asymmetrical compositions, overlapping frames, non-standard formats. The size and proportions of frames must correspond to the scale of the room — large panels in a small room will overwhelm the space, while small ones in a large room will disappear.
Door and window moldings frame openings, creating architectural completeness. They replace or complement standard casings, adding volume and decoration. A wide profiled molding around a door transforms a simple opening into a portal, emphasizing entry into the room. Moldings around a window emphasize it as an architectural element, especially effectively on a dark wall with a contrasting white molding.decorative moldingsThey transform standard openings.
Get Consultation
Installation and finishing of moldings
Installation of polyurethane moldings is simple and does not require professional skills. The surface must be clean, dry, and flat — on an uneven wall, the molding will not fit tightly, gaps will form. Marking — a critical stage. Use a level, plumb bob, tape measure, pencil. Horizontal lines must be strictly horizontal, vertical lines — vertical, rectangles — with right angles. Even the slightest misalignment is noticeable, especially in symmetrical compositions.
Adhesive for polyurethane moldings — polymer mounting adhesive of the "liquid nails" type or special polyurethane adhesive. Applied in strips or dots to the back of the molding, the detail is pressed against the surface and held for 30-60 seconds. Long moldings are additionally secured with painter's tape until the adhesive dries. Joints in corners are beveled at 45° with a chisel for perfect connection. Gaps in joints are filled with acrylic sealant, which is sanded after drying.
Painting moldings — final stage. White color is universal, suitable for any walls, creating a classic contrast. Painting in wall color makes moldings less noticeable, emphasizing shape rather than contrast. Contrast painting — dark moldings on light walls or vice versa — creates a graphic effect. Gold leaf, patina, imitation of marble or wood add luxury.Molding on the Walltransforms the interior.
Crown Molding: An Architectural Bridge Between Wall and Ceiling
Functions and Types of Ceiling Molding
Ceiling molding (crown molding, ceiling trim) is a profiled strip that covers the angle between the wall and the ceiling. Its function is not only decorative but also practical — concealing the uneven joint, which is difficult to make perfectly straight. Cracks from building settlement, gaps from poor installation of a suspended ceiling — all of this is hidden by the molding. Visually, it creates a smooth transition, softening the sharp corner line, adding completeness to the room.Ceiling Molding— a mandatory element of quality renovation.
Smooth, simple-profiled cornices are suitable for modern minimalist interiors. Their purpose is to neatly cover the joint without drawing excessive attention. Width 3-5 cm, white color, minimalist shape. Profiled cornices with scrolls, shelves, and steps create light-and-shadow play, adding classic elegance. Width 5-15 cm, available in painted or gilded finishes. Ornamented cornices with floral motifs, rosettes, and meanders are for lavish historical interiors. Width up to 20-30 cm, complex relief, often gilded or patinated.
Moldings with backlighting — a modern trend combining decorative function with illumination. The molding is mounted with a setback from the ceiling, and an LED strip is installed in the recess. Light reflecting off the ceiling creates soft, diffused illumination, visually lifting the ceiling and adding atmosphere. Especially effective in rooms with low ceilings — hidden backlighting visually increases height.Moldings for Hidden Lighting— functional beauty.
Choosing Molding by Room Size
Proportions — key to harmony. A wide, heavy molding in a small room with a low ceiling visually crushes the space, making it even lower and more cramped. A narrow, modest molding in a spacious living room with high ceilings will disappear, failing to fulfill its decorative role. General rule: ceiling height up to 2.5 m — molding 3–5 cm, 2.5–3 m — 5–10 cm, 3–3.5 m — 10–15 cm, over 3.5 m — 15–20 cm and more. Room area also matters — even in a narrow room with high ceilings, an overly wide molding will be excessive.
Molding color affects perceived ceiling height. A white molding on a white ceiling creates a unified surface, visually lifting it. A contrasting molding — dark on a light ceiling — clearly separates planes, emphasizing the boundary. This may visually lower the ceiling but adds graphic clarity and architectural definition. A molding in wall color visually extends the wall to the ceiling, also increasing perceived room height. Choice depends on desired effect and interior style.
Multi-level moldings combine several profiles, creating a complex composition. A main wide molding is supplemented by narrow moldings above or below, forming a stepped structure. This is typical for classical interiors with high ceilings, where such excess is appropriate and adds luxury. In modern interiors, multi-level design is rare — preference is given to clean lines.Buy Ceiling MoldingCorrect size is critical for the result.
Rosettes: Ceiling Accents for Chandeliers and Light Fixtures
Purpose and History of Ceiling Rosettes
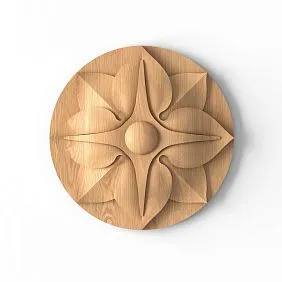
A ceiling rosette is a decorative element of circular, oval, or polygonal shape, mounted on the ceiling at the point of attachment for chandeliers or central light fixtures. Historically, rosettes concealed the point of wire or cable exit, masked holes in the ceiling, and covered installation marks. Decorative function was equally important — the rosette framed the light fixture, creating a visual accent around it, emphasizing the ceiling composition’s focal point.Ceiling Rosettes— transform utilitarian mounting into a decorative element.
In classical interiors, rosettes are richly ornamented — floral motifs, acanthus leaves, roses, laurel wreaths, geometric patterns. Relief creates light-and-shadow play, enhancing the perception of volume. Sizes vary from modest 20–30 cm in diameter for small rooms to grand 80–120 cm for formal halls. Shape is not necessarily circular — ovals, polygons, stars, complex curved contours add variety.
In modern interiors, rosettes are used selectively. Minimalist design does not tolerate decorative excess — chandeliers are mounted without rosettes or with minimal smooth rosette rings. Neoclassicism and modern classicism allow rosettes, but restrained in form — clear geometric profiles, moderate relief, absence of ornate decoration. Eclecticism boldly mixes — a modern minimalist chandelier against a classical ornate rosette creates contrast, a play of styles.Decorative Ceiling Rosettes— choose according to interior style.
Rosette Size and Placement
Proportionality — primary selection criterion. Rosette diameter should match chandelier and room size. Empirical rule: rosette diameter equals 50–70% of chandelier diameter (measured from outermost points of shades or decorative elements). Too small a rosette disappears against a large chandelier; too large a rosette competes with it, drawing attention away. For small ceiling fixtures, rosettes 20–40 cm; for medium chandeliers, 40–60 cm; for large chandeliers, 60–100 cm.
Rosette placement is typically at room or compositional center — above dining table in dining room, above bed in bedroom, in center of living room zone. If chandelier is offset from geometric center (common in studios and zoned rooms), rosette is offset accordingly. Multiple rosettes are possible if multiple fixtures are installed — symmetrically on both sides of center or grouped in a specific zone.
Installing rosette before or after chandelier mounting — technical question. Easier to first glue rosette to ceiling, then cut hole for wire, and mount fixture through rosette. If chandelier is already installed, rosette with central hole is slipped over wire, lifted to ceiling, and glued. Some rosettes come in two halves for mounting around installed fixtures.ceiling molding— includes rosettes of various configurations.
Brackets: functional beauty of support
What are decorative brackets?
A bracket (console) is an protruding element serving as support for shelves, curtain rods, fireplace mantels, balconies, and bay windows. Historically, brackets were load-bearing structures made of stone or wood, genuinely supporting significant weight. Modern polyurethane brackets are predominantly decorative — actual load-bearing function is performed by hidden fasteners; the bracket merely mimics support, adding visual weight and architectural logic.Decorative bracketscreate an illusion of a massive structure.
Bracket shapes vary from strictly geometric to ornate. Triangular or trapezoidal brackets with straight lines suit modern and minimalist interiors. S-shaped brackets with volutes (scrolls) — a classic variant, characteristic of Baroque and Rococo. Carved brackets with floral motifs, mask-like faces (sculptural faces), and heraldic elements — for historical styles. Size ranges from compact 10-20 cm for light shelves to massive 50-80 cm for fireplace mantels and large cornices.
Installing brackets requires consideration of real loads. If heavy items are placed on a shelf "supported" by brackets, the shelf must be securely anchored to the wall — using anchors or screws into a strong base. A lightweight polyurethane bracket is merely glued to the wall and shelf for decorative purposes and does not bear load. If there is no load (a purely decorative shelf with light figurines), the bracket may be the only visible fastener, but the shelf must still be additionally anchored to the wall.
Application of brackets in interior design
Under fireplace mantels, brackets create the impression that the massive mantel rests on these protrusions, although it is actually secured to the wall with hidden anchors. A pair of symmetrical brackets on either side of the fireplace enhances the perception of monumentality and weight of the structure. Bracket shape should match the fireplace style — for a classic marble fireplace, carved brackets with scrolls; for a modern minimalist fireplace, strictly geometric brackets.Decorative elements for fireplaceinclude brackets.
Under curtain rod cornices, decorative brackets add architectural character to the window opening. The actual curtain rod — metal or wooden bar — is mounted to the wall using bracket supports. Decorative polyurethane brackets are installed beside or replace the visible part of functional brackets if those are unattractive. A pair of ornate brackets at the ends of the cornice transforms utilitarian mounting into a decorative element framing the window.
Under beams and false beams on the ceiling, brackets create the illusion that the beam rests on the wall via these protrusions. In loft and country-style interiors, where beams are a key decorative element, brackets enhance the sense of structural authenticity. Massive wooden (or polyurethane imitating wood) brackets under similar beams create the impression of real wooden construction.Decorative beams on ceilingare complemented by brackets.
Capitals: crowning glory of columns and pilasters
Architectural orders and types of capitals
A capital is the upper part of a column or pilaster, crowning the shaft and serving as a transition to the ceiling. In classical architecture, capitals are one of the main distinguishing features of an order (architectural system). Doric order — a simple capital with an echinus (convex cushion) and abacus (square slab). Ionic — a capital with characteristic volutes (scrolls) on the sides. Corinthian — an ornate capital with acanthus leaves and scrolls, the most decorative of the classical types.capitals for columnsreproduce these historical forms.
Composite capitals combine elements of Ionic and Corinthian orders — volutes plus acanthus leaves. This is a Roman invention, distinguished by particular opulence. Tuscan order — a simplified version of Doric, with an even more minimalist capital. These five classical orders became the foundation for countless variations in architecture across different eras. Renaissance, Classicism, and Empire reinterpreted classical forms, adding details, altering proportions, yet preserving the recognizability of the order systems.
Modern capitals are often eclectic — combining elements of different orders, adding new motifs, simplifying or complicating traditional forms. Minimalist capitals — a simple geometric protrusion, smoothly expanding from the column shaft. Neo-classical — a restrained interpretation of the Corinthian capital with acanthus leaves, but less ornate. Eclectic — mixing classical volutes with modern geometric forms. Choice depends on interior style and column scale.Buy decorative capitalscan be adapted to any style.
Proportions and installation of capitals
In classical orders, capital height is strictly proportional to column diameter. For Doric order, capital height is approximately equal to column diameter. For Ionic — 0.7–0.8 of diameter. For Corinthian — 1.2–1.4 of diameter. These proportions were developed over millennia, ensuring visual harmony. Violating proportions — too small or too large capital — creates imbalance, a sense of incorrectness, even if one cannot precisely say what is wrong.
Installing a capital on a column or pilaster is simple for polyurethane products. The column shaft is usually hollow, and the capital is simply placed on top like a lid. If diameters match precisely, the capital fits snugly and is additionally secured with glue. If the capital is wider than the shaft (which is architecturally correct — the capital should project), it rests on the top edge of the shaft and is glued. For pilasters (flat protrusions on walls), the capital is glued to the wall above the top edge of the pilaster, creating a finished look.
Capital painting — an important decorative element. Classic option — white capital on a white column, monochromatic. Gilding the capital against a white shaft — a common technique, emphasizing the importance of the crowning element. Patination — imitation of aged patina, created by darkening recesses of relief, highlighting volume. Painting in contrasting color — a rare but striking technique in eclectic interiors.molded decoration made of polyurethaneis easily painted.
Pilasters and half-columns: vertical architecture
Differences and features of vertical elements
Pilaster — a flat vertical protrusion on a wall, imitating a column but not bearing load. Composed of base (foundation), shaft, and capital, like a full column, but protruding only a few centimeters from the wall. Its function is purely decorative — dividing the wall vertically, creating rhythm, emphasizing doorways, niches, mirrors. Pilasters visually structure space and add architectural significance to flat walls.Decorative pilasters— a classic interior element.
Half-column — a vertical element protruding from the wall by half or one-third of its diameter, circular or semicircular in cross-section. It is bulkier than a pilaster, creates a more pronounced relief, and protrudes more strongly into space. Used to frame fireplaces, mirrors, doorways, and to create accents in interiors. In classical interiors, a pair of half-columns on either side of a fireplace or door is a common technique, adding monumentality.
Full column — a freestanding vertical element with a circular cross-section, potentially load-bearing, though in interiors it is usually decorative. It divides space without creating a full partition, marking zones. A pair of columns forms a portico — a grand entrance to a living room or dining room, creating an architectural pause. A colonnade — a row of columns — is an effective zoning technique in large spaces, characteristic of neoclassical interiors.Columns for interiorscreate architectural expressiveness.
Placement and proportions
The placement and proportions of pilasters and columns follow architectural rules. Symmetry is preferred — paired elements on either side of the room’s, fireplace’s, or door’s axis. Rhythmic repetition — pilasters placed at equal intervals along a long wall — create a colonnade, dividing the length. The spacing between pilaster axes (intercolumniation) in classical architecture is 1.5–3 times the column’s diameter. Too frequent placement creates a cramped feeling, too sparse — a disjointed appearance.
The height of a column or pilaster is usually the full height of the wall from floor to ceiling cornice or to a designated level marked by a horizontal molding. Full-height pilasters from floor to ceiling visually increase room height and emphasize verticality. Shorter pilasters, not reaching the ceiling, are used for local accents — framing niches, fireplaces, not spanning the full wall height.— everything must correspond to the chosen era.are coordinated in height.
Column proportions are determined by the order. Doric columns are more squat, with a height-to-diameter ratio of 6–8. Ionic and Corinthian columns are more slender, with ratios of 9–10 and more. Modern interiors allow for flexibility, but extremes are undesirable — a too thick, short column appears heavy, a too thin, tall one — fragile. The base and capital must be proportionate to the shaft, as described in the capital section. Polyurethane items are produced in sets with coordinated proportions.
Friezes and moldings: horizontal decorative strips
Purpose and types of friezes
A frieze is a horizontal decorative band on a wall, usually ornamented. Historically, a frieze is the middle part of the entablature (horizontal structure above columns), located between the architrave below and the cornice above. In interiors, friezes are used as wall moldings, dividing zones and creating horizontal accents. They can be smooth, relief, or with repeating ornament — geometric, vegetal, narrative.Decorative friezesadd elegance to the interior.
Wall moldings — narrow decorative strips with ornament, glued onto wallpaper. Polyurethane friezes are bulkier, more relief, and longer-lasting than paper moldings. They can be painted, gilded, or patinated, creating exclusive finishes. Frieze width is 5–15 cm, plank length is usually 1–2 meters. Mounted with adhesive like moldings, joined end-to-end to form a continuous band around the room’s perimeter or on a specific wall section.
Ceiling moldings — friezes placed under the ceiling, often directly under the cornice or instead of it. They create an additional horizontal line, complicating the upper wall composition. In high classical-style rooms, a multi-level cornice-frieze-molding system creates lavish decoration, characteristic of Baroque and Empire styles. In modern interiors, moldings are used selectively, more often as accent elements on one wall than around the entire perimeter.
Ornaments and frieze styles
Geometric ornaments — meanders (zigzag lines at right angles), zigzags, diamonds, braids — are characteristic of classical and neoclassical styles. Rigidity of forms, mathematical precision, rhythm create a sense of order and rationality. Suitable for restrained interiors where excessive ornamentation is undesirable, but an accent is needed. Black-and-white or contrasting color combinations enhance graphic quality.
Vegetal ornaments — acanthus leaves, laurel branches, grapevines, roses, palmettes — are classics of decorative art. They create a sense of lushness, abundance, organic beauty. Characteristic of Baroque, Rococo, Empire, and Art Nouveau. Color may be monochromatic with relief highlighted by gilding or patina, or polychromatic, imitating natural plant colors — green foliage, flower beauty.polyurethane ornamentsreproduce historical motifs.
Narrative friezes depict scenes — mythological, historical, everyday. This is a rare and most decorative type, requiring great craftsmanship. Ancient triumphs, hunting scenes, pastorals create narrative, turning walls into picture galleries. Used in grand interiors, libraries, halls, where heightened decoration is appropriate. Color may imitate ancient relief (monochromatic white or terracotta) or be polychromatic.
Corner elements and arches: space organization
Corner Elements and Their Functions
Room corners — problematic zones where planes intersect, often with non-ideal geometry. Corner molding elements — special details that decorate internal and external corners, giving them architectural expressiveness. Internal corners are softened by ovolo moldings, visually reducing the sharp 90° angle. External corners (wall protrusions, pilasters, columns) are protected by corner caps from damage, simultaneously decorated.Corner molding elementssolve both functional and aesthetic tasks.
Keystone stones — decorative elements placed at the apex of an arch or above a doorway. Historically, a keystone is the central wedge-shaped stone of an arch, closing the vault and bearing load. Decorative polyurethane keystones do not bear load but imitate a structural element, creating architectural logic. Shape may be simple trapezoidal or adorned with a mask, crest, or ornament.
Corner rosettes — decorative elements placed at the junction of ceiling cornices of two adjacent walls. They conceal the cornice joint, which is difficult to make perfectly clean, while simultaneously creating an accent. Shape varies from simple geometric to complex ornamented, matching the style of the cornices. In rooms with multi-level cornices, corner rosettes may be very complex compositions.
Arches and their stucco decoration
Arches — architectural elements that span openings with curved arches. In interiors, arches frame doorways, divide spaces without doors, and create niches. Stucco emphasizes the arch’s form and adds decorative appeal. Archivolts — moldings that frame the arch along its curved contour, mirroring the arch’s shape. They can be simple profiled or ornamented, depending on the interior style.Architectural elementsare produced flexible or segmented.
Imposts — horizontal projections on walls at the sides of the arch, marking where the arch begins, transitioning from vertical supports to curved coverings. In classical architecture, imposts are structural elements transferring the arch’s load to supports. In decorative interior arches, polyurethane imposts are purely decorative but architecturally logical, giving the arch completeness and correct form.
Keystone at the top of the arch — the central accent element completing the composition. It may be a modest trapezoidal projection or richly decorated with a mask, coat of arms, or vase. It emphasizes the highest point of the arch, creating visual weight that balances the composition. In paired arches, keystones must be identical to maintain symmetry.Decor for archesincludes all necessary elements.
Stucco materials: from plaster to polyurethane
Traditional plaster: classicism and complexities
Plaster stucco — a traditional material used for millennia. Plaster is easily molded, precisely reproduces details, becomes hard and sufficiently strong after setting. It is eco-friendly, emits no harmful substances, regulates room humidity. Plaster items can be restored, repaired, or historical elements recreated. For authentic classical interiors and restoration of historical buildings, plaster is indispensable.Gypsum molding— choice of perfectionists.
Plaster stucco
Polyurethane: modern alternative
made of polyurethane is installed quickly and easily.wall moldingPolyurethane’s water resistance allows its use in bathrooms, kitchens, and pools — places where plaster quickly deteriorates. The material does not absorb water, does not soften, and does not lose shape under high humidity. Impact resistance is significantly higher than plaster — polyurethane molding springs back upon impact without cracking. Transportation requires no special precautions, reducing logistics costs. Cost is 2–3 times lower than plaster for comparable appearance.
Modern polyurethane stucco production technologies provide clear relief detailing, matching plaster. Special coatings protect against UV, preventing yellowing. High-density polyurethane does not burn but melts, not supporting flame spread. Longevity under proper use — decades without shape or color change.
Modern polyurethane molding production technologies provide clear relief detailing that rivals gypsum. Special coatings protect against ultraviolet radiation, preventing yellowing. High-density polyurethane does not burn but melts, not supporting flame spread. Longevity with proper use — decades without changes in shape or color.Polyurethane moldings— optimal choice for modern renovation.
Polystyrene and foam plastic: Budget solutions
Polystyrene foam (penoplastic) — the cheapest material for stucco. Super-lightweight, easy to cut with a regular knife, minimal cost attract for limited budgets. However, drawbacks are significant: brittleness (easily crumbles, breaks), coarse-grained structure (visible up close, revealing low cost), poor detailing (small ornamental elements not reproduced clearly), flammability (easily ignites, emits toxic gases). Penoplastic stucco suits temporary decor, budget rental apartments, non-critical zones.
Extruded polystyrene (XPS) is denser and higher quality than regular penoplastic. Fine-pored, uniform structure allows better detailing, smooth surface, non-grained. Strength is higher, but still inferior to polyurethane. Water resistance is excellent — material used for foundation insulation, withstands constant moisture contact. Price between penoplastic and polyurethane — compromise option. For exterior facade decoration, XPS is preferable to polyurethane due to better UV and temperature resistance.
made from different polymers meet different needs.Decorative Elements for InteriorStylistic combination of stucco elements
Stylistic combination of molding elements
Classical interiors: harmony of proportions
In classical styles — Baroque, Rococo, Classicism, Empire — stucco is not merely decoration but the foundation of architectural expression. The system of elements is strictly hierarchical: ceiling cornices frame the top, wall moldings divide walls into panels, pilasters create vertical rhythm, capitals crown columns, rosettes accentuate light fixtures. Consistency of scale is crucial — in spacious halls with high ceilings, large profiles, massive capitals, and wide cornices are used. In smaller rooms, proportions are more restrained, but the principles remain the same.
Classical stuccoClassical moldingrequires a systematic approach.
Unity of ornament unifies scattered elements into a cohesive composition. If the cornice is decorated with vegetal ornament featuring acanthus leaves, friezes, capitals, and rosettes, they must contain the same motifs in the same style. Mixing incompatible ornaments — geometric meanders with lavish Baroque scrolls — creates stylistic dissonance. Color solution is traditionally monochromatic — white on white with relief highlighted by light, or gilding on white background for formal interiors.
Modern interiors: restrained elegance
Modern classicism (neoclassicism) uses stucco sparingly, avoiding decorative excess. Simple profiles without ornament, clear geometric forms, minimal detailing. Moldings create framed panels on walls, but the profile is simple — rectangular or with one curved edge. Ceiling cornice is present but modest, 5–7 cm wide. Rosette under chandelier — smooth ring without ornament or absent altogether. Pilasters are used rarely, only for zoning large spaces.
Minimalism allows molding only as a functional element, concealing joints and hiding communications. A ceiling skirting of minimal width, smooth, white, and inconspicuous. Floor skirting of a modern profile, often concealed during installation. Decorative moldings, outlets, pilasters are absent — they contradict the philosophy of minimalism, which demands the rejection of ornamentation. If molding is present, it is maximally neutral and non-distracting.Molding in modern interiors— above all, functionality.
Scandinavian style occupies an intermediate position — it is not as ascetic as minimalism, but also not as decorative as classicism. Simple moldings create wall panels, highlighting zones. A ceiling cornice is present, but modest. The color is exclusively white — Scandinavians do not recognize colored molding, only white on a white background. Ornaments are absent, forms are simple geometric. Such molding adds structure to the space without overloading it with decoration, which perfectly corresponds to the Scandinavian philosophy of cozy minimalism.
Eclecticism and fusion: bold combinations
Eclectic interiors freely mix elements of different styles and eras, creating individual compositions. A classic ornate ceiling outlet may combine with a minimalist modern chandelier. Ornate Corinthian pilasters frame a modern fireplace with glass and steel. Baroque brackets support a simple unprocessed wooden shelf. Such contrasts create tension, dynamism, individuality, but require refined taste — the line between eclecticism and tastelessness is thin.
Colored molding — a bold approach characteristic of eclecticism. A black cornice on a white ceiling creates a graphic contrast. Gilded moldings on a dark blue wall — dramatic luxury. Pastel pink, blue, mint tones of molding in feminine interiors add softness. It is important that the color of the molding corresponds to other interior elements — textiles, furniture, accessories, creating color harmony.Colored moldingrequires thoughtful color coordination of the entire interior.
Combining materials expands possibilities. Polyurethane cornices and moldings are complemented by handcrafted gypsum outlets at accent points. Carved wooden brackets combine with polymer pilasters. Gilded metallic capitals crown polyurethane columns. Such combinations allow budget optimization — the bulk of decoration is affordable polyurethane, unique accent elements are made from noble materials. The main thing — stylistic unity, so that diverse materials read as a cohesive composition.
Practical recommendations for selection and installation
Assessing the room: where to start
Before purchasing molding, carefully measure the room. Ceiling height determines the scale of elements — in low rooms (2.4–2.5 m) use modest cornices 3–5 cm, in medium (2.7–3 m) — 5–10 cm, in high (3.5 m and above) — 10–20 cm. Room area is also important — excessive molding in small spaces creates a cramped feeling, while in large rooms modest decoration will be lost. Fix the perimeter of walls, length of cornices, number of corners, door and window openings on a plan — this is the basis for material calculation.
Surface condition is critical for quality installation. Molding adheres to a base that must be strong, clean, dry, and flat. Loose plaster, peeling paint, dust prevent adhesive bonding — elements will detach. Significant irregularities — bumps, holes, waves — will not allow molding to adhere tightly, creating gaps. Before installing molding, surfaces must be prepared — leveled with spackle, primed, dried. If you plan to hang wallpaper, do it after installing molding, so that wallpaper overlaps the moldings.
Designing the composition — a creative stage. Make a sketch or computer visualization showing where moldings will be placed, what panels they will form, how openings will be framed. Symmetry, proportions, rhythm — check everything on the sketch before purchasing materials. Lay moldings on the floor to form a rectangle, evaluate proportions — are the frames too wide or too narrow? Measure wall positions with painter’s tape, marking outlines of future panels.Buy molding for the interiorafter careful planning.
Calculating material quantities
For cornices and moldings, measure the room’s perimeter, length of all sections where molding will be glued. Standard plank length is 2 or 2.4 meters. Divide total length by plank length, round up to the nearest whole number — this is the number of planks. Add 10% allowance for trim, cutting errors, possible defects. For framed panels, measure the perimeter of each frame, add them up to get total length. Corner joints are cut at 45°, requiring precision — account for possible errors.
For outlets, brackets, capitals, and other individual elements, count piece by piece according to the project. An outlet is usually one under the central chandelier, if there are several — by the number of lights. Brackets are often paired — two per fireplace, shelf, cornice for curtains. Capitals — by the number of columns and pilasters. Add one spare element in case of damage during installation. Individual elements are more expensive than linear ones; saving on allowance may lead to problems if something breaks during installation.
Calculate adhesive based on package consumption — typically, a 300–500 ml tube is sufficient for 10–15 linear meters of molding or 2–3 medium-sized outlets. Round up — better to have extra adhesive than run short during work. Acrylic sealant for filling joints — 1–2 tubes per room. Paint, if planning to paint — consumption depends on the surface area of molding and paint coverage, usually indicated on the package.Molding accessoriesBuy in advance along with the main decor.
Installation: step-by-step technology
Surface preparation — the first and most important stage. Clean from dust, grease, peeling coatings. Spackle unevenness, holes, cracks. Prime with deep-penetration primer, let dry. Mark positions of elements with pencil, level, plumb line — horizontal lines must be strictly horizontal, vertical lines vertical, rectangles with right angles. Use a laser level for precision. Incorrect marking — a fatal error that cannot be corrected later.
Trimming elements is done with a fine-toothed saw or a tenon saw for precise angular cuts. Polyurethane cuts easily but requires care — rough edges and chips ruin the joint. For 45° cuts, use a tenon saw or a circular saw — manual cutting results in imprecise angles. Internal angles are mirrored — left molding with right cut slope, right molding with left cut slope. External angles are reversed. Test the joint before applying adhesive, ensuring tight fit.
Adhesive application — a responsible operation. Apply adhesive in zigzag or dots along the entire back of the molding. Press firmly against the marked line, ensuring full contact along the length. Hold for 30–60 seconds until adhesive sets. Secure long elements with painter’s tape until adhesive fully dries (12–24 hours). Immediately wipe away excess adhesive with a damp cloth. Apply adhesive to both sides of joints for strong bonding. After drying, fill gaps with acrylic sealant, smooth with a wet finger, and after drying, lightly sand with fine-grit sandpaper.
Painting and final finishing
White polyurethane is usually sold ready for use, painting is not required. But if you want another color or to protect the surface, paint with acrylic or latex water-based paint. Alkyd and nitro paints may dissolve polyurethane. Apply with brush, roller, or spray gun in 1–2 coats. First coat — primer, diluted paint. Second coat — finish, thick paint for even coverage. For complex relief, paint with a brush to ensure paint penetrates all recesses.
Gilding creates a luxurious effect characteristic of palace interiors. Leaf gold — ultra-thin gold sheets — is applied to adhesive base using a specialized technique requiring professional skill. Easier to use gold paint or patina (gold imitation from brass). Apply with a brush to raised parts of relief, leaving recesses dark — this emphasizes volume. Patina effect — the patina of time — is created by dark paint in recesses, imitating centuries-old dirt accumulation.
Protective coating extends the life of molding. Acrylic lacquer in 1–2 coats creates a washable surface, protects from dust, moisture, mechanical damage. Matte lacquer does not change appearance, glossy adds shine, satin is a compromise. For humid rooms — bathrooms, kitchens — lacquering is mandatory even for moisture-resistant polyurethane. Wax for molding gives a silk-like sheen, protects from dust, but requires regular renewal every 1–2 years.Buy decorative moldingand install correctly — an art accessible to everyone.
Care and restoration of molding
Regular care: preserving beauty
Dust is the main enemy of moldings, settling on horizontal surfaces and in the recesses of relief. Regular dry cleaning with a soft brush, microfiber, or vacuum cleaner with a soft attachment removes dust without damaging the surface. Frequency depends on the dustiness of the room — on average, once a month. Pay special attention to outlets, capitals, ornamental friezes, where dust accumulates in recesses. White molding shows dust less than colored or gilded ones.
Wet cleaning is performed as needed, but no more than once every 3-6 months. Wipe the surface with a well-wrung soft cloth dampened with water and a small amount of mild detergent. Do not use abrasive cleaners, stiff brushes, or solvents — they scratch and damage the finish. Polyurethane is moisture-resistant, but excessive moisture at joints is undesirable. After wet cleaning, dry the surface thoroughly. Do not clean gypsum molding with wet cleaning — only dry methods are allowed.
Protection against mechanical damage — be careful when moving furniture, relocating large items, or during children’s play. An impact may chip off a fragment or leave a dent. Especially vulnerable are protruding elements — brackets, capitals, corner moldings. Arrange furniture so that chair backs and cabinet doors do not touch molding when opening. In children’s rooms, avoid low-lying decorative elements that a child can reach.
Local repair of damage
Cracks and chips in polyurethane molding are repaired with acrylic sealant or putty. Clean the damaged area of dust, degrease it. Fill the chip with sealant, smooth it with a wet finger or putty knife, forming the contour. After drying, sand lightly with fine-grit sandpaper, and if necessary, repaint to match the molding color. Small damages are almost invisible after this. Large chips or broken fragments require replacing the entire element.
Detached sections are the result of poor installation or movement of the base. Clean the back of the detached molding and the wall from old adhesive. Apply fresh adhesive, press firmly, and secure with tape for 24 hours. If a large fragment has detached, additional mechanical fastening with countersunk screws, filled and spackled, may be required. Check the cause of detachment — if the base is weak, the section will detach again.
Yellowing of white polyurethane is caused by UV exposure, nicotine, and pollution. High-quality polyurethane with UV protection does not yellow for decades. Cheap, unprotected polyurethane yellows within 2-3 years on sun-exposed surfaces. It is corrected by repainting with white acrylic paint in 1-2 coats. First, wash, degrease, and lightly sand the surface with fine-grit sandpaper for better paint adhesion. After repainting, the molding is once again snow-white, like new.
Conclusion: molding as a tool for transforming space
Molding elements are not just decorative details, but a powerful architectural tool for transforming space.MoldingsThey organize wall planes, creating structure and rhythm.Crown MoldingThey complete the upper composition, visually raising the ceiling or creating cozy intimacy. Outlets accentuate light fixtures, transforming utilitarian mounting into a decorative focal point. Brackets add an illusion of structural logic and weight. Capitals crown verticals of columns and pilasters, completing the classical architectural system.
The correct choice of elements depends on interior style, room scale, and project budget. Classic interiors require a complete set of elements in a coordinated style — order capitals, profiled cornices, ornate friezes. Modern interiors use molding sparingly — minimalist profiles without ornamentation, only for spatial structuring. Eclecticism freely mixes elements from different eras and styles, creating individual compositions.
Material determines not only budget but also application possibilities. Gypsum is the choice of perfectionists and restorers who value authenticity and are willing to accept the complexity of installation. Polyurethane is the optimal solution for most modern projects, combining quality, accessibility, and ease of installation. Polystyrene is a budget option for non-critical applications. The choice must be deliberate, considering all factors.
STAVROS offers a full range ofpolyurethane molding elements— from simple baseboards to complex capitals. European manufacturing quality, precise relief detailing, durable UV-protected materials, and reasonable prices make STAVROS products the optimal choice for professionals and private clients. The catalog includes hundreds of models in various styles — from strict neoclassicism to lavish baroque, from minimalist profiles to richly ornamented designs.
Transforming interiors with molding — a project accessible to everyone. You don’t need to be a professional designer to plan a composition, or a builder to install elements. Basic knowledge, care, and attention to detail — that’s all that’s required. The result will exceed expectations — a typical apartment gains individuality, flat walls acquire architectural expressiveness, the interior achieves completeness and style. Molding connects the past and present, classical beauty and modern technology, transforming a home into a space where it’s pleasant to live, where you want to return, and of which you are proud.