Article Contents:
- The three pillars of door construction: anatomy of an opening
- Door frame: the foundation of everything
- Visualization of layers
- Casing: decorative frame of the opening
- Sizes and proportions
- Casing profile
- Casing materials
- Casing installation
- Casing corners
- Extension: door frame expander
- When an extension is needed
- Extension dimensions
- Extension material
- Extension installation
- Finishing the extension end
- So what is a door plinth?
- Why confusion arises
- Correct terminology for ordering
- Decorative casings: when a door becomes a work of art
- Carved architraves
- Casings with capitals
- Wide architectural casings
- Selecting casings to match the interior and door
- Matching the door style
- Matching the door material
- Matching the interior color scheme
- Installation: DIY or hire professionals
- Required tools
- Sequence of work
- When a professional is needed
- FAQ: answers to common questions
- Conclusion: speak correctly, buy consciously

You've decided to update your door. You open the manufacturer's website, browse the catalog — and stumble upon unfamiliar terms. Casing, extension, trim, stop strip, telescopic. Which of these do you actually need? What attaches to what? What is the correct name for that very strip that covers the gap between the door frame and the wall?
What is a door baseboard called? — a question that troubles many buyers. The answer is not as simple as it seems. In professional circles, three main terms are used, each denoting a specific element of the door structure. Confusion arises because in everyday speech, these concepts are often mixed up, with everything being called by one word.
Let's clarify the terminology once and for all. No fluff, no general phrases — only specific definitions, technical characteristics, visual descriptions, and practical advice on selection. After reading this article, you'll speak the same language as sellers and installers, understanding exactly what you're ordering.


The three pillars of a door structure: the anatomy of an opening
To understand what each element is called, you need to visualize the structure of a door opening. It's not just a door leaf in a wall — it's a complex, multi-layered structure.


Door frame: the foundation of everything
Door frame (ludka, lutka, obsada) is the frame into which the door leaf is inserted. It consists of vertical posts (door jambs) and a top horizontal crossbar (head jamb). The frame is attached to the wall with anchors or mounting foam, creating a rigid structure.
The standard width of a door frame is 70-100 mm. This is the distance from the outer edge of the frame to the inner edge where the hinges and lock are installed. It might seem sufficient for a wall. But the problem is that the wall thickness often exceeds the frame width.
Walls in apartments can be 80-150 mm (interior partitions made of drywall, aerated concrete blocks), 200-300 mm (brick walls), 400-600 mm (load-bearing walls in old buildings, insulated walls). If the wall is 30-50 mm or more thicker than the frame, a visible gap forms between the edge of the frame and the wall surface. This is where additional elements are needed.
Our factory also produces:


Visualization of layers
Imagine a door opening in cross-section (side view). The layers go from the center to the edges:
-
Door leaf (thickness 35-45 mm)
-
Door frame (width 70-100 mm)
-
Jamb extension (if needed, width 50-200 mm)
-
Door casing (width 60-120 mm)
-
Wall
The jamb extension is installed between the frame and the wall, extending the frame to the wall thickness. The casing is attached over the extension (or directly to the frame if no extension is needed), covering the joint between the frame/extension and the wall and masking the mounting gaps.
Now let's examine each element in detail.
Get Consultation
Door casing: the decorative frame of the opening
Door casing— is a plank that frames the door opening from the outside, on the room side. Its main function is decorative. The casing covers the technological gap between the door frame (or jamb extension) and the wall, giving the opening a neat, finished appearance.
Dimensions and Proportions
The width of the casing is usually 60-120 mm. Narrow casing (60-70 mm) suits modern minimalist interiors where the door should be as inconspicuous as possible. Standard casing (70-90 mm) is a universal solution for most interiors. Wide casing (100-120 mm and more) is used in classic interiors with high ceilings, where monumentality is desired.
The thickness of the casing varies from 8 mm (thin MDF casings) to 20-25 mm (massive wooden ones). Thickness affects visual weight: thin casing looks light and elegant, thick casing looks solid and substantial.
The standard length of casing is 2100-2200 mm. This is the door height (2000 mm) plus allowance for miter cuts. For tall doors (up to 2400 mm), extended casings of 2500-2600 mm are used.
Casing profile
Profile — is the shape of the casing's cross-section, which determines its visual character.
Flat casing — a simple rectangular plank without relief. Width 60-90 mm, thickness 10-12 mm. This is a minimalist solution for modern interiors where conciseness is important. Advantages: low price (from 150 rubles/meter for MDF, from 400 rubles/meter for wood), easy installation, versatility. Disadvantages: visual simplicity, lack of volume.
Rounded casing — a plank with one or two bevels (roundings) along the edges. The bevel creates a thin shadow line, adding volume. This is a classic profile suitable for most interiors. Width 70-100 mm, thickness 12-16 mm. Price: from 200 rubles/meter for MDF, from 500 rubles/meter for wood.
Profiled casing — a plank with relief: beads, grooves, steps. Such a profile creates a play of light and shadow, visually enriching the door. Suitable for classic, neoclassical, and Provence interiors. Width 80-120 mm, thickness 16-20 mm. Price: from 300 rubles/meter for MDF, from 700 rubles/meter for wood.
Carved casing — with ornamentation, floral motifs, geometric patterns. This is custom work, used in luxurious interiors. Width 100-150 mm and more, thickness 20-30 mm. Price: from 2000 rubles/meter for simple carving, up to 10000+ rubles/meter for complex custom work.
Casing materials
MDF door casing— the most popular option in terms of price/quality ratio. MDF (medium-density fiberboard) is strong, stable, doesn't warp from humidity, and is easy to work with. It is covered with a film that imitates wood or with enamel.
Advantages of MDF: affordable price (150-400 rubles/meter), variety of finishes (from bleached oak to wenge), moisture resistance (with a quality film), geometric stability. Disadvantages: the film can peel off if damaged, looks less prestigious compared to solid wood.
Wooden architrave made of solid wood is a premium option. Hardwoods are used: oak, ash, beech, walnut. Wood has a natural grain, is pleasant to the touch, eco-friendly, and repairable (scratches can be sanded out).
Advantages of wood: noble appearance, prestige, durability (50+ years), possibility of repainting and restoration. Disadvantages: high price (400-1500 rubles/meter depending on the wood species), requires stable humidity conditions, heavier than MDF.
Plastic architrave is a budget option for technical rooms. Rarely used, mainly for plastic doors in bathrooms. Advantages: low price, moisture resistance. Disadvantages: cheap appearance, fragility, limited selection.
Architrave Installation
The architrave is attached to the door frame or extension in three ways:
Headless nails — the classic method. Thin nails (1.2-1.5 mm in diameter, 30-40 mm long) without heads or with heads bitten off are used. The nail is driven through the architrave into the frame/extension, countersunk by 1-2 mm, and the countersunk spot is filled with a wax pencil matching the wood tone. Advantages: reliability, invisible fastening. Disadvantages: difficulty of removal (the architrave may split).
Liquid nails (adhesive) — the modern method. Mounting adhesive based on polyurethane or rubber is used. The adhesive is applied in dots to the back of the architrave, and the architrave is pressed against the frame for 10-20 seconds. Advantages: no visible fasteners, simplicity, possibility of removal (the architrave can be pulled off with a little force). Disadvantages: requires a flat surface, doesn't hold on loose substrates.
Telescopic installation — a special method for telescopic architraves. There is a groove on the back of the architrave that inserts into a protrusion (tongue) on the extension or frame. The connection is hidden, without glue or nails. Advantages: perfectly hidden installation, possibility of repeated removal/installation, width adjustment. Disadvantages: requires a special frame/extension with a tongue, more expensive than standard.
Architrave Corners
Joining architraves at the corners of the opening is done in two ways:
At a 45-degree angle — the classic method. Architraves are cut at a 45° angle in a miter box or on a miter saw, joined at the corner. Creates a beautiful diagonal joint without visible end grain. Suitable for profiled and rounded architraves. Requires precise cutting — even a 1-degree deviation creates a gap.
At a 90-degree angle — the simplified method. Side architraves are joined with the top one at a right angle. The top architrave rests on the ends of the side ones. This method is simpler to execute, doesn't require a miter box, but is less aesthetic — the ends of the side architraves are visible. Suitable for flat architraves in modern interiors.
Extension: Door Frame Widener
An extension (extension strip, extension element) is a strip installed between the door frame and the wall plane when the wall thickness exceeds the frame width.Door Extensionperforms a technical function — widens the frame to the required size so that it occupies the entire wall thickness.
When an Extension is Needed
An extension is necessary if the difference between the wall thickness and the frame width is more than 30 mm. A smaller difference is covered by the architrave (a wide architrave of 100-120 mm covers a gap of up to 40 mm). A larger difference requires an extension.
Example: wall thickness 180 mm, frame width 100 mm. Difference 80 mm. An extension with a minimum width of 80 mm is needed (usually taken with a margin of 90-100 mm to have surface area for attaching the architrave).
Typical situations where an extension is needed:
-
Brick walls (250-380 mm) with a narrow frame (70-100 mm)
-
Walls with insulation (150-200 mm net thickness)
-
Wooden houses made of timber (wall 150-250 mm)
-
Doors in thick partitions made of aerated concrete blocks (200-300 mm)
Extension Dimensions
Extension width varies from 50 mm to 200 mm. The most popular sizes: 100, 120, 150 mm. For non-standard walls, extensions are made to custom sizes (usually from MDF, which is easy to cut).
Extension thickness is standard — 10-12 mm for MDF, 16-20 mm for solid wood. A thick extension is more rigid, doesn't sag, creates a solid feel. A thin one is lighter, cheaper, easier to install.
Extension length corresponds to the opening height. For standard doors (height 2000 mm), an extension length of 2050-2100 mm is used. The extension is installed on the two vertical sides of the opening and the top horizontal one (lintel). In total, approximately 5.5-6 meters of extension is needed for one opening.
Extension material
Extensions are typically made from the same material as the door and frame for visual unity.
MDF extension — the most common type. It is covered with the same film as the door (oak, walnut, wenge, etc.). Advantages: affordable price (200-400 rubles/meter), exact color match with the door (if purchased as a set from one manufacturer), moisture resistance. Disadvantages: the film may peel off if damaged.
Wooden extension — for premium solid wood doors. Made from the same wood species as the frame. Advantages: complete texture match, prestige, durability. Disadvantages: high price (500-1200 rubles/meter), requires the same operating conditions as solid wood.
Laminated chipboard — a budget option. Rarely used, mainly in the economy segment. Advantages: low price. Disadvantages: lower strength, risk of swelling in high humidity, the structure is visible if the film is damaged.
Extension installation
Extensions are attached to the door frame in three ways:
With mounting foam — the simplest and most reliable method. The extension is positioned in the opening, secured with spacers to the frame, and the gap between the extension and the wall is filled with mounting foam. After the foam dries (12-24 hours), the extension is rigidly fixed. Advantages: reliability, simplicity, no special skills required. Disadvantages: cannot be removed without destroying the extension, foam is visible from the ends (covered by the casing).
With screws — the classic method. The extension is screwed to the frame with screws (3.5×30 mm) spaced 30-40 cm apart. The screws are countersunk, and the attachment points are filled with a wax pencil. Advantages: possibility of removal, precise fixation. Disadvantages: visible attachment points (though disguised), requires care.
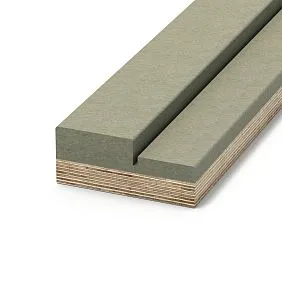
Telescopic extension — a special type with a protrusion (tongue) that inserts into a groove in the door frame. This creates a hidden connection without fasteners. A telescopic casing is then fitted onto the extension. Advantages: completely hidden installation, adjustability, aesthetics. Disadvantages: requires a special frame with a groove, more expensive (400-800 rubles/meter).
Finishing the extension end
The end of the extension (the edge facing the room) must be covered, otherwise the internal structure of the MDF or the wood end will be visible. The end is covered in two ways:
With PVC or melamine edge banding — a thin strip 18-22 mm wide, glued to the extension end using a hot method. The edge banding has the same finish as the extension surface. This is the standard solution for MDF extensions. The edge banding protects the end from moisture and damage, giving a finished look.
With casing — the extension end is completely covered by the casing, which is installed over the extension. If the casing is wide enough (70-90 mm) and properly positioned, the extension end is not visible at all. This solution is for wooden extensions, where the end has a beautiful wood grain, but it is still better to cover it for protection.
So what is a door skirting board?
Now let's return to the original question: what is a door skirting board called? In strict terminology, a door skirting board does not exist. A skirting board is an element that covers the joint between the wall and the floor (floor skirting board) or the wall and the ceiling (ceiling skirting board, cornice, coving).
When people say 'door skirting board,' they usually mean casing — the strip that frames the door opening. The confusion arises due to their visual similarity: both skirting boards and casings are long strips that cover joints. But their function and installation location are different.
Why the confusion arises
In everyday speech, terminology is blurred. Salespeople in stores sometimes call casings 'door skirting boards' themselves — to be understood by customers unfamiliar with professional terms. In online searches, people type 'skirting board for door,' 'door skirting board' — and find casings.
Another reason for the confusion is the visual similarity between floor skirting boards and casings. Both elements are often made from the same material (wood, MDF), have similar profiles, and are painted the same color. In classic interiorsWooden baseboardand wooden casing indeed look like continuations of each other — the lower skirting board runs along the floor, then the casing rises vertically, framing the door.
Correct terminology for ordering
When you order door opening elements, use precise terms:
-
Casing — door framing, a decorative strip covering the joint between the frame and the wall
-
Extension — frame expander, a strip between the frame and the wall for thick walls
-
Door frame — the frame into which the door leaf is inserted
-
Meeting rail — a narrow strip covering the gap between the two halves of a double door
-
Threshold — a horizontal element at the bottom of the opening (for entrance doors, usually not installed for interior doors)
If you go to a store or call a supplier and say 'I need a door skirting board,' you will most likely be understood and offered casings. But if you say 'I need casings 80 mm wide and extensions 120 mm,' you will be perceived as a knowledgeable customer, and the service will be faster and more accurate.
Decorative casings: when a door becomes a work of art
decorative door architraves— is not just a functional element, but a way to turn an ordinary door into an architectural accent. This is especially relevant for entrance doors, doors to main rooms (living room, study), and doors in classic and luxurious interiors.
Carved casings
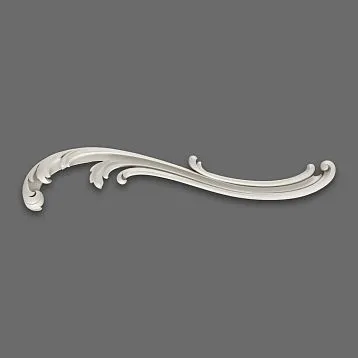
Carved wooden architraves are the pinnacle of joinery art. The ornament is created by hand or using CNC machines, which allow for the reproduction of the most complex compositions.
Popular carving motifs:
-
Floral ornaments: grapevine, oak leaves, acanthus, roses, ivy
-
Geometric patterns: meanders, braids, rhombuses, stars
-
Architectural elements: rosettes, volutes, modillions, capitals
-
Symbolic images: sun, birds, heraldry
Carved architraves are made from softwood (linden, alder) or hardwood (oak, beech). Linden is easier to carve, allowing for delicate, lace-like elements. Oak is stronger and more durable but requires skill—carving oak is technically more challenging.
The cost of a carved window surround is determined by the complexity of the ornament. A simple low-relief pattern (carving depth 3-5 mm) — from 2000 rubles/meter. A complex high-relief ornament (depth 10-15 mm) — 5000-8000 rubles/meter. Openwork carving (pierced ornament) — 8000-15000 rubles/meter.
Architraves with capitals
For doors in classic interiors, architraves with capitals are used—decorative finials at the top corners. Capitals imitate architectural orders (Ionic with volutes, Corinthian with acanthus leaves, simplified Doric).
Such architraves turn a door into a portal-like structure with columns. The side posts of the architrave are the 'columns,' and the capitals are their decorative tops. The composition is completed by a horizontal architrave-pediment above the door.
Architraves with capitals require high ceilings (minimum 2.8 m) and appropriate furnishings. In a small room with a low ceiling, they look excessive and bulky.
Wide architectural architraves
For formal interiors, wide architraves of 150-200 mm or more are used. They create a substantialdoor framing, turning the door into a significant architectural element.
A wide architrave is often multi-tiered—it has several planes with different profiles, creating deep relief. The inner part (closer to the door) is a narrow strip of 30-40 mm. The middle part is the main plane of 60-80 mm. The outer part is a decorative projection of 30-50 mm with ornamentation or carving.
Such architraves are custom-made for the project. There are no standard solutions—each order is unique. The cost of a set (for one opening, with capitals and ornamentation) ranges from 30,000 to 150,000 rubles, depending on the wood species, complexity of carving, and dimensions.
Selecting architraves to match the interior and door
The architrave must match the style of the door and the interior. Here are the basic selection rules.
Matching the door style
If the door is modern (smooth panel without panels, minimalist design), the architrave should be laconic. A flat or slightly rounded profile, width 60-80 mm, without ornamentation. Color—matching the door or contrasting (e.g., a white architrave on a dark door).
If the door is classic (with panels, relief, glazing), the architrave should support this style. A profiled profile with beads and grooves, width 80-100 mm, moderate decoration possible. Color matches the door color.
If the door is premium (carved, with patina, decorative inserts), the architrave should be of a corresponding level. Carved or with capitals, made from the same wood species, with the same finish. Such a door is a work of art, and the framing should dignify it appropriately—not overshadowing it, but not inferior either.
Matching the door material
A wooden door requires a wooden architrave. An MDF door pairs with an MDF architrave. A plastic door (in bathrooms) pairs with a plastic architrave.
Exception: an expensive wooden door can be paired with a high-quality MDF architrave if the latter is perfectly painted and does not reveal its material nature. But the opposite is unacceptable: a cheap MDF door with a premium wooden architrave looks absurd.
Matching the interior color scheme
The architrave is a frame for the door and simultaneously an element of the wall. It should connect the door with the interior.
A white architrave is a universal solution. It suits any wall and door colors. Creates a sense of cleanliness, freshness, and visually expands the space. The only limitation is that it shows dirt easily (white reveals any stains).
Door casing in the color of the door — creates a cohesive composition where the door and casing are perceived as a single object. Suitable for situations where the door should be a prominent accent in the interior.
Door casing in the color of the walls — on the contrary, makes the door as inconspicuous as possible. The casing blends with the wall, standing out only by its relief. This is a modern technique that creates a monolithic space.
Door casing in the color of the baseboard — a classic technique that connects the top and bottom of the room. If the floor baseboard is dark oak, the door casing is also dark oak. This creates a rhythmic structure in the interior.
Installation: Do it yourself or hire professionals
Installing casings and extensions is a moderately complex job. A DIYer with basic skills can handle it. But there are nuances.
Required tools
For DIY installation you will need:
-
Miter saw or miter box — for cutting casings at a 45° angle. A miter saw provides a perfectly precise cut. A miter box is cheaper but requires skill — it's easy to deviate from the desired angle.
-
Tape measure and square — for precise measurements
-
Level — for checking vertical and horizontal alignment
-
Hammer — for driving nails (if installing with nails)
-
Nail set — for countersinking nails
-
Putty knife — for applying adhesive (if installing with adhesive)
-
Wood saw — for trimming extensions to length
-
Pencil and wax crayons — for concealing fastening points
Professionals additionally use a pneumatic nailer (a gun for driving micro-pins), which speeds up the work and makes the fastening invisible.
Work sequence
-
Measuring the opening — accurately measure the height and width of the opening, the wall thickness, and the width of the door frame. Determine if an extension is needed and what width.
-
Installing extensions (if needed) — trim the extensions to length, install them in the opening, secure them to the frame or with mounting foam. Level them. Wait for the foam to dry completely (12-24 hours).
-
Measuring and marking casings — measure the height of the side casings from the floor to the top of the opening. Add 3-5 mm for miter cutting. Measure the width of the top casing (the distance between the outer edges of the side casings plus two casing widths).
-
Cutting miters — cut the casings at a 45° angle using a miter box or miter saw. Check the joint accuracy on a flat surface — the gap should be no more than 0.5 mm.
-
Fastening — attach the casings to the frame/extension using the chosen method (nails, adhesive, telescopic fastening). Start with the side ones, then install the top one.
-
Finishing — conceal the fastening points with a wax crayon matching the wood tone. Check the joints — if there are micro-gaps, fill them with acrylic sealant matching the casing color.
When a professional is needed
Call a professional if:
-
You don't have a miter saw or miter box — precise miter cutting is impossible without them
-
The opening is non-standard (uneven angles, different side heights, curved walls)
-
The casings are expensive wooden ones — a cutting mistake will be costly
-
The casings are carved with capitals — installing such elements requires experience
-
You are not confident in your skills — redoing the work costs more than paying a craftsman from the start
Cost of professional installation: 1500-3000 rubles per door opening (depends on region, complexity, presence of extensions).
FAQ: answers to frequently asked questions
What is the difference between a window surround and window casing?
They are synonyms. 'Obnalichka' is the colloquial name for 'nalichnik'. In professional circles, the term 'nalichnik' is more commonly used; in everyday speech, 'obnalichka' is used. Both terms refer to the same thing: a decorative strip framing a door opening.
Is it possible to install door casings without extensions on thick walls?
Technically yes, if using very wide casings (150-200 mm) that will cover the entire gap between the door frame and the wall. But this looks disproportionate — an overly massive casing overwhelms the door. Furthermore, a wide casing on a thick wall will stand off from the wall at a significant distance, creating a 'pocket' where dust accumulates. The correct solution is to use an extension.
Which extension is better: foam-mounted or telescopic?
For standard conditions (regular apartment, stable humidity and temperature), a foam-mounted extension is more reliable and cheaper. A telescopic extension is justified when the possibility of disassembly is needed (rental apartment, temporary renovation) or when the perfect aesthetics of hidden fastening are important (luxury interior).
Do casings need to be painted or varnished?
Depends on the material. MDF casings with a film coating are ready for installation; no additional finishing is needed. Unpainted wooden casings require mandatory final finishing — coating with varnish, oil, or paint. Without a protective coating, the wood will darken, absorb dirt, and may crack.
How to choose casings if there are several doors and they are different?
If the doors within one room (or adjacent visible rooms) are different, the casings should be chosen to be the same — in a unified style and color. This creates visual unity. The color of the casings is chosen to be neutral — white or matching the wall color. If the doors are in different isolated rooms, the casings can be different, corresponding to the interior of each room.
Can ceiling skirting be used as door casing?
Technically possible, but not recommended. Ceiling skirting (cornice) is designed for mounting at an angle between the wall and ceiling; its profile is asymmetrical. When installed vertically, it will look incorrect. Moreover, ceiling skirting is usually made of polyurethane or expanded polystyrene — lightweight materials for top mounting. Door casing must be stronger, as the door constantly opens and closes, creating vibrations.
How many casings are needed for one door?
Standardly, for one door (a one-sided set), 5 casing strips are needed: 2 side and 1 top on one side of the door, 2 side and 1 top on the other side. But some doors are cased only on one side (for example, a closet door from the hallway side has casings, but from the closet side — none). Then 2.5 strips are needed (two side and one top).
What to do if there are gaps after installing the casings?
Small gaps (up to 1 mm) in the corner joints of casings are filled with acrylic sealant matching the casing color. The sealant is applied in a thin strip, smoothed with a wet finger, and excess is removed. Gaps between the casing and the wall (if the wall is uneven) are sealed with the same sealant or putty, then painted over. Large gaps (more than 3 mm) indicate errors in cutting or wall curvature — it's better to redo them correctly.
Conclusion: Speak correctly, buy consciously
What a door skirting is called — now you know the answer. It's a casing, a decorative framing of a door opening. An extension is a frame expander for thick walls. Skirting is an element for the joint between the floor and the wall. Three different elements, three different names, three different functions.
Knowing the terminology is not just theory. It's a practical necessity when ordering doors and components. When you speak with a seller, installer, designer in the same language, you save time, avoid mistakes, and get exactly what you need.
Choosing casings and extensions is a choice of style, material, quality. Cheap MDF casings with poor-quality film will lose their appearance in 3-5 years, the film will peel, and edges will crack. High-quality wooden casings will last for decades, preserving a noble look and emphasizing the status of the interior.
For those who value quality and understand the importance of details, the company STAVROS offersWooden door casings and baseboardsmade from solid premium wood species.
wooden moldings STAVROSare products made from selected solid oak, beech, ash kiln-dried (moisture content 8-10%). Precise geometry (tolerance ±0.2 mm), perfect sanding (grit up to 240), variety of profiles from laconic modern to classic multi-step.
The catalog features over 50 casing profiles with widths from 60 to 150 mm, thickness from 12 to 25 mm. Each profile is developed considering ergonomics, aesthetics, and installation practicality. Flat, rounded, profiled, carved — for any styles and tasks.
Extensions are manufactured in accordance with the casings — from the same wood, with the same processing. Standard widths 100, 120, 150 mm and custom sizing. Extensions come with PVC edge banding or are sold for self-edging.
Hand-carved casings — for connoisseurs of uniqueness. STAVROS craftsmen create ornaments according to classical canons and author's sketches. Floral motifs, geometric patterns, architectural elements — any complexity of carving. Carving is done on solid linden or oak, then the product is tinted, patinated, coated with a protective compound.
STAVROS professional consultants will help select casings considering the door style, interior features, wall thickness. Free calculation of required material quantities, installation recommendations, assistance in choosing final finishing.
Own production ensures quality control at all stages — from raw material selection to final packaging. Warehouses in Moscow and St. Petersburg guarantee availability of popular items and fast shipping. Delivery across Russia and CIS with professional packaging that prevents damage.
Visit STAVROS showrooms to see all profiles in person, compare textures of different wood species, assess processing quality. Designers will help visualize selected elements in the context of your interior.
Choose correctly. Speak precisely. Buy consciously. With STAVROS wooden casings and extensions, your doors will gain a worthy framing that emphasizes the quality and style of the entire interior.
Your ideal door opening begins with correct terms and quality materials. Start today.