


Article Contents:
- Cornice in Architecture: A Multifunctional Element
- Ceiling Cornice: Interior Classic
- Facade Cornice: Protection and Decoration
- Door Cornice: Elegance of Framing
- Door Cornice: Structure and Proportions
- Structure of a Door Cornice
- Proportions of a Door Cornice
- Installation of a Door Cornice
- Wooden Cornice: Nobility of Natural Material
- Advantages of Wooden Cornice
- Wood species for cornices
- Profiles of Wooden Cornices
- Differences Between Door Cornice and Ceiling Cornice
- Functional Differences
- Constructive differences
- Proportional Differences
- Stylistic Differences
- Application of Cornices in Different Interior Styles
- Classic style
- Neoclassicism
- Modern style
- Scandinavian Style
- Provence
- Loft
- Installation of a Wooden Cornice: Technology and Nuances
- Foundation Preparation
- Corner Trimming
- Fastening
- Finishing
- FAQ: Answers to Practical Questions
- Conclusion: Cornices as the Language of Architecture
The word 'cornice' is familiar to everyone. But what comes to mind when you hear it? Probably a ceiling strip covering the joint between the wall and ceiling. Or an element under the roof on a building facade. Perhaps even a structure for mounting curtains. And only a few will recall the door cornice — a horizontal element crowning a doorway, transforming an ordinary door into an architectural work.
Door Cornice andWooden cornice— are two concepts that intersect but are not identical. The first denotes function and application, the second — material. Between them lies an entire universe of architectural solutions, stylistic nuances, and technical features. Let's explore where each of these elements is used, how they differ, and how to choose the right one for your interior.
This article is not just theory. It is a practical guide with specific dimensions, prices, and application examples. After reading, you will understand the architectural logic of cornices and will be able to consciously choose elements for your home.


Cornice in Architecture: A Multifunctional Element
Before discussing door and wooden cornices, it is necessary to understand what a cornice is in principle. It is a horizontal protruding element that separates planes or crowns a structure. A cornice creates a shadow line, structures space, and gives completeness to a volume.


Ceiling Cornice: Interior Classic
Ceiling cornice (cove molding) is the most common type. It is installed at the junction of the wall and ceiling, creating a visual transition between the vertical and horizontal planes. Functions of a ceiling cornice:
Architectural Structure. The cornice separates the ceiling from the walls, creating a clear boundary. Without a cornice, the boundary is blurred, especially if the walls and ceiling are painted in similar tones. The cornice makes the composition orderly and readable.
Concealing Defects. The joint between the wall and ceiling is rarely perfect — unevenness, cracks, gaps in stretch ceilings. The cornice hides all of this, creating the illusion of a perfect connection.
Visual height correction. A wide cornice visually lowers the ceiling, making the space cozier. A narrow one preserves the sense of height. A cornice painted the color of the ceiling visually raises the ceiling; painted the color of the walls, it lowers it.
Space for hidden lighting. An LED strip can be placed behind a wide cornice (80-120 mm), creating soft, diffused lighting that visually increases the height of the room.
Wooden ceiling corniceis made from solid wood (oak, beech, ash) or MDF. Width varies from 50 mm (for low ceilings 2.3-2.5 m) to 150 mm (for high ceilings 3.0-3.5 m and above). The profile can be simple (a rectangular plank with a chamfer) or complex (multi-stepped with beads and grooves).
Our factory also produces:


Facade Cornice: Protection and Decoration
A facade cornice is installed on the building facade under the roof. Its main function is practical: diverting rainwater from the walls. The cornice projects 40-80 cm beyond the wall plane, creating a protective overhang. Water runs off the roof onto the cornice and drips onto the blind area, not reaching the walls.
Simultaneously, the facade cornice is a crucial decorative element, crowning the building and giving it architectural completeness. In classical architecture, a cornice is a complex, multi-stepped structure with modillions, dentils, and ornaments. In modern architecture, it is a laconic profile emphasizing the building's geometry.
Facade cornices are made from polyurethane (lightweight, moisture-resistant, inexpensive), glass fiber reinforced concrete (strong, durable, heavy, expensive), or natural stone (prestigious, very heavy, extremely expensive). Wood is rarely used for facade cornices—it requires thorough moisture protection and regular maintenance.
Get Consultation
Door Cornice: Elegance of Framing
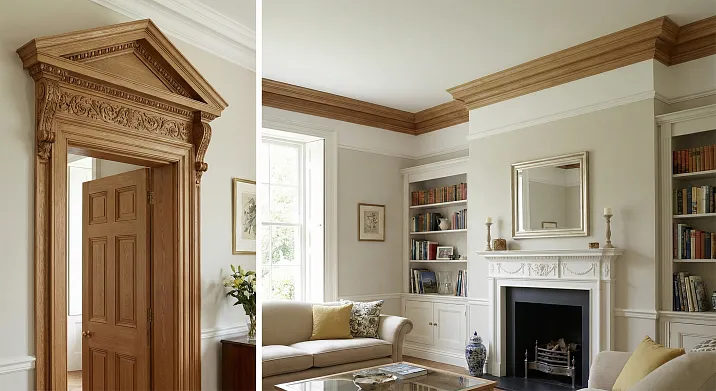
A door cornice (pediment) is a horizontal decorative element installed above a door opening. It mimics an architectural cornice in miniature, turning the door into a semblance of a portal or temple entrance.
A door cornice serves a purely decorative function. It does not divert water (unnecessary indoors) and bears no structural load. Its task is to create architectural expressiveness, give the door significance, and connect the door with the overall interior style.
door framingusing a cornice transforms the opening into an architectural accent. Instead of a boring frame with casings, a composition with a clear structure emerges: side posts (pilaster casings), a horizontal casing, and a finishing cornice above the entire opening.
Door cornices are especially relevant for:
-
Entry doors in private houses (main entrance)
-
Doors to main rooms (living room, study, library)
-
Interiors in classical styles (Classicism, Neoclassicism, Art Deco)
-
Rooms with high ceilings (from 2.8 m), where there is space for vertical decor
Door Cornice: Structure and Proportions
A door cornice is not just a plank above the door. It is a thoughtful architectural structure with specific proportions and elements.
Structure of a Door Cornice
A classic door cornice consists of several parts:
Base (Frieze) — A rectangular plank attached directly to the wall above the door opening. The width of the base is usually equal to the width of the top casing plus 50-100 mm on each side (so the cornice projects beyond the casings). The height of the base is 40-80 mm. The base creates the foundation for the following elements.
Projecting Profile (Crown) — The actual cornice, a profiled plank projecting forward from the wall plane. The projection is 30-80 mm. The profile can be simple (one chamfer or bead) or complex (multi-stepped with several beads, grooves, ornamentation). This is the main visible element, creating a play of light and shadow.
Decorative Elements — Additional details enhancing expressiveness. Modillions (brackets under the projecting part, imitating support), dentils (a row of rectangular teeth), rosettes (round or oval overlays), ornamental inserts.
Proportions of a Door Cornice
The size of a door cornice is determined by the height of the opening and the overall proportions of the room.
For a standard door 2000 mm high in a room with a 2.7 m ceiling, the optimal door cornice has a width of 60-80 mm (profile height) and a projection of 40-60 mm. The total length of the cornice exceeds the width of the opening by 100-200 mm (50-100 mm on each side).
For a tall door (2200-2400 mm) in a room with a 3.0-3.5 m ceiling, the cornice should be more massive: width 80-120 mm, projection 60-100 mm, length exceeding the opening width by 150-300 mm.
A fundamental rule: the door cornice must not come closer than 150-200 mm to the ceiling cornice. If the distance is smaller, the elements visually merge, and the readability of both is lost. It is better to reduce the size of the door cornice or forgo it altogether in favor of a simple horizontal casing.
Installing a Door Cornice
A door cornice is mounted after the door and casings are installed. Sequence:
-
Marking — determine the installation height of the cornice. It is usually mounted 50-100 mm above the top edge of the casing. Draw a strictly horizontal line using a level.
-
Base mounting (if the structure is composite) — attach the base strip to the wall using dowels or screws. Fastening spacing is 30-40 cm. For a wooden base, use 4×50 mm screws with pre-drilling.
-
Profile installation — attach the profiled part to the base using headless nails or adhesive. If the cornice is solid (without a base), mount it directly to the wall using a combined method: adhesive along the entire length plus mechanical fasteners at 3-4 points.
-
Installation of decorative elements — modillions and rosettes are glued using polyurethane adhesive or liquid nails. Additionally, thin nails (1.2 mm) can be used for temporary fixation until the adhesive sets.
-
Sealing joints and painting — gaps are filled with acrylic sealant, fastener points are sealed with a wax pencil or filler. After drying, the cornice is painted in the chosen color.
Wooden cornice: the nobility of natural material
When they say “Wooden cornice», most often refers to a ceiling cornice made of solid wood. It is an element that combines functionality (covering the joint between the wall and ceiling) with decorativeness (natural wood texture, possibility of carving and ornaments).
Advantages of a wooden cornice
Naturalness and eco-friendliness. Wood is a natural material that does not emit harmful substances. Rooms with wooden elements are more comfortable to breathe in, maintaining optimal air humidity (wood absorbs excess moisture and releases it when dry).
Visual warmth. Wood grain creates a sense of coziness, warmth, and homeliness. Even a painted wooden cornice has a special texture, different from smooth polyurethane or foam.
Prestige and status. Solid wood is perceived as an expensive, high-quality material. Wooden cornices are a sign of care for quality, taste, and durability.
Workability. Wood can be sanded, cut, milled, painted, tinted, and patinated. Any profile can be created, carved ornaments applied, and the desired color and texture achieved.
Durability. A properly treated and installed wooden cornice lasts 50-100 years. It can be restored, repainted, and renewed without replacement.
Repairability. Scratches and dents on wood can be sanded out, chips restored with wood filler. A damaged section can be cut out and a new fragment glued in.
Wood species for crowns
Wooden cornicesare made from different wood species, each with its own characteristics.
Oak is an elite wood species with a density of 720-880 kg/m³ and a hardness of 3.7-4.0 HB. Oak is strong, stable, and has a pronounced texture with medullary rays (shiny stripes on a radial cut). Its color ranges from light yellow to dark brown. Oak is heavy and requires sturdy mounting. The cost of an oak cornice is 1500-3500 rubles per linear meter, depending on the profile and wood grade.
Beech — a dense species (density 680-750 kg/m³, hardness 3.5-3.8 HB) with a uniform fine-grained texture. Color is light pink or cream. Beech is easy to work with, paint, and tint. Less expressive than oak but more affordable. Cost: 1200-2800 rubles per meter.
Ash — a strong species (density 700-760 kg/m³, hardness 4.0-4.5 HB) with a contrasting texture. A light background with dark stripes creates a dynamic pattern. Ash is elastic, holds its shape well, and does not warp. Cost: 1300-3000 rubles per meter.
Linden — a soft species (density 450-550 kg/m³, hardness 1.5-2.0 HB) with a uniform structure. Color is light cream, almost white. Linden is easy to cut, ideal for carved cornices with fine details. However, it is less durable and scratches easily. Used for decorative elements not subject to mechanical loads. Cost: 800-2000 rubles per meter.
Pine — a budget-friendly coniferous species (density 480-580 kg/m³, hardness 2.0-2.5 HB) with a pronounced texture from annual rings. Pine is resinous and requires special preparation before painting (de-resination). Pine cornices are used in country, chalet, and Scandinavian style interiors. Cost: 500-1200 rubles per meter.
Profiles of wooden cornices
Profile — this is the cross-section of the cornice, determining its appearance, play of light and shadow, and stylistic affiliation.
Simple rounded profile — a strip with one or two beveled edges. Width 50-80 mm, projection 20-40 mm. This is a minimalist solution for modern and Scandinavian interiors. Emphasizes the wood texture without overloading the space with details.
Classical profile with beads — a multi-step composition of projections (beads) and recesses (grooves). Width 80-120 mm, projection 40-60 mm. Creates a deep play of light and shadow, characteristic of classical interiors. Beads can be round, oval, or teardrop-shaped.
Ornamented profile — with plant or geometric motifs. Carving is done by hand or with CNC machines. Width 100-150 mm, projection 50-80 mm. Used in luxurious interiors with high ceilings (from 3.0 m). Creates a sense of palace luxury.
Profile with dentils — with a row of rectangular teeth along the lower edge. Dentils imitate beam ends in classical architecture. This is an exquisite element requiring precise manufacturing. Width 90-130 mm, projection 50-70 mm.
Differences between a door cornice and a ceiling cornice
Although both elements are called cornices, there are significant differences between them.
Functional differences
Ceiling cornice performs a practical function: it covers the joint between the wall and ceiling, masks defects, and can serve as a base for hidden lighting. Its presence in the interior is practically mandatory — without it, the room looks unfinished.
Door cornice is purely decorative. It does not hide anything critical and does not bear any load. It can be omitted entirely — the door will function normally. A door cornice is an additional element for creating architectural expressiveness.
Constructive differences
A ceiling cornice is attached in two planes simultaneously: to the wall and to the ceiling. This provides good stability even for wide profiles (100-150 mm). Attachment is usually with adhesive along the entire length, supplemented by mechanical fasteners at several points.
A door cornice is attached only to the wall, projecting forward in a cantilever manner. This requires more reliable fastening, especially for massive elements with a large overhang. A combination of adhesive and mechanical fasteners (dowels, screws every 30-40 cm) is used.
Proportional Differences
A ceiling cornice has horizontal development along the entire perimeter of the room. Its length is measured in tens of meters (for a 4x5 m room, the perimeter is 18 meters). The width of the cornice relative to its length is small — the ratio is approximately 1:200-1:300.
A door cornice is a local element with a length of 1.0-1.5 meters (width of the opening plus overhangs at the edges). The width of the cornice is comparable to its length — the ratio is 1:10-1:20. It is a more compact, concentrated element.
Stylistic Differences
A ceiling cornice sets the overall style of the room. Its profile, size, and finish influence the perception of the entire space. A classic ornamented cornice makes a room solemn, a simple modern one makes it laconic.
A door cornice works locally, at the level of a specific opening. It should match the overall style but can be slightly more richly decorated — it is an accent element that attracts attention.
Application of Cornices in Different Interior Styles
The choice of cornices is determined by the interior style. Different styles require different profiles, sizes, and materials.
Classic style
Ceiling cornice: width 100-150 mm, complex multi-stage profile with two or three beads, possibly with dentils. Material — wood (oak, beech) or polyurethane, painted white or cream. The cornice is massive, creating a sense of monumentality.
Door cornice: installed above main doors (entrance to the living room, study). Width 80-120 mm, profile matches the ceiling cornice but is slightly richer — modillions, rosettes are possible. Material — wood matching the door or white enamel.
door framingIn the classical style, it also includes side pilaster casings with capitals, emphasizing the verticals. The door cornice crowns this composition, creating a resemblance to a temple portal.
Neoclassicism
Ceiling cornice: width 80-120 mm, restrained profile with one or two beads, without excessive ornamentation. Material — light-toned wood or painted polyurethane. The cornice is elegant but not excessive.
Door cornice: used selectively — above main doors. Width 60-90 mm, simple profile with one bevel or bead. Color — white or matching the walls. Creates a slight hint of classicism without heaviness.
Modern style
Ceiling cornice: width 50-80 mm, simple laconic profile (rectangular strip with one bevel or no relief at all). Material — light wood species (bleached ash, bleached oak) or painted MDF. The cornice is minimalist, emphasizing clean lines.
Door cornice: usually not used. Doors are framed with simple casings without additional elements. If a cornice is still needed (e.g., above a door to a particularly significant room), it is maximally laconic — a straight strip without relief, painted the color of the walls or casings.
Scandinavian style
Ceiling cornice: width 50-70 mm, simple rounded profile. Material — light wood (pine, spruce, birch) with white or light gray paint that preserves the visibility of the texture. The cornice is light, airy.
Door cornice: not used. Scandinavian style leans towards minimalism, avoiding excessive decor. Doors are framed with thin casings, often painted white.
Provence
Ceiling cornice: width 70-100 mm, profile with light relief — one or two beads, possible fine carving with plant motifs. Material — wood with patina, artificially aged, painted in light tones (white, cream, olive, lavender). The cornice should look antique, with history.
Door cornice: can be used above doors to main rooms. Width 60-80 mm, simple profile with light carving. Finish — patina, aging. Creates a feeling of a French province, an old estate.
Loft
Ceiling cornice: often not used at all — loft style leans towards open structures where ceilings, walls, and utilities are left exposed. If a cornice is installed, it is maximally simple — a straight wooden strip without finish or with rough brushing. Material — old wood, roughly processed, dark, with visible cracks and knots.
Door cornice: not used. Doors in a loft are often without traditional framing — sliding, barn, industrial. If hinged doors are used, framing is minimal or absent.
Installation of a Wooden Cornice: Technology and Nuances
Installing a wooden cornice requires precision and an understanding of the material's properties.
Foundation Preparation
The surface to which the cornice is attached must be strong, level, and clean. For a ceiling cornice, this is the junction of the wall and ceiling. If it is uneven (deviations of more than 3-5 mm per meter of length), the cornice will not adhere tightly, and gaps will be visible.
Eliminate significant unevenness with plaster or filler. Minor unevenness (1-3 mm) can be compensated by the thickness of the adhesive layer. Remove dust from the surface, prime with deep-penetration primer. For wooden walls, use wood primer; for painted walls, use universal primer.
Trimming Corners
The cornice is joined at room corners at a 45-degree angle. For precise cutting, use a miter saw with a blade of at least 250 mm and at least 60 teeth (for a clean cut without chipping). Cut oak and beech at reduced speeds (3000-4000 rpm) to avoid scorching the wood.
If the room corners are not exactly 90 degrees (which is common in old houses), adjust the cutting angle experimentally. Make a test cut on short scraps, check the fit on site, and correct the angle.
Fastening
a decorative elementA wooden cornice is attached in a combined manner: adhesive along the entire length plus mechanical fasteners.
Adhesive: Use polyurethane wood glue (construction adhesive like "liquid nails") or specialized molding adhesive. Apply the adhesive with a notched trowel (4-6 mm teeth) to the back of the cornice or in dots every 30-40 cm. Press the cornice against the surface and hold for 10-15 seconds.
Mechanical fasteners: For lightweight cornices (up to 80 mm wide, made of pine or linden), headless nails (finish nails) 40-50 mm long, driven every 50-60 cm, are sufficient. For heavy cornices (over 100 mm wide, made of oak or beech), use 4x60 mm screws, driven into pre-drilled 3 mm diameter holes. Fastening spacing: 30-40 cm.
Sink nail heads 2-3 mm with a nail set. Fill the holes with a wax pencil matching the wood tone or acrylic wood filler, then sand smooth.
Final finishing
After installation, the cornice requires finishing (if supplied unfinished).
Sanding: Sand the filled fastener areas with 180-220 grit sandpaper. Remove dust with a damp cloth.
Priming: Apply wood primer in 1-2 coats. The primer fills pores, reduces absorbency, and ensures even paint coverage.
Painting or staining: For classic interiors, use water-based enamel (white, cream, ivory). Apply 2-3 thin coats with a brush or spray gun, allowing 4-6 hours drying time between coats. For interiors where wood grain is important, use stain (water-based or alcohol-based) followed by varnish or oil. Apply stain with a brush or sponge, wiping off excess with a rag. Apply varnish in 2-3 coats with intermediate sanding using 320-400 grit sandpaper.
Distressing: For Provence, shabby chic, or vintage styles, use a distressing technique. First apply a dark stain, then white or cream paint, lightly sand the raised profile parts to reveal the dark base. Seal with wax or matte varnish.
FAQ: answers to practical questions
What is the difference between a cornice and a molding?
A cornice is a horizontal projecting element that crowns a structure (wall, opening, building). Molding is a more general term for any profiled strip used for decoration. Molding can be horizontal, vertical, or slanted. A cornice is a type of molding with a specific function and placement.
Can a ceiling cornice be used as a door cornice?
Technically yes, if the profile is suitable. But ceiling cornices are usually wider (80-150 mm), which is excessive for door applications. A door cornice should be more compact (60-100 mm), otherwise it will visually overwhelm the door. Also, a ceiling cornice is designed for attachment in two planes, while a door cornice is attached in one, requiring more robust fastening.
Which cornice is stronger: wood or polyurethane?
Wooden cornices are stronger in bending and compression—oak hardness is 3.7-4.0 HB versus 0.5-0.8 HB for polyurethane. But polyurethane is more impact-resistant—under strong impact, wood may split, while polyurethane deforms but does not break. For ceiling cornices (not subject to mechanical stress), the difference is negligible. For door cornices in high-traffic areas, polyurethane may be preferable.
Does a wooden cornice require additional treatment with protective compounds?
It depends on the room. For dry rooms (living room, bedroom, study) with normal humidity (40-60%), standard finishing with paint or varnish is sufficient. For damp rooms (kitchen, bathroom), additional treatment with water repellents or the use of moisture-resistant varnishes is required. Treat the cornice on all sides (including the back) to prevent moisture absorption and warping.
How long does a wooden cornice last?
With proper installation and finishing—50-100 years. Oak and beech hardly age, maintaining strength for decades. Refinishing (repainting, re-varnishing) may be needed every 15-25 years, but the cornice itself remains functional. Polyurethane cornices last 30-50 years, after which they may yellow (especially in sunlight) or crack.
Can a cornice be installed on a stretch ceiling?
Yes, but with limitations. The cornice is attached not to the stretch fabric (it cannot support the weight), but to the wall slightly below the ceiling level. A 10-20 mm gap is created between the top edge of the cornice and the fabric. This gap can be used for hidden LED lighting. An alternative is installing mounting blocks behind the stretch fabric during ceiling installation. The cornice is then attached to these blocks through the fabric.
Which cornice to choose: solid wood or laminated?
Solid wood (cornice milled from a single piece) is stronger, has continuous grain, but is more expensive and prone to warping with humidity changes. Laminated wood (glued from lamellas) is more dimensionally stable, does not warp, is cheaper, but has glue lines that may be visible with translucent finishes. For painted cornices (white enamel), there is no difference. For stained and varnished finishes, solid wood is better.
How to calculate the amount of cornice needed?
For a ceiling cornice, measure the room's perimeter (sum of all wall lengths). Add 10% for miter cuts and possible waste. Divide by the length of one strip (usually 2.4 or 2.6 meters). Round up to the nearest whole number. Example: room 4x5 m, perimeter 18 m, with margin 18 × 1.1 = 19.8 m, divide by 2.4 = 8.25, round up to 9 strips.
For a door cornice, measure the opening width, add 50-100 mm on each side (cornice overhang beyond the casing). Usually one strip 1.2-1.5 meters is enough.
Conclusion: Cornices as the language of architecture
A door cornice and a wooden cornice are not just strips covering joints. They are elements of architectural language used to create the character of a space. Properly chosen cornices transform an ordinary room into a thoughtful interior where every detail is in its place.
A door cornice is a way to highlight an opening, give it significance, and create architectural hierarchy: some doors are simple (to utility rooms), others are framed with casings, and others are crowned with cornices (main entrances). This hierarchy is instantly perceived, creating an understanding of the house's structure.
A wooden cornice is a choice for quality, durability, and naturalness. Wood ages nobly, acquiring a patina of time. In twenty years, a wooden cornice will look even better than on the day of installation—with history, with character. Polyurethane will yellow during that time and require replacement.
Door DecorationUsing cornices transforms an opening into a composition worth contemplating. Instead of a utilitarian element (a door as a means of separating rooms), an architectural object emerges, contributing to the overall aesthetics of the home.
To bring your ideas for creating harmonious interiors to life, STAVROS offersWooden cornicespremium quality from solid oak, beech, ash.
STAVROS production uses selected chamber-dried raw materials (8-10% moisture content), ensuring geometric stability of products. Dimensional tolerances of ±0.3 mm represent a precision level that guarantees perfect element joining. Sanding is performed in multiple stages with final treatment using 220-240 grit abrasives, creating a silky surface.
The catalog features over 30 profiles of ceiling cornices with widths from 50 to 150 mm — from minimalist modern to ornate classical designs. Door cornices are custom-made considering opening dimensions, ceiling heights, and interior style. Carving of any complexity, patination, and artificial aging are available.
All products are supplied carefully sanded and ready for finishing. Upon customer request, complete finishing is performed: staining with wood stains, painting with RAL enamels, varnishing, patina application. Finishing is done in painting booths with temperature and humidity control, ensuring uniform coating and durability.
STAVROS professional consultants will help select cornice profiles considering ceiling heights, interior style, and room features. Free calculation of required materials, installation and finishing recommendations, assistance in choosing complementary elements (door casings, baseboards, moldings).
In-house full-cycle production guarantees quality control at all stages — from wood cutting to final packaging. Warehouses in Moscow and Saint Petersburg ensure quick shipment of popular items. Delivery across Russia with professional packaging that prevents transportation damage.
Visit STAVROS showrooms to see all cornice profiles in person, compare textures of different wood species, and evaluate processing quality. Designers will help visualize selected elements in the context of your interior and suggest optimal compositional solutions.
Create interiors where architectural logic is evident in the details. Choose cornices that don't just cover joints but create spatial character. Trust quality verified by decades of production and thousands of completed projects. With STAVROS wooden cornices, your home will gain the nobility of natural materials and the expressiveness of thoughtful architecture.
Your perfect space begins with the right details. Start the transformation today.


