Article Contents:
- Why Wooden Skirting Boards Creak and Knock – The Physics of the Problem
- Three Sound Sources in the 'Skirting Board – Wall – Floor' System
- How to Distinguish Knocking from Creaking: Auditory Diagnosis
- Diagnostic Method: The 'Hand and Step' Test
- Skirting Board is Loose – Weak Fastening as the Main Cause of Knocking
- Why Fastening Weakens Over Time
- Dowel Fastening: Lifespan and Signs of Wear
- Clamp Fastening: Why It Doesn't Creak
- How to Reinforce a Skirting Board Without Complete Dismantling
- Wood Expansion: Skirting Board Presses Against the Floor and Creaks
- Creaking Mechanism from Expansion
- End Expansion in Corners: 'Skirting Board Knocks' from Stress
- Sealing Tape Under Skirting Board – Sound Absorption
- What is Sealing Tape for Skirting Boards
- How Sealing Tape Works
- Installing Sealing Tape: Work Sequence
- Double tape: top and bottom contour
- Silicone Buffers and Spacers – Where to Install
- What is a Silicone Buffer for Skirting Boards
- Where to Install Silicone Buffers
- Homemade Silicone Spacers
- How to Tighten a Skirting Board Without Dismantling – Spot Re-gluing
- Glue Under Skirting Board for Creaking: Which One to Choose
- Spot Re-gluing Technology
- Prevention: Correct Installation with a 1–2 mm Gap from the Floor
- 1–2 mm Gap from the Floor: Technology and Purpose
- Fastening Spacing and Its Impact on Sound
- First and Last Clip – Critical Points
- Wall preparation: evenness as a condition for silence
- Additional sound causes: diagnosing non-standard cases
- Parquet creaking attributed to the baseboard
- Vibration from utility lines
- Acoustic resonance of an air pocket
- Wooden baseboard care: preventing sound issues
- FAQ - answers to popular questions
- About the Company STAVROS

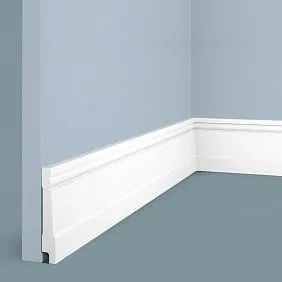
Imagine: the renovation is complete, the parquet is laid,Wooden baseboardinstalled. Everything looks exactly as you envisioned. And suddenly — the very first evening, the very first steps across the room — and you hear it. A quiet, yet distinct knocking. Or worse: a muffled creak that accompanies every movement across the floor, like an unwanted audio commentary on your own life in your own home.
A wooden baseboard creaking is not a verdict or a material defect. It's a signal: somewhere in the 'wall — baseboard — floor' system, one or more technical conditions have been violated. And these conditions can be diagnosed, corrected, and — importantly — prevented with proper installation.
This article provides a complete breakdown: why wooden baseboard knocking and creaking occur, how to diagnose the cause without disassembly, how to fix the problem with minimal effort, and how to install the baseboard initially so that silence is permanent — not the result of another repair.


Why wooden baseboards creak and knock — the physics of the problem
Before picking up tools, it's important to understand: sound is always a consequence of movement. A baseboard makes sound only when it moves. Therefore, the number one task is to determine what exactly is moving, where, and why.


Three sound sources in the 'baseboard — wall — floor' system
First source: the baseboard moves relative to the wall. The fastening has loosened or was initially insufficient. With each step, floor vibration transfers through the baseboard's base, the baseboard slightly 'pulls away' from the wall and returns. Contact between wood and the wall — or wood and a fastener — produces a characteristic dull knock.
Second source: the baseboard moves relative to the floor. The lower edge of the baseboard rests on the floor covering under pressure. When a person walks on the floor, the parquet or laminate slightly deflects — the lower edge of the baseboard 'slides' across the floor covering surface. Wood on wood or wood on laminate — characteristic creak or rustle.
Third source: the baseboard moves due to thermal expansion. A baseboard whose end butts against an adjacent plank or a corner plank without an expansion gap 'pushes' the neighboring element during thermal expansion. Stress builds in the system, which is 'released' with a characteristic creak or click when walking.
Our factory also produces:


How to distinguish a knock from a creak: auditory diagnosis
Before starting any work, you need to precisely determine the type of sound and its source — not 'roughly there,' but accurate to within a meter.
Knock (dull, percussive sound) — a sign of contact impact between two hard surfaces. Source: the baseboard hits the wall (weak fastening) or a metal anchor/cleat (no damping pad).
Creak (high-frequency rubbing sound) — a sign of sliding contact between two surfaces. Source: the lower edge of the baseboard rubs against the floor, or the baseboard rubs against the wall during lateral movement.
Click (short sharp sound) — a sign of an elastic 'snap' under load. Source: a baseboard under excessive stress (pinched between walls without an expansion gap) 'snaps back' when the load is removed.
Vibration (low-frequency hum) — a sign of structural resonance. Source: the baseboard in an 'air pocket' zone behind its back surface resonates with impact sounds (footsteps from neighbors below, washing machine operation).
Get Consultation
Diagnostic method: the 'hand and step' test
A simple diagnostic method requiring no tools:
-
Stand next to the problematic section of baseboard.
-
Place your hand on the baseboard — feel any movement with your fingers.
-
Ask an assistant to walk by with a normal step.
-
Note: does the baseboard move with the step (weak fastening) or is there sound but no movement (air pocket resonance).
Additionally: lightly press the baseboard against the wall with your hand — if the sound disappears while walking, the cause is insufficient pressure of the baseboard against the wall.
Baseboard is loose — weak fastening as the main cause of knocking
The most common reason why a wooden baseboard knocks in a room is simply loose fastening. It's not a material defect or a structural problem—it's the fastener that has stopped doing its job.
Why fastening loosens over time
Nail fastening of wooden baseboards is a traditional but not the most reliable method in the long term. A finish nail in drywall or plaster holds the baseboard for the first 1–3 years. Then:
-
Drywall under the fastening point gradually 'compresses'—the nail loses contact with the base material
-
Vibrations from walking, slamming doors, and household appliances gradually 'loosen' the nail in the wall
-
The wood of the baseboard 'breathes' with seasonal humidity fluctuations—each expansion/contraction cycle further loosens the fastening
After 3–5 years of nail fastening, it's often found that the baseboard is formally 'holding,' but when pressed by hand, it clearly pulls away from the wall by 1–3 mm. This is enough for a distinct knocking sound when walking.
Dowel fastening: lifespan and signs of wear
A dowel with a screw is a more reliable fastening than a nail. But it also has a reliable service life, depending on the wall material:
| Wall material | Reliable lifespan of dowel/screw fastening | Signs of wear |
|---|---|---|
| Monolithic concrete | 15–25 years | Practically no wear |
| Brickwork | 10–20 years | Possible crumbling of mortar between bricks |
| Aerated concrete/foam block | 5–10 years | Dowel 'widens' the hole |
| Gypsum board | 3–7 years | Dowel 'sinks' under load |
| Plaster ≥ 20 mm | 7–12 years | Dowel pulls plaster plug with it |
In porous bases (aerated concrete, drywall)—'umbrella' dowels or chemical anchors: they provide significantly more reliable fastening by distributing the load over a larger area.
Clamp fastening: why it doesn't creak
Clip mounting of wooden skirting—a system of metal clips that are fixed to the wall and hold the baseboard in a 'groove.' The fundamental difference from nail and dowel fastening: the baseboard is not pierced through by the fastener but 'snaps' into the clip.
Why clamps don't cause knocking:
-
The metal clip has slight elasticity—it 'springs' during vibration, not transmitting a hard impact back to the baseboard
-
Contact between the baseboard and the clip is point-based, dampened
-
With the correct clip spacing (350–400 mm), the baseboard is evenly pressed along its entire length without 'sagging' sections
Clip fastening — the first choice for installationwooden baseboardin rooms with hard floor coverings and heavy use.
How to reinforce a baseboard without complete removal
If the baseboard is mounted on nails and has started to 'shift' — reinforcement without removal is possible in 70% of cases:
Re-gluing method. Use a thin syringe or narrow spatula to inject acrylic mounting adhesive into the gap between the baseboard and the wall. Press the baseboard against the wall and secure it with painter's tape for 24 hours. Works if the gap between the baseboard and the wall is 1–3 mm — enough to inject the adhesive.
Additional anchor method. Drill a pilot hole through the baseboard into the wall at a 45° downward angle in a visible spot (preferably closer to the floor where it will be hidden). Drive a countersunk screw, sink it into the baseboard body, and fill with wood-colored putty. A 'rough' method, but reliable where aesthetics allow.
Fastening replacement method. Remove the baseboard in the problem area (1–2 planks), install new anchors in the wall (chemical anchors in porous substrate), reinstall the baseboard using clips. The most labor-intensive, but the most durable.
Wood expansion: baseboard presses against the floor and squeaks
The second most common source of squeaking in wooden baseboards is thermal and moisture expansion of wood due to improper installation.
Squeak mechanism from expansion
During installation, the baseboard was set with a 0 mm gap from the floor or even pressed against the floor covering. In summer or with humidity changes, the wood expands: the baseboard 'grows' in width — and the bottom edge starts pressing against the floor surface. Parquet or laminate 'resists' — friction occurs between the baseboard's bottom edge and the floor covering. When walking, the parquet flexes and 'releases' the pressure — squeak.
A characteristic sign of this type of squeak: the sound from the wooden baseboard has a 'sliding' nature, intensifies in warm seasons or damp weather, and weakens or disappears in dry winter periods.
End expansion in corners: 'baseboard knocks' from stress
A special case — a baseboard whose ends press against adjacent planks without an expansion gap. On a long straight section (3–4 meters), end expansion is 0.5–1 mm. If there is a rigid stop at one end (e.g., door trim or a corner element without a gap), the baseboard 'bows' or 'pops' with a characteristic sound when expanding.
This is exactly the case when the baseboard knocks against the wall not from weak fastening, but from excessive internal stress. Diagnosis: when pressing the baseboard away from the wall — the sound doesn't change (fastening is normal). But in the corner or joint area, a periodic clicking sound is heard in warm weather.
Solution: complete removal of the problem section, trimming the plank end to create a 0.8–1.2 mm gap, reinstallation.
Sealing tape under baseboard — sound absorption
Backing for wooden baseboard — one of the most effective and lesser-known methods for eliminating and preventing sound. This is a material installed on the back surface of the baseboard (the side facing the wall) and performs several functions simultaneously.
What is baseboard sealing tape
Baseboard sealing tape — a self-adhesive strip of soft material, 8–15 mm wide, 2–4 mm thick uncompressed. Materials used:
Polyethylene foam (PE foam). The most affordable option. Excellent cushioning, moisture resistance, durability. Compression rate: 50–60% under load. Recommended thickness for baseboard: 3–4 mm.
Polyurethane foam (PU foam). A more resilient material, recovers shape better after prolonged load. Optimal for baseboards on walls with minor irregularities — the tape compensates for substrate relief.
EPDM rubber tape. The most durable option, resistant to temperature effects. Used in rooms with underfloor heating, where regular polyethylene foam may lose resilience from heat.
Cork tape. Natural material with excellent acoustic characteristics. Absorbs sound more effectively than synthetic tapes. Slightly more expensive, but justified in premium interiors with natural wood.
How sealing tape works
The tape is installed on the back vertical surface of the baseboard — the one that contacts the wall. When installing the baseboard, the tape compresses between the baseboard and the wall, creating constant elastic pressure that:
-
Holds the baseboard in a stable position, compensating for minor wall irregularities
-
Dampens vibration transmitted through the wall or floor (footsteps, appliance operation)
-
Eliminates direct rigid contact between wood and plaster or drywall — a source of knocking when the baseboard moves
Tape thickness of 3–4 mm provides significant allowance for compensating wall irregularities and damping baseboard movements during seasonal changes.
Sealing tape installation: work sequence
Applying tape to an already installed skirting board (without removal) is possible in a limited number of cases — only if there is a gap ≥ 3 mm between the skirting board and the wall. A more effective method is application before installation:
-
Clean the back surface of the skirting board from dust and oil contamination.
-
Remove the protective paper from the self-adhesive tape.
-
Apply the tape along the back surface of the skirting board — continuously along the entire length.
-
For a skirting board width ≥ 80 mm — two parallel tapes: one at the top edge of the back surface, the second at the bottom. This ensures uniform pressure and eliminates "peeling" of the middle part.
-
Install the skirting board in standard mode — the tape will provide tight acoustic contact with the wall.
Double tape: top and bottom contour
A wide wooden skirting board of 100 mm or more requires double tape — along the top and bottom edges of the back surface. One tape in the center leaves the top and bottom edges "free" — they can vibrate independently. Two tapes — "snap" the skirting board onto the wall around the entire perimeter, eliminating any micro-movements.
Silicone buffers and pads — where to install
Sealing tape — a solution for the back surface of the skirting board. Silicone buffers — a solution for point damping in mounting areas.
What is a silicone buffer for a skirting board
A silicone buffer is a small cylindrical or disc-shaped element made of hard silicone (Shore A 40–60), which is installed between the clip (metal bracket) and the body of the skirting board. Purpose: to eliminate direct metal contact "clip — wood," which is a source of knocking during vibration.
Without a buffer: vibration from the floor → skirting board moves → wood hits the metal clip → knocking.
With a buffer: vibration from the floor → skirting board moves → wood rests against the silicone buffer → vibration is absorbed → silence.
Where to install silicone buffers
Standard positions:
-
On each clip — a cylindrical buffer with a diameter of 6–8 mm, thickness of 3–4 mm between the metal clip and the groove of the skirting board
-
In plank joint areas — a disc buffer under the end of each plank prevents end impact during thermal expansion
-
In external corners — a corner silicone insert that separates the two ends of the skirting board in a corner joint
High-risk areas:
-
Near doorways — area of active traffic, high vibration load
-
Long straight sections > 3 meters — risk of "play" in the middle of the section between mounting points
-
Areas near heavy furniture — sofa, wardrobe against the wall transmit additional load to the floor, increasing vibration in the skirting board area
Homemade silicone pads
If branded buffers are not available — an analogue can be made from available materials:
-
Wine cork, cut into circles 3–4 mm thick
-
Silicone cord with a diameter of 5–6 mm (construction, for window sealing), cut into pieces 10–15 mm long
-
Soft rubber from automotive sealing
All these materials are available and provide acceptable results when used pointwise in mounting areas.
How to tighten a baseboard without removal — spot re-gluing
Baseboard removal — a radical solution. In most cases, the squeaking of a wooden baseboard can be eliminated without removal — using spot methods.
Glue for baseboard squeaking: which one to choose
Choosing the right glue for spot re-gluing is critical: the wrong glue can fix the baseboard rigidly, depriving it of the ability to 'breathe' during seasonal changes — and next season the baseboard will either start squeaking again or become deformed.
Acrylic mounting adhesive (elastic, water-based): the best choice for wooden baseboards. Provides elastic adhesion — fixes but allows micro-movements. Does not emit toxic substances when drying. Removable if necessary.
Acrylic sealant (universal construction): functionally similar to acrylic adhesive. Advantage: applied from a gun in a thin continuous bead — convenient for filling the gap between the baseboard and the wall.
ABSOLUTELY NOT recommended:
-
'Liquid nails' (mounting adhesive based on high-rigidity polymers) — create a rigid bond; when the wood expands, they 'rip out' a piece of the wall or deform the baseboard
-
Epoxy adhesives — rigid, irreversible, incompatible with the movement of wooden baseboards
-
Silicone sealants — poor adhesion to wood, easily 'peel off'
Spot re-gluing technology
If the gap between the baseboard and the wall is ≤ 2 mm:
-
Fill a narrow cartridge with acrylic adhesive or use a construction syringe.
-
Insert a thin nozzle into the gap between the baseboard and the wall — along the entire length of the problematic section.
-
Apply adhesive in small portions every 15–20 cm.
-
Press the baseboard against the wall — with your hands, then secure with painter's tape every 20–25 cm.
-
Leave for 24–48 hours until the adhesive fully cures.
-
Remove excess adhesive that has squeezed out of the gap — before it fully dries, it can be wiped off with a damp cloth.
If the gap between the baseboard and the wall is > 3 mm:
A large gap means the baseboard has significantly pulled away from the wall. Adhesive alone won't hold it — temporary mechanical pressure is needed. Algorithm:
-
Apply adhesive to the back surface of the baseboard (where it meets the wall).
-
Press the baseboard firmly against the wall — an assistant holds it while you secure it with tape.
-
Additionally: a thin 3×40 mm screw through the baseboard into the wall at a 45° angle — in an inconspicuous place, closer to the bottom edge.
-
After 48 hours, remove the tape, cover the screw with wood filler.
Prevention: proper installation with a 1–2 mm gap from the floor
The best way to fight squeaking is to prevent it. Properly performed installation of a wooden baseboard eliminates all the mentioned problems without additional measures.
1–2 mm gap from the floor: technology and purpose
A gap between the lower edge of the baseboard and the surface of the floor covering is a mandatory element of professional installation. Not 'the baseboard is pressed against the floor,' but 'the baseboard hangs 1–2 mm above the floor.'
Why the gap is needed:
-
Floor covering (parquet, laminate) 'breathes' — expands and contracts with changes in temperature and humidity. The gap allows the covering to move freely under the baseboard without friction
-
When the baseboard expands (in width), it does not 'press' against the floor — the lower edge has room to move
-
Eliminates squeaking from friction of 'wood against wood' or 'wood against laminate' when the floor moves.
How to maintain the gap during installation:
Spacer shims are used—pieces of hardboard, thin plywood, or special plastic wedges 1–2 mm thick, which are placed under the lower edge of the baseboard during installation. After securing the baseboard to the wall, the shims are removed—the baseboard 'hangs' at the required height.
Fastening spacing and its effect on sound
The more closely spaced the fastening points are, the less the baseboard 'shifts' between them, and the quieter it is. Optimal spacing depending on baseboard width:
| Baseboard width | Optimal clip spacing | Maximum allowable spacing |
|---|---|---|
| 40–60 mm | 450–500 mm | 600 мм |
| 60–80 mm | 400–450 mm | 500 мм |
| 80–100 mm | 350–400 mm | 450 мм |
| 100–120 mm | 300–350 mm | 400 мм |
A wide baseboard requires more frequent fastening—it has a larger surface area and without sufficient fixation points, it will 'warp' during temperature changes, creating vibrations.
First and last clip—critical points
The first clip is installed at a distance of 80–100 mm from the corner or from the edge of the doorway. The last one—similarly. These points are most vulnerable to vibration (the corner is a rigid node where the baseboard is stressed during thermal expansion), and they absolutely must not be 'saved' on.
Wall preparation: evenness as a condition for silence
An uneven wall is the root cause of many sound issues with baseboards. If the wall has a bulge or depression of 3–5 mm, it is impossible to press the baseboard evenly against it—a gap forms in the 'depression' area, and the baseboard 'shifts' under load.
Recommendations for base preparation—in the STAVROS article aboutperfect baseboard installation: leveling a strip 150–200 mm wide at the installation height of the baseboard is the minimum measure that ensures even pressure along the entire length.
Additional causes of sound: diagnosing non-standard cases
Sometimesa wooden baseboard creaks when walkingdue to reasons that lie not in the baseboard itself, but in adjacent structures.
Squeaking of parquet that is 'attributed' to the baseboard
Often, the squeaking comes from the parquet board or laminate, but is 'acoustically' perceived as baseboard squeaking—the sound reflects off the baseboard and wall, creating the illusion that the source is at the wall.
Check: step on a section of the floor 30–50 cm from the wall. If the sound is the same as at the wall—the floor is squeaking, not the baseboard. Repair: fill the parquet joints in the problematic area with acrylic sealant, treat with a special anti-squeak compound for parquet.
Vibration from utility lines
Water or heating pipes may run inside the wall behind the baseboard. When water flows through the pipes, vibration is transmitted to the wall, then to the baseboard. A characteristic sign: the sound from the wooden baseboard occurs only when water is running or the heating is on.
Solution: remove the baseboard section in the problematic area, add vibration-isolating pads between the pipes and the wall, reinstall the baseboard with sealing tape.
Acoustic resonance of an air pocket
Behind the back surface of a wide baseboard (especially with a shaped profile), an 'air pocket' forms between the baseboard and the wall—a space bounded by the baseboard in front and the wall behind. Under impact sounds (neighbors' footsteps, door slamming), the air in this pocket resonates—the baseboard acts as a membrane, amplifying the sound.
This is not a 'squeak', but a 'hum' or 'murmur'. Fix: fill the space behind the baseboard with acoustic sealant (during removal) or install a sealing strip with a thickness equal to the pocket depth (without removal, if the gap is sufficient).
Wooden baseboard care: preventing sound issues
Regular maintenance prolongs silence — literally.
Annual inspection: in spring (after the winter 'cycle' of drying) and autumn (after the summer 'cycle' of swelling) — walk along the perimeter of all rooms, check the baseboard's fit to the wall by hand. Early diagnosis of loosening fasteners — before sound appears — allows fixing the problem with spot re-gluing, without removal.
Air humidification: maintaining humidity at 45–55% RH sharply reduces the amplitude of wood movement — and thus, the load on the fasteners. This works for all wooden finishes:solid wood skirting, molding, door casings.
Refreshing oil coating: oil reduces wood's hygroscopicity — and thus, reduces movement amplitude and load on fasteners. Refreshing every 3–5 years is direct prevention of sound issues.
FAQ — answers to popular questions
Wooden baseboard squeaks only in winter — why?
Winter is the period of maximum air dryness. Wood dries out, the baseboard 'shrinks', reducing pressure against the wall or floor. In places where the baseboard was tight in summer, a micro-gap appears in winter — and squeaking occurs. Solution: air humidifier and spot re-gluing of problem areas.
Can you lubricate the bottom of a wooden baseboard to eliminate squeaking against the floor?
Not recommended. Lubricating the bottom edge of the baseboard (wax, paraffin, silicone oil) temporarily eliminates squeaking but does not address the cause — contact between the baseboard and floor. After 3–6 months, the lubricant wears off, and squeaking returns. The correct solution is to create a 1–2 mm gap between the bottom edge of the baseboard and the floor. This requires removal and reinstallation.
Baseboard knocks against the wall only in one spot — how to locate the point?
Walk slowly along the wall, applying light foot pressure on the floor near the baseboard. Where the sound is loudest — that's the source. Then press the baseboard against the wall by hand: if the sound stops — the cause is weak pressure. If not — the cause is end pressure (the baseboard is pressing against an adjacent element).
Is it necessary to remove the old baseboard before installing a new one to prevent squeaking?
Yes, strongly recommended. Installing a new baseboard over the old one increases the offset from the wall, changes the fastening geometry, creates a 'double layer' — a source of additional vibrations. Removing the old baseboard, leveling the wall strip, new anchors — that's the correct work procedure.
Wooden baseboard becomes loose after 5 years without sound — is this normal?
Normal with nail and screw fastening in drywall or light plaster. After 5 years, fasteners in porous substrate 'fatigue'. Solution: chemical anchors or remounting on clips with sealing tape.
About the company STAVROS
Silence in the home is not accidental. It is the result of properly selected material and professional installation.Wooden baseboardSolid oak baseboard, installed correctly, does not squeak, knock, or 'wobble' — it simply stands and does its job in complete silence, year after year.
STAVROS — a Russian manufacturer of architectural decor from natural solid wood. The STAVROS catalog features a complete system of wooden finishes:baseboards and moldings from solid wood, Moldings and cornices, door casings, Furniture legsanddecorative handlesOne wood species — oak or beech — a single quality standard for all system elements.
STAVROS produces baseboards with 8–10% moisture content, geometry accurate to the millimeter, and a surface ready for finishing. Material that, when installed correctly, operates in silence — and operates for a long time.
STAVROS: when the house is quiet — that's also a result of our work.