


Article Contents:
- What comes first — wallpaper or baseboard: correct sequence
- Two camps, one correct answer
- Technological chart: correct sequence with wooden baseboard
- How to bring wallpaper to wooden baseboard: trimming and joining
- Main mistake when trimming wallpaper
- Trimming technique: step by step
- Complex situations when joining wallpaper to baseboard
- Gaps between baseboard and wallpaper: how to fix with acrylic
- Why gaps are inevitable — and that's normal
- Correct technique for applying acrylic to baseboard-wallpaper joint
- Acrylic for baseboard-wallpaper joint: which one to choose
- Gap width and repair tactics
- Baseboard over wallpaper vs baseboard under wallpaper: complete analysis
- Scenario A: baseboard installed over already glued wallpaper
- Scenario B: baseboard installed on bare wall, wallpaper brought to baseboard
- Installing baseboard without damaging wallpaper
- Screw wooden baseboard — and don't ruin what's underneath
- Technique for screwing wooden baseboard to wall with wallpaper
- Protecting wallpaper during baseboard installation
- Installation with liquid nails — alternative to screws
- Painted baseboard against wallpaper: color recommendations
- Baseboard as color connector
- How baseboard color interacts with wallpaper pattern
- Joining colored baseboard and colored wallpaper — practical cases
- Painted baseboard: matte or glossy against wallpaper
- FAQ: answers to popular questions about baseboard and wallpaper
- About the Company STAVROS
Ask this question to ten foremen — and get ten different answers. Some will say: 'first glue wallpaper, then install baseboard'. Others: 'no, first baseboard, then wallpaper under it'. Third: 'there will be a gap anyway — just cover it with acrylic'. Fourth don't even understand the question.
And meanwhile, behind this seemingly technical question lies an entire system — work sequence that determines the final result. Correct sequence — and the joint betweenwooden skirting boardand wallpaper looks professional: a clean line, no gaps, no lifted edges of the wallpaper, no whitish streaks of dried glue on the front side of the baseboard. An incorrect one — and this joint will irritate you every day for the next five years of renovation.
This article is a detailed guide to all scenarios: what comes first, what comes next, how to cut, what to fill with, how to attach without damaging the wallpaper. And — a separate topic — which painted baseboard looks like an accent against the wallpaper, and which turns into a mistake.


What comes first — wallpaper or baseboard: the correct sequence


Two camps, one correct answer
The debate between 'wallpaper first' and 'baseboard first' is one of the eternal ones in the renovation community. Each approach has supporters with arguments. Let's examine both — honestly.
First camp: wallpaper first, then baseboard.
Logic: wallpaper is glued to prepared walls, the bottom edge is lowered down to the floor with a margin of 2–5 cm. After pasting, the baseboard is installed, which overlaps the bottom edge of the wallpaper — presses it against the wall and hides the trimming. No need to precisely cut the bottom of the wallpaper — the baseboard will hide everything. Fast, simple, no precise trimming.
Pros: the bottom edge of the wallpaper is securely pressed by the baseboard; no precise trimming along the bottom edge is needed; the baseboard is installed at the final stage of work — protected from contamination during pasting.
Cons: when subsequently removing the baseboard (repair, replacement) the wallpaper will come off with the baseboard — the bottom edge will be torn off; when wet, the baseboard pulls the bottom edge of the wallpaper with it; a rigid solid wood baseboard presses on the bottom edge of the wallpaper — over time, the wallpaper may ripple in the pressure zone.
Second camp: baseboard first, then wallpaper.
Logic: the baseboard is installed first — on bare or plastered walls. Then the wallpaper is glued exactly to the baseboard: the bottom edge is trimmed flush with the top edge of the baseboard. The joint between the wallpaper and baseboard is open, without overlap. The gap (if any) is filled with acrylic.
Pros: the baseboard does not 'hold' the wallpaper — when replacing the baseboard, the wallpaper is not damaged; when replacing wallpaper — the baseboard does not need to be touched; a professional approach used in serious projects.
Cons: precise trimming of the bottom edge of the wallpaper is needed — skill and care; the baseboard is installed earlier and may get dirty during pasting (protective masking is needed).
The correct answer: depends on the type of baseboard and wallpaper.
Forwooden baseboardFor solid wood — the correct approach is 'baseboard first, then wallpaper'. Justification: wood is a living material that reacts to moisture. If the wallpaper goes behind the baseboard, and then when drying the wood swells slightly or shifts — it will raise a ripple in the wallpaper at that spot. An open joint with acrylic caulking is a more durable option.
For PVC baseboards — 'wallpaper first, then baseboard' is a quite workable approach, as PVC does not react to moisture and does not deform.
Our factory also produces:


Technological map: correct sequence for wooden baseboard
-
Wall leveling (plastering, finishing putty)
-
Final sanding of walls
-
Priming walls (acrylic deep penetration)
-
Installation of wooden baseboard on bare (primed) walls
-
Painting or coating the baseboard (if it's paintable — do it now, without risk of staining the wallpaper)
-
Masking the baseboard with painter's tape along the top edge
-
Wallpaper pasting — the bottom edge is trimmed exactly along the top edge of the baseboard
-
Removing painter's tape from the baseboard
-
Sealing the joint with acrylic sealant (if necessary)
Get Consultation
How to bring wallpaper to a wooden baseboard: trimming and adjoining
The main mistake when trimming wallpaper
The most common mistake: wallpaper is cut with scissors along a line drawn with a pencil. The result — the bottom edge is uneven, wavy, with tears in the paper or non-woven backing. On the wall, this is visible as an uneven line, sometimes with gaps, sometimes overlapping the baseboard.
The correct tool for trimming wallpaper along the baseboard:
-
Sharp utility knife with a new blade (blade changed every 2–3 wallpaper sheets)
-
Long metal ruler or spatula as a guide
-
On wet wallpaper — make the trimming cut 'in two passes': first — mark the line, second — cut through
Trimming technique: step by step
Step 1: Hanging the sheet with excess. Wallpaper is hung with a 5–7 cm excess at the bottom (the lower edge overlaps the baseboard or floor). Let the wallpaper 'settle' — 10–15 minutes for vinyl, 20–30 minutes for non-woven. Wallpaper should be damp but not 'floating'.
Step 2: Press the top edge of the baseboard with a spatula. Insert a wide flat spatula into the angle between the wallpaper and the top edge of the baseboard. Press. This creates a clear fold line on the wallpaper — the knife will follow exactly this line.
Step 3: Cut along the spatula. Guide the utility knife along the spatula, cutting off the excess wallpaper. Movement — in one direction, without 'sawing' back-and-forth motions. The knife must be strictly vertical, without tilting — otherwise the cut will 'run off' and create a gap.
Step 4: Remove the offcut. Carefully remove the excess wallpaper without shifting the main sheet.
Step 5: Press the edge. Press the lower edge of the sheet to the wall with a clean damp roller or your palm. At the cut line — especially thoroughly.
Complex situations when wallpaper meets the baseboard
Situation 1: Baseboard is uneven (wave along the top edge). A wooden baseboard on an uneven wall may have a 'wave' along its top edge — sometimes a 3–5 mm variation over a 2 m length. In this case, precise trimming along the baseboard line will result in an uneven lower edge of the wallpaper, which in some places will fit tightly to the baseboard, in others — leaving a gap.
Solution: trim the wallpaper with a 2–3 mm excess below the lowest point of the wave, so that the wallpaper overlaps the baseboard from above everywhere. Then seal the thin joint between the wallpaper and baseboard with acrylic sealant.
Situation 2: Corner joint. In a corner, the lower edges of two sheets meet above the baseboard. Each sheet must be cut independently, into the corner — make a small knife cut 'for entry'. Carefully press the corner separately.
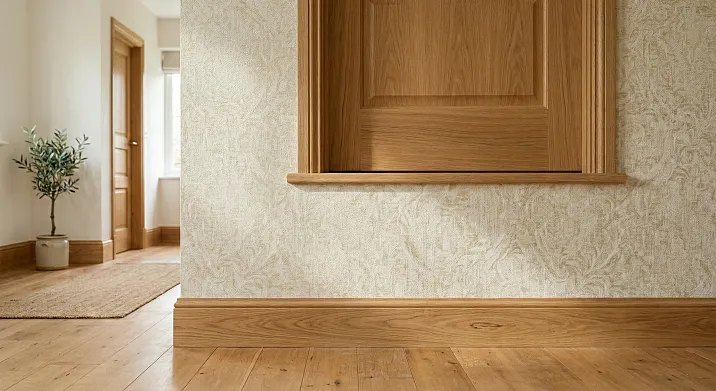
Situation 3: Doorway. In the doorway area, the woodenwooden wall baseboard goes around the wall section and meets the door casing. Here, the lower edge of the wallpaper is trimmed as on a straight section — along the top edge of the baseboard — up to the joint with the casing. The end of the sheet at the casing is cut precisely along the vertical line of the casing.
Gaps between baseboard and wallpaper: how to fix with acrylic
Why gaps are inevitable — and this is normal
Wooden baseboard and gaps — a topic many perceive as a sign of poor installation. In fact, a small gap between the baseboard and wallpaper (up to 2 mm) is the norm, not a defect. Reasons:
-
Wall is not perfectly even — the baseboard adheres to it unevenly
-
Wallpaper shrank slightly upon drying
-
Lower edge of wallpaper was trimmed with a small gap (better a small gap than wallpaper 'bunching' at the baseboard)
-
Wood moved slightly upon drying (first weeks after installation)
The professional tool for sealing these gaps is acrylic sealant. Not silicone (it doesn't paint and doesn't accept wallpaper paste), not filler (it will crack at the joint of two materials), specifically acrylic sealant — elastic, paintable, compatible with any wallpaper and paints.
Correct technique for applying acrylic to the baseboard-wallpaper joint
Tool: sealant gun (mechanical or pneumatic), narrow tube nozzle cut at a 30–45° angle — hole diameter 2–3 mm (no larger).
Surface preparation: the joint must be dry, clean, free of dust and wallpaper paste. If paste got on the baseboard during hanging — wash off, let dry. Wallpaper must be completely dry (24–48 hours after hanging).
Application:
-
Apply a thin (!) continuous bead of acrylic along the entire joint — precisely into the gap, not over the wallpaper and not over the baseboard
-
Immediately (without waiting for it to dry) — smooth the joint with a wet finger. Movement: one pass from the beginning to the end of the section — not 'back and forth'
-
Excess acrylic on wallpaper must be removed immediately (!) with a damp sponge — acrylic becomes visible on wallpaper after drying
-
Excess acrylic on baseboard — remove with a damp cloth. If the baseboard is painted or varnished — acrylic comes off easily. If the baseboard is oiled — more difficult: oil prevents acrylic from adhering, but also makes it harder to remove. In this case, apply acrylic only into the gap, without extending onto the baseboard
Drying: acrylic sealant 'sets' in 20–30 minutes, full drying — 24 hours. After drying — if the baseboard is painted — the joint can be touched up to match the baseboard color
Acrylic for baseboard-to-wallpaper joint: which one to choose
| Acrylic type | Painting | Elasticity | For joint with wallpaper |
|---|---|---|---|
| Construction acrylic (white) | Yes | Medium | Yes, universal |
| Sanitary acrylic | No (or limited) | High | No |
| Wood acrylic (tinted) | Yes | Medium | Yes, for painted baseboard |
| Silicone | No | Very High | No — cannot be painted |
| Silicone-acrylic | Limited | High | With caution |
Optimal choice: white construction acrylic sealant (Quelyd, Ottocoll, Ceresit CS 25). White — because it can be painted to match wall or baseboard color. Construction — because it is compatible with wallpaper and paints
Gap width and sealing tactics
| Gap width | Reason | Tactics |
|---|---|---|
| Up to 1 mm | Normal shrinkage, wall unevenness | Thin layer of acrylic, smooth out |
| 1–3 mm | Uneven wall, insufficient baseboard fit | Acrylic, possibly in two passes |
| 3–5 mm | Significant wall unevenness | Acrylic + acrylic putty |
| More than 5 mm | Installation problem: skirting board does not fit flush | Demolition and reinstallation with adjustment |
Skirting board over wallpaper vs. skirting board under wallpaper: complete analysis
Scenario A: skirting board is installed over already glued wallpaper
This is the most common scenario in standard renovation. The wallpaper is ready and dry. The skirting board is installed over it — the bottom edge of the wallpaper goes under the skirting board.
Advantages:
-
No need for precise trimming of the bottom edge of the wallpaper — the skirting board will hide everything
-
Skirting board installation is the final stage, after which nothing gets dirty or damaged
-
Quick and easy for standard renovation
-
The skirting board "presses" the bottom edge of the wallpaper, preventing it from lifting
Disadvantages:
-
Wallpaper under the skirting board is not pressed against the wall — there is an "air pocket" where moisture can accumulate
-
When removing the skirting board (major renovation), the bottom edge of the wallpaper will tear off
-
Solid wood skirting board on damp wallpaper in the first weeks may "shift" — wallpaper adhesive acts as a lubricant
-
Rigid wooden skirting board presses on the bottom edge of the wallpaper — after a year or two, a dent or wave may appear
Critical point: if the wallpaper was glued with an overlap on the floor (the most careless option), then before installationwooden baseboardthe bottom edge of the wallpaper must be trimmed flush with the floor — otherwise, the skirting board will stand on a "substrate" of wallpaper and be unstable. The bottom edge of the wallpaper should touch the floor but not extend onto it.
Scenario B: skirting board is installed on a bare wall, wallpaper is brought up to the skirting board
Professional approach for solid wood skirting board. Wallpaper is trimmed exactly along the top edge of the skirting board — open joint.
Advantages:
-
Independence of elements: replacing the skirting board — without damaging the wallpaper, replacing the wallpaper — without removing the skirting board
-
No "air pocket" under the skirting board with wallpaper — the wall is dry and clean
-
More durable: wood does not press on the wallpaper, no risk of waves in the pressure zone
-
Professional result: clean joint line, sealed with acrylic
Disadvantages:
-
Requires precise trimming of the bottom edge of the wallpaper — skill and proper tools are needed
-
Skirting board is installed earlier — masking is needed when gluing wallpaper
-
The skirting board–wallpaper joint is visible (even if sealed with acrylic) — requires careful sealing
When B is better than A — unequivocally:
-
Wooden skirting board 80 mm high or more: wide skirting board under wallpaper is a serious "air pocket"
-
Heavy wallpaper (non-woven backing 150+ g/m²): the bottom edge may deform under the pressure of a thick baseboard
-
Expensive or textured wallpaper (embossed vinyl, fabric): the bottom edge looks better 'cut flush' than 'under pressure'
Installing baseboard without damaging wallpaper
Screw a wooden baseboard — and don't ruin what's underneath it
If baseboard installation occurs after wallpapering (Scenario A), the task becomes more complicated: you need to screw a heavy wooden element to the wall without damaging the wallpaper below and above the installation line.
Main problem: when drilling, the drill can slip and puncture the wallpaper. When screwing in screws — the head can 'tilt' and tear the coating. When fitting the baseboard to length — chips and dust contaminate the wallpaper.
Technique for screwing a wooden baseboard to a wall with wallpaper
Step 1: Marking. Snap a mounting line — 5 mm below the lowest point of the wallpaper (or along the top edge of an already installed baseboard). Mark the fastener points (spacing 40–50 cm).
Step 2: Drilling. Drill — with a depth stop (stop collar or painter's tape on the drill bit). Drill strictly horizontally, without tilting. Drill bit touches the wall — don't push, let it enter on its own.
Step 3: Installing wall plugs. Plastic wall plug is driven into the drilled hole with a careful hammer (not a sledgehammer!). Plug — flush with the wall, not deeper.
Step 4: Placing the baseboard. Baseboard is put in place. Check fit to wall and floor. If there are gaps — use thin veneer shims in the necessary spots.
Step 5: Screwing in screws. Screwdriver on low speed. Screw is countersunk 1–1.5 mm below the surface of the baseboard. Not 'dry' torque — otherwise the wood will split at the end. Not 'under-tightened' — otherwise the head protrudes.
Step 6: Concealing fasteners. Screw heads — wax pencil matching the wood tone, or wooden plug with glue (for quality installation).
Protecting wallpaper during baseboard installation
-
Painter's tape on wallpaper in the installation zone — above and below the baseboard (during drilling and sawing)
-
Before cutting the baseboard on site — move the wallpaper sheet to another wall or protect with cloth
-
Drilling dust — immediately remove with a dry brush, before it gets on wet wallpaper
-
When painting the baseboard after installation — tape on wallpaper along the entire top edge of the baseboard
Installation with liquid nails — an alternative to screws
Screw a wooden baseboardto the wall without drilling — possible when using liquid nails (construction adhesive). This is especially relevant with wallpaper on walls: drilling — risk for wallpaper, adhesive — no risk.
Construction adhesive for wooden baseboard:
-
Applied in a zigzag pattern on the back of the baseboard — not a solid layer (air escape needed)
-
Baseboard is pressed against the wall, held for 30–60 seconds (for initial setting)
-
Secured with painter's tape or tape loops for 12–24 hours
-
Full strength — after 48–72 hours
Limitations: liquid nails for wooden baseboard only work on flat walls. On uneven walls — the baseboard will fall off after a year. Also: liquid nails glue the baseboard permanently — removing it without damaging the wall is impossible.
Hybrid option: adhesive + 1–2 through screws for every 2 m of length (at the endpoints). Adhesive ensures contact along the entire length, minimal fasteners — reliability.
Painted baseboard against wallpaper: color recommendations
Baseboard as a color connector
Painted wooden skirting boardIn an interior with wallpaper, it plays a special role: it visually connects the floor and the wall. Choosing its color is not an isolated decision, it's a decision within a system: wallpaper tone + floor tone + skirting board tone.
Three basic strategies:
Strategy 1: Skirting board matching the wallpaper tone. The skirting board 'disappears' — blends with the wallpaper, the boundary between the wall and floor becomes soft. Works with solid-color wallpapers in neutral shades. With textured or patterned wallpapers — it's difficult to match the exact tone, and the discrepancy will be noticeable.
Strategy 2: Skirting board matching the floor tone. A classic approach. The skirting board is the 'vertical edge' of the floor, its upward continuation. The wallpaper starts higher: the boundary is clear, the floor visually expands.
Strategy 3: White skirting board regardless of wallpaper. A neutral solution that works with any wallpaper. A white painted wooden skirting board is the 'frame' of the interior, which does not compete with either the wallpaper or the floor. This is the safest choice for patterned wallpaper, with saturated color, or with a large pattern.
How skirting board color interacts with wallpaper pattern
| Wallpaper type | Recommended skirting board color | Why |
|---|---|---|
| Solid neutral (beige, gray) | Matching wallpaper tone or white | Soft unification |
| Solid dark (blue, green) | White or lighter than wallpaper | Prevents 'heaviness' at the floor |
| With small regular pattern | White or matching the background tone | Pattern 'continues', skirting board is neutral |
| With large botanical pattern | White — definitely | Clean frame for a complex pattern |
| Brick/stone imitation | Dark or matching the 'brick' tone | Continuation of texture |
| Solid pastel | Matching floor tone or slightly darker than wallpaper | Smooth transition |
| Flocked, textile | White | Textiles + white — a winning combination |
Matching colored skirting boards and colored wallpaper — practical cases
Striped wallpaper: with vertical stripes, the color of the wallpaper 'background' is important — the skirting board should match the background tone. The stripes are trimmed horizontally, and the background 'continues' downward as the skirting board. With horizontal stripes — a painted skirting board should precisely 'continue' one of the stripes: either the bottom horizontal stripe (which 'transitions' into the skirting board) or a white neutral one.
Wallpaper with wood imitation: the combination 'wood-look wallpaper' +Wooden skirting board K-series STAVROSmade from solid wood — is one of the most convincing options. Real wood at the floor + wood imitation on the wall: the difference is perceived as 'natural + decorative,' but not as a 'mismatch.'
Wallpaper with metallic print (gold, silver): wooden skirting board with gold patina — a direct rhyme with the wallpaper's metallic print. Skirting board made ofthe K-series STAVROS moldingwith a shaped profile for gold patina (dark base + gold 'scraped' on the raised parts) — a luxurious finishing touch for an interior with metallic accents.
Painted skirting board: matte or glossy against wallpaper
Matte paint on a skirting board — an unconditional choice for wallpaper with any texture. A glossy skirting board next to matte wallpaper — creates dissonance: the shiny horizontal strip looks out of place. Exception: a glossy skirting board with wallpaper that has a glossy finish (liquid wallpaper with mother-of-pearl, lacquered vinyl wallpaper) — here, a uniform level of shine works.
Semi-matte (15–30 GU) — a compromise: slightly 'livelier' than matte, not as flashy as glossy. For corridors and hallways where practicality is needed (semi-matte surfaces are easier to clean) — a good choice.
FAQ: answers to popular questions about skirting boards and wallpaper
Can wallpaper be glued directly onto a wooden skirting board?
Technically — yes. But it's not advisable. Wood is a living material: it expands and contracts with changes in humidity. Wallpaper glued directly to the skirting board will 'tear' at that point when the wood deforms. Correct method: wallpaper up to the skirting board, the joint — sealed with acrylic sealant.
How long after installing a wooden skirting board can wallpaper be glued?
If the skirting board is painted or varnished — 24–48 hours after the coating has completely dried. If the skirting board is oiled — 72 hours. An unfinished wooden skirting board — it is undesirable to glue wallpaper without masking: wallpaper adhesive will soak into the unprotected wood, leaving stains.
How to avoid waves in wallpaper near the skirting board?
The cause of waves is an air pocket or insufficient pressing of the bottom edge of the wallpaper. Prevention: apply wallpaper adhesive in a thin layer to the bottom 20 cm of the wallpaper (additional coating), firmly press the bottom edge with a roller or spatula during application. Smooth with sweeping motions 'from top to bottom' until all air is removed.
What is better for masking gaps — acrylic or silicone?
Acrylic. Only acrylic. Silicone cannot be painted, does not accept putty, cannot be cleaned without leaving marks when dirty, and yellows and peels with age. Acrylic sealant — elastic, paintable, easily removable when fresh, durable when applied correctly.
How to remove a wooden skirting board without damaging the wallpaper?
If the skirting board is installed over the wallpaper: slide a narrow spatula under the top edge of the skirting board, carefully pry it away from the wall — the bottom edge of the wallpaper will come off with the skirting board. This is inevitable. If it is necessary to preserve the wallpaper — at the bottom edge of the wallpaper, cut along the top edge of the skirting board with a sharp knife (through the wallpaper into the wall), only then remove the skirting board.
Is it necessary to prime a wooden skirting board before gluing wallpaper next to it?
Yes — if the skirting board is not coated with paint or varnish. Unprotected wood absorbs moisture from the wallpaper adhesive applied to the lower part of the wall. Primer on the skirting board — 1 coat of acrylic primer — seals the pores, preventing absorption.
About the company STAVROS
In the matter of wallpaper and skirting boards, not only installation is important — the quality of the skirting board itself is crucial.Wooden skirting board K-series STAVROSmade from kiln-dried oak and beech (moisture content 8–10%) — stable geometry without deformation even with seasonal humidity changes in the apartment. This is critical specifically in combination with wallpaper: an unstable skirting board 'moves' and pulls the bottom edge of the wallpaper, a stable one — stands like a monolith.
The top edge of the skirting board — sanded to P180, perfectly straight, without waves along its length. It is along this edge that wallpaper is trimmed — and the result is clean. Over 30 profiles: from the minimalist K-034 (40 mm, flat) to the monumental K-066 with classic shaped relief. Forwide wooden baseboardin classic interiors with expensive wallpaper — precisely this skirting board, precisely this wood.
Additionally:Carved Mouldingsmade from the same solid wood,KZ-series cornicesfor ceiling framing,Furniture wooden handles— a unified wooden decor system that looks coordinated in any interior, including interiors with designer wallpapers.
Samples: 180 rub./set. Warehouse in Moscow and Saint Petersburg. Consultation: 8 (800) 555-46-75.
STAVROS — because the right baseboard and the right installation are two different things, and both are important.


