


Article Contents:
- Three Types of Skirting in the Kitchen: Floor, Plinth and Countertop Junction
- Anatomy of Kitchen Skirting: Why There Are Three
- Why Wood is Better Than Plastic in the Kitchen
- Wooden Floor Skirting in the Kitchen — Moisture-Resistant Species and Finishes
- Which Wood Species Can Withstand Kitchen Conditions
- Profile Rating for Kitchen Floor Skirting
- Finish for Wooden Skirting in the Kitchen
- Skirting for Kitchen Unit Junction with Wall — Cove or Molding?
- Upper Unit Junction: A Technical Problem with an Aesthetic Solution
- Cove or Molding: What's the Difference
- Unit Junction with Wall: Side Adjacencies
- Wooden Countertop Skirting — Joint Protection and Aesthetics
- Why the Countertop-Wall Joint is the Most Critical
- Profiles for Countertop Skirting
- Material for Countertop Skirting: Maximum Requirements
- Wooden Countertop + Wooden Skirting: The Perfect Combination
- Wooden Molding for Kitchen: What to Order as a Set
- Complete Kitchen Molding Map
- Order Volume Calculation for an 8 m² Kitchen
- Additional Items for a Unified Ensemble
- Installation, Finish, Maintenance in the Kitchen
- Installing Wooden Skirting in the Kitchen: Step by Step
- Finishing Wooden Skirting in the Kitchen: Step-by-Step Technology
- Maintenance of Wooden Skirting in the Kitchen
- FAQ: Answers to Popular Questions
- About the Company STAVROS

The kitchen is the most aggressive room in the house in terms of finishing operating conditions. It simultaneously features: temperature fluctuations from cold floors to hot stovetops, splashes of water and oil, steam from pots, condensation on surfaces, mechanical impacts from dropped objects. Any material in the kitchen works under extreme conditions.
And yet, it is precisely hereWooden baseboardwood is used — and used correctly — under one condition: if the right species, the right finish, and the right installation method are chosen. Wood in the kitchen is not romance defying common sense. It is a professional choice with a professional approach.
In this article, we will examine all three types of skirting found in the kitchen: floor skirting at the base of walls, furniture plinth under the unit, and skirting for the countertop junction with the wall. Three different tasks — three different solutions — one material. And at the end — a complete algorithm for a comprehensive order and installation.


Three types of kitchen skirting: floor, plinth, and countertop junction


Anatomy of kitchen skirting: why there are three
A person building a kitchen from scratch for the first time usually thinks of one skirting board—the one along the floor against the walls. But a professional view of kitchen space distinguishes three fundamentally different 'junction zones,' each requiring its own solution.
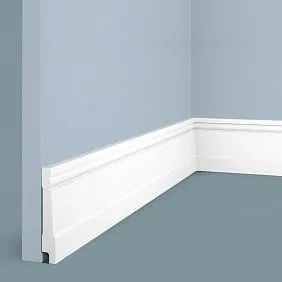
Zone one: wall–floor. The classic floor skirting. Covers the expansion gap between the floor covering (tile, laminate, parquet) and the wall. In the kitchen, it's in the highest-risk zone: moisture accumulates here, floors are washed here, spills flow here. Requirements: moisture resistance of the material and finish.
Zone two: cabinet plinth–floor. The furniture plinth skirting. Covers the lower space under kitchen cabinets—between the unit's adjustable legs and the floor. Standard height: 100–150 mm. Requirements: ability to withstand scrubbing with a sponge, resistance to grease stains.
Zone three: countertop–wall (backsplash). Skirting for countertop junction. Covers the joint between the horizontal plane of the work surface and the vertical plane of the backsplash or wall. This is the 'hottest' zone in both literal and figurative senses: splashes, grease, steam. Requirements: complete joint sealing, moisture resistance, ease of cleaning.
Three different zones with different loads—and for each, there is its own technical and aesthetic solution from the arsenalwooden trim.
Our factory also produces:


Why wood in the kitchen is better than plastic
A question often asked aloud: why use wood in the kitchen when there are special moisture-resistant plastic skirting boards?
The answer is both technical and aesthetic.
Technically: properly treated wood (oil, hard wax, varnish) has a service life of 10–15 years in the kitchen without losing appearance with proper care. Plastic skirting yellows after 3–5 years, cracks at seams, loses shape in areas of temperature fluctuations. Wood 'ages' gracefully—plastic degrades.
Aesthetically: in a kitchen with wooden elements—wooden countertop, fronts, bar stool legs—wooden skirting creates a unified ensemble. Plastic skirting next to wooden elements is always a dissonance visible to any non-professional.
Practically: wooden skirting can be repainted or recoated with oil if necessary. Plastic, once it loses appearance, can only be thrown away.
Get Consultation
Wooden floor skirting in the kitchen—moisture-resistant species and finishes
Which species can withstand kitchen conditions
Not all wood species tolerate kitchen conditions equally well. Selection criteria: density (higher means less moisture absorption), natural resin content (resins are natural hydrophobes), and stability under humidity fluctuations.
Oak—the best choice for kitchen floor skirting. Density 700–750 kg/m³, high tannin content, excellent moisture resistance with proper treatment. Under hard oil-wax or polyurethane varnish—serves for decades. In the STAVROS catalog, the entire K-series is available in oak: K-034, K-006, K-070, K-071, K-009, and other models.
Larch—a resinous coniferous species with natural moisture resistance. Resin content forms a natural hydrophobic barrier—which is why larch is used in saunas, piers, open terraces. In the kitchen, it's an exceptionally reliable material. Under oil, it gives a characteristic light-warm tone with expressive growth rings—Scandinavian character.
Beech—less moisture-resistant than oak and larch in its raw state. But under white or colored enamel paint—completely isolated from moisture impact. Therefore, for white kitchens, beech is an excellent choice: under white matte enamel, it gives a perfectly smooth surface without a visible grain pattern.
Pine—acceptable with quality finishing: 2 coats of primer + 2 coats of varnish or enamel. Without finish—not recommended: soft structure quickly absorbs moisture and grease.
Profile rating for kitchen floor skirting
In the kitchen, floor skirting is often hidden behind cabinets—visible only on 'open' sections. This is an important observation: there's no need to buy expensive ornamental profiles for areas that won't be seen. Skirting behind cabinets is purely technical. Skirting on open sections is decorative.
For open sections of the kitchen (between cabinets and door, under window, along island wall):
-
K-006 (from 440 rub./lm)—moderate classic profile, universal
-
K-070 (from 950 rub./lm)—more elaborate profile for classic kitchens
-
K-034 (from 230 rub./lm)—concise straight profile for modern and Scandinavian kitchens
-
K-125 (from 270 rub./lm)—minimalist profile for kitchens without ornament
For zones behind cabinets (technical sections):
-
K-034 (from 230 rub./lm)—minimally necessary profile, only for gap closure
-
You can use the same profile as on open sections—to simplify ordering
Wooden skirting board finish for the kitchen
The finish is a key factor in the durability of a wooden skirting board in kitchen conditions.
Hard oil-wax (Osmo, Rubio Monocoat and similar). Penetrates the wood structure, creates internal protection, does not form a film. Advantage: easy to repair locally without complete redoing in case of damage. Disadvantage: less moisture-resistant than varnish with constant water contact.
Polyurethane varnish — a polymer film on the surface. Maximum moisture resistance among all wood finishes. In the kitchen — the preferred choice. Matte or satin finish: 2–3 coats with inter-coat sanding (grit 240). Service life without renewal: 8–12 years.
Alkyd-urethane varnish — a compromise between oil-wax and polyurethane. Good moisture resistance, a 'warmer' look compared to pure polyurethane, possibility of spot repair.
Matte acrylic enamel — for skirting boards intended for painting (white kitchen, colored kitchen). Creates a reliable vapor-impermeable film. 2 coats of enamel over a primed surface — the finish withstands washing with a sponge without damaging the appearance.
Important rule: the kitchen skirting board is painted before installation (including ends and the back side) — this prevents moisture penetration through unfinished surfaces. Final touch-up of joints with acrylic sealant — after installation.
Skirting board for the junction between the kitchen unit and the wall — cove or molding?
Upper junction of the unit: a technical problem with an aesthetic solution
The upper sections of a kitchen unit typically do not fit tightly against the ceiling: a gap of 20–80 mm remains (depending on room height and upper cabinet height). This gap is a standard 'kitchen problem': dust, grease, and cobwebs accumulate there, and it's practically impossible to reach during cleaning.
Solution: a decorative cornice or cove made of wooden molding, covering the gap. Mounted along the top edge of wall cabinets — or directly to the ceiling above them.
Functions:
-
Covers the technical gap between the top of the unit and the ceiling
-
Creates a 'finishing touch' for the upper tier of the kitchen — analogous to a ceiling cornice in a living area
-
Protects the space above the cabinets from dirt accumulation
Cove or molding: what's the difference
Cove — a small rounded profile (quarter-round or ogee), mounted in a corner. Used in the kitchen:
-
For sealing the joint between the countertop and the wall (internal corner)
-
For sealing the joint between the wall tile backsplash and the upper cabinets
-
As a decorative 'shelf' at the junction of the ceiling and upper cabinets with a small gap (up to 30 mm)
Molding (cornice strip) — a wider profile with a decorative cross-section. In the kitchen, it is mounted on top of the upper cabinets as a 'unit cornice'. Creates architectural completeness for the entire kitchen ensemble. With the correct profile choice, the kitchen unit's cornice strip 'rhymes' with the floor skirting board — and the entire kitchen becomes a unified system.
From the STAVROS catalog for the role of a kitchen unit cornice strip:
-
K-034 (from 230 rub./lm) — a minimalist strip for modern kitchens
-
K-125 (from 270 rub./lm) — a slightly more substantial profile
-
K-006 (from 440 rub./lm) — moderately classical — for kitchens with molded fronts
-
K-071 (from 1,140 rub./lm) — a richer profile for high-end classic kitchens
Unit junction with the wall: side adjacencies
Where the side of the kitchen unit meets the wall (e.g., near the refrigerator or door opening), a visible gap often remains. It is covered with a vertical overlay — a narrow strip 30–50 mm wide, of the same wood species as the skirting board. Installation: liquid nails or finish nails.
Material: beech or oak from the same batch as the floor skirting board. With unified painting — an absolutely unnoticeable, 'native' element.
Skirting board for a wooden countertop — joint protection and aesthetics
Why the countertop-wall joint is the most critical
The kitchen work area is a place of maximum concentration of moisture, grease, and mechanical impact. The countertop is the horizontal surface used for cutting, placing hot items, and spills. The wall (backsplash) is the vertical surface that catches splashes from cooking and washing. The joint between them is a 'dead zone' where everything accumulates but is difficult to clean.
If this joint is not sealed, moisture penetrates into the countertop substrate and the wall. This leads to swelling of the countertop at the rear edge, mold in the gap, and deterioration of the wall under the backsplash tiles. All of these are consequences of an unprotected joint.
A wooden skirting board for the countertop-to-wall junction (wooden countertop skirting boards) is a profiled strip that:
-
Physically closes the gap between the rear edge of the countertop and the wall
-
Creates a decorative transition from the horizontal plane to the vertical
-
Provides sealing (in combination with silicone sealant under the strip)
Profiles for countertop skirting
For the countertop-to-wall junction, narrow profiles with a rounded internal corner or beveled cross-section are optimal:
Cove (quarter-round) — a classic option. Radius 15–25 mm. Installed in the corner between the countertop and wall. Covers gaps up to 20 mm. Easy to install — does not require precise mitering in corners if corner blocks are used.
Corner molding — a straight profile with a 90° angle, overlaps the joint from both sides. A more 'strict' appearance compared to cove. Suitable for modern kitchens with rectangular geometry.
Narrow decorative molding with a slight relief — for classic kitchens with molded fronts. Creates a 'framed' accent on the countertop-to-backsplash transition.
From the STAVROS catalog, suitable narrow profiles — K-034 (from 230 rub./lm), K-105 (from 300 rub./lm) — can be used as a wooden countertop skirting board in the role of a decorative junction molding.
Material for countertop skirting: maximum requirements
The skirting for the countertop junction is the most moisture-loaded element among all wooden moldings in the kitchen. Therefore, the requirements for it are the strictest:
-
Wood species: oak or larch. Only dense, moisture-resistant species.
-
Finish: polyurethane varnish in 3 coats. Painting — acrylic enamel in 2–3 coats with prior priming. Oil-wax — only as a temporary solution requiring annual renewal.
-
Sealing: before installation — a layer of silicone sealant on the back of the skirting and on the wall-countertop joint. After installation — additional sealing of the seam with color-matched sealant. This is critically important: without sealant, the skirting is only decoration, not protection.
-
Installation: adhesive + finishing nails. Never use exposed screws — they create points for moisture penetration.
Wooden countertop + wooden skirting: the perfect combination
A special case — a kitchen with a wooden countertop. This is one of the most beautiful and complex options for kitchen finishing. A wooden countertop made of oak or ash requires regular maintenance but creates an incomparable 'living' atmosphere.
In this case, the skirting for the countertop-to-wall junction must be made from the same wood species as the countertop. An oak junction skirting next to an oak countertop — under a unified oil-wax finish — is the only correct choice. Any other creates a disconnect.
Wooden moldings for the kitchen: what to order as a set
Complete map of kitchen moldings
When a kitchen is designed from scratch or completely remodeled, it makes sense to order all wooden moldings as a set. Let's consider the complete 'map' of all molding positions in a kitchen:
| Zone | Element | Function | STAVROS profile |
|---|---|---|---|
| Floor — wall (open areas) | Floor skirting board | Decorative + technical | K-006, K-034, K-070 |
| Floor — wall (behind cabinetry) | Floor skirting (technical) | Technical only | K-034, K-125 |
| Countertop — wall | Splashback skirting | Sealing + decor | K-034, K-105 |
| Upper cabinets — ceiling | Cornice strip | Decorative | K-006, K-125, K-071 |
| Cabinet side panel — wall | Vertical overlay | Technical + decor | Narrow strips |
Order volume calculation for an 8 m² kitchen
Typical kitchen 3.2 × 2.5 m, one door 0.9 m, U-shaped cabinet layout along three walls (cabinet length 5.5 lm).
Baseboard:
-
Kitchen perimeter: (3.2 + 2.5) × 2 = 11.4 lm
-
Minus door opening: −0.9 linear meters
-
Total: 10.5 lm
-
10% margin: +1.05 lm
-
To order: 12 lm
Cornice strip:
-
Length of cabinet front (visible): 3.2 + 2.5 − 0.9 (door) = 4.8 lm
-
10% margin: +0.5 lm
-
To order: 5–6 lm
Countertop splashback skirting:
-
Length of countertops (rear edge): 3.2 + 2.5 = 5.7 lm (from two walls)
-
10% margin: +0.6 lm
-
To order: 6–7 lm
Total for an 8 m² kitchen:
-
Floor skirting K-006: 12 lm × 440 rub. = 5,280 rub.
-
Cornice strip K-125: 6 lm × 270 rub. = 1,620 rub.
-
Splashback skirting K-034: 7 lm × 230 rub. = 1,610 rub.
-
Total: ~8,500 rub. for all wooden kitchen moldings
This is the price of one decorative mass-market component — but for it you get a fully equipped kitchen with a unified wooden system from floor to cornice.
Additional items for a unified ensemble
Furniture legsfor bar stools or kitchen island: height 200–250 mm for bar height (≈ 100 cm), same beech or oak, same finish. Creates a 'continuation' of the wooden theme in the vertical dimension.
Decorative overlays for facades: molding frames on lower cabinet doors in the same ornamental theme as the baseboard. For classic kitchens — completes the unified decorative ensemble.
Mirror frame RM-series: if there is a mirror or decorative painting in the kitchen — a frame made of the same wood species completes the ensemble.
Installation, coating, care in the kitchen
Installing Wooden Baseboard in the Kitchen: Step by Step
Quality installation requires professional tools: a fine-toothed circular saw, miter gauges for precise angle cuts, and a drill with torque adjustment.
-
Miter saw with laser guide (45° angle for internal and external corners)
-
Water-based liquid nails (solvent-free)
-
Finish nails 40–50 mm, nail set
-
Acrylic sealant in the color of the skirting
-
Paint or oil for finish coating
Step 1. Surface preparation.
The wall must be dry — at least 28 days after applying plaster or tile adhesive. Room temperature during installation: from +15°C. The baseboard must acclimate in the room for 48 hours.
Step 2. Pre-painting.
Paint the baseboard on all sides — including the back and ends — before installation. This is critical in the kitchen: uncoated surfaces absorb moisture. Allow to dry completely.
Step 3. Cutting corners.
Internal corners: two baseboards at 45° facing each other. External corners: similarly, but in the opposite direction. In the kitchen, there are usually few corners — a U-shaped set typically does not require navigating external corners.
Step 4. Applying adhesive.
On the back of the baseboard — a 'snake' of liquid nails with a spacing of 25–30 cm. Special attention: apply sealant along the lower edge of the baseboard (in the area adjacent to the floor) — this creates waterproofing for the joint.
Step 5. Installation.
Press the baseboard against the wall for 30–60 seconds (adhesive curing time). Drive finish nails into the wall at a 45° angle through the top edge of the baseboard. Sink nail heads 1–2 mm with a nail set.
Step 6. Final sealing.
Seal with acrylic sealant in matching color:
-
Joint between baseboard and floor
-
Joint between baseboard and wall
-
Baseboard joints in corners
-
Nail holes
Smooth with a wet finger. Allow to dry for 24 hours before first washing.
Coating wooden baseboard in the kitchen: step-by-step technique
Option A: White matte kitchen
-
Sanding skirting board before installation: P180, then P240
-
Acrylic primer: 1 coat, drying time 2 hours
-
Sanding: P240
-
Acrylic matte enamel: 1st coat, drying time 4 hours
-
Sanding: P320
-
Acrylic matte enamel: 2nd coat, drying time 8 hours
-
Installation → sealing → final touch-up of joints with the same enamel
Option B: Natural oak with oil-wax finish
-
Sanding P150 → P180 → P240 along the grain
-
Applying oil-wax with a brush or pad
-
Curing time 30 minutes
-
Wiping off residue with a clean cloth until uniform matte sheen
-
Full polymerization: 24 hours at +20°C
-
2nd coat of oil-wax (optional but recommended for kitchen)
-
Installation → final treatment of joints with oil-wax
Option C: Polyurethane varnish (maximum protection)
-
Sanding P150 → P240
-
First coat of water-based polyurethane varnish: brush along the grain
-
Drying time 3–4 hours
-
Sanding P320
-
Second coat of varnish
-
Sanding P400
-
Third coat of varnish (mandatory for kitchen)
-
Full polymerization: 72 hours — only then installation
Care for wooden skirting board in kitchen
Proper care extends the service life of wooden skirting board by 2–3 times compared to neglect.
Daily care:
-
Wipe with a damp (not wet) cloth when soiled
-
Do not allow water to stand at the base of the skirting board
-
Wipe up spills immediately — not after an hour
Monthly care:
-
Washing with warm water and neutral detergent
-
Do not use abrasive cleaning agents — they scratch the lacquer finish
Annual maintenance (for oil-wax finish):
-
Light sanding with fine P400 sandpaper along the grain
-
Applying a thin layer of oil-wax
-
Rubbing and polymerization
Signs that a full finish renewal is needed:
-
Whitening of the lacquer in areas in contact with water
-
Cracking in corners
-
Darkening of the wood through the finish — a sign of moisture penetration under the finish
With timely renewal, a wooden kitchen skirting board lasts 15–20 years. This far exceeds the lifespan of any plastic counterpart.
FAQ: Answers to popular questions
Can a wooden floor skirting board be used in the kitchen next to the sink?
Yes, if it is oak or larch with a 3-layer polyurethane lacquer finish, and the joint between the skirting board and the floor is sealed with silicone sealant. Without sealing — no wood species will withstand constant water contact at the base.
Which skirting board is better for a kitchen with ceramic floor tiles?
Wooden skirting board is installed on top of the tiles — this is standard. Height: 40–70 mm (to match the height of the cabinet plinth). Profile: K-034, K-125, or K-006 — depending on the kitchen style. Mounting: liquid nails + finishing nails into the wall.
Is a skirting board needed behind the kitchen cabinet, where it is not visible?
Technically — yes, it is needed to close the expansion gap of the flooring. But decorative appearance is not important here — you can use the simplest K-034 profile for 230 rub./lm.
Wide wooden skirting board (80–100 mm) — is it suitable for the kitchen?
Suitable under the condition: the height of the cabinet plinth must be higher than the skirting board. If the plinth is 100 mm and the skirting board is 80 mm — it's fine. If the plinth is 80 mm and the skirting board is 80 mm — trimming is needed in the cabinet area.
How to paint the skirting board the same color as the kitchen fronts?
Ask the kitchen manufacturer for the color name according to the RAL or NCS catalog. Order an acrylic matte enamel with the same RAL code. Apply using the standard technique: primer + 2 coats of enamel.
STAVROS wooden moldings — are there special kitchen series?
STAVROS produces a single K-series from solid beech and oak without finish. For the kitchen, the required wood species (oak or larch) is selected and the appropriate finish is applied. There are no special 'kitchen' series — because properly prepared wood from the K-series works in the kitchen without limitations.
How much does it cost?to buy wooden baseboardfor an 8 m² kitchen?
A full set of wooden moldings for an 8 m² kitchen (floor skirting board + cornice strip + countertop edge skirting) from basic STAVROS K-series profiles — from 7,000 to 12,000 rub. Higher-class profiles (K-070 and above) — from 15,000 to 25,000 rub.
About the company STAVROS
The kitchen requires materials that not only look beautiful — but withstand what they face every day. Steam. Grease. Water. And at the same time — maintain their appearance for years.
STAVROS produceswooden K-series millwork— over 30 profiles from solid beech and oak, from 230 to 6,060 rub./lm, unfinished — for use in any rooms, including kitchens. Chamber drying to 8–10% moisture ensures geometric stability even with kitchen temperature and humidity fluctuations. 3D milling and manual sanding — this is surface quality that accepts any finish without additional preparation.
Additionally in the catalog —Furniture legsfor bar stools and kitchen islands,Decorative Insertsfor fronts,MLD elementsfor molding frames andPolyurethane cornices KPUfor ceiling design — a complete ensemble from a single source.
Shipment on the day of order. Delivery throughout Russia and CIS countries.
STAVROS — wood that knows what a kitchen is. And withstands it.


