Article Contents:
- Multi-layering in interior design: the philosophy of combining wood and polyurethane
- Wood: warmth, texture, nobility
- Polyurethane: versatility, detail, practicality
- How to combine wood and polyurethane: the principle of hierarchy
- Wooden wall elements: rosettes, overlays, carved panels
- Carved rosettes: round and oval accents
- Carved overlays: rectangular and shaped elements
- Carved panels: large-format decor
- Molding as framing: polyurethane moldings around wooden decor
- Molding frames: from simple to complex
- Moldings for panels: structuring the wall
- Moldings as horizontal belts
- Wooden baseboard as the foundation of a multi-layered composition
- Height and profile of wooden baseboard
- Baseboard Color and Finish
- Classical furniture: how it supports the decorative theme
- Carved furniture elements: connection with wall decor
- Proportions and scale
- Color and furniture finish
- Practice of creating multi-layered composition: step-by-step algorithm
- Step 1: Composition planning
- Step 2: Selection of materials and elements
- Step 3: Wall preparation
- Step 4: Baseboard installation
- Step 5: Installation of wall moldings
- Step 6: Installation of wooden decor
- Step 7: Installation of ceiling cornice
- Step 8: Furniture arrangement
- Color strategies for multi-layered interior
- Strategy 1: White polyurethane plus natural wood
- Strategy 2: Unified Frame Color
- Strategy 3: Tonal Transition
- Frequently Asked Questions: A Multi-Layered Interior Without Mistakes
- Conclusion: Create Your Dream Interior with STAVROS Products

Imagine an interior where walls are not merely painted or wallpapered, but transformed into a multi-layered canvas, where carved wood coexists with pristine white moldings, where classic furniture supports the decorative theme, where every element works to create depth, volume, and visual richness. How to achieve such harmony? How to combine different materials—wood, polyurethane, MDF—so they don't conflict but enhance each other? Let's explore in detail: from selectingwooden wall decor to final installationpolyurethane molding on the wall, from choosingclassic furniture to creating a unified architectural ensemble.
A multi-layered interior is not a chaotic accumulation of details, but a thoughtful composition where each layer has its purpose. The first layer is the main background (painted or wallpapered walls). The second layer is framing elements (baseboards, moldings, cornices). The third layer is volumetric decor (wooden rosettes, overlays, carved panels, polyurethane moldings). The fourth layer is furniture, which completes the composition. When all layers are coordinated in style, color, and proportions, that very feeling of luxury, completeness, and professional execution arises, distinguishing a well-thought-out interior from a random collection of beautiful items.
Multi-Layering in Interior Design: The Philosophy of Combining Wood and Polyurethane
Why combine wood and polyurethane if you can use just one? The answer is simple: each material has its strengths, and their combination yields a result unattainable with a mono-technological approach.


Wood: Warmth, Texture, Nobility
Carved wooden decoration carries the warmth of a living material. Each wooden rosette, each carved overlay has a unique texture—annual rings, rays on a radial cut, the play of light on the fibers. Wood is perceived as a premium material, associated with nature, durability, and the handiwork of a master.Buy wooden wall decor costs more than polyurethane, but it is precisely what creates accents, focal points, those details that catch the eye.
Where to use wood in a multi-layered composition? In key places—the center of a wall (a large carved rosette above a fireplace, above a console), framing for mirrors and paintings (carved solid wood frames), accent inserts in molding panels (carved overlays in the center of a panel), furniture decor (carved table legs, carved cabinet fronts). Wood works in a targeted manner, like a jewel that should not be multiplied.
Our factory also produces:


Polyurethane: Versatility, Detailing, Practicality
Polyurethane molding is a material for creating architectural frames, extended lines, and repeating elements.Moldings made of polyurethane are painted white or any other color, creating a neutral framework against which natural wood stands out. Polyurethane is lighter (density 250-350 kg/m³ vs. 500-800 kg/m³ for wood), cheaper (3-5 times less for similar detailing), moisture-resistant (can be installed in any room), and stable (does not dry out or swell).
Where to use polyurethane in a multi-layered composition? Everywhere length is needed—ceiling cornices (framing the ceiling around the room's perimeter), wall moldings (panels, frames around wooden decor, horizontal bands), door portals (framing openings), floor baseboards (if painting to match the wall color is needed). Polyurethane creates the structure, the architectural foundation upon which wooden accents are layered.
Get Consultation
How to Combine Wood and Polyurethane: The Hierarchy Principle
The main principle is material hierarchy. Wood is the highest level of decor, an accent, a jewel. Polyurethane is the frame, support, framework. Not the other way around. Imagine a composition: the center of the wall is adorned with a large carved oak rosette 400 mm in diameter, finished with natural oil (the wood grain is visible). Around the rosette is a rectangular frame made of 80 mm wide polyurethane moldings painted white. Below, at a height of 100 cm from the floor, is a horizontal band made of polyurethane molding (a panel). At the bottom is a white polyurethane baseboard 120 mm high. The entire wall is a framework of white polyurethane, in the center of which is a precious wooden rosette. The hierarchy is obvious: the rosette is primary, the polyurethane is secondary.
The second principle is color contrast. Show wood in its natural state (oil, clear varnish, light tint)—let the texture be visible. Paint polyurethane with opaque paints (white, gray, beige, any other)—let it be a neutral background. The contrast between natural wood and painted polyurethane creates visual interest and emphasizes the value of the wood.
The third principle is scale. Wooden elements are individual, relatively small (rosettes 60-500 mm in diameter, overlays 70×120 — 200×300 mm, panels 300×600 — 600×1200 mm). Polyurethane elements are extended, linear (moldings 2-2.5 m long, cornices around the entire room perimeter). Do not place large wooden panels measuring 1×2 meters next to narrow polyurethane moldings—the proportions will be disrupted.
Wooden Wall Elements: Rosettes, Overlays, Carved Panels
What is wooden wall decor? These are individual elements made of solid wood (oak, beech, ash, linden, pine), created by milling, carving, or turning, intended for mounting on vertical surfaces. Let's examine the main types.
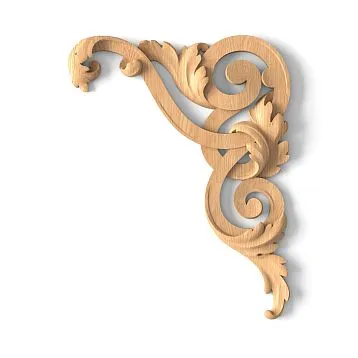
Carved Rosettes: Round and Oval Accents
Carved rosette R-06060 mm in diameter — a compact element for small accents. Floral motif with four petals, relief depth 8-10 mm. Suitable for furniture (center of doors), for corners of molding frames (instead of a 45-degree joint). Made of oak or beech, thickness 18 mm.Rosette R-049.1140 mm in diameter — medium size for walls. More complex floral ornament with scrolls, relief depth up to 15 mm. Installed on walls as a standalone accent or as the center of a molding frame.
How to mount rosettes? With glue (polyurethane or epoxy) plus one central screw (if diameter is over 150 mm). The screw is driven into the center of the rosette, the head is countersunk, the hole is filled, and after oil or varnish coating it becomes invisible. Rosettes can be painted (if white or colored is needed), but it's better to show the natural wood texture — this is their main advantage.
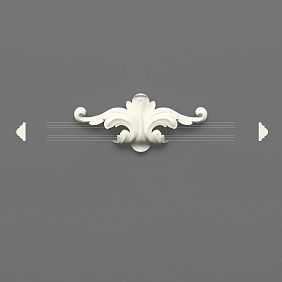
Carved overlays: rectangular and shaped elements
carved appliqués— rectangular or shaped elements sized from 70×40 mm to 300×200 mm, with a relief ornament on the front side. Overlays are used for furniture decoration (cabinet fronts, dresser drawers, chair backs), for inserts into molding panels on walls (center of a rectangular frame), for framing mirrors and paintings (corner overlays on the frame).
Overlay N.VRS-004120×80 mm in size — an element with a floral ornament (acanthus leaves, scrolls). Relief depth 12-15 mm, thickness 18 mm. Made of oak or beech. Mounting — with glue plus finishing nails (2-4 pieces at the corners, heads are countersunk and filled).Overlay N-182.1— a more complex ornament, size 150×100 mm. Suitable for large furniture (sideboards, cabinets), for central inserts in wall panels.
Where to use overlays in a multi-layered interior? In the center of molding panels on walls — this creates a focal point, attracts the eye. Imagine: a wall is divided into rectangular panels by polyurethane moldings (molding width 70 mm). Inside each panel — a smooth surface (painted or wallpapered). In the center of one of the panels (accent) — a carved overlay made of oak, coated with oil. The contrast of white polyurethane, a calm background, and natural wood creates visual interest.
Carved panels: large-format decor
Carved panels — large elements sized from 300×300 mm to 1000×1500 mm, with relief or openwork ornament, occupying a significant part of the wall.Carved wall panelsare used as accent inserts (bed headboard, wall behind a sofa, wall space between windows), as radiator screens (openwork carving allows heat to pass through), as partitions (lace panels zone the space without blocking light).
Panels are manufactured in two ways: CNC milling (precision, repeatability, detail, but the ornament is flat, relief depth 5-15 mm) or hand carving (relief depth up to 30-50 mm, volume, but expensive, time-consuming, requires a highly skilled craftsman). For multi-layered interiors, CNC panels are usually used — they are cheaper, faster, and sufficiently detailed.
How to mount panels? Large panels (over 600×600 mm) are mounted on a frame of wooden blocks screwed to the wall. The panel is screwed to the frame with screws from the back side (invisible fastening). Medium panels (300×600 mm) can be glued with polyurethane glue plus several screws for reliability. After mounting, panels are coated with oil or varnish — the wood texture should be visible.
Molding as framing: polyurethane moldings around wooden decor
A carved wooden rosette or overlay on an empty wall can look lost, random. But frame it with a polyurethane molding — and it turns into a deliberate accent, part of an architectural composition. How does such framing work?
Molding frames: from simple to complex
Simple rectangular frame — a basic technique. A rectangle of polyurethane molding is created around a wooden rosette or overlay. The distance from the edge of the wooden element to the molding is 10-20 cm (the larger the element, the greater the distance). Molding width — 50-80 mm (slightly narrower than the baseboard at the bottom of the wall, slightly wider than the ceiling cornice). Molding profile — simple (one or two grooves) or classic (roundings, protrusions).
Imagine: in the center of a wall — a carved oak rosette 300 mm in diameter. Around it, at a distance of 15 cm — a rectangular frame of polyurethane molding 70 mm wide. The molding is painted white, the rosette is coated with tinted oil (dark oak). Frame size — 90×90 cm. Inside the frame (between the molding and the rosette) — a background of the same color as the entire wall (beige, gray, any other). The effect — the rosette is clearly highlighted, perceived as a painting in a frame.
Double frame — a more complex option. Two frames are created around the wooden element: an inner one (narrow molding 40-50 mm wide at a distance of 5-10 cm from the element) and an outer one (wide molding 70-80 mm at a distance of 15-20 cm). The background between the frames can be a different color or texture (inner zone — patterned wallpaper, outer zone — smooth paint). A double frame creates even more depth, visual complexity.
Arched frame — for classic interiors. The vertical sides of the frame are straight moldings, the top side is an arched (semicircular) molding. The arch adds solemnity, characteristic of palace interiors, classicism, empire style. In the center of an arched frame, a carved rosette, a carved overlay, or evena beautiful wooden panel.
Moldings for panels: structuring the wall
The second way to use polyurethane moldings is to create wall panels. The wall is divided into rectangular sections by moldings (usually in the lower or middle part of the wall). Inside each section can be located:
-
A smooth background (painted in a contrasting color)
-
Patterned wallpaper (while the surrounding wall is smooth paint)
-
Wooden overlay or rosette (in the center of the panel)
-
Decorative plaster (texture)
wooden carving decoration for homeInside the molding panels creates maximum decorative richness. Imagine a classic dining room: the lower third of the walls (up to 120 cm from the floor) is divided into rectangular panels by polyurethane moldings. The size of each panel is 80×60 cm. Inside the panels is a background painted dark green. In the center of each panel is a small carved oak overlay measuring 100×70 mm. The moldings are painted white. The baseboard at the bottom is polyurethane, white, 120 mm high. The result is a classic English interior where wood and polyurethane work as a unified system.
Moldings as horizontal belts
The third method is horizontal moldings that divide the wall into tiers. A classic technique is a molding at a height of 100-120 cm from the floor (the boundary between the lower paneled part and the upper smooth part). A second molding is under the ceiling (the transition from the wall to the ceiling cornice). Wooden elements—rosettes, overlays, panels—can be placed between the moldings. Moldings create structure, organize the composition, and connect disparate elements into a unified whole.
Wooden baseboard as the foundation of a multi-layered composition
Any vertical composition begins with a foundation—the floor baseboard. It sets the scale, proportions, and color palette of all elements above. In a multi-layered interiorwooden skirting board purchaseit is worth it if:
-
The floor is wooden (parquet, solid wood, engineered wood)—a baseboard in the same tone creates unity
-
Natural wood finishing (oil, varnish) is planned—an oiled wooden baseboard echoes the wooden decor on the walls
-
The interior style is classic—wood is associated with tradition, quality, and premium
If painting the baseboard white or another opaque color is planned, you can use a polyurethane or MDF baseboard—they are cheaper, easier to install, and not inferior to wooden ones after painting.
Height and profile of a wooden baseboard
For multi-layered interiors, a wide baseboard—100-150 mm—is recommended. It creates a stable foundation for the entire vertical composition, visually stabilizes the walls, and emphasizes the scale. A narrow baseboard (60-80 mm) suits minimalist interiors with little decor. In a multi-layered interior, a narrow baseboard will look disproportionate.
Baseboard profile—classical profiled (with roundings, grooves) or European straight (rectangular cross-section, height 120-150 mm). A profiled baseboard echoes the profiled moldings on the walls and the ceiling cornice—everything is connected by a unified line. A straight European baseboard suits neoclassical styles where the classical foundation (molding, carved wood) is simplified and closer to modern aesthetics.
Baseboard color and finish
In a multi-layered interior, a wooden baseboard can be:
-
Natural with oil—the wood grain is visible, the color is warm (honey oak, golden oak). Such a baseboard echoes the wooden carved elements on the walls, creating material unity.
-
Tinted—oil with pigment (gray oak, graphite oak, dark walnut oak). Tinting preserves the grain but changes the color. Suitable for interiors where a cool or dark wood shade is needed.
-
Painted—opaque paint (white, gray, beige, any other). After painting, a wooden baseboard is indistinguishable from polyurethane or MDF. A painted baseboard is suitable if a uniform color for all framing elements is desired (baseboard, moldings, cornices—all white or all gray).
For maximum harmony: if the wooden decor on the walls (rosettes, overlays) is finished with natural oil, also finish the baseboard with natural oil of the same wood species. If the decor is painted, paint the baseboard the same color.
Classical furniture: how it supports the decorative theme
Classic Furnitureis an integral part of a multi-layered interior. It is not just functional (seating, storage, work space); it continues the decorative theme set by the carved wood and molding on the walls. How does this work?
Carved furniture elements: connection with wall decor
Classical solid wood furniture (oak, beech, walnut) often includes carved elements—legs (turned or carved), fronts (with overlays, milling), chair and armchair backs (with carved inserts), cabinet cornices (with carved friezes). These elements visually echo the carved decor on the walls, creating unity.
Imagine a living room: on the wall above the fireplace is a large carved oak rosette with a floral ornament, 400 mm in diameter. Next to the fireplace is an armchair with carved armrests and a carved back, the same floral motif (acanthus leaves). Opposite is a sideboard with carved overlays on the fronts, a similar ornament. All carved elements are made of oak, finished with oil, and have the same shade. The result—the interior is perceived as a unified composition where the furniture and wall decor are connected by a common theme.
Proportions and Scale
Classical furniture has solid proportions—wide tabletops, massive legs, high backs. These proportions correspond to wide baseboards (100-150 mm), large moldings (70-100 mm), and voluminous carved elements on the walls. If you place lightweight minimalist furniture (thin hairpin legs, low sofas without backs) in an interior with rich molding and carved wood, dissonance will arise. Furniture should match the decor in scale.
Color and finish of furniture
In a multi-layered classical interior, furniture can be:
-
Made of natural wood with oil or varnish—the grain is visible, the color is warm. Such furniture echoes the wooden decor on the walls.Where to buy classical wooden furnitureFrom oak, beech, walnut array — an important question, the answer to which determines quality and durability.
-
Painted — white enamel, cream, gray. Painted furniture creates lightness, airiness, characteristic of French Provence, shabby chic. Painted furniture combines with painted moldings and baseboards, creating a unified color background against which wooden accents stand out.
-
With patina — artificially aged finish (wear marks, showing base, gold or silver highlights). Patina gives furniture an antique look, enhances the sense of luxury, historical depth.
Practice of creating a multi-layer composition: step-by-step algorithm
How to implement a multi-layer interior in practice? Step-by-step algorithm from planning to final installation.
Step 1: Planning the composition
Start with a sketch. Draw the wall to scale (by hand on paper or in a graphic editor). Indicate:
-
Baseboard at the bottom (height, profile, color)
-
Horizontal moldings (if planned) — height from floor, molding width
-
Vertical moldings (if planned) — placement, width
-
Wooden elements (rosettes, overlays, panels) — size, placement
-
Ceiling cornice at the top (width, profile, color)
-
Furniture (placement relative to wall decor)
The sketch will help see the entire composition as a whole, assess proportions, understand if the interior is not overloaded with details.
Step 2: Selection of materials and elements
Determine what each element will be made of:
-
Baseboard — wood (if the floor is wooden and natural finish is needed) or polyurethane/MDF (if painting is planned)
-
Wall moldings — polyurethane (lighter, cheaper, easier installation)
-
Ceiling cornice — polyurethane
-
Wooden decor (rosettes, overlays) — oak, beech, ash (depending on floor and furniture color)
-
Furniture — solid wood of the same species as the decor
Order all elements from one manufacturer (if possible) — this guarantees profile compatibility, a unified sizing system, consistency.
Step 3: Wall preparation
Walls must be leveled, primed, painted (or wallpapered) before installing decor. If molding panels with different background colors inside and outside are planned, first install the moldings, then paint the zones in different colors (protecting moldings with painter's tape). If the background is uniform, paint the entire wall, then install moldings and wooden decor.
Step 4: Baseboard installation
Start with the baseboard — it sets the lower level. Installation of wooden baseboard — with adhesive (polyurethane) plus finishing nails or screws with countersunk heads. Corner joints — at 45 degrees (requires a miter saw). After installation, fill holes, sand, cover the baseboard with oil or varnish (if natural finish) or paint (if opaque paint).
Step 5: Installation of wall moldings
Polyurethane moldings are installed with polyurethane adhesive. Technology:
-
Marking lines for molding placement on the wall (pencil, level)
-
Cutting moldings to length and at an angle (miter saw)
-
Applying adhesive to the back of the molding (in a zigzag pattern)
-
Application to the wall, pressing, holding for 30-60 seconds
-
Sealing joints with acrylic putty, sanding
-
Painting moldings (two coats of acrylic paint)
If the moldings are wide (over 100 mm) or long (horizontal belts), additionally secure them with dowels (drilling through the molding into the wall, countersinking the heads, puttying).
Step 6: Installation of wooden decor
Carved rosettes, overlays, and panels are installed after the moldings (to precisely determine their placement—in the center of frames, in the center of panels). Installation:
-
Marking the attachment point (center of the frame, center of the panel)
-
Applying adhesive (polyurethane or epoxy) to the back of the element
-
Pressing against the wall, securing (for large elements—a central screw with countersinking)
-
Puttying the hole (if there is a screw), sanding
-
Applying oil or varnish (natural finish) or painting (opaque)
To preserve the wood texture, use oils (Osmo, Biofa, Renner)—they penetrate the wood, do not create a film, and highlight the natural grain. Varnishes (polyurethane, acrylic) create a protective film and can be glossy, semi-matte, or matte.
Step 7: Installation of ceiling cornice
The polyurethane ceiling cornice is installed last, completing the vertical composition. The technology is similar to moldings—adhesive, pressing, sealing joints, painting. Cornice width—70-120 mm (slightly narrower than the baseboard at the bottom). Color—uniform with the moldings (white, gray, any other).
Step 8: Arranging furniture
After completing the wall decor, arrange the furniture so that it supports the composition. Place large items (sideboards, cabinets, consoles) opposite accent walls (with carved elements), creating a dialogue between wall decor and furniture decor. Position small items (chairs, armchairs, tables) so they do not block the decor.
Color strategies for a multi-layered interior
Color is a key tool for creating harmony or chaos. In a multi-layered interior, several proven strategies work.
Strategy 1: White polyurethane plus natural wood
All polyurethane elements (baseboards, moldings, cornices) are painted white. All wooden elements (rosettes, overlays, furniture) are coated with natural oil (texture visible, color warm). Walls—neutral background (beige, light gray, cream). Result—elegant classic style, where white creates structure, and wood provides accents.
Strategy 2: Uniform framing color
Everything that frames (baseboards, moldings, cornices, mirror frames) is painted in a uniform color (white, gray, beige, even dark). Wooden decor (rosettes, overlays) is painted in a contrasting color (gold, silver, black) or left natural. Furniture—either in the framing color or natural wood. Result—strict consistency, monumentality.
Strategy 3: Tonal transition
Baseboard—dark (stained wood or painted polyurethane). Moldings at medium height—medium tone (gray). Ceiling cornice—light (white). Wooden decor—natural (medium tone). Result—smooth transition from dark bottom to light top, visually lightening the space.
Frequently asked questions: multi-layered interior without mistakes
Will a multi-layered interior be overloaded, excessive?
It will be if moderation is not observed. Rule: no more than three types of decor on one wall. For example: baseboard at the bottom, molding panel in the middle with one carved overlay inside, ceiling cornice at the top. That's three elements—enough. If you add more horizontal moldings, vertical pilasters, several rosettes, it will be chaotic.
Can polyurethane stucco be combined with plaster stucco?
Yes, but achieving unity is difficult. Plaster is heavier (installation is more complex), and after drying, it slightly changes shade (requires painting). Polyurethane comes primed, ready for painting immediately. It's easier to use one material—polyurethane for all stucco (moldings, cornices, rosettes in polyurethane), wood for accents.
What glue should be used for mounting wooden elements on a wall?
For small elements (rosettes up to 200 mm, overlays) — polyurethane glue (Moment Crystal, Titebond) or two-component epoxy (EDP, Poxipol). For large elements (panels, shelves) — polyurethane glue plus mechanical fasteners (countersunk screws).
Is it necessary to coat wooden decor with a protective compound if it's indoors?
Yes, absolutely. Even indoors, wood is susceptible to soiling (dust, grease from touch), color change (ultraviolet from windows). Minimum protection — oil (Osmo, Biofa) in 2-3 coats. Maximum — varnish (polyurethane, acrylic) in 2-3 coats. Oil preserves the tactile feel of wood, varnish creates a film (more durable, but less natural).
How much does it cost to create a multi-layered interior in a 20 m² room?
Approximately:
-
Wooden skirting board (perimeter 18 m, height 120 mm) — 400 rub/m × 18 = 7200 rub
-
Polyurethane moldings for panels (40 m) — 250 rub/m × 40 = 10000 rub
-
Wooden carved overlays (5 pcs) — 1500 rub/pc × 5 = 7500 rub
-
Large carved rosette (1 pc) — 5000 rub
-
Polyurethane ceiling cornice (18 m) — 300 rub/m × 18 = 5400 rub
-
Glue, fasteners, putty, oil, paint — 5000 rub
-
Total materials: 40100 rub
-
Labor (if hiring craftsmen): 30000-50000 rub
-
Total: 70000-90000 rub
If doing it yourself — save 30-50 thousand on labor.
How to care for a multi-layered interior?
Wood (rosettes, overlays, furniture) — wipe with a dry or slightly damp cloth once a week. Do not use aggressive cleaning agents. Renew the oil coating every 2-3 years (wipe, apply a thin layer of oil, rub in).
Polyurethane (moldings, cornices, skirting boards) — wipe with a damp cloth. Painted surfaces are durable and not afraid of water. For mechanical damage, touch up locally.
Can a multi-layered approach be used in small spaces (10-15 m²)?
Yes, but with limitations. In small rooms, use narrow skirting boards and moldings (60-80 mm instead of 100-120 mm), small wooden elements (rosettes 100-150 mm instead of 300-400 mm), light colors (white polyurethane, light wood). Avoid overloading — one accent wall with decor, the rest — calm.
Is it mandatory to use classic furniture?
Not mandatory, but desirable. Multi-layered decor (molding, carved wood) is associated with classic style. Modern minimalist furniture (metal, glass, smooth surfaces) in such an interior may look alien. But if the style is neoclassical (classical elements simplified, geometric), modern furniture will fit in.
Where to order custom carved elements according to your own sketch?
Many manufacturers offer custom production services.Carved wooden decoration%s can be manufactured according to your sketch if there is a production run (usually a minimum of 10-50 identical elements). Single-piece production is possible, but expensive (hand carving).
Conclusion: create your dream interior with STAVROS products
A multi-layered interior is not a chaotic accumulation of details, but a thoughtful architectural composition where each element has its place, its purpose, its role. Where carved wood creates accents, polyurethane molding provides framing, classic furniture supports the theme. Where colors are coordinated, proportions are precise, materials complement each other. Such an interior is not created by chance — it is designed, planned, and implemented with an understanding of the laws of composition, scale, and harmony.
STAVROS is a leading Russian manufacturer ofwooden wall decorandmoldings from polyurethanewith over twenty years of history. STAVROS creates products for those who value quality, durability, beauty, and professional execution. In-house full-cycle production, use of selected wood species (oak, beech, ash), application of advanced technologies (CNC milling, polyurethane casting in high-detail silicone molds), multi-level quality control — all this guarantees premium-class products at reasonable prices.
Carved rosettes, overlays, panels by STAVROS is solid oak or beech of class A, manual sanding of Prestige level (products require no further finishing), precise geometry (deviation no more than 0.5 mm), clear relief (depth 8-30 mm depending on the model). The catalog features dozens of models: from miniature rosettes with a diameter of 60 mm to monumental panels sized 1000×1500 mm, from simple geometric patterns to complex floral ornaments. Each element can be made from oak (porous texture, warm color, strength) or beech (dense texture, uniformity, paintability).
Polyurethane moldings and cornices by STAVROS is two-component polyurethane with a density of 300-350 kg/m³ (maximum strength and relief clarity), white factory primer (ready for painting without preparation), perfect geometry (deviation no more than 0.5 mm per meter of length). The catalog includes over 150 molding profiles with widths from 30 to 200 mm, dozens of ceiling cornice models, corner elements, rosettes, capitals. Any architectural style — from antiquity to modern — finds its embodiment in STAVROS products.
Wooden solid wood baseboards — oak, beech, ash, pine, height from 60 to 200 mm, profiles from straight to complex classical. STAVROS baseboards have perfect geometry (error no more than 0.5 mm per 2 meters of length), smooth sanded surface (180 grit), even ends (cut on precision miter saws).
Classic furniture made of solid wood by STAVROS — tables, chairs, armchairs, sideboards, cabinets, crafted in the traditions of European furniture art. Selected wood species (oak, beech, walnut), manual assembly, hand-carved elements, natural finishes (oil, wax) or classic enamels. STAVROS furniture is created for those who value quality, beauty, durability.
STAVROS professional consultants will help you select a set of elements for your multi-layered interior: calculate the quantity of baseboards, moldings, carved elements, recommend optimal profiles and sizes, advise on installation and finishing technology. The company's website features detailed catalogs with photos, dimensions, prices, articles with examples of completed projects. Delivery across Russia is available, pickup from warehouses in Moscow and St. Petersburg.
Choosing STAVROS, you choose quality tested by time. You choose products that preserve geometry, color, strength for decades. You choose a partner who understands your tasks and offers comprehensive solutions — from a wooden carved rosette to a polyurethane cornice, from a baseboard to furniture. You choose the opportunity to create an interior that will inspire you every day.
Create spaces where walls are not just partitions, but multi-layered compositions telling stories. Where wood and polyurethane work in unison, creating volume, depth, visual richness. Where classic furniture completes the picture, linking wall decor with functional content. Trust the masters of STAVROS — and your home will acquire that very professional, impeccable, inspiring appearance you dream of.