Article Contents:
- Wooden rosettes: round harmony of carving
- Decorative appliqués: linear elegance of carving
- Wall panels: canvas for decorative elements
- Unity through wood species and finish
- Stylistic directions: from baroque to modern
- Composition and placement: art of balance
- Installation of decorative elements: technology and nuances
- Restoration and renewal: second life of decor
- Custom manufacturing: unique decor for a unique interior
- Ecological and durability: eternal values
- From idea to implementation: step-by-step guide

Wooden wall cladding is inherently noble and expressive, but when enhanced with carved decorative elements — rosettes, appliqués, ornaments — the space transforms into a piece of applied art. A flat wooden surface gains depth, relief, visual accents. Simple panels become luxurious architectural compositions. Ordinary furniture becomes unique pieces worthy of museum collections.Carved wall rosettesandwooden appliqués on panels— this is not just decoration, it is a way to infuse the interior with artisan craftsmanship, artistic value, individuality, which cannot be purchased in mass-market stores.
Why does carved decoration so transform wooden cladding? Because it creates a multi-level perception. The first level — the overall composition of the wall or furniture. The second — the texture of the wood, its color, the pattern of growth rings. The third — the relief of carving, the play of light and shadow on three-dimensional elements. The fourth — the details of carving, revealed upon close inspection — the delicacy of petal work, the intricacy of patterns, the skill of execution. This multi-layeredness creates richness in visual experience, making the space interesting and preventing the eye from becoming bored.Furniture and wall decoration— carved elements transform utilitarian surfaces into objects of contemplation, adding cultural, almost museum-worthy value to the interior. Moreover, carved decoration is a link to craft traditions, the history of decorative-applied art, to eras when every interior element was crafted by hand by master carvers. Returning these elements to modern spaces, we return respect to craftsmanship, to manual labor, to the artistic value of objects.


Wooden rosettes: round harmony of carving
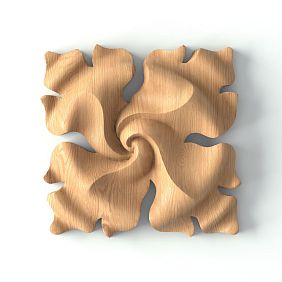
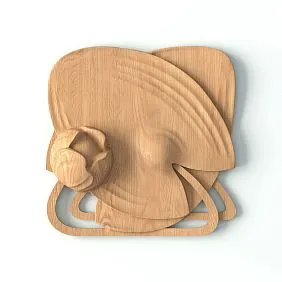
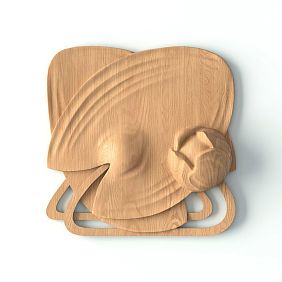
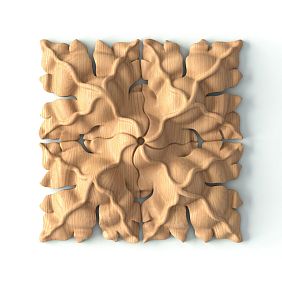
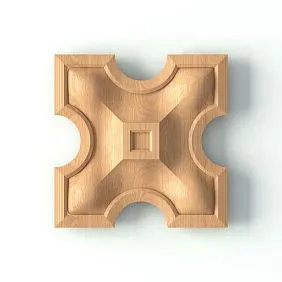
decorative rose outlets— these are round or oval appliqués with carved relief resembling a blooming flower, hence the name. The rosette is one of the oldest decorative motifs, found in all architectural styles from antiquity to modern. In classical architecture, rosettes adorned ceilings, walls, furniture, creating focal points that attract the gaze.
Modern wooden rosettes continue this tradition, but adapted to contemporary interiors. Sizes vary from miniature 50-80 millimeters in diameter for furniture decoration to large 200-400 millimeters for wall compositions. The depth of relief also varies — from shallow 3-5 millimeters to high-relief 15-25 millimeters, where carving becomes almost sculptural.
Carving motifs on rosettes are diverse. Floral ornaments — stylized flowers, leaves, vines interwoven in a circular composition. This is the most popular and universal motif, working in most styles from classic to Provence. Geometric patterns — circles, spirals, rays radiating from the center, creating a dynamic, rhythmic composition. Suitable for art deco, modern, ethnic styles. Classical ornaments — acanthus, palmettes, roses, characteristic of classical European carving. They create an atmosphere of palace luxury. Minimalist rosettes — with simple concentric relief, without complex details, for modern interiors where a delicate decorative accent is needed.
Application of rosettes on walls is varied. Central composition — a rosette at the center of a wall panel, surrounded by moldings, creating a focal point. This is a classic technique, visually gathering the composition and establishing its center. Corner accents — rosettes at the corners of panels, at the intersections of moldings, creating rhythmic accents across the entire wall. Framing — rosettes around mirrors, paintings, wall-mounted lights, transforming them into more solemn objects. Above a fireplace — a large decorative rosette above the mantelpiece becomes an architectural focal point of the room. On doors — a rosette at the center of the door or above the door frame adds solemnity to the portal.
Application on ceilings — a traditional place for rosettes in classical architecture. A rosette at the center of the ceiling, usually where a chandelier is mounted, creates an arrangement for the light fixture, transforming a utilitarian hook into a decorative element. A large rosette with a diameter of 300-500 millimeters becomes an independent ceiling ornament, especially if it is contrast-painted or patinated.
Application in furniture — rosettes adorn the fronts of cabinets, chests, buffets, transforming simple furniture into decorative pieces. The center of a cabinet door, the panel of a chest, the headboard of a bed — wherever a decorative accent is needed, a rosette works perfectly.Buy decorative rosettes— and install on furniture — a simple way to transform standard items, giving them individuality and artistic value.


Decorative Inserts: Linear Carving Elegance
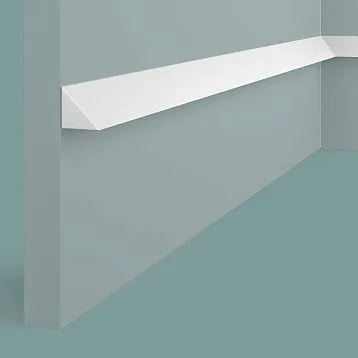
If the outlets are a circular composition, thenDecorative Inserts— linear. Appliqués are elongated carved elements — straight, curved, angular — that decorate edges, perimeters, joints, creating decorative frames, borders, transitions. Appliqués function as architectural moldings, but more decorative, with pronounced relief carving.
Appliqué shapes are adapted to various applications. Straight appliqués — long carved strips for framing panels, doors, furniture facades. Length is usually 200 to 1000 millimeters, width 30–100 millimeters, relief height 5–20 millimeters. Angular appliqués — L-shaped or triangular elements for panel, frame, or furniture corners. They create a decorative accent at line intersections. Arched appliqués — curved elements for arches, round doorways, curved furniture elements. Central appliqués — elongated vertical or horizontal elements placed in the center of panels or doors, creating vertical or horizontal accents.
Ornaments on appliqués continue the traditions of wood carving. Vegetal motifs — grapevines with leaves and clusters, oak leaves with acorns, floral garlands. Ribbon ornaments — braids, plaits, meanders, creating rhythmic linear decoration. Classical elements — egg-shaped ornament, pearl, acanthus leaves, characteristic of Greek-Roman tradition. Geometric patterns — diamonds, zigzags, waves, suitable for Art Deco and ethnic styles.
Application on wall panels transforms simple cladding into a luxurious architectural composition. Panel framing — appliqués along the perimeter of wall panels create a visual frame, adding depth. Vertical dividers — appliqués between panels form vertical accents, imitating pilasters. Horizontal friezes — appliqués along the top edge of panels create decorative friezes. Filled panels — appliqués within panels form recessed decorative panels.
Application on doors — transforms a utilitarian item into a piece of joinery art. Door perimeter — appliqués along the edge of the door panel create a dimensional frame. Central composition — vertical and horizontal appliqués in the center of the door form a cross, a classic decorative motif. Filled panels — appliqués frame recessed door panels, emphasizing them.Door DecorationCarved appliqués — an accessible way to refresh old doors or make new ones unique.
Application in furniture — appliqués decorate facades, bases, cornices of furniture. The top cornice of a cabinet with carved appliqués becomes visually richer. The base of a chest with appliqués gains architectural solidity. Edges of a tabletop with delicate appliqués receive an elegant framing.Buy decorative elementsFor furniture — an investment in uniqueness, transforming factory-made furniture into original pieces.
Our factory also produces:


Wall panels: canvas for decorative elements
Solid wood wall panels themselves create noble cladding, but when they become the basis for carved decorative elements, their value increases manyfold. The panel transforms from simple cladding into an architectural composition, where each element is part of a thought-out design.
Smooth panels made of solid wood or veneer — ideal background for carved decoration. Their flat surface does not compete with the relief of carving, allowing decorative elements to be the main focus. Light-colored wood — oak, ash, maple — creates contrast with dark shadows of carving. Dark wood — walnut, wenge — works well with appliqués painted gold, silver, or patinated.
Fillet panels — shields with a frame and recessed center — traditional base for decorative elements. The rosette in the center of the fillet becomes the compositional center. Appliqués along the perimeter frame enhance the framing. Angular elements at the corners of the fillet create additional accents. Such panels are characteristic of classical and neoclassical interiors.
Lath panels — a modern type of cladding — can also serve as a base for decoration, though less traditionally. Rosettes between laths on a base wall create a play between the linearity of the laths and the round shape of the rosettes. Appliqués on the laths themselves add decorative detail. This is a bold modern interpretation of traditional elements.
Combined panels — combination of different types of cladding — offer maximum freedom for decoration. Lower part of the wall in smooth panels with rosettes, upper part in lath cladding. Central panel smooth with rich decoration, side panels lath without decoration. These contrasts create visual complexity, multi-layered depth.
Baseboard panels — lower third of the wall in wooden cladding — a classic place for carved decoration. Here, decorative elements are closer to eye level, easier to view and appreciate craftsmanship. Rosettes on baseboard panels create rhythmic accents around the room perimeter. Appliqués along the top edge of the baseboard form a decorative frieze.
Fully paneled walls — from floor to ceiling in wood — are characteristic of offices, libraries, country houses. Here, decorative elements are arranged hierarchically: the most elaborate at eye level, simpler above and below. This creates visual structure, guiding the viewer’s attention.
Get Consultation
Unity through wood species and finish
To create a harmonious composition, it is critically important that wall panels and decorative elements are made of the same wood species or visually compatible species. Oak panels require oak rosettes and appliqués. Walnut cladding — walnut decoration. Violating this rule creates visual dissonance, even if each element is individually high quality.
Oak — ideal wood for carved decoration due to its hardness, density, and expressive texture. Oak carving is clear, relief-rich, and durable. On oak panels, oak carved elements create a monolithic impression, where all parts belong to one whole. Oak can be left natural, highlighted with oil, or tinted in any shade.
Beech — second most popular wood for carving. It is dense, uniform, and holds fine carving details well. Beech elements on beech panels create an elegant, slightly pinkish composition. Beech is often painted or patinated, as its natural color is less expressive than oak or walnut.
Walnut — wood for luxurious interiors. Walnut carving on walnut panels creates a dark, noble, monumental space. Walnut is expensive, so it is often combined: panels made of more affordable wood, tinted to match walnut, with genuine walnut carved elements. The key is to match the tone.
Linden — traditional wood for delicate carving due to its softness and uniformity. Linden carving is often painted, gilded, or patinated, used as a base for decorative treatment. Linden elements can decorate panels of any wood, if painted in a harmonizing color.
Surface finish should be uniform for all elements. If panels are coated with matte oil — carved elements should also be oiled. If panels are varnished — decoration should be varnished. It is not possible to combine matte panels with glossy carved elements — the difference in gloss will be glaring.
Color solution determines the character of the composition. Monochromatic — all elements in one color, creating a calm, noble atmosphere. Decoration is read through relief, play of light and shadow, not color contrast. Contrasting — panels in one color, carved elements in another. Classic option: light panels, dark decoration or vice versa. This emphasizes decorative elements, making them visual accents. Patinated — artificial aging with light patina in recesses of carving or dark patina on raised areas. Creates a vintage, elegantly aged look. Gilded or silvered — covering carved elements with gold, silver, or their imitations. Luxurious option for palace interiors, requiring appropriate context.
Stylistic directions: from Baroque to Modern
Baroque and Rococo — styles of maximum ornamentation, where carved elements are not accents but main characters. Wall panels are richly adorned with rosettes, appliqués, garlands. Motifs are lavish and complex — roses, cherubs, shells, scrolls. Wood is often gilded or painted white with gilded details. This is palace aesthetics, requiring large spaces, high ceilings, luxurious furniture.
Neoclassicism — a more restrained version of Baroque. Decorative elements are present but in smaller quantities, more symmetrically and orderly. Motifs are classical — acanthus, palmettes, meanders, rosettes of simple geometric forms. Wood of noble species in natural color. Panels with fillets, rosettes in centers, appliqués along perimeters. Elegance, proportionality, respect for classical canons.
Empire — a more monumental, imperial version of Neoclassicism. Decorative elements are large, relief-rich, often with military symbolism — laurel wreaths, torches, swords, lions. Wood in dark tones — red, mahogany, walnut. Gilding is used, but more restrained than in Baroque. Panels are tall, often covering two-thirds or full height of the wall. Atmosphere of imperial power and solemnity.
Victorian style — English interpretation of classicism with extensive wooden cladding. Baseboard panels on one-third height with carved appliqués forming fillets. Carving is restrained, geometric or with Gothic motifs. Wood is dark — oak, mahogany. Atmosphere of solidity, respectability, gentleman’s club or English manor house.
Art Nouveau (Modern) — style of smooth lines and natural motifs. Carved elements imitate plants, flowers, seaweed, waves. Forms are asymmetrical, flowing, avoiding sharp angles. Rosettes are oval or irregularly shaped, not round. Appliqués are curved and winding. Wood of any species, often stained or painted. Atmosphere of refinement, artistic flair, reverence for nature.
Art Deco — geometric, graphic, luxurious. Carved elements have clear geometric shapes — steps, zigzags, sun rays, stylized plants. Rosettes are round with radial composition. Appliqués are straight with geometric ornamentation. Wood of exotic species or stained in exotic colors. Inlaid with metal or mother-of-pearl. Atmosphere of the jazz age, luxury of the 1920s–30s.
Provence and Country — rustic styles where carving is simpler, folk-like. Rosettes and appliqués with plant motifs — sunflowers, grapes, wheat stalks. Carving is shallow, sometimes rough, emphasizing handcrafted work. Light-colored wood, painted in white, cream, pastel tones, often with patina. Panels on one-third of height. Atmosphere of rustic coziness, simplicity, connection to the earth.
Neoclassicism — modern interpretation of classicism. Decorative elements are present but in minimal quantity, as delicate accents, not dominants. Rosettes are small, simple in shape. Appliqués are minimalist, with simplified ornamentation. Light-toned wood — whitewashed oak, light beech. Panels on one-third height or only as accent areas. Atmosphere of modern elegance with references to classical traditions.
Modern Eclectic — bold combination of traditional carving with modern finishes. Lattice panels with carved rosettes between slats. Minimalist smooth panels with one large baroque rosette as an art object. Carved elements painted in unexpected colors — graphite, indigo, emerald. This is a play with traditions, creating new meanings through unexpected combinations.
Composition and Placement: Art of Balance
Placement of decorative elements — an art requiring sense of composition, proportions, rhythm. Overloading with decoration creates visual chaos, lack of it — dull emptiness. Balance is needed.
Principle of Focal Points — every room must have visual centers attracting attention. Large decorative rosette above the fireplace, on the central wall panel, on the ceiling above the dining table — these are focal points. There should not be many — 1–3 per room, otherwise attention is scattered.
Principle of Rhythm — repetition of decorative elements creates rhythm, structuring space. Rosettes on all wall panels with equal intervals. Appliqués framing each door. Corner elements in all corners of panels. Rhythm creates order, predictability, calmness.
Principle of Symmetry — classical composition is built on symmetry. Rosette in the center of the panel, appliqués symmetrically on both sides. Two identical rosettes symmetrically from the fireplace. This creates a sense of stability, classical correctness.
Principle of Asymmetry — modern composition is often asymmetrical. Rosette offset from center, creating dynamism. Appliqués of different lengths create uneven rhythm. This adds modernity, freedom, avoids academic rigidity.
Principle of Scale — size of decorative elements must correspond to room and panel scale. Miniature rosettes 50–80 mm for small furniture facades. Medium 100–150 mm for standard wall panels. Large 200–400 mm for large rooms with high ceilings. Mismatched scale makes elements either lost or overpowering.
Principle of Placement Height — elements at eye level (130–170 cm) attract maximum attention, their details are easily visible. Above and below this level, elements are perceived more generally. Therefore, most detailed, artistically valuable rosettes are placed at eye level, simpler ones — above and below.
Principle of Context — decorative elements must match the overall character of the room. Rich carving requires appropriate surroundings — quality furniture, expensive materials, thoughtful lighting. In a budget interior, it will look out of place, like a diamond in an aluminum setting.
Installation of Decorative Elements: Technology and Nuances
Installation of carved rosettes and appliqués is technically simple but requires care. Incorrect installation can ruin even the highest-quality elements.
Surface Preparation — critical stage. The surface to which the decorative element is glued must be clean, dry, and degreased. Dust, dirt, moisture, and grease reduce adhesive bond. If the surface is freshly painted — let it dry completely, minimum one day, preferably three. If the surface is varnished — lightly sand the mounting area with fine-grit sandpaper to improve adhesion.
Adhesive Selection — for wooden elements on wooden surfaces, optimal adhesive is carpentry-grade PVA glue D2 or D3 class. It provides strong wood-to-wood bond, no additional fasteners needed for small elements. For large, heavy elements, use mounting glue like "liquid nails" on polyurethane or acrylic base. For elements exposed to moisture (bathrooms, kitchens), use water-resistant glue.
Test Fitting — before applying glue, place the element on the mounting spot and mark its position with a pencil. For rosettes, find the panel center using a ruler or tape measure. For appliqués, use a level to ensure strictly horizontal or vertical position. Ensure the element fits, doesn’t hit adjacent elements, and looks harmonious.
Glue Application — glue is applied to the back of the decorative element, not to the wall or panel. For PVA, apply evenly across the entire back surface. For "liquid nails," apply in dots or zigzag pattern. Do not apply too much — excess will ooze out at edges upon pressing, requiring cleanup.
Installation — place the element on the marked spot, press down, hold for several seconds. If the element is large and heavy — secure with painter’s tape, supports, or weight during drying. Immediately wipe away excess glue from edges with a damp cloth while it’s still wet.
Additional Fastening — for very large or heavy elements, glue alone may be insufficient. Use thin finishing nails without heads or furniture screws. Drive them through the element into the base surface, then fill holes with wood putty, sand smooth, and they become invisible after painting.
Drying Time — PVA glue sets in a few hours, fully dries in 24 hours. "Liquid nails" set faster, full curing takes 12–24 hours. Do not load, wash, or paint the element until fully dry.
Final Finishing — if the element is installed on already painted or varnished surface — after glue dries, paint or varnish the element to match the surface. If the entire composition will be painted after installation — fill gaps between element and panel with thin layer of acrylic putty, sand after drying, then paint the entire surface.
Restoration and Renewal: Second Life of Decor
Old furniture or finishes with carved elements — not a death sentence, but an opportunity for restoration. Wooden decor can be restored and renewed, turning a worn item into a work of art.
Condition Assessment — carefully inspect elements. Minor scratches and scuffs — easily removable. Chips and cracks — require filling. Detached carved pieces — more complex, may require a restorer. Rot, mold, insect damage — critical issues requiring professional intervention.
Cleaning — remove old finish (paint, varnish) with specialized wood strippers. Carefully apply stripper to carved elements, avoiding contact with surrounding surfaces. After the time specified in instructions, scrape off softened finish with plastic scraper, without damaging wood. Clean small carved details with stiff brush. After stripping, rinse with water and dry.
Sanding — minor scratches and unevenness are removed by sanding. Use fine-grit sandpaper (grit 180–220), sand along wood grain. Sand carved elements carefully to avoid smoothing relief. For hard-to-reach areas, use small pieces of sandpaper wrapped around a thin stick.
Defect Repair — chips and cracks are filled with matching wood putty. Apply putty with putty knife, filling defect and leveling with surface. After drying, sand smooth. To imitate wood texture, scratch putty with sharp tool, replicating wood grain pattern.
Restoration of lost fragments — detached carving pieces can be recreated. If there is a symmetrical element, remove a silicone mold from it and cast the missing fragment using epoxy wood putty. If there is no symmetrical counterpart, cut a new fragment by hand from wood or order it from a carver. Attach the restored fragment and fill the joints with putty.
Staining — if the wood has faded unevenly or after restoration shows different shades, stain it with a stain. Choose a shade close to the original or desired one. Apply the stain with a brush or cloth, evenly distributing it. Deep carving recesses may absorb more stain and appear darker — this creates a beautiful patina effect.
Patina application — to create an effect of noble aging, apply patina. Dark patina (bituminous) is applied to raised carving areas, creating the effect of age-related dirt. Light patina (white, cream) is applied to recesses, imitating lime accumulation or wear. After applying patina, gently wipe raised areas with a cloth to remove excess, leaving patina only in recesses.
Final coating — coat the restored element with oil, wax, or varnish. Oil and wax preserve the tactile quality of wood, emphasizing its texture. Varnish creates a protective film, more resistant to wear. Apply in thin layers, allowing each to dry completely.
Custom manufacturing: unique decor for a unique interior
Ready-made decorative rosettes and appliqués are available in dozens of standard shapes and sizes. But for a truly individual interior, consider custom manufacturing.
Sketch development — begins with an idea. This could be a plant motif characteristic of the region (e.g., Siberian cedar for a house in Siberia). It could be a geometric pattern that complements other interior elements. It could be a family crest, monogram, or zodiac sign. The designer or the master carver creates a sketch on paper or in computer software.
Technology selection — carving can be hand or machine. Hand carving — work by the master carver using chisels, gouges, and knives. It is expensive, time-consuming, but the result is unique and carries the mark of the human touch. Machine carving — on CNC machines based on a computer model. Faster, cheaper, more precise, but lacks the individuality of handwork. Combined technology — main work on the machine, final finishing by hand — optimal balance.
Wood selection — the master will recommend the appropriate species. For fine, delicate carving — linden, pear. For larger, relief carving — oak, beech, ash. For exotic dark wood — walnut, mahogany, wenge. The species should match the application and overall interior concept.
Manufacturing — the process takes from several days to several weeks depending on complexity and technology. Hand carving a large rosette may take a week of work by an experienced master. Machine carving a series of appliqués — one to two days. After carving, elements are sanded, stained if necessary, and coated with a protective finish.
Installation — it is preferable to entrust the installation to the master who created the elements. He knows their features, installs them correctly, and can make adjustments on-site if needed. If installing yourself, follow the master’s recommendations regarding adhesive type, mounting method, and final finishing.
Cost — individually carved elements are significantly more expensive than mass-produced ones. But this is an investment in uniqueness, in a work of art that no one else has. For prestigious, exclusive interiors — the only correct choice.
Ecological and durability: eternal values
Wooden carved decor — it is not only beauty, but also ecological friendliness, durability, an investment in the future. Unlike synthetic decorative elements made of plastic, polyurethane, or polystyrene, wood is a living, breathing, ecologically pure material.
Ecological purity — wood does not emit harmful substances, is hypoallergenic, safe for children, allergy sufferers, and pregnant women. Moreover, wood regulates air humidity, absorbing excess moisture and releasing it when dry. This creates a healthy microclimate in the room.
Renewability — wood is a renewable resource with proper forest management. Choosing products made from certified wood (FSC, PEFC) means voting for responsible forest management. Synthetic materials are produced from oil, a depleting non-renewable resource.
Biodegradability — at the end of their service life, wooden elements biodegrade, returning to the natural cycle. Plastic remains in landfills for hundreds of years, polluting soil and water. Wood decomposes within a few years through microorganisms, becoming soil.
Durability — quality wooden carved decor lasts for decades, generations, centuries. Carved elements in historic palaces, estates, and churches have survived for centuries, passed down to descendants. Plastic decor fades, cracks, and requires replacement within 10–15 years.
Repairability — wooden elements can be restored as described above. Scratched, faded, or even partially damaged carved decor can be restored and brought back to life. Plastic, upon damage, goes to the trash.
Energy and atmosphere — wood carries the energy of living material, a connection to nature. In rooms with wooden finishes and decor, people feel calmer, more balanced. This is not esotericism, but a scientific fact — natural materials positively affect human psychological state.
From idea to realization: step-by-step guide
Creating an interior with wooden finishes and carved decor — a process requiring planning. Here is a step-by-step algorithm.
Step 1: Style definition — choose the interior style that will determine the type of carved decor. Classic, neoclassic, baroque, Provence, modern — each style requires its own type of carving.
Step 2: Wood species selection — determine the species that will unify the finish and decor. Oak for solidity, ash for Scandinavian lightness, walnut for luxury, linden for painted decor.
Step 3: Finishing planning — decide which surfaces will be covered with wood. Baseboard panels, full cladding, accent wall, paneling. Calculate the required amount of material.
Step 4: Decorative element selection — choose rosettes, appliqués, and other elements. For ready-made elements — from a catalog, selecting by style and size. For custom elements — create a sketch or technical specification for the carver.Buy carved wall rosettes— available in specialized stores.
Step 5: Placement planning — create a layout for decorative elements. Where will the rosettes be placed, where the appliqués, how many, with what spacing. Use compositional principles: focal points, rhythm, symmetry or asymmetry.
Step 6: Color solution — determine the treatment of all wooden elements. Natural color, staining, painting, patina, gilding. Important: all elements must be treated identically or in a harmonious palette.
Step 7: Installing finishing panels — install wall panels according to the selected scheme. Ensure surfaces are flat and panels are securely fastened. If painting or tinting is planned, do it before installing decorative elements.
Step 8: Installing decorative elements — mount outlets and appliqués according to the scheme. Use the correct adhesive and ensure secure attachment. Use additional fasteners for larger elements if necessary.
Step 9: Final finishing — if elements were installed on an already painted surface, paint or varnish them to match. If the entire composition is painted after installation, fill joints, sand, and paint the entire surface for a monolithic appearance.
Step 10: Lighting — plan lighting that highlights the wood texture and relief of carvings. Side lighting creates dramatic shadows. Directional spotlights accentuate individual elements. Warm color temperature emphasizes the warmth of wood.
Wooden finish with decorative outlets and appliqués — an investment in beauty, quality, and longevity. It’s the creation of a space that delights the eye, inspires pride, and is passed down through generations.wooden decorative elementsThey transform a home into a work of art, where every detail is thoughtfully designed and each element holds value. Start small — one outlet on an accent panel, a few appliqués on furniture. Feel how carved decoration transforms the space. Then move forward, creating an interior where wood and carving intertwine into a harmonious composition, where utility becomes beautiful and functionality becomes artistic.