


Article Contents:
- What is a Ceiling Rosette and Why Is It Needed?
- Types of Rosettes by Material
- Gypsum Rosettes - Genre Classic
- Wooden Rosettes - Warmth of Natural Material
- Polyurethane Rosettes - Modern Solution
- Sizes and Proportions - How to Choose Correctly
- Dependence on Room Area
- Relationship with Chandelier Size
- Ceiling Height and Perception of Size
- Styles and Motifs of Rosettes
- Classicism - Strict Harmony
- Baroque and Rococo - Luxury and Abundance
- Empire - Imperial Monumentality
- Modern Style - Minimalist Forms
- Modern Style - Minimalist Forms
- Rules for Installing Rosettes Under Light Fixtures
- Surface Preparation
- Center Marking
- Applying adhesive
- Installation and Fixing
- Final finishing
- Rosettes Outside the Center of the Ceiling
- Offset Composition
- Multiple Outlets
- Rosettes Without Light Fixtures
- Rosettes in Different Types of Rooms
- Living Room - Grandeur and Prestige
- Bedroom - Calm and Coziness
- Dining Room and Kitchen - Functionality
- Bathroom - Moisture Resistance
- Hallway and Corridor - First Impression
- Children's Room - Safety and Lightness
- Combining Rosettes with Other Moldings
- Rosettes and Ceiling Cornices
- Rosettes and Ceiling Moldings
- Outlets and Ceiling Moldings
- Lighting and Outlets - Functional Duo
- Chandelier Selection for Outlet
- Spot Lighting and Outlets
- Hidden Outlet Lighting
- Installing Outlets on Various Ceiling Types
- Concrete or Plastered Ceiling
- Gypsum Board Ceiling
- Tension Ceiling
- Wooden Ceiling
- Ceiling Outlet Care
- Regular Cleaning
- Recoating
- Repair of damage
- Questions and Answers
- Conclusion
The ceiling is the fifth wall of a room, often overlooked in interior design. Yet it is the first thing the eye encounters upon entering, and it creates the volume and scale of the space.decorative rose outletsThey transform a neutral plane into an architectural statement, add a sense of depth, create a visual center around which the entire room composition is organized. A properly chosen outlet can even transform a modest interior, giving it completeness and dignity characteristic of classical palace spaces.
The history of ceiling outlets spans centuries. Even in ancient temples, ceiling coffers were adorned with relief medallions depicting deities and symbols. The Renaissance gifted the world with luxurious plaster outlets featuring floral ornaments and geometric patterns. Baroque took decorative art to its peak—multi-tiered, intricate compositions with angels, flowers, and scrolls turned ceilings into works of art. Classicism returned to restrained forms, yet did not abandon outlets—they became stricter, more geometric, but no less expressive.
Today, outlets are experiencing a renaissance. Modern materials and technologies have made them accessible, and the variety of shapes and sizes allows finding a solution for any interior—from luxurious classicism to restrained neoclassicism. But the main thing has not changed—the outlet remains the central focal point of the ceiling, an element that unifies space, sets the scale, and creates a sense of compositional completeness.


What is a ceiling outlet and why is it needed?
A ceiling outlet is a decorative element of round, oval, or polygonal shape, installed on the ceiling as an architectural accent. The classic purpose of an outlet is to frame a chandelier or pendant light, but the functions of this element go far beyond simple decoration of the fixture's mounting point.
Visual Center — the primary and main function of an outlet. In any room, there must be a point to which the gaze is drawn, around which the composition is organized. On the floor, this role is often played by a rug; on walls — a fireplace or artwork; on the ceiling — precisely the outlet. It creates a focal point, structures the space, preventing it from dissolving into separate, disconnected elements.
Space Scaling — the second important function. The outlet sets the proportions of the room, linking the size of the light fixture to the ceiling area. A large chandelier on a bare ceiling looks out of place, hanging in emptiness. The same chandelier, framed by a proportionally sized outlet, gains visual support and becomes part of the architecture. The outlet creates a transition from the ceiling plane to the fixture’s volume, making this transition harmonious and natural.
The practical function lies in concealing technical elements. The mounting point for a chandelier rarely looks aesthetically pleasing — wires, mounting brackets, hooks, and wall cut marks. The outlet hides all these details, creating an illusion that the fixture grows from a relief medallion rather than hanging from a crude hook. In rooms with tension ceilings, the outlet covers the thermal ring necessary for wiring.
The architectural function of an outlet is manifested in creating complex ceiling compositions. In large rooms, several outlets of different sizes form a rhythmic structure, dividing the ceiling into zones and establishing spatial hierarchy. A central large outlet marks the main zone, while smaller ones at the edges denote secondary areas. Such organization is typical for grand halls, living rooms, dining rooms, where the grandeur of the setting is important.


Types of Outlets by Material
The material of the outlet determines its operational characteristics, visual qualities, cost, and installation complexity. The modern market offers outlets made from various materials, each with its own advantages and applications.
Our factory also produces:


Plaster Outlets — Genre Classic
Plaster is a traditional material for architectural moldings, including ceiling outlets. For centuries, artisans created plaster elements using casting into molds or hand modeling. Plaster outlets have a noble matte surface, natural whiteness, and the ability to achieve fine relief detailing.
The main advantage of plaster is its eco-friendliness and breathability. The material allows air circulation, regulates humidity, and creates a healthy microclimate. Plaster outlets can be painted, tinted, or patinated, enabling diverse decorative effects. The deep relief of plaster elements creates expressive light and shadow play.
The disadvantages of plaster are significant. Its considerable weight requires a strong base and secure mounting. A plaster outlet with a diameter of 800 millimeters can weigh 15–20 kilograms, making installation labor-intensive. The material’s fragility requires careful handling during transport and installation. Plaster is afraid of moisture — in humid rooms, it softens, loses strength, and develops mold.
The cost of quality plaster outlets is high due to the complexity of production and large material consumption. Custom manufacturing takes 2–4 weeks. Installation requires professional skills — plaster elements are mounted using plaster mortar with additional fixation by self-tapping screws, which demands experience.
Get Consultation
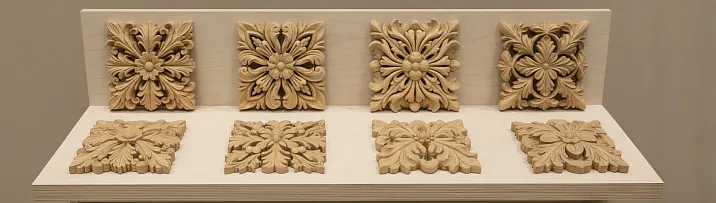
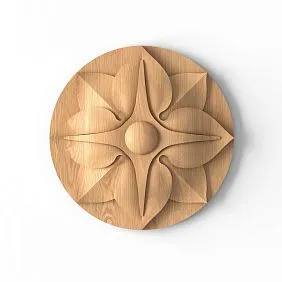
Wooden Outlets — Warmth of Natural Material
Wood is a material that brings special warmth and elegance to interiors. Wooden outlets are crafted by carving from solid blocks of various species. This is a custom-made craft, where each element is unique and bears the mark of the artisan’s hand. Carved outlets are especially prized in classical interiors, where authenticity of materials and traditional techniques are important.
Wood texture is the main decorative feature of wooden rosettes. Annual rings and natural wood grain patterns create a lively, dynamic surface. Each species has a unique character — oak is monumental and strict, beech is uniform and gentle, walnut is rich in tones, linden is soft and easily carved. The choice of species is determined by interior style and technical requirements.
Carving allows creating rosettes of any complexity — from simple round forms with minimal relief to complex multi-tiered compositions with floral ornaments, geometric patterns, and figurative elements. The depth of carving can reach 50-70 millimeters, creating dramatic chiaroscuro effects. Hand-carving gives the rosette individuality, making it a piece of applied art.
The weight of wooden rosettes is less than gypsum ones at comparable sizes. A linden rosette with a 600 mm diameter weighs about 3-4 kg, while an oak one weighs 5-7 kg. This simplifies installation and reduces requirements for the base strength. Mounting is done with self-tapping screws after pre-drilling, which prevents wood cracking.
The drawbacks of wood are related to the nature of the material. Wood reacts to changes in humidity and temperature — it expands and contracts, may deform under significant fluctuations. Quality protective treatment is required — impregnation with antiseptics, application of oils or varnishes. In humid rooms, wooden rosettes are not used due to the risk of rotting and mold growth.
The cost of carved wooden rosettes is high due to the labor-intensive manufacturing process. Complex carving requires dozens of hours of skilled craftsmanship. The production time for custom orders ranges from 3 to 6 weeks depending on the relief complexity. However, for admirers of natural materials and handcrafted items, wooden rosettes remain a preferred choice.
Polyurethane rosettes — a modern solution
Polyurethane has revolutionized the production of decorative moldings. This polymer material combines lightness, strength, moisture resistance, and the ability to precisely reproduce complex reliefs.Moldings decorationPolyurethane rosettes are affordable, easy to install, and durable in operation, making them the optimal choice for most projects.
Polyurethane casting technology allows creating rosettes of any complexity with jewel-like precision of details. Each petal, swirl, bead is reproduced identically in every item. This is critical for symmetrical compositions and when replacing elements — a new rosette will be an exact copy of the installed one. The geometric precision of polyurethane items is unattainable with hand-carving or molding.
The weight of polyurethane rosettes is minimal. A rosette with an 800 mm diameter weighs about 1.5-2 kg, which is 10 times lighter than a gypsum equivalent. Lightness simplifies installation — the rosette is glued with special polyurethane adhesive without additional mechanical fastening. One person can install a rosette in 20-30 minutes without helpers or special equipment.
Polyurethane's moisture resistance allows using rosettes in any rooms, including bathrooms, pools, saunas. The material does not absorb moisture, does not deform, does not develop mold. Polyurethane is not afraid of temperature fluctuations, maintaining stable dimensions and shape within the range of -40 to +80 degrees Celsius. It is a universal material for any climatic conditions.
Polyurethane rosettes' strength exceeds gypsum. The material does not crack or crumble under impact, withstands mechanical loads. Transportation and installation do not require special care. The service life of polyurethane rosettes is 30-50 years without loss of surface quality or relief clarity. The material does not age, does not yellow, does not lose whiteness.
Polyurethane rosettes can be painted with any interior paints based on water or acrylic. The surface does not require preliminary priming — paint lays evenly and adheres firmly. Any decorative effects are possible — patina, gilding, silvering, creating an aged surface effect. The smooth polyurethane surface easily cleanses dust and dirt with a damp cloth.
The cost of polyurethane rosettes is significantly lower than gypsum and wooden ones. Industrial production by casting ensures low cost with high quality. A wide range of ready-made models allows selecting a rosette to match any interior style without waiting for custom manufacturing. This is the optimal combination of price, quality, and convenience for modern renovations.
Sizes and proportions — how to choose correctly
The size of the rosette is critically important for interior harmony. A too small rosette will disappear on the ceiling, failing to fulfill its visual accent function. An overly large rosette will overwhelm the space, create a sense of heaviness, and disrupt proportions. There are proven size ratios that help make the right choice.
The rosette diameter should match the room size to create harmonious proportions.
The main parameter for selection is ceiling area. The larger the room, the larger the rosette should be. For a room of 12 square meters, an optimal rosette diameter is 300-400 mm. This size creates a noticeable accent without overloading a small space.
Rooms of 16-20 square meters (typical living rooms) require rosettes with a diameter of 450-550 mm. This is a universal size that works in most interiors. A rosette of this diameter harmoniously combines with standard chandeliers of 600-700 mm diameter, creating a visually balanced composition.
Spacious rooms of 25-30 square meters allow using large rosettes with a diameter of 700-900 mm. In high rooms with ceilings of 3.5 meters or more, rosettes with a diameter of up to 1200-1500 mm are possible. Such elements become dominant accents, defining the character of the entire space.
In very large halls over 40 square meters, one rosette may be insufficient. Compositions of multiple rosettes are used — a central large one with a diameter of 1000-1200 mm, combined with smaller ones of 400-600 mm in corners or along the perimeter. Such multi-centered compositions structure large spaces, dividing them into zones.
The rosette and chandelier should form a harmonious pair, proportionally matched to each other.
The rosette should harmonize with the light fixture's size. The classic rule — the rosette diameter is 60-80% of the chandelier's diameter. This creates a visually balanced composition where the chandelier and rosette complement each other, not competing for attention. A 700 mm diameter chandelier ideally combines with a 450-550 mm diameter rosette.
For massive multi-tiered chandeliers with a diameter of 900-1200 mm, large rosettes with a diameter of 600-900 mm are required. A smaller size creates imbalance — the chandelier will visually overpower the rosette. Conversely, for compact modern fixtures with a diameter of 400-500 mm, a rosette with a diameter of 250-350 mm is sufficient.
In the case of spotlights or flat ceiling chandeliers, the rosette serves as an independent decorative accent. Its size is determined solely by ceiling area and interior style. The light fixture may be significantly smaller than the rosette or even located outside its center — the rosette functions as an architectural medallion, not as a frame for a specific fixture.
Ceiling height and perception of size
Ceiling height affects the perception of rosette size. In rooms with low ceilings (2.5-2.7 meters), large rosettes visually reduce height, creating a sense of pressure from above. Compact rosettes with a diameter of 300-450 mm and shallow relief are optimal. Flat rosettes with minimal protrusion from the ceiling plane are preferable to volumetric multi-tiered ones.
Standard ceilings of 2.7-3.0 meters allow using rosettes of any diameter according to room area. Relief can be of medium depth — 30-50 mm. Such rosettes create expressive chiaroscuro effects without overloading space with excessive volume.
High ceilings of 3.2 meters and above require large rosettes with deep relief. From a distance, small details are not visible, and the rosette appears flat. Deep relief of 50-80 mm creates dramatic chiaroscuro effects, making the rosette expressive even when viewed from the floor. Diameter should be proportionally increased — from 600 mm and above.
Styles and ornaments of rosettes
The rosette's style determines the character of the entire interior. The rosette is a bright accent that sets the tone, indicating the stylistic affiliation of the space. Choosing an ornament requires understanding of historical styles and their visual language.
Classicism - strict harmony
Classical rosettes are characterized by strict symmetry, geometric precision, and restrained decoration. The ornamentation is based on classical motifs — meander, palmette, acanthus, rosette with radial rays. The composition is built on concentric circles and a clear rhythm of repeating elements.
A typical classical rosette consists of several concentric bands. The central medallion is often a rose, a petal rosette, or a geometric pattern. It is framed by a band of ovals (egg-shaped forms), then a band of acanthus leaves, and an outer band of rays or palmettes. Each element is precisely repeated, creating a mathematically precise composition.
The relief of classical rosettes is moderate — 20–40 millimeters. Forms are sharp, edges are distinct, details are meticulously worked. The color solution is traditionally monochromatic — a white rosette on a white or pastel ceiling. Gilding is used sparingly — only on protruding elements to create accents.
Classical rosettes are universal. They look naturally in both historical interiors and modern neoclassicism. Their restrained decoration and strict forms make them an elegant choice for those who appreciate harmony and proportion.
Baroque and Rococo — luxury and abundance
Baroque rosettes are the opposite of classical restraint. They are a riot of forms, abundance of details, complex multi-tiered compositions. The ornamentation includes lush flowers, acanthus scrolls, cherubs, garlands, shells. Symmetry is preserved, but it is not rigid — elements may slightly vary, creating a sense of movement and life.
The relief of baroque rosettes is deep — 50–80 millimeters. Forms are plastic, flowing into one another. Details are numerous — every centimeter of surface is worked out, there are no empty spaces. The center often features a volumetric composition of flowers or architectural elements, protruding 100–120 millimeters from the ceiling plane.
Rococo develops the baroque tradition toward even greater ornamentation and asymmetry. The ornamentation becomes lighter, airier, and characteristic rocaille motifs — stylized shells with scrolls — appear. Asymmetric compositions create dynamism, a sense of whimsical play of forms. The relief is shallow but very detailed.
The color solution for baroque and rocaille rosettes can be complex. Gilding, silvering, patination, polychrome painting — all means are used to create luxury. A white rosette with gold accents on protruding details — a classic variant. Fully gilded rosettes are characteristic of palace interiors.
Baroque and rocaille rosettes require a corresponding interior. In minimalist spaces, they would be inappropriate. But in classical interiors with stucco, heavy drapes, antique furniture, such rosettes create an atmosphere of luxury and historical authenticity.
Empire — imperial monumentality
Empire rosettes combine classical strictness with imperial monumentality. The ornamentation includes military attributes — laurel wreaths, torches, swords, helmets, eagles. Egyptian motifs — lotuses, papyrus, sphinxes — reflect Napoleon’s era’s fascination with antiquity. Geometry is strict, symmetry is absolute.
The sizes of empire rosettes are significant — diameter from 700 millimeters. Massiveness emphasizes the monumentality of the style. The relief is of medium depth — 30–50 millimeters, but forms are sharp, distinct, graphic. The central medallion often represents a star, a rosette with sharp rays, an imperial eagle.
The color solution is contrasting. A white rosette with abundant gilding — a characteristic technique. Not only protruding details but entire bands of ornament are gilded, creating powerful accents. It is permissible to use black, dark green, burgundy in combination with gold to create a dramatic effect.
Empire rosettes require high ceilings and spacious rooms. In small rooms, their monumentality would be overwhelming. But in grand reception rooms, dining rooms, offices, empire rosettes create an atmosphere of power, respectability, imperial grandeur.
Modern — natural forms and asymmetry
Rosettes in the modern (Art Nouveau) style differ from all previous styles by rejecting classical ornamentation. Here, natural forms dominate — twisting stems, iris and lily flowers, dragonflies, butterflies. Asymmetry becomes a principle — the rosette may have an irregular shape, elements are arranged freely, without forming concentric bands.
Modern lines are smooth, flowing, reminiscent of water movement or plant growth. The relief is shallow — 20–30 millimeters, but very plastic. Transitions are soft, without sharp edges. Working with negative space is characteristic — not only protruding elements but also the space between them are important.
The sizes of modern rosettes can be any, but preferred forms are elongated, oval, asymmetric. Circular rosettes are less characteristic of the style. The color solution is often polychrome — green stems, blue or pink flowers on a white background. Gilding is used sparingly, on individual details.
Modern rosettes are organic in appropriate interiors — with stained glass, curved furniture lines, plant ornamentation. In strict classical interiors, they would be foreign. But for those who appreciate the uniqueness of modernism, such rosettes are a way to create an authentic atmosphere of the era.
Modern style — minimalism of forms
Modern rosettes are characterized by minimalism and geometricism. They are concentric circles without ornament, radial lines, simple geometric patterns. The relief is minimal — 10–20 millimeters, forms are sharp, strict. Emphasis is on the purity of lines, not on the abundance of details.
The sizes of modern rosettes are usually moderate — 300–500 millimeters. Large rosettes are rarely used — in modern interiors, restraint is valued. Forms can be not only circular but also square, polygonal, which corresponds to the geometricism of the style.
The color solution is monochromatic. A white rosette on a white ceiling creates a barely noticeable accent, visible only under certain lighting. Contrasting solutions — a black rosette on a white ceiling or a colored one on a neutral background — create a graphic effect characteristic of modern design.
Modern rosettes are universal. Their minimalism allows them to be used in different interiors — from minimalism to modern classicism. They do not impose a style, working as a neutral accent that highlights the architecture of the light fixture.
Rules for installing a rosette under a light fixture
Installing a ceiling rosette is a process requiring precision and care. Proper installation ensures secure mounting and flawless appearance. Installation errors may lead to rosette detachment, cracks, or disruption of composition symmetry.
Surface preparation
The quality of the base is critically important for reliable adhesion of the rosette. The ceiling must be flat, clean, dry, and strong. Flaking paint, whitewash, and weak putty must be completely removed. The surface is treated with a deep-penetration primer, which strengthens the base and improves adhesive bond.
Ceiling irregularities exceeding 3–5 millimeters must be leveled with putty. The rosette will not conceal significant defects but will emphasize them, repeating all base contours. A flat surface ensures tight contact of the rosette over the entire area, eliminating voids where cracks may form.
Special preparation is required for stretch ceilings. At the rosette installation site, a plastic thermocollar is glued to the stretch fabric, preventing material rupture from heat generated by the light fixture. The rosette is glued to the base ceiling before installing the stretch fabric, and the fabric is cut to the inner diameter of the rosette after installation.
Center marking
Precise determination of the rosette's center is critical for composition symmetry. The center usually coincides with the electrical wiring outlet point for the chandelier. It is marked on the ceiling with a pencil or chalk. If the rosette is installed not at the room's center but in a specific zone, the center is determined by measurements from the walls, taking into account the planned composition.
To check symmetry, it is useful to draw a circle on the ceiling with a diameter equal to the rosette's outer diameter. This allows assessing how the rosette will appear relative to walls, corners, and other interior elements. If necessary, the position is adjusted before mounting.
The hole for electrical wiring is drilled in the center of the rosette. The hole's diameter depends on the chandelier's mounting type - usually 30-50 mm for standard mounting brackets, up to 100 mm for heavy chandeliers on hooks. The hole is drilled carefully to avoid damaging delicate relief elements around the center.
Applying adhesive
The choice of adhesive depends on the rosette material and base. For polyurethane rosettes, use special polyurethane adhesive or universal construction adhesive like 'liquid nails'. For plaster rosettes - plaster adhesive or plaster. Wooden rosettes are mounted with PVA wood glue, with additional fixation using self-tapping screws.
Adhesive is applied to the back of the rosette in zigzag lines or dots over the entire contact area. It is important to apply adhesive evenly, without gaps, but not excessively - the layer thickness should not exceed 3-5 mm. An overly thick layer increases setting time, creates voids, and reduces connection strength.
Adhesive is applied around the rosette in a continuous line - this ensures a tight joint, preventing dust and moisture from entering under the rosette. The central part may have less adhesive, as here the loads are minimal, and the rosette's weight is supported by peripheral areas.
Installation and Fixation
The rosette is placed on the ceiling exactly according to the center marking. It is important to install it correctly immediately - after contact with the ceiling, position adjustment becomes difficult. The rosette is pressed evenly over the entire area, with movements from the center to the edges expelling air bubbles and excess adhesive.
Excess adhesive at the edges is immediately wiped off with a damp sponge. Removing dried adhesive is more difficult, as it may damage the relief or leave marks. It is especially important to remove polyurethane adhesive immediately - after polymerization, it hardens into a solid mass that can only be cut with a knife, risking damage to the rosette.
Adhesive setting time depends on its type. Polyurethane adhesive sets in 15-20 minutes, full polymerization occurs after 24 hours. Plaster adhesive sets faster - in 5-10 minutes. During setting, the rosette must be supported - with a board, mop, or special supports. After the adhesive is fully dry, the supports are removed.
After the adhesive is fully dry, the rosette is ready for finishing. The joint between the rosette and the ceiling often has a small gap due to surface imperfections. This gap is filled with white acrylic sealant, applied as a thin line and smoothed with a wet finger. After drying, the sealant creates an invisible transition from the rosette to the ceiling.
Final finishing
Areas where screws are driven (if mechanical fastening was used) are filled with acrylic putty. After drying, the putty is sanded with fine-grit sandpaper until smooth. The filled areas are painted to match the rosette color for complete concealment.
Screw holes (if mechanical fastening was used) are filled with acrylic putty. After drying, the putty is sanded smooth with fine sandpaper. The filled areas are painted to match the rose's color for complete concealment.
If the rosette is delivered unfinished, it is painted. The surface is cleaned of dust, primed if necessary, then paint is applied in two to three coats with intermediate drying. For polyurethane rosettes, water-based or acrylic paints are used. Brushing allows painting all relief recesses, while spraying creates a more even coating on flat surfaces.
Decorative effects - patina, gilding - are applied after painting. Patina (dark paint or wax) is applied to relief recesses with a brush or sponge, excess is wiped off to emphasize the volume. Gilding is done with gold paint or gold leaf on protruding elements, creating luxurious accents. Such treatment is characteristic of high-end classical interiors.
Rosettes off-center on the ceiling
The rosette does not necessarily have to be placed strictly at the center of the ceiling. There are arrangements where the rosette is offset or multiple rosettes are used to create a complex composition. Such solutions are typical for non-standard spaces or when aiming to create an original decorative effect.
Offset composition
In rooms with irregular shapes - elongated, L-shaped, with slanted corners - the center of the ceiling may not coincide with the optimal chandelier suspension point. In this case, the rosette is placed where the light fixture is located, even if it is not the geometric center. Functionality and visual logic are more important than formal symmetry.
In zoned spaces - studios, lofts - the rosette marks the center of a specific zone, not the entire room. Above a dining table, above a living area, above a bed - the rosette with a light fixture creates a local center, organizing the functional zone. The rest of the space may have other light sources without rosettes or with smaller rosettes.
In rooms with asymmetrical layouts, the rosette may be intentionally shifted from the center to create a dynamic composition. This is typical for modern interiors, where non-standard solutions are valued. It is important that the shift is visually justified - related to furniture, windows, and other interior elements.
Multiple roses
In large rooms over 40-50 square meters, one rosette may be insufficient to create a balanced composition. A system of multiple rosettes is used to organize the ceiling space. A central large rosette with a diameter of 800-1000 mm marks the main zone, while four smaller rosettes with a diameter of 400-500 mm in the corners or along the sides create rhythm.
In long rooms - galleries, corridors - rosettes are arranged in a line with equal intervals. They may be the same size, creating a rhythmic row, or decrease in size from the center to the edges, creating a perspective effect. A light fixture is placed under each rosette, ensuring even lighting of the extended space.
Rosettes with coffered ceilings
Rosettes without light fixtures
Rosettes without light fixtures are placed symmetrically relative to the room's architectural axes. In a square room, four rosettes in the corners create a repeating pattern. In a rectangular room, rosettes may be arranged along the long axis with equal intervals. Mathematical precision in placement is crucial - carelessness destroys the composition.
The size of decorative rosettes without light fixtures can be any, but medium diameters of 400-600 mm are preferred. Too small rosettes will disappear on the ceiling, while large ones without light fixtures may look illogical. Shallow relief is preferred - decorative rosettes work on a plane, not creating strong volume.
The size of decorative rose sockets without lights can be any, but medium diameters of 400-600 millimeters are preferred. Too small roses will be lost on the ceiling, while large ones without lights may look illogical. A shallow relief is preferred — decorative roses work on a flat surface, not creating strong volume.
Rosettes in different types of rooms
Each room has its own requirements for selecting and installing ceiling rose fixtures. Factors such as the purpose of the space, operating conditions, stylistic preferences, and technical limitations are considered.
Living Room - Grandeur and Prestige
The living room is the main room of the house, suitable for the most expressive rose fixtures. Ceiling heights are usually maximal, and the area is significant, allowing the use of large, complex-relief rose fixtures.— everything must correspond to the chosen era.In the living room, they create an atmosphere of respectability.
The diameter of the rose in the living room is usually 600-900 millimeters, depending on the area. In spacious living rooms over 30 square meters, roses up to 1200 millimeters in diameter are appropriate. The relief can be deep - 50-70 millimeters, creating a dramatic play of light and shadow under evening lighting.
The style of the rose is determined by the overall interior concept. In classical living rooms, baroque or neoclassical roses with floral ornaments are appropriate. In modern spaces, minimalist geometric roses work well. In eclectic interiors, bold combinations are possible - a historical rose with modern furniture creates an interesting contrast.
Bedroom - Calm and Coziness
The bedroom requires more restrained solutions. Medium-sized roses of 400-600 millimeters, calm profiles without excessive ornamentation. Ecological safety is important - natural materials, safe compositions. Polyurethane roses are completely ecological, emitting no harmful substances.
The relief of roses in the bedroom is preferably shallow - 20-40 millimeters. Deep relief under nighttime lighting creates sharp shadows that may interfere with falling asleep. Soft, smooth relief creates a calm atmosphere. Floral, rounded ornaments without sharp elements are preferred.
Color solutions in the bedroom are usually monochromatic - a white rose on a white or pastel ceiling. Contrasting and gilded roses are rarely used - they are too active for a resting space. A soft patina in the tone of the walls creates a delicate effect of aged surface, suitable for romantic interiors.
Dining Room and Kitchen - Functionality
The dining room allows the use of expressive roses - here, grandeur is appropriate. A rose with a diameter of 500-700 millimeters above the dining table creates a compositional center, organizing the dining zone. A chandelier framed by a rose marks the significance of this space, creating a festive atmosphere for family meals.
In the kitchen, roses are used less frequently due to practical considerations. High humidity, temperature fluctuations, and contamination require moisture-resistant materials and ease of maintenance. Polyurethane roses are optimal - they are not afraid of moisture and are easy to clean. The relief should be simple, without deep recesses where grease and soot accumulate.
The size of roses in the kitchen is moderate - 300-450 millimeters. Large roses visually overload a typical kitchen. In spacious kitchen-dining rooms, larger roses above the dining zone are possible. A minimalist style is preferred - the kitchen is a functional space, excessive decoration is inappropriate.
Bathroom - Moisture Resistance
The bathroom is the most humid space, where moisture resistance of materials is critical. Gypsum and wooden roses are not used here. Polyurethane roses are ideal - the material does not absorb moisture, does not deform, does not develop mold. They retain their appearance for decades in a humid environment.
The size of roses in the bathroom is usually compact - 250-400 millimeters. Bathrooms are rarely spacious, and large roses would be disproportionate. Bathroom light fixtures are also compact - moisture-resistant shades with a diameter of 250-350 millimeters, proportionate to small roses.
The relief of roses in the bathroom should be simple - smooth surfaces are easier to clean from lime scale and soap splashes. Deep ornaments quickly clog with dirt. Painted roses are preferable to unpainted ones - paint provides additional protection and simplifies maintenance.
Hallway and Corridor - First Impression
The hallway is the first room guests see. It is important to create the right impression. The rose can be expressive, indicating the style of the entire house. The size depends on the hallway area - from compact 300 millimeters in apartments to 600-800 millimeters in spacious hallways of private homes.
In narrow corridors, roses can be arranged in a line, creating rhythm and visually organizing the extended space. Identical roses with a diameter of 300-400 millimeters spaced 2-3 meters apart create even lighting for long spaces. Light fixtures under each rose create a single light line, visually expanding the corridor.The style of roses in the hallway should match the overall interior concept. In classical homes, traditional roses with floral ornaments are appropriate. In modern apartments, minimalist geometric forms work well. It is important that the rose in the hallway sets the tone, anticipating the style of other rooms.
Children's Room - Safety and Lightness
The children's room requires a special approach. The rose must be safe - without small detachable parts, sharp protrusions, fragile elements. Polyurethane roses are optimal - they are strong, do not crumble, have no sharp edges. Mounting must be secure - active games with a ball may create vibrations.
The size of roses in the children's room is moderate - 300-500 millimeters. Large roses may visually overwhelm the child. Shallow relief is preferred, with soft, rounded shapes. Ornaments can be playful - stars, clouds, flowers, butterflies. Such motifs create a fairy-tale atmosphere, pleasing to the child.
Color solutions in the children's room can be bright. A rose painted in pastel tones - blue, pink, yellow, green - becomes a decorative accent. The rose can be painted with characters or patterns. The key is to use water-based, non-toxic paints without harmful vapors.
Combining Roses with Other Moldings
The rose rarely exists in isolation. It is part of a system of decorative elements, including cornices, moldings, pilasters, and brackets. Harmonious combination of all elements creates a high-level, cohesive interior.
Roses and Ceiling Cornices
buy wooden corniceOr polyurethane - the first step toward creating a classic interior. A cornice around the ceiling perimeter and a rose in the center - a basic composition, tested over centuries. It is important to maintain stylistic unity - the cornice and rose should be from the same collection or have similar ornaments.
The crown's width and the rosette's diameter must correspond. A heavy crown 120-150 millimeters high requires a large rosette with a diameter of at least 700-800 millimeters. A thin crown 60-80 millimeters tall harmonizes with rosettes 400-600 millimeters in diameter. Disproportion creates imbalance — a large rosette overwhelms a thin crown, while a small one disappears against a bulky frame.
The relief of the crown and rosette should also match. A flat crown with minimal relief and a voluminous multi-tiered rosette create a stylistic dissonance. It is better to use elements with the same depth of detailing — both flat or both with deep relief.
Rosettes and ceiling moldings
Moldings create geometric compositions on the ceiling — rectangles, squares, ovals. A rosette can be placed at the center of such a frame, becoming the climax of the composition. The rosette's size should be 60-80% of the framing element's size — this creates a harmonious proportion.
polyurethane wall moldingsElements from the same collection ensure stylistic unity. The molding profile must be compatible with the rosette's relief. Simple flat moldings match minimalist rosettes, while intricate carved moldings suit richly decorated rosettes.
In large rooms, complex compositions are possible — several molding frames with rosettes of different sizes inside. A central frame with a large rosette marks the main zone, while peripheral frames with smaller rosettes indicate secondary areas. Such hierarchy structures the space, creating architectural depth.
Rosettes and wall moldings
Buy decorative elementsWall elements — pilasters, capitals, casings, panels — must match the ceiling rosette. Stylistic unity is critical — Baroque pilasters on walls and a minimalist rosette on the ceiling will create chaos. All elements must speak the same visual language.
The size of wall elements and the ceiling rosette must correspond. Tall pilasters require a large rosette; otherwise, it will be lost against active verticals. Small wall medallions harmonize with modest ceiling rosettes. Proportionality creates visual balance.
The color solution of all molding elements must be unified. Traditionally, all molding is white against colored walls and ceilings. Gold options are possible — then gilding is applied to both wall elements and the ceiling rosette. Polychrome painting should also be a unified system, not a collection of disparate solutions.
Lighting and rosettes — functional tandem
The interaction between the rosette and the light fixture requires careful planning. Proper combination creates a harmonious composition; improper combination creates visual dissonance.
Selecting a chandelier for the rosette
The chandelier's size and the rosette's size should correspond according to the 60-80% rule. A chandelier with a diameter of 800 millimeters ideally matches a rosette with a diameter of 500-650 millimeters. A larger rosette visually absorbs the chandelier, while a smaller one creates the impression that the chandelier hangs in empty space.
The chandelier's style must match the rosette's ornament. A classic crystal chandelier requires a traditional rosette with botanical motifs. A modern minimalist light fixture harmonizes with a simple geometric rosette. Eclectic combinations are possible but require refined taste — a modern chandelier against a historical rosette may become an interior highlight or a glaring mistake.
Material and finish must also match. A gilded chandelier requires gilding on the rosette — at least on protruding elements. A chrome modern light fixture matches a white or gray rosette without additional decoration. Colored glass in the chandelier may find resonance in color accents on the rosette.
Spot lighting and rosettes
Spotlights create a special situation. Here, the rosette does not frame a specific fixture but acts as an independent decorative accent. Spotlights are placed around the room's perimeter or in a specific zone, while the rosette occupies the ceiling's center, creating an architectural focal point.
The rosette's size under spot lighting is determined solely by the ceiling's area. Larger rosettes can be used compared to those with a central chandelier — the rosette becomes the main decorative element of the ceiling. The diameter can reach 800-1000 millimeters in standard living rooms, creating a powerful visual accent.
The rosette's style under spot lighting can be any. A classical rosette in a modern interior with spotlights creates an interesting eclectic effect — blending eras and styles. A modern minimalist rosette emphasizes the technological aspect of spot lighting, functioning as a geometric accent.
Hidden rosette backlighting
Modern technologies allow creating an eye-catching backlighting for the rosette. An LED strip is installed along the inner perimeter of the relief, creating soft illumination that highlights the elements' volume. Such backlighting turns the rosette into an independent source of decorative light.
For hidden backlighting, the rosette must have sufficient relief depth — at least 30-40 millimeters. Installing an LED strip in shallow recesses is problematic. Multi-tiered Baroque rosettes are ideal for backlighting — each level can have its own light contour, creating a complex light pattern.
The backlight color determines the atmosphere. Warm white light creates a cozy, homey ambiance. Cool white highlights the interior's modernity. Colorful RGB backlighting allows changing the space's mood — from romantic pink to dramatic blue. Control via remote or smartphone adds functionality.
Mounting the rosette on various ceiling types
The ceiling type determines the rosette's mounting technology. Each option has specific features that must be considered.
Concrete or plastered ceiling
This is optimal for mounting the rosette. The surface is strong and flat after proper preparation. The rosette is glued with special mounting adhesive — polyurethane for polyurethane items, gypsum for gypsum. Adhesive is applied to the back of the rosette, the element is pressed against the ceiling, and it is secured until the adhesive sets.
For heavy gypsum rosettes over 600 millimeters in diameter, adhesive mounting is supplemented with mechanical. Holes are drilled around the perimeter, dowels are installed, and self-tapping screws are screwed in. Screw heads are pressed into the rosette material and masked with putty. Such mounting ensures reliability and prevents detachment.
Preparing a concrete ceiling includes leveling, priming, and drying. Old whitewash is completely removed — it does not provide reliable adhesion. Peeling paint is stripped, and the surface is sanded down to a strong base. Deep-penetration primer strengthens the surface and improves adhesive bonding.
Gypsum board ceiling
Gypsum board is a good base for lightweight polyurethane rosettes. The weight of such items is minimal - 1-3 kilograms even for rosettes with a diameter of 800 millimeters. Gypsum board withstands such a load without problems. The adhesive is applied to the rosette, the element is pressed against the ceiling and fixed until it sets.
Gypsum board is not suitable for heavy gypsum rosettes - it cannot withstand the weight. In this case, reinforcement must be provided - an additional profile at the rosette mounting location during the frame assembly stage. The rosette is screwed into the gypsum board to a metal profile, which provides load-bearing capacity.
Preparation of the gypsum board ceiling is minimal. It is enough to fill the joints between sheets, sand the unevenness, and prime the surface. Gypsum board is inherently flat, which simplifies installation. It is important not to over-tighten screws during mechanical mounting - gypsum board is brittle, excessive force will crush it.
Stretch ceiling
A stretch ceiling creates special conditions. The rosette cannot be mounted to the stretch fabric - it cannot withstand the weight. The rosette is mounted to the base ceiling before installing the stretch fabric. A special technology with a thermal ring is used.
The rosette is glued to the base ceiling using the standard method. After the adhesive has fully dried, the stretch fabric is installed. A thermal ring - a plastic ring that prevents material rupture - is glued to the fabric at the rosette location. The fabric is cut out within the thermal ring, the edges are folded over, and glued to the rosette. This results in the rosette protruding through the stretch fabric.
It is important to accurately calculate the rosette position - after installing the stretch fabric, adjustment is impossible. The thermal ring's diameter must match the rosette's internal diameter. For rosettes without a central hole, a thermal ring is not required - the rosette is fully covered by the stretch fabric from above, which is impossible and illogical. Therefore, only rosettes with a central hole for wire exit are used on stretch ceilings.
Wooden ceiling
Wooden ceiling - a rare base in city apartments but common in suburban homes. Wood is an excellent base for rosettes of any type. Lightweight polyurethane rosettes are glued using the standard method. Heavy gypsum or wooden rosettes are additionally screwed directly into the wood.
Wooden wall decorHarmoniously combines with a wooden ceiling. A carved wooden rosette on a wooden ceiling creates material unity, emphasizing the natural interior. Quality finishing of all wooden elements is important - uniform staining and protective coating create a harmonious composition.
Preparation of a wooden ceiling includes sanding, treatment with antiseptics, and application of protective coating. The wood must be dry - humidity no more than 12%. Wet wood will shrink, which may lead to rosette detachment or cracking. Proper preparation ensures the longevity of the structure.
Ceiling rosette care
Proper care extends the life of rosettes and preserves their decorative qualities. Regular maintenance requires minimal effort but is critically important.
Regular cleaning
Dust is the main enemy of ceiling moldings. It accumulates in the recesses of the relief, making the ornament gray and unremarkable. Regular cleaning once a month preserves the rosette's freshness. Use a soft brush for dust or a dry cloth. Movements should be gentle, without pressure - especially important for gypsum rosettes, which may crumble.
Wet cleaning is performed every six months. A slightly damp, not wet cloth wipes the surface, removing dirt. Polyurethane rosettes withstand wet cleaning without problems. Gypsum rosettes require caution - excess moisture softens the material. Wooden rosettes are wiped with a slightly damp cloth, then dried thoroughly.
Cleaning agents are used rarely - only for heavy soiling. Mild, non-abrasive, solvent-free cleaners are applied with a sponge, rinsed with clean water, and the surface is wiped dry. Aggressive chemicals and chlorine-containing bleach are strictly prohibited - they damage the material and destroy the painted surface.
Recoating
Over time, the painted surface fades, micro-scratches and stains appear. Refreshing the coating every 5-7 years restores the rosette's original appearance. The surface is cleaned of dust and grease, lightly sanded with fine-grit sandpaper to improve adhesion of the new paint layer.
Painting is done with a brush or spray. A brush allows painting all recesses of the relief, but requires care - drips spoil the appearance. Spraying creates an even coating, but inaccessible recesses may not be adequately painted. The optimal approach is to combine both methods - spray the main area, use a brush for recesses.
Paint is applied in two to three thin layers with intermediate drying. A thick layer causes drips and hides the relief details. Thin layers create an even coating and preserve the ornament's clarity. Drying time for each layer is 4-6 hours for water-based paints, 12-24 hours for alkyd paints.
Repair of damage
Mechanical damage - chips, cracks, detached parts - requires repair. Small chips on polyurethane rosettes are filled with acrylic putty, sanded after drying, and painted. Gypsum rosettes are repaired with gypsum putty, wooden ones with wood putty.
Detachment of the rosette from the ceiling requires immediate intervention. A problem detected in time is easily resolved - the rosette is re-glued at the detachment site and fixed until the adhesive dries. Ignored detachment leads to the rosette falling, which is dangerous and may damage furniture or injure people.
Detachment of the rose from the ceiling requires immediate intervention. A problem detected in time is easily resolved — the rose is re-adhered at the detachment point and secured until the adhesive dries. If detachment is allowed to progress, the rose may fall, which is dangerous and may damage furniture or injure people.
Questions and answers
Can a rosette be installed by oneself or are specialists required?
Installation of lightweight polyurethane rosettes up to 600 millimeters in diameter is accessible for a homeowner with basic skills. Required: a stepladder, adhesive, level, knife. The process takes 1-2 hours. Heavy gypsum rosettes over 700 millimeters in diameter are better installed by professionals - requires experience working with gypsum, special mounting, and an assistant to support the weight.
How much does a ceiling rosette cost?
Price depends on material, size, and relief complexity. Simple polyurethane rosettes 300-400 millimeters in diameter cost from 800 to 2000 rubles. Large rosettes 800-1000 millimeters with rich relief - from 5000 to 15000 rubles. Gypsum rosettes are more expensive - from 8000 to 50000 rubles depending on size. Hand-carved wooden rosettes - from 15000 to 100000 rubles for exclusive handwork.
How is a rosette mounted to the ceiling?
Lightweight polyurethane rosettes are glued with special mounting adhesive. Adhesive is applied to the back side, the rosette is pressed against the ceiling, and fixed for 15-20 minutes until the adhesive sets. Heavy gypsum rosettes are additionally screwed - holes are drilled around the perimeter, screws with anchors are screwed in, screw heads are pressed down and sanded.
Can the rose be painted to match the ceiling color?
It is recommended and often advisable. A ceiling rose in the color of the ceiling creates a unified surface where relief is perceived only through the play of light and shadow. This elegant solution suits modern and neoclassical interiors. The same paints used for the ceiling — water-emulsion or acrylic — are applied after installing the rose, once all joints and gaps are sealed.
What diameter of rose should be chosen for a 20 square meter room?
For a 20 square meter room, the optimal rose diameter is 500–600 millimeters. This is a universal size that creates a noticeable accent without overcrowding the space. If ceiling height exceeds 3 meters, it can be increased to 700 millimeters. For low ceilings of 2.5–2.7 meters, it is better to limit the size to 450–500 millimeters.
Is a rose needed with spot lighting?
A rose with spot lighting is not mandatory, but can be used as a decorative accent. It creates a focal point on the ceiling, compensating for the absence of a central chandelier. This is typical for classical interiors, where an abundance of decoration is valued. In minimalist spaces, a rose without a central fixture may be excessive.
How often should a rose be updated?
With proper care, a rose lasts for decades without needing updates. Painted roses require repainting every 5–7 years — paint fades and micro-damage appears. Updating involves light sanding and repainting. Unpainted white polyurethane roses last 20–30 years without changes — the material does not yellow or lose whiteness.
Can a rose be used on a suspended ceiling?
Yes, but with specific considerations. The rose is mounted to the base concrete ceiling before installing the suspended fabric. After installing the suspended ceiling, a thermal ring is applied at the rose location, the fabric is cut out, and the edges are folded over the rose. The rose protrudes through the suspended fabric. It is crucial to precisely calculate the position — after installing the fabric, adjustments are impossible.
Conclusion
A ceiling rose is an element that transforms an ordinary ceiling into an architectural masterpiece. A properly selected rose creates a visual focal point in the room, sets the scale, links the light fixture with the architecture, and conceals technical mounting details. This is not luxury, but a thoughtfully designed detail that completes the interior composition.
Choosing a rose requires considering multiple factors — room area, ceiling height, light fixture size, interior style, and base material. Polyurethane roses are optimal for most projects due to their lightness, strength, moisture resistance, variety of forms, and affordable price. Gypsum roses retain value in the premium segment, where historical authenticity is important. Carved wooden roses are chosen by admirers of natural materials and handcrafted work.
Installing a rose is accessible for DIY enthusiasts with basic skills and proper tools. Careful preparation of the base, precise marking of the center, quality adhesive, and careful execution are essential. Professional installation guarantees results, especially for heavy gypsum roses with large diameters.
Maintenance of roses is simple — regular dust removal, periodic wet cleaning, and repainting every few years. Proper care preserves decorative qualities for decades, making the rose a long-lasting interior element that does not require replacement during cosmetic renovations.
Roses work as part of a system with other molding elements — cornices, moldings, wall decor. Stylistic unity of all elements creates a high-level, cohesive interior.Wall moldingand a ceiling rose from the same collection ensure harmony of forms, ornaments, and proportions.
STAVROS offers a wide range of ceiling roses in polyurethane and wood for any interior solution. The catalog features classic roses with traditional ornaments, modern minimalist forms, and exclusive designer models. The size range, from compact 250 millimeters to monumental 1500 millimeters, allows finding a solution for rooms of any size.
Polyurethane ceiling rosettesSTAVROS are manufactured from high-quality European raw materials using a no-mold casting technology. This ensures maximum relief detail, ornament clarity, and product strength. Each rose undergoes quality control and is individually packaged for protection during transport.
Wooden rosesSTAVROS are crafted by master woodcarvers with years of experience. Premium-grade oak, beech, ash, and walnut wood without knots or defects is used. Hand-carved detailing creates a unique relief, where each element is meticulously crafted with jewel-like precision. STAVROS wooden roses are applied art pieces capable of becoming family heirlooms.
STAVROS professional consultants will help select a rose perfectly suited to your project. All parameters — room area, ceiling height, light fixture size, interior style, base type, and budget — are considered. Extensive experience working with both classic and modern interiors allows providing expert recommendations.
STAVROS offers not only roses but also a full range of molding elements — cornices, moldings, pilasters, capitals, brackets, and door casings. All elements are organized into collections with unified stylistic principles. This enables creating harmonious interior compositions where each detail complements the others.
Delivery to Moscow, Saint Petersburg, and all of Russia ensures STAVROS products are accessible to any region. Reliable packaging protects fragile elements during transport. Warehouse inventory allows immediate shipment of popular models, while production capacity enables manufacturing exclusive solutions within agreed timelines.
STAVROS is the choice of architects, designers, and discerning clients who understand the value of quality molding. STAVROS ceiling roses are an investment in the beauty and longevity of interiors. This is a choice in favor of European quality, traditions of decorative art, and impeccable service. Choose STAVROS — create interiors worthy of admiration.


