


Article Contents:
- What are decorative elements and why are they needed
- Role of decorative elements in interior design
- Where decorative elements are used
- Materials of decorative elements: wood versus polyurethane
- Wood: naturalness and elegance
- Polyurethane: Modern Alternative
- When to choose wood, when polyurethane
- Types of decorative elements
- Overlays: universal decor
- Decorative rosettes: ceiling stars
- Decorative brackets for shelves: function and beauty
- Other Decorative Elements
- How to choose decorative elements: step-by-step guide
- Step 1: Define the interior style
- Step 2: Choose areas for decoration
- Step 3: Select sizes
- Step 4: Choose material
- Step 5: Determine finish
- Step 6: Calculate budget
- Installation of decorative elements
- Installing overlays and rosettes
- Installation of brackets
- Installing ceiling rosettes
- Painting and finishing decorative elements
- Painting in color
- Patination
- Wood tinting
- Care for decorative elements
- Where to buy decorative elements
- Specialized stores for molded decor
- Manufacturers
- Online stores
- Wood Carving Workshops
- Conclusion: Details create a masterpiece
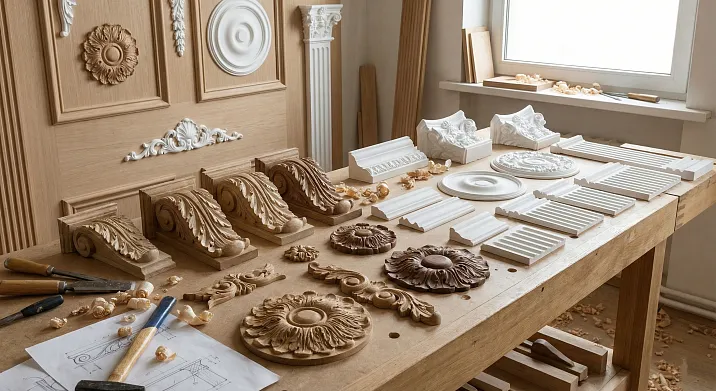
Enter a classic living room. Walls with molding frames, ceiling cornices, parquet. Everything is precisely placed, everything in its place. But the gaze is drawn to details. Carved overlay on the door — acanthus leaves, scrolls, grapevines. Ceiling rosette around the chandelier — a 80 cm diameter circle with baroque motifs. Brackets under shelves — not just metal angles, but elegant wooden elements with carving, supporting bookshelves as works of art.
Details create the character of the interior. You can do a quality renovation — smooth walls, good parquet, proper lighting. But without decorative elements, the interior will remain faceless, standard, lacking individuality.Buy decorative elements— means adding soul to the space, transforming a typical apartment into a unique home with character.
This article is a professional guide to the world of decorative elements from an expert with fifty years of experience in classic interiors, wood carving, and architectural decoration. We will cover all types of decorative elements, from appliqués to brackets, discuss materials — wood versus polyurethane, show how to choose elements to match interior style, and explain installation and maintenance.
Ready to learn how details create masterpieces? Let's dive in.


What are decorative elements and why are they needed
Decorative elements are applied details installed on walls, ceilings, furniture, doors for decoration, style creation, and visual emphasis. They do not bear structural load (unlike cornices or skirting boards), their function is purely aesthetic — to add beauty, expressiveness, and individuality.


Role of decorative elements in interior design
Creating style. The style of an interior is determined not only by wall color and furniture shape, but also by decorative details. A classic interior without carved appliqués, rose petals, or molding frames appears incomplete and simplified. A Baroque interior requires an abundance of decoration — carved appliqués, ceiling rose petals, brackets create its characteristic opulence.
Visual emphasis. Decorative elements direct the viewer's gaze and create focal points. A ceiling rose around a chandelier draws attention to the center of the ceiling. A carved appliqué above a door highlights the entrance. Brackets under shelves turn shelves from mere functional elements into part of a decorative composition.
Covering imperfections. A crack in the wall, an uneven ceiling, an unattractive joint — a decorative appliqué will cover the defect, turning the problem into decoration.
Personalizing space. A standard apartment becomes unique thanks to details. Carved appliqués chosen to your taste, a rose petal of unique design, handcrafted brackets — make the interior yours, unlike thousands of others.
Our factory also produces:


Where decorative elements are used
Walls: appliqués for creating panels, framing zones, decorating corners; molding frames with corner rose petals; vertical appliqués imitating pilasters.
Ceilings: ceiling rose petals around chandeliers and lamps; corner elements at junctions of ceiling cornices; decorative coffered ceilings (recessed areas in the ceiling framed with molding and rose petals in the center).
Furniture: appliqués on cabinet, chest of drawers, bed facades; carved elements on table and chair legs; decorative panels on doors.
Doors and arches: appliqués above doors (pediments, sashings); framing doorways with carved elements; decorating arches.
Fireplaces: framing the fireplace opening with carved appliqués, columns, brackets, creating monumentality.
Shelves and niches: decorative brackets supporting shelves; framing niches with molding and corner rose petals.
Get Consultation
Materials of decorative elements: wood versus polyurethane
Wood: naturalness and nobility
Decorative elements made of solid wood — traditional material, tested over centuries. Wood carving — an ancient art, creating unique elements.
Wood species:
Oak — a hard, durable wood, expressive texture, noble tones. Carved oak elements — standard of quality and prestige. Strength allows creating thin details without fear of chipping. Drawbacks — high price (carved oak appliqué 20×30 cm — 2000–5000 rubles), weight.
Beech — dense wood with fine, uniform texture, pinkish color. Easily carved, allows creating complex details. 30–40% cheaper than oak. Drawback — hygroscopic, requires protective coating.
Linden — soft wood, ideal for carving. Linden is easy to carve, allows creating delicate details — thin leaves, petals, scrolls. Light color, fine texture. Traditionally used for church carving, iconostases. Drawbacks — softness (easily dents), unexpressive texture (often requires toning or painting).
Walnut — premium wood, beautiful texture with brown tones, medium hardness, easily carved. Carved walnut elements — luxury, nobility. High price (walnut appliqué 20×30 cm — 3000–7000 rubles).
Spruce — budget pine wood, soft, easy to process. Texture with bright resin streaks. Suitable for large elements without fine details (soft wood doesn't hold thin elements — they chip). Often painted (paint hides resin streaks and texture flaws). Low price (spruce appliqué 20×30 cm — 500–1500 rubles).
Advantages of wood:
-
Naturalness, eco-friendliness
-
Uniqueness of each element (wood texture is unique)
-
Tactile pleasure (pleasant to touch, warm to the touch)
-
Repairability (can be sanded, repainted, restored)
-
Prestige (wood is associated with luxury and quality)
-
Possibility of creating unique handmade elements
Disadvantages of wood:
-
High price (especially valuable species, hand carving)
-
Heaviness (heavy elements weigh kilograms and require strong mounting)
-
Reaction to humidity (wood absorbs and releases moisture, may deform or crack with humidity changes)
-
Requires protective coating (varnish, oil, wax)
-
Long manufacturing time (hand-carved details take days or weeks)
Polyurethane: modern alternative
Polyurethane — a synthetic polymer, molded under pressure to produce decorative elements imitating wood carving or plaster molding.
Advantages of polyurethane:
-
Lightweight: polyurethane is 8-10 times lighter than wood (a 60 cm diameter wooden rose weighs 2-3 kg, while polyurethane weighs 200-300 grams). Easy to install, does not require strong mounting.
-
Water resistance: absolute (water absorption less than 1%). Can be installed in bathrooms, kitchens, humid basements, pools. Does not rot, mold, or swell.
-
Stability: does not react to humidity, does not deform, does not crack with temperature or humidity changes.
-
Price: 3-5 times cheaper than wood (a 60 cm diameter polyurethane rose costs 1000-2500 rubles, while oak costs 5000-12000 rubles).
-
Production speed: molding is fast, allows production of thousands of identical elements.
-
Detail clarity: pressure molding in aluminum molds reproduces the finest details — leaf veins, flower stamens, bark texture (accuracy up to 0.1 mm).
-
Ready for installation: elements are primed with white acrylic primer and ready for mounting or painting.
Disadvantages of polyurethane:
-
Artificial material (lacks the naturalness and tactile warmth of wood)
-
All elements of one model are identical (lacks the uniqueness characteristic of hand-carved work)
-
Less prestige (polyurethane is associated with budget options, though high-quality polyurethane may visually match plaster or wood after painting)
-
Difficult to repair when damaged (cannot sand deep scratches — decorative layer thickness is limited)
When to choose wood, when to choose polyurethane
Choose wood when:
-
For prestigious classic interiors (Baroque, Empire, Russian style)
-
When tactile quality matters (elements at eye and hand level — door and furniture overlays)
-
For unique handcrafted elements (exclusive carved panels, emblems, portraits)
-
When budget allows (wood is more expensive but more prestigious)
-
For dry rooms (living rooms, bedrooms, offices)
Choose polyurethane when:
-
For budget projects (with limited budget, polyurethane delivers 80% of wood’s effect at 30% of the price)
-
For humid rooms (bathrooms, kitchens, pools)
-
For ceilings (lightweight — key advantage; heavy wooden ceiling elements require complex mounting)
-
When many identical elements are needed (framing dozens of windows and doors — polyurethane ensures uniformity)
-
For curved surfaces (flexible polyurethane elements for columns, arches)
Combination: use wood for key eye-level elements (door and furniture overlays, fireplace surround), polyurethane for ceiling elements, window framing, less visible zones. Achieve a balance of prestige and budget.
Types of decorative elements
Moldings: universal decor
Moldings are flat or three-dimensional elements of various shapes, attached to a surface for decoration.
Molding shapes:
Plant motifs: acanthus leaves (classic motif of Greek and Roman architecture), grapevines with leaves and clusters, roses and other flowers, oak leaves with acorns, laurel wreaths.
Geometric ornaments: rosettes (circular symmetric patterns), meanders (continuous geometric ornament made of broken lines), rhombuses, stars, interlacing patterns.
Narrative compositions: angels, putti (baby angels), mythological creatures (griffins, chimerae), animals (lions, eagles), coats of arms, shields.
Architectural elements: keystone stones (elements above arches), brackets, consoles, capitals (tops of columns), modillions (decorative brackets under cornices).
Sizes: from miniature 5×5 cm to large panels 100×150 cm.
Applications of moldings:
-
Framing doors and windows (moldings at corners of frames, above doors)
-
Creating wall panels (composition of moldings with moldings inside frames)
-
Decorating furniture (moldings on cabinet, chest of drawers, bed fronts)
-
Decorating fireplaces (moldings on fireplace surrounds)
-
Accenting room corners (corner moldings)
Prices:
Polyurethane moldings: 10×10 cm — 150-400 rub, 20×30 cm — 400-1200 rub, 50×70 cm — 1500-4000 rub.
Oak wooden moldings: 10×10 cm — 800-2000 rub, 20×30 cm — 2000-5000 rub, 50×70 cm — 8000-20000 rub.
Decorative rosettes: ceiling rosettes
decorative rose outlets— circular or polygonal elements, usually installed on ceilings around chandeliers or light fixtures.
Sizes: diameter from 20 cm (for small fixtures in small rooms) to 120 cm (for large chandeliers in spacious living rooms or halls).
Ornaments:
Classical: symmetrical plant motifs (acanthus leaves, roses, laurel wreaths), radiating from the center; concentric circles with relief; cove molding (radial grooves).
Baroque: lavish asymmetrical compositions with angels, putti, grapevines, shells; multi-level relief with deep shadows.
Modern: smooth curved lines, stylized flowers (lilies, irises), asymmetry.
Art Deco: geometric patterns (zigzags, steps, rays), symmetry, contrast.
Modern: minimalist geometric forms (circles, polygons with simple relief), sometimes without ornament (just a solid form).
Construction:
Most rosettes have a central hole for a chandelier hook (diameter 10-15 cm). Some are without holes (installed next to fixtures as standalone decorative elements).
Materials:
Polyurethane — optimal choice for ceiling rosettes. Lightweight (a 60 cm polyurethane rosette weighs 200-300 grams), easily adheres with glue, does not exert load on the ceiling. Price: 20-30 cm — 300-800 rub, 40-60 cm — 1000-2500 rub, 80-120 cm — 3000-8000 rub.
Wood — used less often (heavy), but in classical interiors with wooden ceiling beams or coffered ceilings, wooden rosettes harmonize well. Price in oak: 40-60 cm — 5000-12000 rub, 80-100 cm — 15000-35000 rub.
Gypsum — traditional material for moldings, heavy, fragile, expensive (handmade). Currently being replaced by polyurethane.
Application:
-
Chandelier mounting (most common — the rose accentuates the chandelier, creating a composition)
-
Ceiling decoration without a chandelier (rose as a standalone decorative element, sometimes with backlighting along the contour)
-
Coffered ceilings (roses in the center of each coffer cell)
-
Walls (rarely used, but sometimes — rose as a wall panel)
Decorative brackets for shelves: function and beauty
Decorative brackets for shelves— elements supporting shelves, protrusions, balconies, cornices, combining functionality with decorativeness.
Construction: the bracket has a vertical part (attached to the wall) and a horizontal part (supporting the shelf). The connection is usually reinforced with a diagonal brace or decorative element (scroll, carving), ensuring rigidity.
Styles:
Classical: carved with acanthus leaves, scrolls, volutes; symmetrical, proportionate; made of wood (oak, beech) with staining or gilding.
Baroque: lavish, asymmetrical, with putti, shells, grapevines; often with gold patina.
Modern: curved, flowing lines, stylized plants; asymmetry.
Minimalist: simple geometric shapes (rectangular, triangular connections), without carving; made of wood with natural finish or painted in neutral colors.
Loft/industrial: rough brackets from solid timber with preserved knots and cracks; or metallic with wooden inserts.
Dimensions:
Projection (shelf depth supported by the bracket): from 15 cm (for narrow shelves under photo frames, small items) to 50 cm (for bookshelves, heavy items).
Height: from 10 cm (miniature for light shelves) to 40 cm (heavy-duty for heavy shelves, fireplace beams).
Load capacity:
Solid wood brackets (oak, beech) with 25–30 cm projection support 15–30 kg (books, heavy items).
Polyurethane brackets are less strong — support 3–8 kg (light decorative items, photo frames, vases). For heavy shelves, polyurethane brackets are used as decorative overlays on hidden metal or wooden load-bearing brackets.
Application:
-
Bookshelves (brackets support shelves, creating a classic look for a home library)
-
Decorative shelves (for vases, figurines, photo frames)
-
Fireplace beams (heavy-duty brackets support the fireplace beam, creating monumentality)
-
Cornices (brackets under ceiling cornices — decorative function, often do not bear load)
-
Balconies, bay windows (facade brackets supporting balconies — architectural exterior element)
Prices:
Polyurethane brackets: 15–20 cm projection — 300–800 rubles/piece, 25–35 cm — 800–2000 rubles/piece, 40–50 cm — 2000–5000 rubles/piece.
Oak wooden brackets: 20–25 cm projection — 1500–4000 rubles/piece, 30–40 cm — 3000–8000 rubles/piece, 45–50 cm — 6000–15000 rubles/piece.
Other decorative elements
Corner elements: overlays for external and internal room corners, molding frames. Cover molding joints, eliminating the need for precise 45-degree trimming.
Capitals: tops of columns and pilasters. Classical orders (Doric, Ionic, Corinthian) have characteristic capitals. Used for decorating columns and pilasters.
Column bases: bases of columns and pilasters, creating a transition from the floor to the vertical element.
Keystone: decorative elements at the top of an arch (usually a projecting stone with carving). Emphasizes the arch, creating an accent.
Consoles: projecting elements supporting cornices, beams, shelves. Similar to brackets, but usually more robust and monumental.
Pediments: triangular or semicircular elements above doors, windows, niches. A classic architectural element.
How to choose decorative elements: step-by-step guide
Step 1: Define the interior style
Decorative elements must match the interior style. Mismatching distracts the eye and disrupts harmony.
Classic: complex symmetrical elements with plant motifs (acanthus leaves, roses, laurel wreaths), capitals of classical orders, ceiling rosettes with concentric circles and relief. Material — wood (oak, beech), polyurethane painted to resemble wood or with patina.
Baroque: lavish asymmetrical elements with angels, putti, shells, grapevines; deep multi-level relief; gilding or silver patina. Material — carved wood, polyurethane with patina.
Neoclassicism: simplified classical elements (fewer details, cleaner lines), symmetry, proportionality; white or light paint (concealing material, creating graphic effect). Material — polyurethane painted white or light gray.
Modern: smooth curved lines, asymmetry, stylized plants (lilies, irises, vines), absence of sharp angles. Material — wood with natural tone staining, polyurethane.
Art Deco: geometric forms (zigzags, steps, rays, trapezoids), symmetry, contrast; use of metallic effects (gold, silver, chrome). Material — polyurethane painted in contrasting colors, metallic finishes.
Provence/Country: simple elements with plant motifs (flowers, leaves), not overly ornate; white or pastel paint with aging effects. Material — wood (pine, linden) with paint, polyurethane.
Minimalism: minimal decorative elements or complete absence of them; if used — simple geometric forms, no ornamentation. Material — wood with natural finish, polyurethane painted in neutral colors.
Loft: rough elements made of solid wood with preserved knots and cracks; industrial motifs; dark tones. Material — wood (oak, ash) with brush finish, dark oil.
Step 2: Choose areas for decoration
You don’t need to decorate everything. Excess decorative elements overload the interior, creating visual clutter. Choose key zones.
Ceiling: rosettes around chandeliers in living rooms and dining rooms; coffered ceilings with rosettes at the center of each cell (for high ceilings); corner elements at junctions of ceiling cornices.
Walls: molding frames with corner rosettes in living rooms, bedrooms, offices; appliqués above doors; paneling with appliqués on accent walls; framing around fireplace openings.
Doors: appliqués on door panels (central panels, corners); pediments above doors.
Furniture: appliqués on cabinet and chest fronts; carved elements on table and chair legs.
Shelves: decorative brackets under shelves in libraries, living rooms.
Rule: better several quality accents than abundance of small elements throughout the space.
Step 3: Select sizes
Element sizes must match the room’s scale.
For standard apartments (ceilings 2.7–3 m, rooms 15–25 m²): ceiling rosettes 40–70 cm in diameter, appliqués 15–40 cm, brackets with 20–30 cm projection.
For spacious rooms (ceilings 3.2+ m, rooms 35+ m²): ceiling rosettes 70–120 cm in diameter, large appliqués 50–100 cm, heavy-duty brackets with 35–50 cm projection.
For small rooms (ceilings 2.5–2.7 m, rooms 10–15 m²): small rosettes 25–40 cm, miniature appliqués 10–20 cm, slim brackets 15–20 cm, or opt for minimalism instead of decorative elements.
Step 4: Choose material
Follow the criteria from the 'Materials' section above. Briefly:
-
Wood — for prestigious zones, tactile surfaces, uniqueness
-
Polyurethane — for ceilings, humid areas, budget projects, when many elements are needed
-
Combination — wood for key elements, polyurethane for the rest
Natural (clear lacquer, oil) — for interiors where the texture of wood is appreciated (classic with wooden furniture, parquet).
Staining — to change the color of wood while preserving the visibility of the texture (dark tones for luxurious interiors, light tones for Scandinavian style).
Painting (white, colored tones) — for neoclassicism, Provence, Scandinavian style (paint hides the texture, creates graphic effect).
Patina — for Baroque, palace interiors (gold, silver on relief protrusions).
Metallics — for Art Deco, modern interiors (painting to resemble gold, silver, bronze, copper).
Step 6: Calculate budget
Budget option (10,000–30,000 rubles per room): polyurethane elements (ceiling rose 40–60 cm for 1,000–2,000 rubles, 10–15 inserts at 300–800 rubles each, molding frames, corner elements); white paint or wood-tone staining.
Mid-range option (30,000–80,000 rubles per room): combination of polyurethane (ceiling rose, corner elements) and wood (door inserts, shelf brackets); quality finish (lacquer, patina).
Premium option (80,000–200,000+ rubles per room): wood (oak, walnut) with hand-carved details; large elements; gold patina; unique elements based on custom sketches.
Premium option (80000-200000+ rub per room): wood (oak, walnut) with hand-carved details; large elements; gold patina; unique elements based on custom sketch.
Quality installation of decorative appliqués and corner elements requires precision, correct materials, and adherence to technology. Even the most beautiful elements will look poorly with careless installation.
Installing inserts and roses
On adhesive — primary method for lightweight elements (polyurethane, small wooden).
Surface preparation: clean from dust, dirt, grease; prime (primer improves adhesive bond).
Adhesive: polyurethane adhesive, "liquid nails", adhesive for polyurethane molding. For wood — construction-grade PVA D3-D4 (water-resistant) or polyurethane.
Applying adhesive: apply in a zigzag or dot pattern (for small elements), in a continuous layer (for large, heavy elements).
Pressing: press element onto surface, hold for 30–60 seconds (adhesive setting time). For heavy elements — secure with painter’s tape or support for 12–24 hours until fully dry.
Removing excess: wipe away excess adhesive squeezed out along edges immediately (before it dries).
On self-tapping screws — for heavy wooden elements.
Technique: drill holes in element, position against surface, mark points on wall/ceiling through holes, drill, insert anchors, screw in self-tapping screws. Sink screw heads, mask with putty or wax pencil.
Combined (adhesive + self-tapping screws) — for maximum reliability of heavy elements.
Installing brackets
Brackets bear load (weight of shelf + items on it), require strong mounting.
Polyurethane decorative brackets (support only light items): attach to wall with adhesive, place shelf on bracket, secure with adhesive or self-tapping screws through shelf into bracket.
Wooden load-bearing brackets: attach to wall with self-tapping screws (minimum 2 screws per bracket, 60–80 mm long, into anchors or directly into wooden wall). Place shelf on brackets, secure with self-tapping screws through shelf into horizontal part of bracket.
Polyurethane bracket as a cover for load-bearing: first, attach hidden load-bearing bracket (metal angle or wooden beam) to wall, place shelf on it, then attach polyurethane decorative bracket to wall and bracket with adhesive, concealing the load-bearing structure.
Installing ceiling roses
Ceiling preparation: ceiling must be flat, clean, primed.
Marking center: find center of ceiling (intersection of diagonals) or point for chandelier attachment. Mark center of rose.
Central hole: if rose has hook hole, align hole with chandelier hook.
Applying adhesive: apply in continuous layer or dense grid (rose has large contact area).
Pressing: press the rose against the ceiling, aligning the center with the marking. Hold for 1-2 minutes (light polyurethane roses), secure with painter's tape crisscross or supports for 12-24 hours (heavy wooden).
Removing excess: immediately remove the glue squeezed out along the edges.
Chandelier mounting: after the glue dries (24 hours), mount the chandelier through the central hole of the rose.
Painting and finishing decorative elements
Most polyurethane elements are sold primed with white acrylic primer. They are ready for installation (white elements suit many interiors) or painting.
Painting in color
Acrylic paint — optimal for polyurethane and wood. Dries quickly (2-4 hours per layer), odorless, easy to apply with brush or spray, does not peel.
Technology:
-
If the element is already installed — protect adjacent surfaces with painter's tape.
-
Apply paint in thin layers (2-3 layers are better than one thick layer — thick layer runs and forms drips).
-
Brush for recesses in relief, roller or spray for flat surfaces.
-
Allow each layer to dry 2-4 hours before applying the next.
Colors: white (universal, suitable for neoclassicism, Provence, Scandinavian style), black (contrasting modern interiors), gray (from light to anthracite — modernity, neoclassicism), colored (beige, cream, pastels — Provence; dark blue, emerald — luxury).
Patina
Technology:
-
Paint the element in the base color (white, cream, light gray or dark — walnut, wenge). Let dry.
-
Take gold, silver, or bronze paint (acrylic metallic or special patina).
-
Dip the dry brush lightly into paint, wipe off excess with paper (brush should be almost dry).
-
Apply paint lightly only on raised parts of the relief (rosettes, leaves, scrolls). Patina remains on raised parts, base color — in recesses.
-
Let dry. If necessary, cover with protective varnish.
Effect: creates the impression of antique gold, noble aging, depth of relief.
Wood tinting
For wooden elements where color needs to be changed while preserving texture.
Stain or colored oil: applied with brush or cloth, absorbed into wood, changing color. Excess is wiped off after 15-30 minutes. After drying (12-24 hours), covered with protective varnish or oil.
Colors: from light (bleached oak, Scandinavian light) to dark (walnut, wenge, stained oak, black wood).
Care for decorative elements
Regular cleaning: once a month wipe with dry soft cloth or vacuum with soft brush, removing dust. For relief elements — soft brush in recesses.
Wet cleaning: every 3-6 months wipe with slightly damp (well wrung out) cloth and mild detergent. Avoid excess water (especially for wooden elements).
Renewal of finish: after 5-10 years paint may fade. For polyurethane — repaint (lightly sand with fine sandpaper, remove top layer, apply fresh paint). For wood — sand, apply fresh varnish or oil.
Repair: small scratches on painted elements — touch up with matching paint; on wood — wax pencil. Chips — fill with putty, sand, paint.
Where to buy decorative elements
Specialized stores for molded decor
Direct from the manufacturer — lower price (no intermediaries), option to order custom elements by sketches.
Manufacturers
Buy decorative elementsDirect from the manufacturer — lower price (no intermediaries), option to order custom elements by sketches.
Online stores
Convenience, wide selection, delivery. Minus — can't see in person. Study photos from different angles, read size descriptions, order samples.
Wood carving workshops
For exclusive handcrafted wooden elements — contact woodcarvers' workshops. Individual design, uniqueness. Production time 2–8 weeks, high price.
Conclusion: Details create a masterpiece
Decorative elements are not a luxury or mere ornamentation. They are tools for creating the character of an interior, personalizing space, and transforming a standard apartment into a unique home.
Carved applique above the door, ceiling rose around the chandelier, elegant brackets under shelves — each detail contributes to the overall composition. Together, they create harmony, style, and atmosphere.
Company STAVROS — a leading manufacturer of decorative elements from wood and polyurethane with over 25 years of experience — offers professional solutions for any interior: polyurethane appliques over 500 models in all major styles, sizes from miniature 5×5 cm to large panels 100×150 cm (vegetable motifs: acanthus leaves, rose, grapevines, oak leaves, laurel wreaths, geometric ornaments, rosettes, meanders, rhombuses, stars, narrative compositions, angels, putti, mythological creatures, animals, coats of arms, architectural elements, keystone stones, consoles, capitals, modillions), decorative appliques from solid wood over 200 models of hand and machine carving from oak, beech, walnut, linden in all styles from classic to modern, sizes from 10×10 to 80×120 cm,decorative rose outletsceiling roses from polyurethane over 150 models, diameter from 20 to 120 cm, all styles (classical symmetrical with vegetal motifs, baroque lavish with angels and putti, modern with flowing lines, art deco with geometric patterns, contemporary minimalist), decorative rosettes from solid oak, beech, walnut 40 models, diameter 40–100 cm, hand-carved for luxury interiors,Decorative brackets for shelvesfrom polyurethane over 100 models in all styles, projection from 15 to 50 cm, height from 10 to 40 cm (classical with carving, baroque lavish, modern with curved lines, minimalist geometric, loft rustic), decorative brackets from solid oak, ash, beech 60 models, projection 20–50 cm, carved or uncarved, load capacity up to 30 kg, corner elements, capitals, bases, column elements, keystone stones, consoles, pediments — all necessary elements for full interior decoration, custom manufacturing of elements of any complexity by sketches, drawings, or photos of the client (unique carved panels, coats of arms, logos, portraits, narrative compositions, non-standard sizes and shapes, ornaments, production time 3–8 weeks).
Visit stavros.ru, browse catalogs with thousands of models, detailed photos, technical descriptions, order samples for home try-on, arrange delivery across Russia, or visit our showroom in Moscow, where professional designers will help you create a decoration concept for your interior, select elements, calculate quantities, and provide installation and finishing recommendations — and transform your space into a unique interior that will delight you for decades.


