Article Contents:
- Preparation: foundation of success
- Assessment of wall condition
- Cleaning and Leveling
- Priming: Mandatory Step
- Decorative Plaster: Affordable Luxury
- Plaster from Ordinary Spackle
- Termite Plaster
- Venetian Plaster: Marble Effect
- Stamped Plaster: Patterns and Designs
- Installing Decorative Elements: Moldings and Panels
- Moldings and Cornices: Geometry on Walls
- Wall panels: quick transformation
- Inlays and Appliqués: Focal Point Accents
- Painting with Effects: The Art of Brush Control
- Ombre: Color Gradient
- Sponging: Sponge Texture
- Stencils: Precise Patterns Without Artistic Skills
- Common Mistakes and How to Avoid Them
- Haste and Skipping Preparation
- Incorrect Material Selection
- Ignoring Proportions and Scale
- Working Without Tools
- Inspiration and Implementation

Transform your space with your own hands, create a unique interior without an army of designers and craftsmen, infuse your soul into every square meter — the dream of many homeowners becomes reality thanks to modern decorative finishing technologies. DIY wall decoration is no longer the domain of select artisans: today, anyone with desire, patience, and basic skills can turn dull white walls into a work of art. DIY wall decoration is not only a cost-saving measure compared to professional work, but also an opportunity to realize your own vision, create something you can't buy in a store, and bring to life ideas that live in your head. DIY wall finishing opens up boundless opportunities for experimentation, allows learning from your own mistakes, improvement, and pride in the result. How to make decorative finishing that will delight you for years, without spending a fortune and without turning the process into a nightmare — this is a detailed story with step-by-step instructions, master secrets, and honest warnings about hidden pitfalls.


Preparation: foundation of success
Any decorative finishing begins long before the first plaster stroke or the first element is applied. Preparation determines eighty percent of success — professionals know this for sure, while beginners often ignore it, paying for it with the result.


Assessing Wall Condition
The first step — realistically evaluate what you’ll be working with. Perfectly flat walls are rare, especially in older residential buildings. Take a long straightedge or level board, place it against the wall in different spots at different angles. Gaps over five millimeters — a problem that needs to be solved.
Check the strength of the existing finish. Tap the wall with your knuckles — a dull sound indicates voids under the plaster, a ringing sound indicates a solid base. Run your palm over the surface — if it flakes, crumbles, or is covered in cracks, serious preparation will be required.
Assess the wall material. Concrete, brick, drywall, and wood require different approaches. Concrete and brick can withstand any load, and heavy decor can be attached to them. Drywall requires care, and large elements need additional support. Wooden walls are flexible, and not all types of decor are suitable for them.
Our factory also produces:


Cleaning and Leveling
Remove old finishes completely. Soak wallpaper with water and detergent, then scrape it off with a putty knife. Scrape paint with a sander or chemical strippers. Wash whitewash with a sponge and water multiple times. Weakly adhering old plaster must be scraped down to a solid base.
After cleaning, dust the surface. Dust is the enemy of adhesion — nothing sticks to a dusty wall. Vacuum with an industrial vacuum cleaner, wipe with a damp cloth, and let it dry. Grease stains (especially on kitchens) should be cleaned with a solvent or special cleaners.
Leveling depends on the chosen decorative finish. Walls for painting and thin wallpaper must be perfect — any unevenness will be visible.Decorative plasterForgives minor flaws, but major unevenness must be corrected with a basic plaster layer. Raised panels and moldings hide imperfections, but the base must be strong.
Get Consultation
Primer: mandatory step
Primer is not luxury, but necessity. It strengthens the base, binds residual dust, equalizes the surface's absorbency, improves the adhesion of the finish coating. Saving on primer results in decoration peeling, bubbles, stains.
Choose primer for specific base. For loose, crumbling surfaces — deep-penetration. For dense concrete — concrete-contact with quartz sand, creating roughness. For gypsum board — universal acrylic. For wood — alkyd with antiseptics.
Apply primer evenly with a roller or brush, without gaps. Pay special attention to corners, joints, problem areas. Allow to dry completely — usually four to six hours, exact time indicated on packaging. If needed, apply a second layer — this increases base strength.
Decorative plaster: affordable luxury
Decorative plaster is one of the most popular ways to finish walls yourself. It creates a textured surface, hides minor defects, requires no high skill, allows experimentation. Result depends on chosen technique, tool, and patience.
Plaster from ordinary spackling compound
Budget-friendly decorative plaster — ordinary gypsum spackling compound applied with texture. Buy inexpensive finish spackling compound in bags, mix according to instructions to the consistency of thick sour cream, obtain working material.
Basic method — apply spackling compound in a thin layer, three to five millimeters, with a wide trowel or float using chaotic strokes. Do not strive for smoothness — let waves, bumps, transitions form. Allow to dry for twenty minutes, then lightly smooth protruding parts with a clean float using gentle movements. Result: textured surface with natural pattern.
Advanced techniques: use a crumpled cellophane bag to dab freshly applied spackling compound, creating chaotic relief. Use a stiff brush to draw lines — straight, wavy, circular — forming grooves. Apply additional layer with a sponge over the base using strokes.Wall finishing with decorative plasterFrom spackling compound, it offers endless creative possibilities.
After full drying — usually one day — surface is sanded with fine-grit sandpaper, removing sharp edges and overly protruding parts. Then primed and painted. Use double-painting technique: first layer dark, applied with fluffy roller, filling all recesses; second layer lighter, applied with short-pile roller, touching only protruding parts. Result: play of light and shadow, emphasizing relief.
Plaster 'Termite'
Termite — popular textured plaster, creating a pattern resembling beetle tracks on wood. Sold ready-to-use in barrels or dry in bags for mixing with water. Contains mineral granules that cut grooves during troweling.
Applied on previously leveled and primed walls. Spread mixture evenly with metal trowel or float to thickness approximately grain size — usually two to three millimeters. Do not make thicker, otherwise pattern won't appear; thinner — gaps will form.
After ten to fifteen minutes, when plaster begins to set and no longer sticks to tool, start troweling with plastic float. Pattern depends on troweling direction: vertical movements create vertical grooves, horizontal — horizontal, circular — chaotic pattern, crosswise — interlaced lines. Granules within mixture cut grooves, creating characteristic texture.
Work in one-meter sections, overlapping wet with wet, to avoid visible seams. Termite sets quickly — no delay allowed. Best to work in pairs: one applies, another trowels. After drying, Termite can be painted with acrylic facade paints — they are elastic, do not crack, do not fade.
Venetian plaster: marble imitation
Venetian plaster — pinnacle of craftsmanship, creates illusion of polished marble with deep internal glow. Difficult to execute, requires skill, patience, special tools. But result exceeds expectations — walls look luxurious, like in Italian palazzi.
Applied in multiple layers — minimum three, better five to seven. Each layer is thin, semi-transparent, applied with special stainless steel Venetian float. First layer — base, solid, covering base. Subsequent layers — textured, applied with overlapping strokes, creating color transitions.
Application technique: take small amount of material on float, apply to wall at 30-degree angle, spread with arc-like motion, creating thin stroke. Next stroke overlaps first, slightly covering edge. Fill entire surface with irregular strokes of different sizes and directions.
Each layer must fully dry before applying next — from two to twelve hours depending on thickness and humidity. After drying, lightly sand with fine-grit sandpaper, removing protruding particles. Final layer is polished with clean float using firm circular motions — surface begins to shine, depth and glow appear.
Final step — applying wax for Venetian plaster. Wax protects surface, enhances gloss, makes coating washable. Applied in thin layer with sponge or float, polished with soft cloth.DIY decorative wall finishingVenetian plaster — ambitious task, but achievable with proper effort.
Stamped plaster: patterns and designs
Stamping technique uses special tools — stamps, stencils, patterned rollers, creating repeating pattern on plaster. These can be geometric patterns, floral motifs, imitation of brick, stone, leather, fabric.
Base plaster layer applied normally — with float or trowel, thickness five to ten millimeters. Allow to slightly dry so surface stops being wet but remains plastic — usually fifteen to thirty minutes. Test with finger: if it doesn't stick but yields to pressure — ready.
Wet stamp with water or special liquid to prevent sticking to plaster. Press onto wall, apply even pressure across entire area, then lift. Pattern imprint remains on plaster. Next imprint overlaps previous, aligning pattern. Fill entire surface this way.
Roll the decorative roller from top to bottom along the wall in a continuous motion with constant pressure. This creates a repeating vertical pattern. It is important not to stop or change the pressure, otherwise transitions will be visible. After drying, the stamped surface is painted, emphasizing the relief using a two-tone technique.
Installation of decorative elements: moldings and panels
In addition to plastering, wall decoration can be done using ready-made elements — moldings, cornices, panels, and appliqués. This is simpler than plastering, does not require artistic skills, and gives a predictable result. The main thing is accuracy, precise measurements, and proper installation.
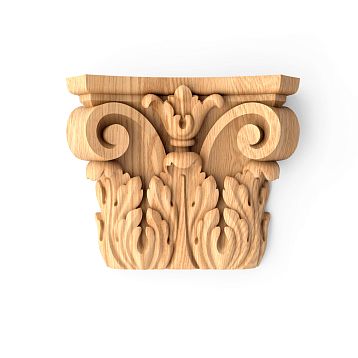
Moldings and cornices: geometry on walls
Moldings create a graphic pattern on the wall, divide the surface into zones, and imitate classical panel compositions.Moldings for wall decorationSold by the linear meter, usually two meters long. Material — polyurethane, polystyrene, rarely plaster or wood.
Before installation, draw a sketch of the molding placement on the wall with a pencil and level. Classic composition — rectangular frames spaced thirty to fifty centimeters from the wall edge and from each other. Modern — asymmetrical shapes, horizontal or vertical division of the wall into sections.
Moldings are cut with a fine-tooth hacksaw or a circular saw. Angles are mitered at 45 degrees using a miter box. It is important that both mating elements are mitered mirror-image with high precision — even the slightest error will result in a gap at the corner.
Adhesive is applied to the back of the molding in a zigzag or dotted pattern. Use a special mounting adhesive for polyurethane — it dries quickly, holds firmly, and excess can be easily wiped away with a damp sponge. Attach the molding to the wall according to the marking, press for a few seconds, and immediately wipe away any excess adhesive.
Apply adhesive to the joints in corners and along the length, aligning tightly. If micro-gaps remain, fill them with acrylic sealant and smooth with a damp finger. After the adhesive dries, moldings can be painted any color — classic white, contrasting with the wall, gold or silver for luxury.
Wall panels: quick transformation
Wall panels cover a significant area of the wall with a ready-made decorative finish. They come in sheet (large panels) and modular (small modules) forms. Material — MDF, PVC, polyurethane, wood.Decorative wall panelsMounted in two ways: with adhesive or on a grid frame.
Mounting with adhesive is simpler and faster, but requires a flat surface. The wall must be leveled with plaster or drywall, and primed. Adhesive — liquid nails, mounting foam, special panel adhesives. Applied to the panel in dots or zigzag, the panel is attached to the wall, pressed, and leveled with a level.
Mounting on a grid frame is more complex but more versatile — does not require a perfectly flat wall, allows for insulation installation, and conceals utilities. The grid frame is made of wooden beams or metal profiles, attached to the wall with anchors. Panels are attached to the grid frame with clips, self-tapping screws, or nails.
Panel joints are covered with special profiles — connecting, corner, and end profiles. They conceal seams and create a neat, finished look. Panels that mimic wood, stone, or leather create the illusion of expensive finishes at a modest budget. After installation, panels usually require no finishing — just wipe off dust.
Appliqués and decals: point accents
Decorative appliqués — small elements of various shapes, glued onto walls, doors, and furniture to create accents. These can be outlets, corner elements, floral ornaments, geometric shapes.sculpted appliquésMade of polyurethane, they are lightweight, strong, easy to glue, and paint beautifully.
Appliqués are used to decorate doors: symmetrically placed elements transform a smooth door into a paneled one. On walls, appliqués mark zones, create compositions, and frame mirrors and paintings. In room corners, corner appliqués connect walls with ceilings, adding a sense of completion.
Appliqués are glued using the same mounting adhesive as moldings. Clean the adhesive area of dust, degrease if necessary. Apply adhesive to the back of the appliqué, press it onto the wall, and hold for a few seconds. Lightweight appliqués hold securely on adhesive; heavy ones can be additionally secured with painter’s tape until the adhesive dries.
After installation, appliqués are painted either together with the wall or separately in a contrasting color. For classic interiors, gold leafing is popular: appliqués are coated with gold paint or gilding, creating a sense of luxury.Decorating walls yourselfUsing appliqués — a simple way to add elegance without major renovations.
Painting with effects: the art of brush control
Paint is one of the most accessible materials for decorative finishes. But plain, single-tone painting is boring. Modern decorative painting techniques turn walls into works of art, using only paint, tools, and imagination.
Ombre: gradient color transition
Ombre — a smooth transition from one color to another vertically or horizontally. Usually from dark at the bottom to light at the top, but any variations are possible. Creates a sense of lightness, airiness, and visually raises ceilings.
For ombre, you need three to four shades of one color with gradual lightening. For example, dark blue, blue, light blue, pale blue. Mentally divide the wall into horizontal zones — equal to the number of colors. Paint the bottom zone with the darkest shade and the top zone with the lightest shade.
While the paint is still wet, blend the zone boundaries by running a dry brush or roller along the seam from bottom to top, mixing the colors. Movements are light, chaotic, and without pressure. The boundary gradually blurs, creating a smooth gradient. The technique requires speed — work while the paint is still wet, before it dries.
Vertical ombre is done similarly, but the zones are arranged horizontally. Radial ombre—from the center of the wall to the edges or vice versa—is more complex and requires artistic flair. Ombre looks impressive in bedrooms, children's rooms, and living rooms, creating an atmospheric accent wall.
Sponging: texture with a sponge
Sponging — applying paint with a sponge to create a soft, mottled texture. The base layer is painted with a roller in the main color and fully dried. Then, a natural sponge is lightly dipped in contrasting or similar-toned paint and squeezed out.
Easily dab the wall with chaotic motions, leaving imprints. Do not press hard, do not drag across the surface — only dabbing. Gradually, the entire wall becomes covered with a mottled pattern. You can use multiple colors, applying them sequentially and allowing each to dry completely.
Sponging creates a soft, textured surface resembling natural materials. Suitable for any room, especially bathrooms and kitchens, where it hides minor stains. The technique forgives mistakes — poorly executed areas can be easily covered with additional layers.
Stencils: precise design without artistic skills
Stencils allow you to apply clear designs on walls without needing to draw. Available pre-made in hardware stores or can be made yourself from film or cardboard. Attached to the wall with painter’s tape; paint is applied through the cutouts using a brush, roller, or sponge.
Use thick paint and apply in thin layers — otherwise, paint will seep under the stencil and blur the design. Hold the brush perpendicular to the wall, dabbing, not spreading. After applying paint, carefully remove the stencil without smudging the fresh paint.
Using stencils, you can create repeating patterns across the entire wall — ornaments, geometric shapes, botanical motifs. Or single large images — a tree, a bird, a city silhouette.DIY decorative finishingEven people without artistic education can use stencils — with careful execution, the result is professional.
Typical mistakes and how to avoid them
DIY wall finishing is full of hidden pitfalls. Beginners make typical mistakes that ruin the result, require redoing, and waste time and money. Knowing these mistakes helps avoid them.
Haste and skipping preparation
The desire to see results faster leads to skipping preparatory steps. Applying decor to an uncleaned wall — it peels off within a month. Applying plaster to an unprimed surface — it flakes off in layers. Painting over old paint — new paint bubbles and peels.
Preparation takes 70% of the time but yields 90% of the result’s quality. Don’t rush — do everything sequentially: cleaning, leveling, priming, then decor. Let each layer dry completely — don’t touch, don’t rush with a fan, don’t start the next stage prematurely.
Incorrect material choice
Buying inappropriate materials condemns the project to failure. Using gypsum plaster in the bathroom — it deteriorates from moisture. Applying polyurethane with PVA — it peels off under its own weight. Painting with non-waterproof paint in the kitchen — it washes off during cleaning.
Study the purpose of materials, read instructions, consult with sellers. For humid areas — only waterproof compounds. For heavy elements — strong mounting adhesive plus mechanical fastening. For painting — washable acrylic paints. Correct materials cost more, but the result lasts for years.
Ignoring proportions and scale
Large moldings in a small room look ridiculous, small ones in a large room disappear. Too contrasting colors strain the eye, too similar colors blend into monotony. Walls overloaded with details feel oppressive, empty walls feel dull.
Observe scale: in a room 2.5 meters high, moldings 5–8 cm wide; in a 3-meter room — 10–15 cm. Decorate one or two walls, leave the rest plain. Choose harmonious colors, use a color wheel for selection.
Working without tools
Trying to cut moldings with a kitchen knife, glue with wallpaper glue, or paint with a sponge results in crooked joints, peeling decor, and streaked paint. Professional tools exist not to extract money, but to achieve quality results.
Minimal toolset for decorative finishing: hacksaw with fine teeth or circular saw, miter saw for angled cuts, set of spatulas of different widths, trowel, rollers of different nap, brushes, level, tape measure. These are not huge expenses, but the difference in convenience and quality is enormous.
Inspiration and implementation
DIY wall decorative finishing — a creative path requiring patience, precision, and willingness to learn. Don’t fear mistakes — they are inevitable, they teach, and from them craftsmanship grows. Start simple: painting with effects, installing ready moldings, basic textured plaster. Once you gain experience, move to complex: Venetian plaster, multi-element compositions, artistic reliefs.
Seek inspiration everywhere: in magazines, on websites, in real interiors that impressed you. Save references, create collections, analyze what specifically catches your eye. Visitdecorative finishing showroomsSee materials in person, touch, feel the texture, evaluate quality.
Don’t try to do everything at once — start with one wall, evaluate the result, understand what worked well and what needs refinement. The next wall will be better, then even better. Gradually, you’ll develop your own style, signature, skills, and become a master of your own interior.
DIY wall decorative finishing is not only a way to save on professional services. It’s an opportunity to create a space absolutely unique, infused with your energy, embodying your vision of beauty. It’s pride in realizing: I did it myself, I created with my own hands something that delights every day. It’s an invaluable experience, new skills, confidence in your own abilities. Start today — and your home will speak the language of beauty you gave it yourself.