Article Contents:
- Why Update Furniture Instead of Replacing It
- Economics: The Price Difference is Fundamental
- Ecology: Wood Shouldn't Go to Landfill
- Uniqueness: No Mass-Produced Version Exists
- Main Furniture Decoration Techniques: From Simple to Complex
- Technique 1: Painting with Tone Change
- Technique 2: Patination — The Lived-In Effect
- Technique 3: Molding Decoration
- Technique 4: Overlay Carved Elements
- Technique 5: Decoupage
- Technique 6: Painting
- Wooden Overlays: The Fastest Way to Change Style
- Why Overlays Always Work
- How to Choose the Right Overlay for a Specific Item
- Decoration Kits: Ready-Made Scenarios
- Author's Collection "Summer Garden"
- Door Decoration: Casings, Moldings, Handles
- Casings: Frame for the Door
- Moldings on Door Panels: How a Flat Door Becomes Classic
- Handles: The Final Touch
- Decorative Overlays on Door Panels
- Tools, Glue, Primer: Complete Work List
- Tools
- Primer: Why It's Not Optional
- Glue: What and When
- Putty: Finishing Work
- Step-by-Step Project: Updating a Kitchen Front
- Decorating Different Items: Specific Scenarios
- Chest of Drawers: Restoration with Character
- Mirror: frame from nothing
- Bookshelf: verticals and capitals
- FAQ: answers to what everyone asks
- STAVROS: everything for DIY furniture decor — in one catalog

Stop. Before you throw out this cabinet — look at it again. Not at the stains and scratches. At the construction. At the shape. At what it's made of. Because if inside — solid wood or at least thick MDF, you're holding not trash, but a blank. Raw material. A canvas on which you can embroider anything.
Decorating old furnitureDIY — is not a hobby for bored housewives with decoupage paper. It's a skill. Mastering it, you don't just 'update' an item — you rewrite its history. Turn a Soviet sideboard into a console in the spirit of Provence. Turn a flat sliding-door wardrobe into a classic wardrobe with moldings and carved overlays. Turn an ordinary door into an architectural portal.
It works. You just need to know where to start and what mistakes not to repeat.


Why update furniture instead of replacing it
The question is not rhetorical. It has three clear answers.


Economics: the price difference is fundamental
Replacing a kitchen set with a solid wood product — from 300,000 rubles and up. Updating existing fronts with moldings, wooden overlays, and new painting — from 15,000 to 50,000 rubles for the same visual result. Decorating doors with trims and handles — from 5,000 rubles for the entire hallway.
This is not saving on quality. It's the ability to work with what you already have.
Our factory also produces:


Ecology: wood should not go to the landfill
Wooden furniture from the Soviet and post-Soviet era is made from materials rarely used today: solid birch, oak, pine. This is a valuable material that doesn't belong in a trash container. Updating such furniture with wooden decor means extending the life of a resource already expended.
Get Consultation
Uniqueness: a serial version does not exist
The result of DIY old furniture decoration is always a one-of-a-kind specimen. This is not IKEA, which you can find in three neighboring apartments. This is an item with history and your personal touch.
Main furniture decoration techniques: from simple to complex
Let's break downfurniture decoration techniquesin increasing order of complexity. We'll start with what anyone can do — and end with what requires tools and experience.
Technique 1: Painting with tone change
The simplest and most underrated action. Painting a front changes not only the color — it changes the character of the item. White enamel on a Soviet sideboard with carved legs — this is no longer 'grandma's sideboard,' it's a Provencal sideboard. Dark gray matte paint on a 90s wardrobe — suddenly you get something close to loft style.
Furniture painting rules that cannot be ignored:
-
Sanding P120 → P180 → P240 before each layer
-
Primer: acrylic adhesion primer under enamel — mandatory
-
Two layers of finish enamel with intermediate sanding P280
-
Matte enamel forgives minor imperfections; glossy — reveals every one
The mistake everyone makes: painting without sanding. They get a 'shell' of paint that peels off in 3 months.
Technique 2: Patination — the effect of lived-in time
Patina is controlled 'aging'. Principle: apply a dark base tone → apply a light top layer → wipe off the top layer on the raised relief areas, leaving the dark color in the recesses. The result is the feeling that the item has been around for a hundred years.
Technology:
-
Prime and paint with a dark base color (gray-brown, black).
-
After drying, apply a wax layer in areas where 'aging' will be maximal (corners, edges, handles).
-
Apply a light top layer (white, ivory, gray).
-
After partial drying (30–60 min), wipe off the top layer on the raised areas with a soft cloth.
For volumetric carved wooden overlays, patination gives a stunning effect: every curl of the relief 'comes to life', recesses darken, and raised areas lighten.
Technique 3: Molding Decoration
This is already a serious tool. Moldings — profiled wooden strips — turn a flat facade into a frame system. Four pieces cut at 45° form a rectangular frame. Two frames on one facade, and a neoclassical-style cabinet is ready.
For this technique, you need:
-
Wooden moldingsMolding of the required profile — width 20–50 mm depending on the scale of the facade.
-
Miter saw with a precise 45° angle (or a miter box with a handsaw — for small volumes).
-
PVA D3 or mounting adhesive.
-
Micro pins with a nailer or thin nails.
The system works flawlessly in combination withcorner decorative overlays— they cover the 45° miter joints of the molding and create the feeling of a single, cast decoration.
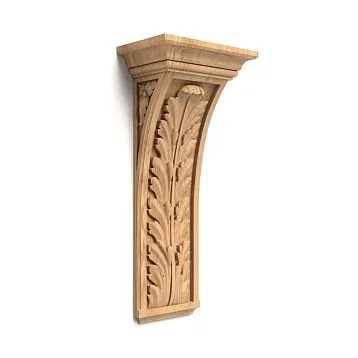
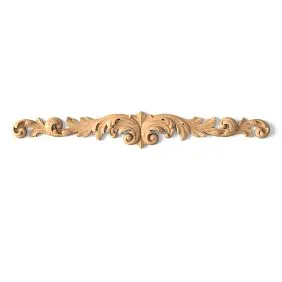
Technique 4: Overlay Carved Elements
This is the most high-impact tool with minimal execution skill. The solid wood overlay is already ready — it just needs to be correctly placed in the right spot. The result is instant: a facade that was empty gains volume, relief, and character.
Wooden carved patternsin the STAVROS catalog — over 400 models in oak and beech. Range from N-372 for 1,210 rub. to ornamental panels N-422 for 15,030 rub. Small accents for first-time experience: N-093 from 1,370 rub., N-002 from 1,750 rub., N-316 from 1,700 rub.
Mounting technique — in a separate section below.
Technique 5: Decoupage
A classic of the genre. A design from paper or fabric is transferred onto the furniture surface and sealed with varnish. The result is the illusion of painting or inlay without special artistic skills.
Decoupage works on:
-
Flat surfaces: doors, drawers, tabletops.
-
Rounded objects with caution — paper is cut and glued in sections.
Weak point: not durable on surfaces with intensive use (tabletops, kitchen facades). Acceptable for decorative items with minimal contact.
Technique 6: Painting
The most skill-demanding. Requires understanding perspective, color mixing, brush technique. But the result is also the most individual. No one will reproduce your painting exactly.
Formats of painting on furniture:
-
Gzhel, Khokhloma, Zhostovo — folk styles on a dark or white background
-
Floral motifs — for Provence, country, romantic styles
-
Geometric patterns — for Art Deco and Scandinavian style
-
Narrative paintings — birds, landscapes, still lifes
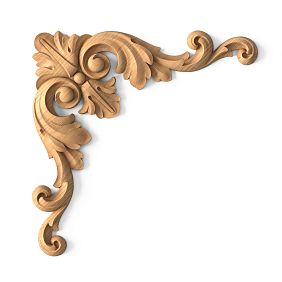
Wooden overlays: the fastest way to change the style
If you had to choose one technique among all — the one that delivers maximum results with the lowest entry barrier — it would be wooden overlays. And here's why.
Why overlays always work
A carved wooden overlay is a ready-made artistic statement. You don't need to draw, carve, or calculate it. It already exists, is already beautiful, and is already thought out in terms of proportion and ornament. Your task is to choose correctly, place correctly, and glue correctly.
Result: a facade that was just an empty rectangle yesterday now has relief, shadow, and a story.
How to correctly choose an overlay for a specific item
Three selection rules:
Rule of scale. The overlay must be proportionate to the surface. For a 400×700 mm facade — a central overlay of 80–120 mm. For a 600×900 mm facade — 120–180 mm. An overlay that's too small gets lost. One that's too large overwhelms.
Rule of style. Acanthus leaves, rocaille, cartouches — Baroque and Classicism. Geometry — Art Deco and Modern. Leaves and flowers in a simplified design — Provence and country. Strict symmetrical elements without ornament — Neoclassicism.
Rule of system. If overlays are placed on several items in the same room — they must be from the same series. Mixing ornaments from different styles ruins the interior.
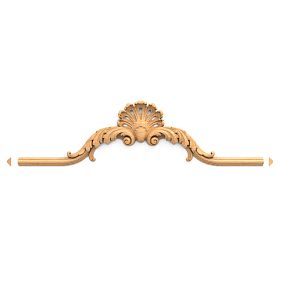
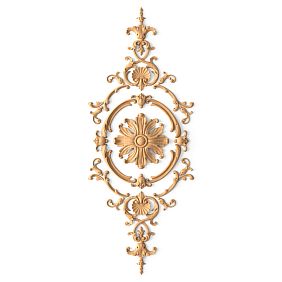
Decorative sets: ready-made scenarios
For those who don't want to assemble a system piece by piece, STAVROS offers ready-made sets — C-015 from 7,270 rub., C-016 from 18,690 rub., C-017 from 21,880 rub., C-018 from 21,240 rub., C-020 from 31,540 rub., C-021 from 29,260 rub. Each set includes: corner overlays + a central element — all already coordinated in style, scale, and ornament.
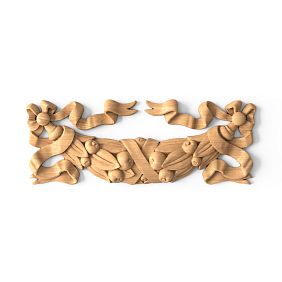
Author's collection "Summer Garden"
STAVROS's author series "Summer Garden" deserves special attention. It's Baroque carving with a modern reinterpretation: leaves, shoots, flowers, birds. Not pompous — lively. Perfect for decorating kitchen facades, mirror frames, wall panels, and doorways.
Small accent elements from "Summer Garden" (leaves, branches, birds) allow you to build a decorative narrative: place them rhythmically across several facades — and achieve the feeling that a living garland is trailing across the furniture surface.
Door decoration: casings, moldings, handles
Door Decorating— is a separate topic often underestimated. And in vain. A door is a boundary between spaces. Its decoration defines how the space "begins" for the person passing through it.
Casings: the frame for the door
wooden casing— is the first and main tool for door decoration. A bare door frame without a casing is an unfinished architectural statement. A casing gives the door a frame, scale, and completeness.
Options:
-
Flat casing — minimalist, for Scandinavian style and modern classic
-
Profiled — with curves and beads, for classic and neoclassical styles
-
Carved — with applied ornament or fretwork pattern, for historical styles
The width of the casing should correspond to the scale of the door and the room. For a standard 700–800 mm door opening — a 60–80 mm casing. For tall doors from 2,200 mm — 80–100 mm.
Moldings on the door leaf: how a flat door becomes classic
The most effective technique for transforming doors is applying moldings to a flat leaf. Two or three rectangles of molding, forming "panels" on the door — and an IKEA door turns into a classic paneled one.
Technology:
-
Measure the proportions of the "panels" (classic: top panel — 1/3 of the height, bottom — 2/3, or symmetrical three panels)
-
Cut molding at 45° — four pieces per panel
-
Apply glue + secure with micro pins
-
Fill joints and nail heads with putty
-
Sand with P220 → P240
-
Primer + two coats of enamel
Result — a door indistinguishable from custom joinery priced at 30,000–50,000 rubles, with material costs of 3,000–5,000 rubles.
Handles: the final touch
A door handle is the last thing your hand touches before entering a room. It sets the tone for the entire space beyond the door. A wooden handle in an interior with wooden moldings and trims creates a system where everything speaks the same language.
Furniture wooden handlesSTAVROS — 32 solid wood models: geometric, classic, pulls, knobs. Four finishes. Standard mounting hardware included.
Decorative overlays for door panels
After applying moldings and before painting — you can add a central overlay to the top door panel. An acanthus leaf, cartouche, or rococo scroll — a single element dramatically changes the door's feel. Especially effective in tandem: top overlay + beautifulwooden furniture handles.
Tools, glue, primer: complete list for the job
Let's break down the material side without romance — only what you really need.
Tools
| Tool | Purpose | Priority |
|---|---|---|
| Miter saw | Cutting moldings at 45° and 90° | Essential |
| Orbital sander | Surface preparation | Essential |
| Pneumatic nailer | Quick fixation of overlays and moldings | Desirable |
| Hammer + nail set | Alternative to nailer | Acceptable |
| Laser level | Layout for moldings and overlays | Desirable |
| Flexible putty knife | Applying putty | Essential |
| Brushes 25–50 mm | Applying primer and paint | Essential |
| Velour roller | Final coat of paint without brush marks | Desirable |
Primer: why it's not optional
Primer is not an 'extra layer for perfectionists'. It's the foundation without which paint won't adhere.
On bare wood and MDF — acrylic antiseptic primer. Strengthens fibers, prevents raising of the grain, ensures paint adhesion.
On laminated surfaces (melamine, PVC) — adhesion primer ('Adgezol', 'Primer for smooth surfaces'). Without it, paint will peel off in 2–3 months regardless of enamel quality.
On wooden overlays before installation — priming the end grain. End grain is the most absorbent area; without primer, paint will apply unevenly.
Glue: what and when
PVA D3 (water-resistant) — basic choice for most tasks. Wood to wood, wood to MDF. Open time 5–8 min. Clamping time 1–2 h. Full cure 24 h.
Polyurethane glue — for problematic surfaces: laminate, PVC film, melamine. Activated by surface moisture. Slightly dampen one surface before bonding. Caution: expands during curing.
Construction adhesive ('Liquid Nails') — for vertical surfaces with large overlays. Fast initial grab. No clamps required. Downside: rigid bond, removal impossible without damage.
3M double-sided acrylic tape — for lightweight overlays on flat surfaces. Width 12–19 mm. Suitable for thin elements weighing up to 80–100 g.
Putty: finishing work
After installing overlays and moldings — puttying joints and screw heads. Use wood putty of the desired tone (or white for painting). Apply with a spatula, shaping the surface perfectly flush. After curing — sand with P220, then P240.
Key point: the putty must completely disappear under the paint, leaving no 'ridges' or 'steps'. For this — don't skimp on sanding.
Step-by-step project: updating a kitchen cabinet front
A concrete example — from a blank MDF front to classic frame-style decor.
Initial data: front 400×700 mm, MDF with PVC film, color — gray. Task: create a classic look with moldings and a central overlay.
Step 1 — Sand the PVC film. Abrasive P120. The surface should become matte, with no film gloss.
Step 2 — Apply adhesion primer. One coat with a brush, drying 30–60 min.
Step 3 — Mark out the molding frames. For one frame — 30 mm inset from the front edge. Draw a 340×640 mm rectangle with a pencil.
Step 4 — Cut molding MLD-014 or MLD-018 into four pieces mitered at 45°. Lengths — according to the markings.
Step 5 — Install corner overlays N-106 or N-154.1 in the frame corners. PVA D3 glue + micro-pins.
Step 6 — Glue the molding around the perimeter, butting against the corner overlays. Press, secure with pins.
Step 7 — Install the central overlay N-093 or N-316 in the center of the frame.
Step 8 — Putty the joints. Sanding P220 → P240.
Step 9 — Acrylic primer — one coat, drying 1 h.
Step 10 — Two coats of enamel. Between coats — sand with P280 and wipe down.
Result: a facade costing 400 rubles for materials + 2,800 rubles for decor transformed into a classic framed facade, indistinguishable from custom joinery.
Decorating different items: specific scenarios
Chest of drawers: restoration with character
A Soviet-era chest of drawers with drawers and three doors is the perfect candidate. Algorithm:
-
Remove the doors and drawers
-
Sand everything down to "clean" wood or smooth MDF
-
For each door: two corner overlays N-106 + molding frame
-
On each box: small overlay N-002 or N-093 in the center
-
Paint with white matte enamel
-
Handles —Furniture wooden handlesmatching the tone
Result: a Provence or neoclassical chest of drawers for 8,000–12,000 rubles in materials instead of 60,000–80,000 rubles for a new one.
Mirror: frame from nothing
A mirror in an unattractive plastic frame is the fastest object to transform. Glue molding around the perimeter → add corner overlays N-237 or N-270 → paint in gold or white. In 2–3 hours and for 2,000–4,000 rubles — a mirror in a classic frame.
Bookshelf: verticals and capitals
Apply flat overlays vertically to the shelf posts — they will create a visual effect of pilasters. On top —Wooden corniceon the horizontal shelf. Result: an ordinary IKEA shelf with architectural pretension.
FAQ: answers to what everyone asks
Can wooden overlays be glued onto PVC film?
Yes, but only after sanding the film and applying adhesion primer. Without these two steps, the overlay will fall off after a few months.
Which glue is better — PVA or "Liquid Nails"?
PVA — for "wood on wood" and "wood on MDF" connections. Liquid Nails — for vertical surfaces and large overlays that need to be fixed without clamps. Ideally — both simultaneously: PVA around the perimeter of the overlay + small dots of mounting adhesive in the center.
Is primer needed if painting over old paint?
Yes. Sanding P120–P150 + adhesion primer. Without this, the new layer of paint will separate from the old one, not from the surface.
How to remove the gap between the overlay and the surface after installation?
Acrylic sealant of the desired color, applied with a syringe along the contour of the overlay, smoothed with a finger moistened with water. After drying — sand with P240. The gap will disappear.
How long after installing overlays can you paint?
PVA glue D3: 24 hours for full curing. Mounting adhesive: 12–24 hours. Do not paint before the deadline: the glue may bubble under the paint when heated with a hairdryer.
Can furniture made of chipboard be decorated?
Yes, but with limitations. Chipboard holds screws worse than MDF and especially solid wood. For overlays — only glue, no nails or screws into the laminate. Chipboard without coating on the edges — prime the edge before installation.
Which overlays are suitable for a first experience?
Small central overlays N-093 from 1,370 rub., N-316 from 1,700 rub., N-002 from 1,750 rub. — small, lightweight, forgiving positioning inaccuracy of 2–3 mm. For a first project — optimal.
STAVROS: everything for DIY furniture decoration — in one catalog
There are things that cannot be explained — they can only be shown. Look atdecorative inlays for furniturefrom STAVROS and you'll understand what we mean. The relief of an acanthus leaf, where every vein is worked out to the millimeter. The rocaille curl that 'comes alive' with changing light. The 'Summer Garden' carving, where you feel the artist's hand, not just the machine's program.
STAVROS — manufacturing with a history of restoring state-significant objects. When your first experience is the Konstantinovsky Palace and the Hermitage, you understand decor differently. Not as 'decoration', but as a system.
For those updating furniture themselves — the STAVROS catalog is:
-
Wooden Inlays— 400+ models in oak and beech, from 1,210 rub.
-
Wooden moldings— for frame systems on facades and doors
-
Wooden casings create a frame around the opening, visually highlighting it from the wall plane. A classic casing has a profiled section that corresponds to the profiles of baseboards and moldings.— for decorating doorways
-
wooden handles from solid wood— 32 models, four finishes
-
pilasters and columns— for architectural accents on shelves and cabinets
-
Crown mouldings and baseboards— for completing architectural systems
Order from 1 piece — no minimum quantity. Delivery across Russia and CIS. Pickup from warehouses in Moscow and St. Petersburg.
DIY furniture decorationstarts with the right materials. STAVROS is the place where these materials exist. All at once. In one catalog. From one manufacturer.