Article Contents:
- Wooden Table Restoration: Bringing It Back to Life
- Condition Assessment: What Can Be Saved
- Removing Old Finish: A Clean Canvas
- Repairing Defects: Filling Cracks and Scratches
- Strengthening the Structure: Tightening Loose Joints
- Wooden Table Decor Techniques: From Simple to Sophisticated
- Painting: The Classic Update
- Patination: The Antique Furniture Effect
- Decoupage: Decorating with Napkins and Paper
- Carved Overlays: Volume Without Carving
- Gilding: Accents of Luxury
- Classic Living Room: Integrating the Updated Table
- Classic Style: Signs and Characteristics
- Combining the Updated Table with New Furniture
- Textiles and Accessories: Completing the Look
- Furniture Handles: The Detail That Changes Everything
- Types of Handles for a Classic Living Room
- Replacing Handles: A Simple Procedure
- Polyurethane Moldings: Architectural Background for Furniture
- What Are Moldings and How to Use Them
- Installing Moldings: Step by Step
- Effect in the Interior
- Comprehensive Approach: An Example of Living Room Transformation
- Action Plan
- Result
- Frequently Asked Questions: Answers to Doubts
- Conclusion: Transform Your Living Room with STAVROS Materials and Furniture

You have an old wooden table in your living room — reliable, sturdy, but having lost its appearance. The tabletop is scratched, the finish is peeling, the legs are worn. It's a shame to throw it away — the wood is of good quality, the construction is solid, and it's also a memory (inherited from grandma, bought in the first year after the wedding, served faithfully for twenty years). Buy a new one? ButClassic Furniture for the Living Rooma solid oak or walnut dining table costs 50,000-200,000 rubles, and that's a blow to the budget. There is a third way —wooden table decorwith your own hands, turning a worn-out item into a work of art that fits into a renewed living room.
Furniture restoration and decoration is an art accessible to anyone willing to spend a weekend, some materials, and a generous portion of creative energy. Techniques vary: from simple (sanding, painting) to artistic (decoupage, patination, gilding, attaching carved overlays). The result is a unique table you can't buy in a store because it exists as a single copy, created by your hands. Complement itclassic living room furniture— with a chest of drawers, a display cabinet, armchairs made of solid wood with carvings, upholstered in natural fabrics. Complete the compositionpolyurethane moldingson the walls, creating classic frames, panels, moldings. Replace old plasticFurniture Handleson the chest of drawers with patinated brass or carved wooden ones — a detail that changes the perception of the entire room.
This article is a practical guide for those who want to update their living room without throwing away old furniture, but giving it a second life. We will learn to restore a wooden table step by step (from removing the old finish to final varnishing), master decoration techniques (decoupage with napkins, patination for an antique effect, attaching carved elements), analyze how to fit the updated table into a classic living room interior (color combinations, styles, proportions), how to choose companion furniture (cabinets, chests of drawers, shelves), how to use decorative elements on walls (moldings creating a background for furniture).


Wooden Table Restoration: Bringing It Back to Life
Restoration is the process of returning an item to its original appearance or creating a new image based on an old structure. The table can be made of solid wood (oak, pine, beech), veneered (MDF or particleboard base with veneer on top), or painted. The restoration approach depends on the material and degree of wear.


Condition Assessment: What Can Be Saved
Examine the table carefully. Tabletop: scratches (minor or deep), stains (from grease, wine, tea), edge chips, cracks. Legs and frame: finish wear, chips, loose joints (the table wobbles). Finish: varnish has peeled, cracked, become cloudy, or paint has flaked off.
Restoration criteria: if the structure is sturdy (the table doesn't wobble, or wobbles slightly — easily fixed by tightening screws, gluing), the wood is intact (no rot, deep through cracks, broken elements) — the table can and should be restored. If the structure is damaged (broken legs, split tabletop, rot) — it's easier to buy a new one or use parts as material for other projects.
Our factory also produces:


Removing the Old Finish: A Clean Canvas
The first stage is to remove the old finish (varnish, paint, stain) down to clean wood. Methods:
Sanding: mechanical (orbital or belt sander, sandpaper grit 80-120-180) or manual (sandpaper wrapped around a wooden block). Sand along the wood grain (across — scratches that ruin the appearance). Start with coarse sandpaper (grit 80) to remove old varnish, move to medium (120), then finish (180). Lots of dust — work in a respirator, ventilate the area.
Chemical stripping: special compounds (gel or liquid) that soften the old finish. Apply stripper with a brush to the surface, wait 15-30 minutes (varnish softens, swells), remove with a scraper. Repeat if the finish is thick (multiple varnish layers). Stripping works faster than sanding but is toxic (work with gloves, respirator, outdoors or in a ventilated area).
Thermal removal: a heat gun (temperature 300-500°C) heats the finish, it softens, and is removed with a scraper. The method is fast but requires care (overheating wood — charring, cracks).
After removing the finish, the surface is sanded with fine sandpaper (grit 180-220), removing varnish residue from pores, scratches are leveled.
Get Consultation
Repairing Defects: Filling Cracks and Scratches
Minor scratches (depth up to 1 mm) are sanded with sandpaper grit 180-220, disappearing during final processing.
Deep scratches, dents (depth 2-5 mm) are filled with wood filler (acrylic, color matched to wood species — oak, walnut, pine). Filler is applied with a rubber spatula, pressed into the depression, leveled flush with the surface. After drying (2-4 hours), sanded with sandpaper grit 220 (filler is leveled with the wood).
Cracks (splits along the grain) are filled with epoxy resin (two-component, resin + hardener mixed, cures in 24 hours, forms a strong fill). Resin is poured into the crack (the crack is pre-widened, cleaned of dust), excess is wiped off, after curing it is sanded.
Edge chips on the tabletop are restored with epoxy filler (epoxy + wood dust forming a pliable mass shaped by hand). The mass is applied to the chip, shaped to match the edge, after curing it is sanded, tinted to match the wood color.
Strengthening the Structure: Tightening Loose Joints
If the table wobbles (legs are loose in joints with the tabletop or rails — horizontal planks connecting the legs), the structure is tightened:
Disassembly: if the joints are detachable (screws, bolts) — disassemble the table, clean joints of old glue, dust.
Gluing: apply wood glue PVA or polyurethane glue to the tenons (protrusions on legs entering mortises in rails or tabletop), assemble the table, tighten with clamps or rope (tie the table around the perimeter, twist the rope with a stick — a homemade clamp). Leave for 12-24 hours (full glue drying).
Reinforcing with screws: if joints are non-detachable or gluing is insufficient — reinforce with screws (drive screws 60-80 mm long through rails into legs at an angle, countersink screw heads, fill with putty).
Metal brackets: for severely wobbly tables — metal brackets (attached with screws from inside, invisible from outside, firmly tighten the structure).
Wooden Table Decoration Techniques: From Simple to Sophisticated
The table has been restored — the surface is smooth, the structure is sturdy. Now it's time for decoration, transforming an ordinary table into a unique one.
Painting: The Classic Update
The simplest technique is to paint the table. The color choice defines the style:
White: universal, suitable for classic, Provence, and Scandinavian interiors. A white table is visually light, doesn't clutter the space, and pairs with any furniture. Use matte acrylic or chalk paint (matte textured, easy to apply).
Dark tones (graphite, black, dark blue, emerald): solidity, elegance, suitable for classic, art deco, eclectic living rooms. A dark table is an accent piece and requires a light environment (light walls, rug).
Natural wood (stain + varnish): emphasizes the wood grain, suitable for classic, rustic, eco-interiors. Stain (water-based, alcohol-based, oil-based) tints the wood (oak, walnut, wenge, mahogany — dozens of shades), varnish (matte acrylic, semi-matte, or glossy polyurethane) protects and adds shine.
Painting technique: primer (acrylic, fills pores, reduces paint consumption), 2-3 coats of paint (each coat dries for 2-4 hours, light sanding with 220-grit sandpaper between coats — removes raised wood fibers), final varnish coat (protects paint from wear and stains).
Patination: The Antique Furniture Effect
Patina is a coating that forms on a surface over time (darkening, paint wear on corners, cracks). Artificial patina imitates the centuries-old history of an object.
Two-layer painting: apply a base coat of dark paint (e.g., dark brown or black), let dry. Apply a top coat of light paint (white, beige, gray). After drying, sand the protruding areas (tabletop corners, leg edges, carved elements if present) with 180-220 grit sandpaper — the dark base coat will show through, creating a worn effect.
Dark wax in recesses: if the table is painted with light paint, apply dark wax (brown, black, sold in restoration stores) with a soft cloth into carving recesses, joints between parts (imitating dirt accumulated over the years). Remove excess wax with a clean cloth, leaving wax only in the recesses. Coat with varnish.
Crackle: a technique for creating cracks in the paint surface (effect of old cracked varnish). Apply a base coat of paint, let dry. Apply crackle varnish (a special compound that contracts upon drying, forming cracks in the top paint layer). Apply a top coat of contrasting color paint (e.g., dark base, light top). As it dries, the top layer cracks, revealing the base through the cracks — an antique effect. Secure with a final varnish coat.
Decoupage: Decorating with Napkins and Paper
Decoupage is the technique of gluing images (from napkins, decoupage cards, prints) onto a surface followed by varnishing. The image looks like hand-painting but is created without artistic skills.
Materials: three-layer napkins with patterns (flowers, landscapes, patterns — sold in craft stores), decoupage glue (or PVA glue diluted with water 1:1), soft brush, acrylic varnish.
Technique: paint the table with a base color (white, beige, gray), let dry. Cut out or tear the pattern from the napkin (tearing gives a softer edge transition than cutting). Separate the top patterned layer of the napkin (discard the two bottom white layers). Place the pattern on the table, apply decoupage glue with a brush from the center to the edges (the napkin soaks up the glue, adhering to the surface). Smooth out air bubbles and wrinkles. Let dry (2-4 hours). Apply 3-5 coats of varnish (each coat dries for 3-4 hours) — the pattern is sealed, becomes part of the surface, and withstands wet cleaning.
Application: decoupage suits Provence, shabby chic, vintage interiors. On the tabletop — a large central pattern (bouquet of roses, landscape), on the edges and legs — small elements (scrolls, birds, inscriptions).
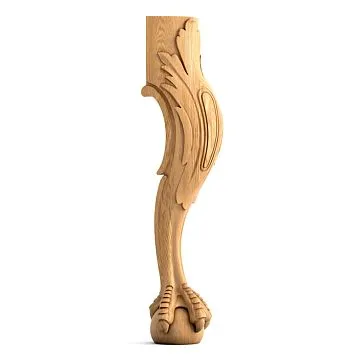
Carved Overlays: Volume Without Carving
If you want to add three-dimensional decor but don't master wood carving — use ready-made carved overlays (made of solid wood or polyurethane), attached with glue.
Types of overlays: corner (size 50×50 mm — 100×100 mm, attached to tabletop corners), central (cartouches, rosettes size 100×150 mm — 200×300 mm, attached to the center of the tabletop or on drawer fronts if the table has drawers), decorative strips (narrow strips with ornament, framing the tabletop perimeter).
Attachment: with PVA wood glue or polyurethane glue. Apply a thin layer of glue to the back of the overlay, press onto the surface for 30-60 seconds, secure with painter's tape or a weight until dry (4-8 hours).
Finishing: after attaching, the overlays are painted along with the table (in one color — the overlay blends with the surface, only the relief is visible) or in contrast (table white, overlays gold — highlights the decor, creates luxury).
Gilding: Accents of Luxury
Gilding — coating elements with a thin layer of gold (gold leaf, imitation gold leaf) or gold paint. Full gilding of a table is excessive (kitsch), partial gilding is elegant.
What to gild: carved overlays (if attached), tabletop edges (thin strip around the perimeter), turned leg details (beads, collars), carved leg elements if present.
Materials: imitation gold leaf (imitation of gold leaf, sheets of gold-colored foil, price 200-400 rubles per booklet of 25 sheets), gold leaf adhesive (special tacky glue), fixative varnish (protects the gold leaf from oxidation). Alternative — metallic gold acrylic paint (easier to apply, but the effect is less noble).
Technique: apply gold leaf adhesive to the areas you want to gild, wait 15-20 minutes (adhesive becomes tacky). Place a sheet of gold leaf, press with a soft brush (the gold leaf adheres to the adhesive, excess falls off). Remove excess with a brush. After drying (2-4 hours), coat with fixative varnish. Gilded elements against a white or dark background create classic luxury.
Classic Living Room: Integrating the Updated Table
wooden table decorThe table's transformation is complete — it has been renewed, becoming a central element. Now, integrate it into a classic living room interior, creating a harmonious space.
Classical Style: Signs and Characteristics
The classical style (neoclassical, classicism, its variations) is characterized by:
Symmetry: furniture is arranged symmetrically relative to an axis (fireplace, window, center of the room). The table is in the center of the living room, armchairs placed symmetrically around it.
Natural materials: wood (solid oak, walnut, beech), stone (marble, granite), natural textiles (linen, cotton, silk, velvet), metal (brass, bronze).
Restrained color palette: beige, cream, white, gray, brown — base. Accents — burgundy, emerald, blue, gold — used sparingly.
Decorative elements: moldings (cornices, moldings, rosettes), carving on furniture, columns, pilasters, mirrors in massive frames, crystal or forged chandeliers.
Combining a refurbished table with new furniture
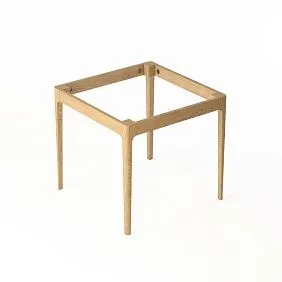
If the table after restoration is painted white —Classic Furniture for the Living Roomit is matched in the same palette (white, cream) or a contrasting one (dark — walnut, wenge). White table + white chest of drawers with carved fronts + white armchairs with beige upholstery — a light, airy interior in Provence or neoclassical style.
If the table is dark (natural oak varnished, or painted graphite) —classic living room furniturein the same tone (dark oak, walnut) or light (contrast). Dark table + dark sideboard with glass doors + light sofa and armchairs — balance, depth, elegance.
A table with gilded elements requires gold support in other items:Furniture Handlespatinated brass on the chest of drawers and cabinet, gilded mirror frame, armchair legs with gold patina, chandelier with gilded elements.
Textiles and accessories: finishing the look
The table is the centerpiece, around which the composition is built. On the table (if it's a dining table) — a tablecloth or runner (a strip along the center of the tabletop). For a classic interior, the tablecloth is natural linen beige or white, cotton with a jacquard pattern, lace (for Provence, shabby chic). The runner is contrasting (on a white table — dark blue or burgundy runner, on a dark table — white or gold).
On the table — a vase (glass, porcelain, ceramic) with fresh flowers or dried flowers, a candelabra (metal — brass, bronze, or carved wood), a fruit bowl (ceramic, metal).
Around the table — chairs or armchairs. For classic style — chairs with carved backs (solid wood, painted or natural), soft seats (upholstery in velvet, linen, jacquard — color matching or contrasting). Armchairs — with high backs, armrests, carved decor.
Furniture handles: a detail that changes everything
In the living room, besides the table, there are chests of drawers, sideboards, cabinets, cabinets. On them — hardware: handles. Standard plastic or cheap metal handles ruin the impression even of expensive furniture. Replacing them with qualityFurniture Handlestransforms the interior.
Types of handles for a classic living room
Patinated brass: cast brass (heavy, massive), patination (artificial oxidation — antique bronze patina, green, black). Shapes: rings on lion heads (antique classic), U-shaped brackets (length 96-128 mm — standard center-to-center distances), round or oval knobs (for small drawers). Price 1500-6000 rubles/piece.
Carved wooden: handles made of solid oak, walnut, beech with hand carving (leaves, flowers, geometry). Painted to match the furniture or contrasting (on a white chest of drawers — handles made of dark walnut, on a dark chest of drawers — white painted). Price 2000-8000 rubles/piece.
Ceramic or porcelain: knob handles with ceramic inserts (white, colored, painted), base brass or nickel-plated. Suitable for Provence, shabby chic interiors. Price 800-3000 rubles/piece.
Crystal: handles with faceted crystal or glass inserts (diamond imitation), metal base. Glamour, luxury, light play. Suitable for Art Deco, glamorous classic interiors. Price 2000-10000 rubles/piece.
Replacing handles: a simple procedure
Unscrew the old handles (with a screwdriver from inside the drawer or cabinet door). If the center-to-center distance of the new handles matches the old holes — screw on the new handles through the existing holes (screws usually included, length 25-35 mm). If it doesn't match — drill new holes (diameter 5-6 mm for M4 screws), fill the old holes with putty, sand, paint over.
Time to replace handles on a chest of drawers with 5 drawers — 15-20 minutes. Result — the chest of drawers looks more expensive, more solid, fits more harmoniously into the updated living room.
Polyurethane moldings: architectural background for furniture
Furniture is the main characters of the interior, but they need a background. Bare smooth walls are a boring background. Walls withpolyurethane moldings— an architectural, structured background that emphasizes a classic style.
What are moldings and how to use them
Molding is a decorative strip (width 20-120 mm, standard length 2-2.4 meters, profile convex, concave, or combined) that is attached to walls, creating frames, panels, and trims.
Wall panels: moldings form rectangular frames on walls (size 60×80 cm — 120×180 cm), inside the frames — contrasting wallpaper, decorative plaster, or paint of a different color. Panels visually structure the wall, making it more interesting and classic. Moldings for panels — width 40-80 mm, profile simple or classic.
Door and window framing: instead of ordinary casings — wide moldings (width 80-120 mm) framing the opening, creating solemnity and monumentality. Moldings are wider than casings, profile classic (beads, rolls).
Horizontal wall division: molding width 60-100 mm, running along the entire perimeter of the room at a height of 90-120 cm from the floor (chair back height). Visually divides the wall into two parts: the lower (base) — painted darker or paneled, the upper — lighter. A classic technique used in palaces and mansions.
Molding installation: step by step
Marking: draw the contours of future frames on the wall with a pencil or painter's tape (use a level to ensure lines are strictly horizontal and vertical).
Cutting moldings: cut moldings to the required length with a miter saw or fine-toothed saw. Frame corners — joining at 45 degrees (cut with a miter saw or miter box). Joints must be precise (a gap of more than 1 mm is noticeable).
Fastening: apply polyurethane adhesive (liquid nails, mounting adhesive — tube with a gun, adhesive applied in a zigzag pattern) to the back of the molding, press the molding against the wall along the marking for 30-60 seconds. For long moldings (over 1 meter), additionally secure with painter's tape (tape from the molding to the wall, remove after 12 hours once the adhesive has dried).
Filling joints: fill molding joints (corners, strip connections) with acrylic putty (white, elastic), smooth with a wet spatula or finger. After drying (2-4 hours), lightly sand with 220-grit sandpaper (the joint becomes invisible).
Painting: paint moldings with acrylic paint to match the wall color (moldings blend in, only the relief is visible) or in contrast (walls beige — moldings white, walls gray — moldings dark gray). Paint is applied with a brush or roller (small, foam) in 2 coats.
Effect in the interior
Moldings made of polyurethanetransform an ordinary living room into a classic one: walls gain structure, architectural quality, and nobility. Against such a backgroundClassic Furniture for the Living Room(chests of drawers, sideboards, tables, armchairs) looks organic, harmonious, as if it has always been here.
Comprehensive approach: example of a living room transformation
Consider a specific case: a 20 m² living room, old furniture (worn pine table, chipboard chest of drawers with peeling laminate, plastic chairs), walls smooth painted beige, floor light laminate. Renovation budget 150,000 rubles (without replacing all furniture).
Action plan
Step 1: Table restoration (weekend, 2 days of active work + drying time). Removing old varnish by sanding, repairing scratches with putty, painting matte white (chalk paint, 3 coats), attaching corner carved overlays (linden, size 80×80 mm, 4 pcs — tabletop corners), gilding overlays with imitation gold leaf, final varnish coating. Material cost: paint 800 rub, sandpaper 300 rub, overlays 4×400=1600 rub, imitation gold leaf+adhesive 600 rub, varnish 500 rub = 3800 rub.
Step 2: Replacing chest of drawers handles (1 hour). Purchasing 5 brass patinated bracket handles (according to the number of drawers), replacement. Handle cost 5×2500=12500 rub.
Step 3: Purchasing new chairs (4 pcs). Solid oak chairs, painted white, seats soft with beige linen upholstery, backs carved. Cost 4×12000=48000 rub.
Step 4: Installing moldings on walls (weekend, 1 day). Creating 6 frames on two walls (frame size 100×140 cm), moldings width 60 mm, classic profile. Inside the frames — non-woven wallpaper with embossed gold pattern on a beige background. Cost of moldings (48 m along frame perimeter × 350 rub/m) = 16800 rub, wallpaper (3 rolls × 2500 rub) = 7500 rub, adhesive, putty, paint = 2000 rub. Total 26300 rub.
Step 5: Purchasing additional elements: mirror in a carved gilded frame (size 80×120 cm, 18000 rub), wall sconces 2 pcs (patinated brass, 2×7000=14000 rub), wool rug (size 200×300 cm under the table, 25000 rub), textiles (linen curtains, armchair cushions, tablecloth — 12000 rub).
Total: 3800+12500+48000+26300+18000+14000+25000+12000 = 159600 rub (fits within the 150000 budget with a slight overrun, which is compensated by savings on other items or increasing the budget by 10000).
Result
The living room transformed: the white table with gilded overlays — the centerpiece, surrounded by white carved chairs, the chest of drawers with brass handles looks more expensive (although the chest itself is old, the handles gave it new life), walls with structure from moldings and wallpaper inside frames create a classic background, the mirror in a gold frame and sconces add light and luxury, the rug and textiles — coziness and completeness. The living room went from bland to classic, elegant, individual — the result of a thoughtful approach, where restoration of the old combines with purchasing the new, where details (handles, moldings) play no less a role than large items.
Frequently asked questions: answers to doubts
Is it worth restoring an old table, or is it easier to buy a new one?
Financially: restoration costs 3000-10000 rub (materials + your time), a new solid oak table — 50000-150000 rub. Savings of 5-15 times. Emotionally: restoration provides satisfaction from creating with your own hands, uniqueness (your table is the only one like it). A purchased ready-made one — the same as thousands of others. Conclusion: if the table's structure is sturdy — restore it, you won't regret it.
Can a chipboard table be restored or only solid wood?
Chipboard is more difficult to restore (material crumbles during processing, does not hold screws when repairing joints, coating (laminate) cannot be removed — only painted over). But if the table is in good condition (not wobbly, laminate not heavily peeling) — it's possible: sand the laminate with sandpaper for adhesion, prime, paint, glue on overlays. The result is worse than with solid wood, but for 3000-5000 rub you get a refreshed table.
How long does a full table restoration take?
Active work — 6-10 hours (removing old finish 2-3 hours, repairing defects 1-2 hours, painting 1 hour, attaching decor 1 hour, final coating 1 hour). Drying time between layers — total 24-48 hours. Total: stretched over 3-4 days (working in the evenings or over 2 days off), but active work is 1 day.
How to care for a restored table so the finish lasts long?
Wipe with a dry or slightly damp soft cloth (to remove dust, crumbs). Do not place hot items directly without coasters (steam can leave white marks on the varnish). Use coasters under plates and glasses (protection from scratches, stains). Every six months, wipe with furniture polish (refreshes the finish, creates a protective film). Do not use abrasive cleaners or solvents (they damage varnish, paint).
Where to buy carved overlays and moldings for restoration?
From specialized manufacturers of decorative elements, in construction hypermarkets (molding, millwork sections), in online stores (wider selection, delivery). Quality criteria: clarity of carving (details are well-defined, not blurry), absence of chips, material (solid wood or dense polyurethane 350+ kg/m³).
Can you mix different styles (restored vintage table + modern chairs)?
Yes, it's called eclecticism. The main thing is to find a connecting element: color (table and chairs of the same color), material (both made of wood), shape (similar proportions). A vintage white distressed table + modern Scandinavian white chairs with wooden legs — works, connection through color and material.
Conclusion: Transform your living room with materials and furniture from STAVROS
wooden table decorDIY — a creative process that turns old into new, bland into unique. Techniques are diverse — from simple painting to artistic decoupage, patination, gilding, attaching carved elements. Each technique is accessible to beginners with desire, patience, and basic materials. The result — a table you won't find in any store, because it's created by your hands, carries your energy, your taste.Classic Furniture for the Living Roommade from solid wood,classic living room furniturewith carving, patina, quality hardware complements the restored table, creating a harmonious space.Furniture Handlesbrass, carved wood, crystal replace cheap hardware, instantly elevating the look of the furniture.Moldings made of polyurethaneon walls create an architectural background, turning an ordinary room into a classic living room.
Company STAVROS — the largest Russian manufacturer and supplier of classic solid wood furniture, decorative elements made of wood and polyurethane, furniture hardware, offering everything needed to create and update classic interiors.
Classic furniture STAVROS — dining and coffee tables, dressers, sideboards, display cabinets, wardrobes, shelves made of solid oak, ash, beech, wood moisture content 8-12% (stability, no warping), sturdy construction (mortise and tenon joints, glued), high-quality hand or CNC carving, finish of choice (natural wood under varnish or oil, painted white/grey/graphite, patinated, with gilding). 5-year warranty on construction.
Carved overlays STAVROS made of solid linden, oak, beech — corner, central (cartouches, rosettes), decorative strips, sizes from 30×30 mm to 400×600 mm, clear detailed carving, thickness 8-12 mm. Treatment: unfinished (for custom finishing to match your project), primed white (ready for painting), stained (oak, walnut, wenge stain). Price from 200 rubles for a small overlay to 4000 rubles for a large hand-carved cartouche.
Furniture handles STAVROS — cast patinated brass (weight 150-450 grams, patina antique bronze, green, black), carved wood from oak and walnut (hand carving, painting/staining of choice), combined (wood+brass, wood+leather), painted ceramic, faceted crystal. Sizes from miniature buttons 25 mm in diameter to long backplates 200 mm. Center-to-center distances standard (32, 64, 96, 128, 160 mm) and custom upon request. Price from 500 rubles for a simple button to 8000 rubles for an exclusive carved handle.
Polyurethane moldings STAVROS — density 350-400 kg/m³ (clear relief, strength), width 20-120 mm, length 2.0-2.4 meters, profiles from simple (rectangular with chamfers) to classic complex (coves, beads, dentils). Color white primed (ready to paint any color) or factory-painted. Application: wall panel frames, door/window trim, horizontal wall division, ceiling cornices. Price 280-800 rubles/m (depends on width, profile complexity).
Materials for restoration and decor — acrylic and chalk paints (palette 50+ colors), stains (oak, walnut, wenge, mahogany), matte/semi-gloss/gloss acrylic varnishes and polyurethane varnishes (for furniture, wear-resistant), wood oils (Danish, tung, linseed), imitation gold leaf (gold, silver, copper), decorative waxes for patina, wood fillers (all colors matching wood species), adhesives (carpenter's PVA, polyurethane, for gold leaf). Tools: brushes, rollers, spatulas, sandpaper (all grits).
Free consultations — STAVROS specialists will advise which materials to choose for your table restoration project, how to combine the restored table with new furniture, which moldings suit your living room, which handles to replace on a dresser. Call, write in the website chat, visit showrooms in Moscow and St. Petersburg (addresses on the website) — see samples in person, touch them, assess the quality.
Delivery across Russia — by courier in Moscow and St. Petersburg (1-3 days), by transport companies to regions (7-21 days). Furniture individually packed (protection from damage), delivery at agreed time, floor delivery, assembly (if service ordered).
Choosing STAVROS, apartment and house owners, amateur restorers, designers choose quality (proven by thousands of projects), variety (everything for a classic interior in one place), affordability (manufacturer prices without middleman markups), professionalism (consultations, training, support).
Transform your living room, breathe new life into old furniture, create a classic interior filled with the warmth of wood, the elegance of molding, the shine of quality hardware. With materials, furniture, decor from STAVROS your living room will become a space where it's pleasant to gather with family, host guests, spend evenings in conversation — a room that preserves stories, creates memories!