Article Contents:
- Sections and Durability
- Fence Transparency
- Connection Nodes
- Outdoor Oils
- Drainage and Maintenance
- Conclusion: Architecture of Harmony with Nature
- Frequently Asked Questions
A country house in Russian culture is not just a suburban home, but a philosophy of life. It is a place where the city recedes, nature takes its place, time flows more slowly. Here, morning begins with tea on the terrace, the day passes in the garden, evening — at the table in the gazebo. The terrace and gazebo are key elements of country house space, connecting links between the house and the garden, between the enclosed and the open, between man and nature.
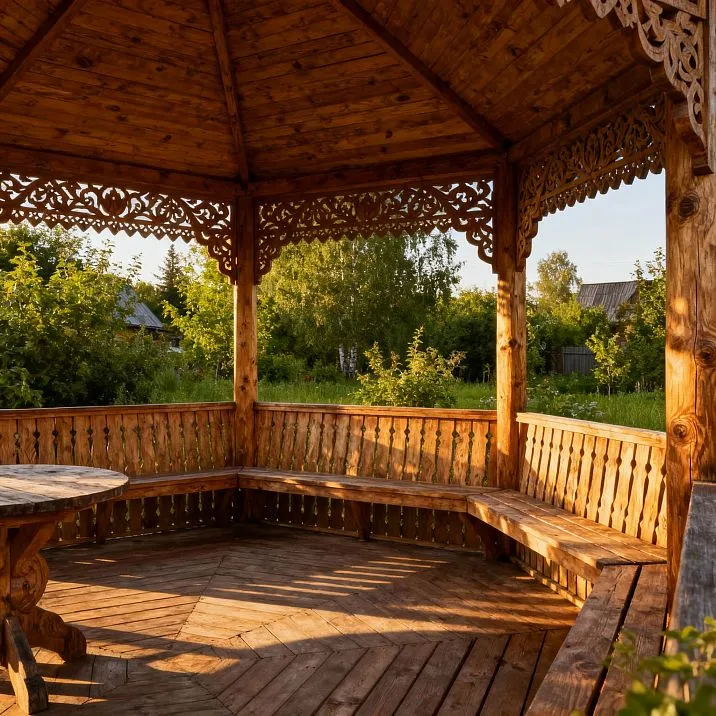
Traditional Russian gazebo — a wooden structure with carved posts, ornate railings, and a pointed roof. It does not shield from nature, but frames it, creating a point of contemplation. The terrace — an extension of the house into the garden, an open area where one can dine, relax, and entertain guests while remaining outdoors.
Gazebo from Wooden Lumberand louvered terrace railings — this is a modern interpretation of tradition. Lumber creates semi-transparent walls that protect from wind and slanted rain, but do not isolate from nature. They allow light, air, and views of the garden, creating a play of shadows that changes throughout the day. This is light, airy architecture, in harmony with the spirit of the Russian country house — being part of nature, rather than separating from it.
In this article, we will examine how to create a terrace or gazebo in Russian style using wooden lumber. You will learn which sections and species withstand outdoor conditions, how to create proper fence transparency, which connection nodes ensure reliability, which oils protect wood from atmospheric effects, and how to organize drainage and maintenance for the structure.
Sections and Durability
The street — the most severe conditions for wood. Direct sunlight, rain, snow, frost, thaw, wind, temperature fluctuations from -30°C in winter to +35°C in summer. Without proper wood selection and sectioning, the structure will quickly deteriorate. For terraces and gazebos, durability is as critical as aesthetics.
Wood species for outdoor use. Not all species withstand atmospheric effects. Softwoods (pine, spruce) darken within 1-2 years and begin to rot after 5-7 years. Hardwoods with natural protection last for decades.
Larch — the best choice for outdoor structures in Russia. Density 650-700 kg/m³, contains resin (natural oil), making the wood practically immune to rot, fungi, insects. Larch does not fear moisture — the wetter it gets, the harder it becomes. It was used for Venice piles and lower log frame joints.Wooden Lumber for FacadesLarch lumber for facades lasts 30-50 years without deterioration.
Oak — classic, time-tested. Density 700 kg/m³, contains tannins (tannic substances), protecting against biological damage. Oak posts, beams, railings last 50-100 years. Minus — high cost, heaviness (harder to install). Plus — noble appearance, which only improves over time (oak darkens, develops a silver patina).
Cedar (Siberian pine) — softer than larch and oak, but contains a large amount of essential oils, protecting against rot and repelling insects. Cedar is easier to process and has a pleasant aroma. Good for interior gazebo elements (ceiling, benches), for terraces in areas with less severe climates.
Thermowood — any species (pine, beech, birch), processed at high temperature (180-230°C) in an oxygen-free environment. Thermotreatment alters the wood structure, making it stable (does not warp), practically non-hygrosopic (does not absorb water), resistant to rot. Color — from light coffee to dark chocolate. Excellent choice for terraces and gazebos, though expensive.
Pine — the most accessible, but requires quality protection for outdoor use. Unprotected pine darkens, turns blue, and begins to rot after 5-7 years. With proper treatment (deep-penetrating antiseptic + exterior oil in 3-4 layers), pine will last 15-20 years. Acceptable for budget projects, but not for structures intended to last decades.
Lumber sections for railings. Lumber in terrace or gazebo railings works under bending (wind load), twisting (uneven load), and tension (connections). Too thin lumber will bend and deform. Too thick lumber is excessive, heavy, and costly.
For vertical lumber in railings 90-110 cm high (standard terrace/gazebo railing height), optimal section is 40×60 mm or 50×80 mm. Thickness (smaller dimension) 40-50 mm provides rigidity, lumber does not bend under wind. Width (larger dimension) 60-80 mm creates visual expressiveness, but not excessive mass.
For horizontal lumber (railings, middle horizontal rails in railings), section can be larger — 50×100 mm or 60×120 mm, since horizontal elements act as beams, bearing load from above (leaning, support).
For posts (vertical supports to which lumber is attached), section 100×100 mm or 120×120 mm. Posts are load-bearing elements and must be substantial and stable. Post height above terrace/ground level — 2.0-2.5 m (up to the bottom edge of roof beam).
Length and cutting. Standard lumber length — 3-6 m. For 100 cm high railings, lumber length needed is 110-120 cm (with allowance for connections and trimming). From a 3 m beam, you can get 2 pieces of 1.2 m each (remaining 0.6 m for horizontal elements or waste).
Anti-rot treatment. Even moisture-resistant species (larch, oak) should be treated with deep-penetrating antiseptic before installation. Antiseptic is applied to dry wood (moisture not exceeding 18-20%) in 2-3 layers with intermediate drying. Special attention — ends (sawn ends), where wood is most vulnerable.
Anti-rot treatment. Even moisture-resistant species (larch, oak) should be treated with deep-penetration preservative before installation. The preservative is applied to dry wood (humidity no more than 18-20%) in 2-3 layers with intermediate drying. Special attention should be paid to ends (sawn surfaces), where wood is most vulnerable.
For pine, antiseptics are mandatory, and deep-penetrating formulations (on alkyd or organic base) are required, which penetrate to a depth of 5-10 mm and are not washed away by rain. Water-soluble antiseptics for outdoor use are unsuitable — they wash away quickly.
After antiseptizing (after 24-48 hours, when the compound has fully absorbed and dried), a final protective coating — exterior oil — is applied, details in the corresponding section.
Fasteners. All fasteners for outdoor structures must be made of stainless steel or hot-dipped galvanized. Ordinary screws and nails rust within 1-2 years, leaving rust stains on wood and weakening the fasteners. Stainless steel fasteners cost 2-3 times more but last as long as the wood itself.
Screws for wood (stainless steel) diameter 5-6 mm, length 70-100 mm (for attaching rails to posts). Bolts (stainless steel) diameter 10-12 mm, length 120-150 mm (for attaching load-bearing elements — posts, beams). Angles, plates, anchors — all must be stainless steel or hot-dipped galvanized.


Fence Transparency
A terrace or gazebo fence performs two functions: safety (prevents falls) and aesthetics (frames the space, creates privacy, but does not isolate from nature). The degree of transparency of the fence determines how open or closed the space will feel.
Fully open fence. Only horizontal rails (top rail at 100-110 cm height) and possibly one middle horizontal rail at 50-60 cm. No vertical fillings. Maximum openness, full 360° view. Suitable for terraces and gazebos with panoramic views (lake, mountains, forest), where views must not be obstructed.
Disadvantages: no wind protection, no privacy (everything is visible from outside), children and pets may squeeze under rails (dangerous). Therefore, fully open fencing is suitable only for terraces where there are no children/pets, and wind is not an issue.
Sparse verticals. Vertical rails with spacing of 20-30 cm. Ratio of rail width to gap width approximately 1:3 or 1:4. For example, 50 mm rail, 150-200 mm gap. Creates a light rhythm of vertical lines, but high transparency — you can clearly see what happens behind the fence.
Such fencing protects from side wind (partially), creates a light psychological boundary, but retains openness. Views of the garden remain, light passes freely, but there is a sense of framing and structure. Suitable for most country house terraces and gazebos in Russian style.
Medium density. Vertical rails with spacing of 10-15 cm. Ratio of rail to gap approximately 1:2 or 1:1.5. Rail 50 mm, gap 75-100 mm. Medium transparency — general outlines behind the fence are visible, but details are blurred. Significant wind protection (wind disperses between rails, its force decreases).
Such fencing creates a sense of enclosure, privacy, but not isolation. Inside the gazebo, you feel protected, but the connection with the garden is preserved. Suitable for terraces/gazebos where intimacy is important (dining area, relaxation zone), but full isolation is not needed.
Dense filling. Vertical rails with spacing of 5-8 cm. Ratio of rail to gap 1:1 or even 2:1. Rail 50 mm, gap 50-75 mm. Low transparency — silhouettes are visible, but details are hidden. Strong wind protection (almost like a solid wall, but with air circulation).
Such fencing creates maximum privacy. Inside the gazebo, you cannot see what happens outside (and vice versa). It is almost like a room outdoors. Suitable for gazebos where full privacy is important (spa zone, changing area near the pool), but ventilation is needed.
Combined transparency. An interesting solution — different rail densities on different sections of the fence. For example, from the house side (where people often look) — sparse rails, high transparency. From the neighbors’ side or road — dense rails, low transparency, maximum privacy.
Or the lower part of the fence (from floor to height 50-60 cm) — dense filling, creating visual base and protection from balls and toys. The upper part (from 60 cm to 110 cm) — sparse rails, preserving the view.
Horizontal vs vertical rails. Traditionally, fences are made with vertical rails. They visually elevate space, create upward movement, associate with columns and trees. Vertical is characteristic for Russian style.
But horizontal rails can be used. They visually expand space, create a calm, stable rhythm. Horizontal fencing resembles a ranch fence or ship railing. This is a more modern, minimalist aesthetic, but it can be adapted to Russian style through material (natural wood) and color (natural tones).
Diagonal and Y-shaped. Non-standard option — rails installed at 45° angle (diagonally) or in a 'Y' shape (changing direction). Diagonals create dynamism, movement, visually more interesting than straight verticals. Y-shape gives a rich, complex pattern.
But diagonal installation is more complex: requires precise marking, beveling each rail on both sides at an angle, more waste. For DIY construction, this is a challenge. But if you manage it — the result will be unique.
Transparency and safety. Important: according to building codes, if the fence is intended to prevent falls (terrace/gazebo height above ground more than 30 cm), the distance between vertical elements must not exceed 10 cm (to prevent a child from fitting their head through). If rail spacing is greater, additional horizontal rails are needed to reduce vertical gaps.
Our factory also produces:


Connection Nodes
The reliability of a terrace or gazebo structure depends on the quality of the nodes — connection points of elements. A weak node is a risk of structural failure due to wind load, snow, or simply time. We will examine key nodes and correct ways to execute them.
Node 1: Post to Base Connection. The post (vertical support) — main load-bearing element. It supports the roof, railing, entire structure. The post must be rigidly fixed to the base (concrete foundation, metal anchor, wooden terrace frame).
Method 1: Anchor Connection. A metal anchor — U-profile or cross with threaded rods — is embedded into the concrete base (column foundation, concrete slab). The post is installed into the anchor and secured with bolts. The anchor raises the post 5-10 cm above the concrete level, protecting the end from moisture.
Method 2: Bolted Connection. The post is attached to the wooden terrace frame via bolts with diameter 10-12 mm, passing through the post and frame. Minimum two bolts per post, positioned perpendicular to each other (crosswise), spaced 20-30 cm apart vertically. Wide washers (diameter 30-40 mm) are placed under bolts to distribute load.
Method 3: Concrete Embedding. The lower part of the post (50-80 cm) is embedded into the ground. The post is placed in a hole 80-100 cm deep, aligned vertically (level), temporarily secured with tensioners, and the hole is filled with concrete. This is the most reliable method, but it requires the lower end of the post to be treated with bituminous mastic or wrapped with roofing felt (protection against rotting in the ground).
Node 2: Railing to Posts Connection. Railing (top horizontal rail of the fence) connects posts and acts as a beam, bearing load from leaning. Railing must be rigidly fixed to posts.
Method 1: Half-wood Connection. A groove 20-30 mm deep (half the thickness of the railing) is cut into the top end of the post, into which the railing rail fits. The connection is secured with screws or bolts driven from top to bottom. This results in a strong, aesthetic connection where railing and post lie in the same plane.
Method 2: Overlapping Connection. Railing is laid over posts and secured with screws or bolts from top to bottom. Easier to execute than half-wood connection, but less aesthetic (fastener heads visible from top). Acceptable for outdoor use where aesthetics are less critical than reliability.
Method 3: Connection via metal brackets. Metal brackets (stainless steel or galvanized) are attached to the post from the inside (the side not visible from the outside). Railing is laid onto the brackets and secured with self-tapping screws. Fastening is invisible from the outside, aesthetics preserved.
Joint 3: Attaching vertical rails to railings and lower plank. Vertical railing rails are attached to the railings at the top and to the lower horizontal plank (at a height of 5-10 cm from the floor decking) or directly to the decking frame.
Method 1: Angled screws (hidden fastening). A screw is screwed into the end of the rail at a 45° angle into the railing (top) and the lower plank (bottom). The screw head is recessed into the wood; the top is filled with wood putty or left as is (for outdoors). Fastening is invisible from the front, maximum aesthetics.
Method 2: Screws from the front (visible fastening). A screw is screwed into the rail perpendicular to the railing (top) and the lower plank (bottom). The screw head is visible, but for outdoor structures this is acceptable. Decorative screws (with large heads in bronze, copper) can be used, which will become part of the design.
Method 3: Dovetail joint. Grooves 10-15 mm deep are milled into the railings and lower plank, into which the rails are inserted. Additionally secured with waterproof wood glue or thin nails. The most labor-intensive connection, but also the most aesthetic — no visible fastening.
Joint 4: Roof beam connection to posts. Roof beams (horizontal elements onto which the roof is laid) must be securely connected to posts, supporting the weight of the roof, snow, and wind load.
Method 1: Notched joint (dovetail). A horizontal notch (saddle) 30-50 mm deep is cut into the top of the post, into which the beam is laid. The beam is additionally secured with bolts or metal brackets. The dovetail distributes load and prevents beam displacement.
Method 2: Metal supports. A metal support (U-bracket, cross brace) is attached to the top of the post, into which the beam is inserted. The beam is secured with bolts through holes in the support. The metal support is very reliable, withstands heavy loads, but is visible (if this does not fit the aesthetics, it can be covered with a decorative element).
Method 3: Through bolts. The beam is laid over the post, a hole is drilled through both the beam and the post, a bolt with a diameter of 12-16 mm is inserted, and tightened with a wide washer and nut. Simple, reliable, but the bolt is visible (the head and nut can be recessed into the wood and covered with a wooden plug).
Joint 5: Corner railing connection. On the corners of the terrace/pavilion, railings meet at a 90° angle (or another, depending on shape). The corner connection must be strong and aesthetic.
Method 1: 45° bevel. Both railing planks are cut at a 45° angle, joined, and the joint is secured with screws screwed in at an angle or with a metal plate from below (invisible from above). The joint becomes clean and neat.
Method 2: Butt joint. One plank is cut at 90°, the other overlaps it end-to-end, forming a T-joint. Secured with screws or bolts. Simpler than a 45° bevel, but less aesthetic.
Method 3: Corner post. A post is installed at the corner, to which railings are attached from both sides. The post acts as a connecting element, providing maximum strength for the corner joint.
Joint quality control. After installation, each joint is checked for strength: try to loosen the post (should not wobble), press on the railings (should not deflect more than 5-10 mm), pull on the rails (should not detach). If there are gaps or deflections, the joint must be reinforced: add fasteners, metal elements, glue.
Get Consultation
Outdoor oils
Finishing treatment of wooden terrace and pavilion elements — a critically important stage. Unprotected wood outdoors darkens within a few months, develops cracks within 1-2 years, and begins to rot after 5-7 years. High-quality outdoor oil extends the life of wood by 3-5 times.
Why oil, not varnish. Varnish creates a hard film on the wood surface. Outdoors, this film is subjected to extreme conditions: UV radiation breaks down the varnish polymers, temperature fluctuations cause wood expansion and contraction, and the varnish film cracks. Water enters through the cracks, and the wood begins to rot under the varnish. Reapplying varnish is difficult — the old film must be completely removed (sanding or washing).
Oil penetrates into the wood, does not form a film on the surface. It fills pores, displaces moisture, protects from within. Meanwhile, the wood remains breathable — moisture can exit without accumulating. Oil ages naturally: it fades over time, but does not crack or peel. Reapplying oil is simple: clean the surface, apply a fresh layer — and protection is restored.
Composition of outdoor oil. Special outdoor oils contain: natural oils (linseed, tung, sunflower) — penetrate into wood, nourish it; hard waxes (carnauba, beeswax) — remain on the surface, creating a water-repellent layer; UV filters (pigments) — protect from ultraviolet radiation, prevent darkening; biocides (fungicides, insecticides) — protect against fungi, mold, insects; siccatives (driers) — accelerate drying and polymerization of the oil.
Known brands of outdoor oils: Osmo (Germany) — UV-Schutz-Öl Extra, Holzschutz Öl-Lasur; Biofa (Germany) — Terrassenöl, Holzlasur; Saicos (Germany) — Holzschutz-Öl; Remmers (Germany) — Aidol HK-Lasur; Tikkurila (Finland) — Valtti Color. Prices: 1000-2000 rubles/liter. Consumption: 100-150 ml/m² in 2-3 coats.
Oil color: transparent or tinted. Transparent (clear) oil preserves the natural wood color, highlighting the texture. However, it provides minimal UV protection — the wood will still darken, albeit more slowly than without any coating. Service life: 2-3 years, then renewal is required.
Tinted oil (with pigment addition) provides significantly better UV protection. The pigment absorbs or reflects ultraviolet radiation, preventing it from damaging lignin in the wood. The deeper the color, the better the protection. Light tones (white oak, natural pine) — service life 3-5 years. Medium tones (golden oak, walnut, teak) — 5-7 years. Dark tones (palisander, wenge, mahogany) — 7-10 years.
For Russian style, optimal wood tones are natural: golden oak, teak, walnut. These colors are warm, natural, and harmonize well with gardens. Avoid exotic tones (bright red wood, purple shades) — they do not match the aesthetics of a Russian dacha.
Wood must be dry (moisture content no more than 20%), clean, and sanded (grit 120-150). If the wood has already been outdoors and has grayed, it must be sanded to a clean light layer or treated with a special wood whitener.
First coat of oil — diluted 10-20% with solvent (e.g., Osmo Verdünnung for natural oil-based products). Dilution improves penetration. Oil is applied with a brush or roller along the grain, worked into the wood. After 30-60 minutes (depending on temperature and wood absorption), excess is wiped off with a clean cloth. Wood is left for one day to absorb and begin polymerization.
Second coat — full concentration oil, same technique. Another day of drying. Third coat (for structures especially exposed to weather — decking, horizontal railings) — also full concentration. After applying the third coat — minimum 3-5 days until full polymerization and beginning of use.
Important: oil must be applied at temperatures +10°C...+25°C, with air humidity no more than 80%. Cannot be applied in direct sunlight (oil dries too quickly on the surface, not allowing time to penetrate), in rain, or on wet wood.
Renewal frequency. Oil outdoors wears unevenly. Horizontal surfaces (decking, railings where people sit or lean) wear faster — every 2-3 years. Vertical surfaces protected from direct rain (rails under pavilion roof) — slower, every 5-7 years.
Signs of needing renewal: fading color, appearance of gray spots, water absorption (drop does not roll off, but is absorbed within a few seconds). When these signs appear — it’s time to renew.
Renewal: clean the surface (stiff brush, water under 15-20 bar pressure, optionally with special wood cleaner). Allow to dry (1-2 days). Lightly sand (grit 180-220) if there is raised fibers or flaking. Apply 1-2 fresh coats of oil. Protection is restored.
Alternative to oil: lacquer. If a more durable finish is desired, oil-based lacquers (Holzschutz Öl-Lasur, HK-Lasur) — hybrids of oil and varnish — can be used. They form a thin, elastic film that is more durable than oil but more permeable to moisture than varnish. Service life: 7-12 years without renewal. However, renewal is more complex than with oil — light sanding is required before applying a new layer.
Drainage and Maintenance
Even the highest-quality wood with the best finish will not last long if water stagnates on the surface, at joints, or under the structure. Proper drainage is the foundation of longevity. Regular maintenance is the guarantee of preserving the appearance.
Drainage of the terrace deck. The deck (horizontal floor of the terrace) must allow rapid water runoff. Deck boards are laid with a 5-8 mm gap between them (water flows downward, does not stagnate). The deck has a 1-2% slope (1-2 cm per meter) away from the house (water flows away from the building, not toward it).
There must be a ventilated space beneath the deck, at least 30 cm from the ground (air circulates, wood underneath dries). If the terrace is at ground level, a drainage cushion is laid beneath it: 20-40 mm gravel layer 15-20 cm thick, topped with geotextile to prevent grass growth and mixing gravel with soil.
Deck boards are laid with bark facing down (growth rings curved upward). This prevents warping: if the board begins to bend due to moisture, it will bow upward but remain supported by the joists at the edges. If laid bark-side up, the board will sag in the middle and become unstable.
Drainage around posts. The base of posts (contact point with foundation or soil) is the most vulnerable area. Water, snow, and moisture accumulate here, causing posts to rot from the bottom. To prevent this: posts are installed on anchors that raise the top end 5-10 cm above concrete or soil (air circulates, the top dries).
A drainage zone is created around the base of the post (within a 30-50 cm radius): gravel or crushed stone that does not retain water. No soil or clay, which holds moisture. If the post is embedded in concrete, the top of the concrete is shaped into a cone (higher toward the post, lower at the edges) to allow water to flow away from the post.
Drainage of the gazebo roof. The gazebo roof must have a gutter and downpipe system to divert water away from the structure. Without a gutter, water runs down the walls of the gazebo, wetting posts and railings. Gutters are installed around the roof perimeter with a 3-5 mm slope per meter toward the downpipes.
Downpipes must divert water at least 1.5-2 meters away from the gazebo into a drainage pit, lawn, or the property’s stormwater system. Water must not run under or beside the gazebo — this creates constant dampness, wetting the foundation and causing posts to rot.
Ventilation of enclosed zones. If the gazebo has enclosed zones (e.g., the lower part of railings is solid with no gaps), ventilation must be provided. Otherwise, air stagnates, moisture condenses, and wood begins to rot from within.
Ventilation is ensured by: gaps between siding boards (5-8 mm), ventilation grilles (decorative wooden grilles at the top and bottom of siding, allowing air circulation), and periodic airing (if the gazebo has removable panels, they are partially removed in winter for maximum ventilation).
Regular cleaning. In autumn (after leaf fall) and spring (after snow melt) — general cleaning. Removal of leaves, branches, and debris from the terrace deck and gaps between boards (using a brush or high-pressure water stream). Cleaning gutters of leaves and dirt. Checking the condition of wood: no darkening, mold, or cracks.
Weekly cleaning during the usage season (May–September) — light cleaning: sweeping the deck, wiping railings with a damp cloth, removing cobwebs and dust. This prevents accumulation of dirt and organic matter, which, when wet, creates a mold-friendly environment.
Anti-mold and fungus treatment. If black spots (mold) or green growth (algae, moss) appear on the wood, they must be removed immediately. Affected areas are cleaned with a stiff brush and treated with preservative (chlorine bleach diluted 1:3 with water, or a specialized wood biocide). After 15-20 minutes, rinse with water. After drying (2-3 days), apply a fresh layer of oil.
Winter care. During winter, the terrace and gazebo are not used but require attention. Snow must be regularly removed from the deck and roof (snow layer over 30-40 cm creates excessive load). Remove carefully with a plastic or wooden shovel, not metal (to avoid scratching wood).
Do not scrape ice off the deck with a crowbar (can damage wood), but sprinkle with sand, salt, and wait for thaw. Alternatively, use specialized de-icing agents safe for wood (based on calcium chloride, not containing aggressive acids).
Minor repairs. Once a year (in spring, before the season begins) — inspect the structure, identify damage. Cracked boards or rails — replace. Loose fasteners — tighten. Rusty screws or nails (if not stainless steel) — replace with stainless steel. Darkened or grayed areas — sand and reapply finish.
Timely minor repairs prevent major problems. One replaced board costs 500-1000 rubles and 30 minutes of work. Rebuilding the entire deck (if cracked boards were not replaced in time, they began rotting and the rot spread) — 50,000-100,000 rubles and one week of work.
Conclusion: Architecture of harmony with nature
Terraces and gazebos in Russian style are not just functional structures, but a philosophical statement on how humans relate to nature — not to conquer, not to isolate, but to be part of it, to find harmony. Lattice railings that let in light and views, roofs that protect from rain but do not block the sky, materials that age naturally and become part of the landscape — all embody this philosophy.
decor in Russian styleOn a dacha — honesty of materials, simplicity of form, respect for tradition. Larch posts will last 50 years, oak railings will outlive generations. Oil finish, renewed every few years, maintains protection and preserves beauty. This is architecture designed for a long life, for passing on to future generations.
A properly built terrace or gazebo becomes a family favorite. Here, breakfast is enjoyed on a summer morning, lunch is eaten in the shade during hot weather, dinner is enjoyed as the sun sets. Here, children play, adults read, elders reminisce. This is a space where memories are created — memories that last a lifetime.
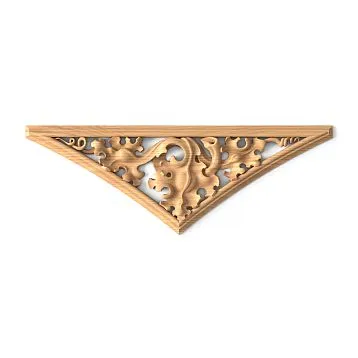
Company STAVROS produces wooden elements for terraces and gazebos. Posts, beams, rails of all cross-sections from larch, oak, cedar, and thermowood. Carved elements (Carved wooden window casings, balustrades, consoles) for decorating gazebos in traditional style. All made from air-dried solid wood, precise dimensions, ready for installation.
We offer comprehensive solutions: project development of terraces/gazebos tailored to your plot, material calculation, manufacturing of elements (standard and custom sizes), installation and protective treatment consultations. We work with landscape designers, construction companies, and private clients.
We have ready-made solutions — standard gazebo and terrace projects of various sizes, adapted to the Russian climate. We can manufacture a unique structure according to your project — realizing your vision. We consult on wood species selection, protective coatings, and connection joints for maximum longevity.
Delivery across Russia. For large elements (beams, posts 4-6 m long), we organize special transport. 23 years on the market, hundreds of terraces and gazebos built across the country, thousands of satisfied clients spending summer evenings in spaces created with our materials.
By choosing STAVROS, you receive quality proven by time and weather, materials that serve for decades, and a partner who understands the specifics of outdoor wooden structures in the Russian climate.
Frequently asked questions
Which tree species is better for a terrace — larch or oak?
Both are excellent. Larch is cheaper, lighter (easier to install), contains natural resins (protection against rot). Oak is more expensive, heavier, but nobler, and becomes more beautiful with age. For terrace decking (high wear), oak is preferable. For vertical elements (posts, rails), larch is optimal.
Can spruce be used for a garden pavilion?
For load-bearing elements (posts, roof beams) — not recommended; larch or oak is better. For non-load-bearing elements (railing rails, roof cladding) — yes, if treated with deep-penetrating antiseptic and coated with oil in 3-4 layers. With protection, spruce lasts 15-20 years outdoors; larch lasts 30-50 years.
How much does it cost to build a 3×3 m larch pavilion?
Materials (4 posts, beams, railing rails, roof sheathing, fasteners): 60,000–80,000 rub. Roof (flexible tile, metal tile): 15,000–25,000 rub. Protective treatment (antiseptic, oil): 8,000–12,000 rub. Labor (foundation, structure assembly, roof): 80,000–120,000 rub. Total: 160,000–240,000 rub. all-inclusive.
How often should the oil on the terrace be renewed?
Decking (horizontal surface, high wear) — every 2–3 years. Vertical elements under the roof (protected from direct rain) — every 5–7 years. Signs: dullness, water absorption. Renewal: cleaning, light sanding, 1–2 layers of fresh oil.
Is it necessary to build a foundation for a pavilion?
Yes, mandatory. A pavilion is a permanent structure and must not sag or lean. Foundation options: pier (4–6 concrete piers at corners and midpoints of sides, depth 80–100 cm); screw-pile (metal piles screwed into the ground); slab (concrete slab 100–150 mm thick over the entire area). Choice depends on soil, pavilion size, and budget.
What distance should be between vertical rails in a terrace railing?
According to building codes (if railing protects from falling more than 30 cm) — no more than 10 cm (to prevent a child from putting their head through). For aesthetics and transparency — 10–15 cm for medium fill, 20–30 cm for sparse, 5–8 cm for dense.
Can a terrace/pavilion be left without a roof?
Terrace — yes, it’s an open area, a roof is not mandatory (but desirable for comfort — protection from rain and sun). A pavilion without a roof is no longer a pavilion, but a canopy or pergola. The pavilion’s roof protects not only people but also the structure (posts, railing stay drier and last longer).
How to protect the terrace from water leakage to the house foundation?
Terrace decking is installed with a 1–2% slope away from the house (water drains away from the building). Between the decking and the house wall — a 10–15 mm gap (to compensate for wood expansion and allow ventilation). A gutter (metal or aluminum) is attached to the wall, directing water flowing down the wall away from the junction with the decking.
Should wood be treated before or after installation?
Optimal — before installation. Elements are treated with antiseptic on all sides (including ends), dried, then assembled. After installation, a finish coat (oil) is applied. If treated after installation, hard-to-reach areas (joints, fastener points) remain unprotected — this is where rot begins.
Exception — if elements may be damaged during transport and installation (scratches, chips), then antiseptic is applied before installation, and oil is applied afterward, once all damage is removed by sanding.
How long will a terrace/pavilion made of larch last?
With proper construction (drainage, ventilation), quality protective treatment (antiseptic + oil in 3–4 layers), and regular maintenance (renewing coating every 3–5 years, cleaning, minor repairs) — 30–50 years without replacing main elements. Individual decking boards, most susceptible to wear, may need replacement after 15–20 years. Load-bearing elements (larch posts on concrete foundation, with proper base waterproofing) last 50+ years.