


Article Contents:
- Wood as interior structure
- Oak and beech beam: load-bearing base
- Boards and beams: screens and panels
- Flat and patterned plank
- Wooden profiles: transitions and joints
- Wooden stopper: small joints
- Technical mounting logic
- Conclusion: interior structure by STAVROS
- Frequently Asked Questions

Interior is not just a set of decorative materials, beautifully matched by color. It is a spatial structure where each element performs its role — load-bearing, partitioning, decorative, protective.Oak beamcreates a load-bearing frame on which panels and partitions are mounted.wooden boards and beamsform screens and rhythmic structures organizing space.Flat wooden plankdivides surfaces into sections, decorates and protects.Wooden profileensures neat transitions and joints.wooden trimcovers small joints and secures elements. All theseTrimming Itemswork as a unified system, transforming an empty room into a thoughtfully designed, functional, aesthetically cohesive environment. Let's understand how wooden interior structure is organized and why understanding the technical mounting logic is critical for achieving quality results.


Wood as interior structure
Traditionally, wood is perceived as a decorative material — beautiful texture, pleasant color, tactile warmth. But wood is primarily a structural material, used for centuries to build houses, bridges, ships. Modern interior design reinterprets this structural role: wood becomes not a hidden frame, but a visible structure organizing space.
The constructive logic of wooden interiors differs from that of stone or concrete. Stone and concrete work under compression, creating massive, monolithic forms. Wood works under bending and tension, allowing for light, open structures. A wooden beam with a 100x150 mm cross-section can span a 4-5 meter span, supporting the load from the floor. A metal beam with similar load-bearing capacity weighs several times more. Wooden structures are lighter, faster to assemble, and create a more comfortable microclimate.
Visual honesty — a principle gaining popularity in modern design. Instead of hiding the structure behind drywall and plaster, designers leave it visible, turning it into a decorative element. Solid oak ceiling beams, supporting the floor, simultaneously structure space, create rhythm, and define scale. Vertical posts of the partition frame, instead of being hidden, are clad with boards, forming a rhythmic screen that zones the space.
Modularity — a key characteristic of wooden structures.Trimming Itemshave standardized dimensions and profiles, allowing them to be combined in infinite variations. A 50x50 mm beam serves as a basic module — from it, a grid is assembled, to which boards, planks, and panels are attached. The grid spacing of 400, 500, or 600 mm is a multiple of the standard 1200 mm width of sheet materials, minimizing waste and simplifying installation.
Transformability of wooden structures — their advantage over load-bearing walls. A board partition can be installed in one day and, if necessary, dismantled without damaging the main structure. A beam frame is easily modified — elements can be added or removed, and the configuration changed. This is especially valuable in commercial interiors — offices, stores, restaurants — where the layout may change every few years.
The ecological nature of wooden structures is indisputable. Solid oak or beech — natural material, free of synthetic resins, formaldehyde, volatile organic compounds. Wood 'breathes,' regulating air humidity, creating a healthy microclimate. A wooden structure is not just beautiful — it is beneficial to health, especially in urban apartments, where most materials are synthetic.
The longevity of a properly executed wooden structure is measured in decades. An oak beam, protected from direct water exposure and treated with antiseptic, lasts 50-100 years without loss of strength. Historical wooden buildings — churches, estates, bridges — stand for centuries, proving that wood, with proper maintenance, is practically eternal.


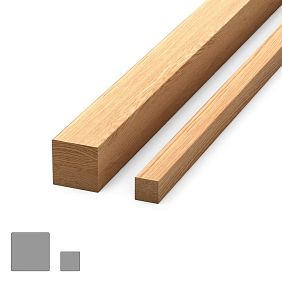
Oak and beech beam: load-bearing base
Oak beam— material combining maximum strength with noble aesthetics. Oak with density 700-800 kg/m³ and modulus of elasticity 13,000 MPa can withstand significant loads. A beam made of oak timber with cross-section 100x150 mm and span 3 meters can support a distributed load up to 500 kg without sagging. This allows using oak timber in load-bearing structures — partition frames, support frames, structural elements of mezzanines and platforms.
Structural use of oak timber requires precise calculation of cross-sections and spans. For horizontal beams subjected to bending, the rule applies: the height of the cross-section should be at least 1/20 of the span. For a beam with a 4-meter span, the minimum cross-section height is 200 mm. The width of the cross-section is usually 50-70% of the height. Thus, for a 4-meter span, the optimal timber cross-section is 120x200 mm or 150x200 mm.
Vertical posts work under compression and require smaller cross-sections. For a standard room height of 2.7 meters, a 50x100 mm timber with a 600 mm spacing is sufficient. At a height of 3.5 meters, a cross-section of 70x120 mm or reducing the spacing to 400 mm is required. The calculation takes into account the load — weight of cladding, possible shelves and cabinets attached to the partition, dynamic loads from doors.
Oak timber beam— an alternative to oak at a lower budget. Beech density is 650-680 kg/m³ and modulus of elasticity 11,000 MPa, slightly lower than oak, but still provides high load-bearing capacity. For the same structures, the cross-section must be increased by 10-15% — instead of oak timber 100x150 mm, use beech timber 120x150 mm. Beech timber is 20-30% cheaper than oak, providing significant savings in large volumes.
Timber processing includes planing for precise dimensions and smooth surface, end-cutting for aligning ends, sanding for removing fuzz and tool marks.Planed wooden strip— made of oak or beech has dimensional tolerance ±0.5 mm, which is critical for precise assembly of frames. Unplaned timber may vary in dimensions by ±2-3 mm, leading to misalignment and unevenness in the structure.
Connections of timber elements are performed in several ways. The simplest — butt joint with metal angles and self-tapping screws. More reliable — half-timber joint, where grooves are cut at the ends to half the thickness of the timber, elements are connected by mutual insertion of grooves and secured with bolts. Classical carpentry joint — tongue-and-groove, where a tongue is cut on one element and a groove on another, elements are connected without fasteners using glue. Such a joint is stronger than the timber itself.
Protection of timber frame from moisture and biological damage is mandatory. Deep-penetration antiseptic is applied in two layers with brush or immersion method. Fire-retardant treatment is required in rooms with heightened fire safety requirements. Finish coating — varnish or oil — protects against mechanical damage and creates a decorative effect if the frame remains visible.
Our factory also produces:


Strip and beam: screens and panels
wooden boards and beams— universal material for creating vertical screens that zone space without erecting load-bearing walls. Strip screen allows light and air to pass, maintaining visual connection between zones, yet clearly separates them functionally. This solution is popular in studio apartments where it is necessary to separate the sleeping area from the living room, in open-plan offices to delineate workstations, and in restaurants to create private zones.
The structure of a strip screen consists of vertical posts — frame made of 50x50 or 60x60 mm timber, horizontal beams — 40x40 mm strips with 800-1200 mm spacing, and finishwooden strips— with cross-section 20x40 or 30x50 mm. Posts are mounted to the floor and ceiling using metal angles and anchors. Beams are inserted into posts or mounted on angles. Strips are mounted vertically to beams with 50-120 mm spacing.
The density of screen filling determines the degree of visual isolation. Solid filling with 20-30 mm spacing creates almost opaque barrier, through which only silhouettes are visible. Medium filling with 60-80 mm spacing allows seeing what happens behind the screen, but blurred, without details. Sparse filling with 100-150 mm spacing — more symbolic zoning than real separation.
Panel structures made of strips create accent walls, attracting attention and structuring space. Frame made of 40x40 mm timber is mounted to the wall with 400-600 mm spacing.Planed wooden strip— mounted to the frame vertically, horizontally, or diagonally, creating rhythmic structure. Between strips and base wall, a 40-60 mm gap is formed, which improves acoustics — sound waves disperse in the gaps, reducing reverberation.
Acoustic properties of strip panels are enhanced by installing sound-absorbing mats behind the strips. Mineral wool with density 50-80 kg/m³ or acoustic foam 50 mm thick is placed between frame strips. The sound absorption coefficient of such a structure reaches 0.6-0.8, comparable to specialized acoustic panels. This is especially valuable in home theaters, music rooms, studios.
Lighting of strip structures turns them into glowing objects. LED strips are mounted in gaps between strips with 300-600 mm spacing. Light reflects off the base wall and passes through gaps, creating even illumination. Adjustable brightness and color temperature allow changing the room’s atmosphere. Cool white light (5000-6000 K) energizes and activates. Warm white light (2700-3000 K) relaxes and creates coziness. RGB lighting allows changing color according to mood.
Hidden storage behind strip panels — practical solution for small apartments. Between frame and wall, there is enough space for placing shallow shelves 150-200 mm deep. They are mounted to the base wall, strips are mounted on top, creating decorative screen. Through gaps between strips, stored items — books, discs, small electronics — can be accessed. Outside — stylish accent wall, inside — functional storage.
Get Consultation
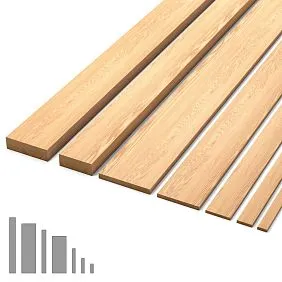
Flat and shaped layout
Flat wooden plank— thin strip 20-40 mm wide and 8-15 mm thick, creating linear divisions on flat surfaces. Main function — dividing large flat surfaces into smaller sections, creating geometric structure visually interesting and proportional. Layout is applied on wall panels, furniture facades, doors, ceilings — anywhere where it is necessary to create framed or grid structure.
Flat layout has rectangular cross-section without profiling. Simple geometry makes it universal for minimalist and modern interiors. Layout width is chosen proportionally to the size of the divided surface: for a 100x150 cm panel, 25-30 mm layout is suitable, for a large 150x200 cm panel — 35-45 mm. Too narrow layout disappears on large surfaces, overly wide layout suppresses, looks crude.
Shaped layout has profiled cross-section with rounded edges, bevels, and curved sections. Profile creates volume, play of light and shadow, visual interest. Shaped layout is characteristic of neoclassical and classical interiors, where detail and architectural logic are valued. Layout profile should harmonize with profiles of other trim elements — baseboards, moldings, cornices.
Layout is attached to surface using PVA carpentry glue or polyurethane glue with additional fixation by finish nails 20-30 mm long. Nails are driven with 300-400 mm spacing, nail heads are recessed by 1-2 mm, recesses are filled with wood-colored putty. After drying, surfaces are sanded flush. Properly executed attachment is invisible — layout is perceived as part of the surface.
Protective function of layout is manifested at edges and corners of panels. Layout installed around panel perimeter protects its edges from chipping and mechanical damage. This is especially relevant for panels made of MDF or plywood, which are vulnerable at ends. Oak or beech layout creates strong frame, absorbing impacts and abrasion.
Decorative function of layout is realized through creation of geometric patterns. Rectangular grid made of horizontal and vertical layouts divides wall into equal sections — classic neoclassical technique. Diagonal grid creates dynamic, modern image. Concentric frames around central element — mirrors, panels, TV — attract attention to it, making it compositional center.
Layout color may match base surface color, creating monochromatic relief structure. Or be contrasting, emphasizing divisions’ geometry. Popular combinations: white layout on gray background, black on white, gold on cream in classical interiors. Contrast makes structure graphic, clear, modern.
Wooden profiles: transitions and joints
Profile made of wood— an element ensuring neat junctions between different planes and materials. Door frame — a profile creating a transition from wall to door panel. Corner profile — an element protecting and decorating exterior wall corners. Connecting profile — a strip covering the joint between panels. Transition profile — an element compensating for height differences between various floor coverings.
Wooden profileDoor frame profiles have L-shaped or П-shaped cross-sections with grooves for hinges, stop strips, and seals. Profile width 80–120 mm is selected based on wall thickness. Thickness 30–40 mm ensures structural strength. Solid oak or beech profile withstands heavy doors without deformation, preserving geometry for decades.
Corner profile protects exterior wall corners from mechanical damage — impacts from furniture, vacuum cleaners, accidental collisions. Г-shaped cross-section with rounded edge or bevel makes the corner safe to touch. Shelf width 25–40 mm. Profile is glued with additional fixation using finish nails. Solid oak corner profile does not dent from impacts, retains its shape, and can be easily restored by sanding if needed.
Connecting profile covers joints between wall panels, cladding sheets, and different finishing materials. N-shaped cross-section with grooves on both sides allows inserting panel edges, creating a neat connection without visible gaps. Profile width 30–50 mm. Such a profile is not only decorative but also compensates for thermal expansion and contraction of panels — wood and wood-based materials expand and contract with humidity fluctuations, and the connecting profile allows them free movement.
Transition profile between different floor coverings — parquet and tile, laminate and linoleum — creates a smooth transition, protects edges from chipping. Profile has an asymmetrical cross-section with different shelf heights, compensating for level differences. Profile width 30–60 mm. Solid oak or beech transition profile is stronger than aluminum or plastic analogs, looks more noble, and harmonizes with natural parquet.
Ceiling profile (casing, cornice) creates a transition from wall to ceiling, concealing the joint and possible irregularities. Profile has a concave cross-section (ovoid), smoothly connecting vertical and horizontal planes. Profile width 40–100 mm depending on room height. Solid oak or beech ceiling profile creates a classic, substantial look characteristic of traditional interiors.
Profile installation requires precision. Ends are milled to the required angle on a miter saw — 45 degrees for corner joints, 90 degrees for linear joints. Profile is glued, finished with nails or screws depending on type and load. Mounting points are spackled, sanded, and painted to match the profile color. Quality installation makes the profile invisible — it is perceived as a natural part of architecture, not an added element.
Wooden stopper: small knots
wooden trim— the smallest element of trim, but its role is critical for the completion of the structure. Stopper secures glass in doors, windows, furniture facades, display cases. Without a stopper, glass is held only by silicone sealant, which is unreliable — glass may fall out due to vibration or impact. Stopper mechanically presses glass against the frame, ensuring secure fixation.
Stopper cross-section is usually 10x15, 12x18, or 15x20 mm depending on glass thickness and frame size. For 4 mm glass, a 10x15 mm stopper is sufficient. For 6–8 mm glass, a 12x18 mm stopper is required. For double-glazed units 24–32 mm thick, special stoppers with 20x30 mm cross-section are used. Stopper profile may be flat rectangular or shaped with a 3–5 mm radius rounded edge.
Stopper mounting is done with finish nails 20–25 mm long, driven at 150–200 mm intervals. The nail passes through the stopper, pressing it against the frame and securing the glass. It is important not to over-tighten — excessive force may crack the glass. Solid oak or beech stoppers hold nails securely without cracking due to dense wood structure. Pine stoppers are easier to split when driving nails and require pre-drilling.
Decorative function of the stopper is evident in classic furniture and glass doors. A shaped oak stopper with carved profile transforms a simple glass insert into a decorative element. Contrasting color stoppers — gold, silver, black on light frames — create graphic structure, emphasizing the geometry of glazing.
Stopper color always matches frame color for visual unity. Even a slight tonal mismatch between frame and stopper is noticeable, especially against transparent glass. Stopper and frame are painted simultaneously with the same materials — then color match is guaranteed. If stopper is purchased later, careful shade matching by sample or paint tinting on site is required.
The stile color always matches the frame color for visual unity. Even a slight color difference between the frame and stile is noticeable, especially against transparent glass. The stile and frame are painted simultaneously with the same materials—this guarantees color matching. If the stile is purchased later, careful color matching using samples or on-site paint tinting is required.
Technical logic of installation
Correct sequence of installing wooden structures is critical for result quality. Disrupting sequence leads to rework, material damage, and extended timelines. Basic principle — from large to small, from load-bearing to decorative, from hidden to visible.
First stage — installation of load-bearing frame from beams. Vertical posts are mounted to floor and ceiling using metal angles and anchors. Horizontal beams are inserted into posts or mounted on angles. Frame is leveled with tolerance not exceeding 2 mm per 2 meters. Diagonals of rectangular frames are checked with tape measure — they must be equal, ensuring no frame skew. Only after full assembly and inspection of frame proceed to next stage.
Second stage — running utilities within frame. Electrical cables in corrugated pipes, water supply pipes (if structure is near bathroom), ventilation channels — all are installed before cladding begins. Utilities are secured to frame beams with plastic clamps or wire. It is important to leave cable length allowance for connections — cutting excess is easy, but extending short cable is difficult.
Third stage — installation of sound and thermal insulation, if provided. Mineral wool or acoustic foam mats are inserted between frame beams. They hold in place without additional fastening. It is important not to compress insulation — its effectiveness depends on air volume inside, compressed mat loses properties. Insulation thickness should be 10–20 mm less than frame depth to create air gap between insulation and finish cladding.
Fourth stage — installation of finish rails, panels, and layouts.Wooden railsRails are mounted to frame using finish nails, screws, or hidden clips. Start from corner or center depending on layout scheme. Each rail is leveled before fixation. Gaps are controlled using calibrated spacers. Work is carried out methodically, without rushing — errors at this stage will always be visible.
Fifth stage — installation of profiles at transitions, corners, and joints.Wooden profileProfiles are precisely milled to size, glued and nailed. Corner joints are made at 45 degrees, checked for gaps. If needed, joint is additionally glued and clamped with clamps until glue dries.
Sixth stage — installation of stoppers, if structure includes glazing. Glass is installed on silicone sealant, pressed bywooden stopperswhich are secured with finish nails. Excess sealant is removed before drying with damp cloth.
Seventh stage — final finishing. All mounting points are spackled with wood-tone putty, then sanded with fine abrasive after drying. Entire structure is wiped clean of dust and inspected for defects. Any defects found are corrected before applying finish coating.
Eighth stage — application of protective-decorative coating. If elements were not painted at factory, they are primed, sanded, and coated with varnish or oil in 2–3 layers with intermediate drying and sanding. Varnish is applied with brush in thin layers, carefully rubbed to avoid runs. After final layer dries, structure is ready for use.
Conclusion: Interior structure by STAVROS
Wooden interior structure is a system of elements, where each performs its role:Oak beamandOak timber beamcreates load-bearing frame,wooden boards and beamsforms screens and panels,flat layoutdivides surfaces,wooden profilesensures transitions,wooden trimcovers joints.
Company STAVROS offers a full rangemolding productsfor creating wooden interior structures. Premium wood, kiln-dried to 8±2%, high-precision processing, professional finishes — STAVROS quality standards.
Planed wooden strip, Oak beam, layouts, profilesavailable from stock in Saint Petersburg and Moscow with delivery across Russia. Custom manufacturing is possible.
Frequently asked questions
What cross-section of beam is needed for a partition frame 2.7 m high? For a standard partition, a 50x100 mm beam with 600 mm post spacing is sufficient. At 3.5 m height, 70x120 mm or 400 mm spacing is required.
Can be beech beam used instead of oak? Yes, with an increased cross-section by 10-15%. Beech is 20-30% cheaper than oak for comparable characteristics.
How to calculate the number of boards for a screen? ((Screen length / (Board width + gap)) × Screen height. Add 15% allowance for trimming.
Is it necessary to treat beams with antiseptic? For interior structures in dry rooms — desirable but not mandatory. For humid rooms and exterior structures — mandatory.
How much does a ready-made board partition cost? Depends on area, wood species, and complexity. On average, 6000–12000 rubles/m² including materials and installation.
How to care for wooden structures? Regular dry cleaning, wet wiping once a week. Refinish every 5–7 years under intensive use.
Can a board structure be dismantled? Yes, wooden structures with mechanical fasteners can be easily dismantled without damaging base surfaces. Glued structures — dismantled using partial destruction method.


