Article Contents:
- What You Need to Know Before Starting: Anatomy of Stair Railings
- Elements of the Railing and Baluster System
- Safety Standards and Requirements
- Preparation Stage: Calculations, Purchasing, Tools
- Calculation of Baluster Quantity
- Choice of wood species
- Required tools
- Step-by-Step Guide: Installing Balusters and Railings
- Stage 1: Installing Support Posts
- Stage 2: Determining the Angle of Incline and Marking the Handrail
- Step 3: Installing balusters
- Stage 4: Preparing and Installing the Handrail
- Stage 5: Final Finishing
- Common Mistakes and How to Avoid Them
- Mistake 1: Inaccurate Cutting Angle
- Mistake 2: Balusters Are Not Vertical
- Mistake 3: Weak Fastening
- Mistake 4: Ignoring Wood Expansion
- Mistake 5: Uneven Spacing Between Balusters
- FAQ: answers to common questions
- How Long Does It Take to Install Balusters and Railings?
- Can Balusters Be Installed on a Metal Staircase?
- Is a Baluster Base Needed or Can Balusters Be Attached Directly to the Steps?
- What distance between balusters is safe for children?
- Can Wooden Balusters Be Painted?
- How to Care for Wooden Railings?
- Can Balusters Made from Different Types of Wood Be Used?
- Do Steps Need to Be Reinforced Before Installing Balusters?
- Where to Buy Quality Balusters and Railings?
- Can Railings Be Installed Alone or Is an Assistant Needed?
- Conclusion: Creating Reliability with Your Own Hands with STAVROS

Installing stair railings is a task that only seems difficult at first glance. Hire a team of professionals? You can. But it's expensive, you have to adjust to someone else's schedule, and you need to monitor the quality of the work. Alternatively, you can do it yourself, not only saving money but also gaining satisfaction from creating a structure with your own hands.
Balusters for staircaseandhandrails— are not just safety elements; they are an architectural composition that defines the character of the entire staircase. And installing this composition is quite feasible for a DIY enthusiast with basic carpentry skills and a willingness to spend a weekend on thoughtful work.


What You Need to Know Before Starting: Anatomy of Stair Railings


Elements of the Railing and Baluster System
Before picking up tools, it's important to understand what makes up a stair railing. It's not a monolithic structure but a system of interconnected elements:
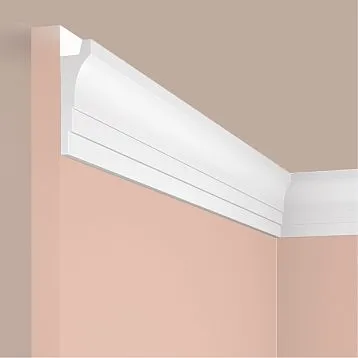
Handrail (railing) — a horizontal element that the hand holds onto when ascending or descending. Typically round or oval in cross-section with a diameter of 40-50 mm — this is optimal for a comfortable palm grip.Wooden handrailsmust be smoothly sanded, free of splinters and sharp edges.
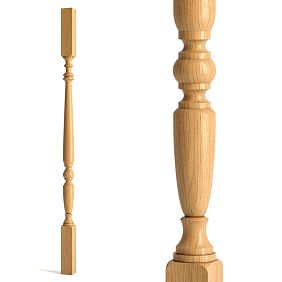
Balusters — vertical posts that support the handrail and form the guardrail structure.Wooden balusterscan be turned (with smooth rounded shapes) or carved (with decorative elements). Standard baluster height is 900 mm (for interior stairs), distance between balusters — no more than 150 mm (safety requirement for children).
Newel posts — more massive vertical elements installed at the beginning and end of a flight of stairs, as well as at turns. They bear the main load from the railing and create visual accents.Posts for staircasetypically have a cross-section of 80×80 mm or 100×100 mm, height from base to top of handrail.
Baluster rail (subrail) — a horizontal strip that attaches to the steps and serves as a base for installing balusters. An optional element, but simplifies installation and improves structural rigidity.
Fastening elements — dowels (wooden pins), threaded studs, screws, glue. The strength of the entire guardrail depends on the quality of the fasteners.
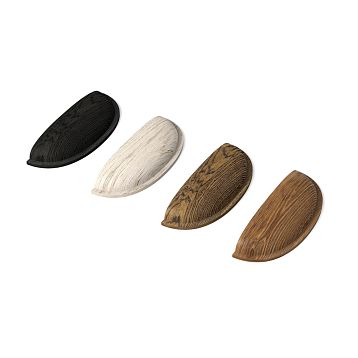
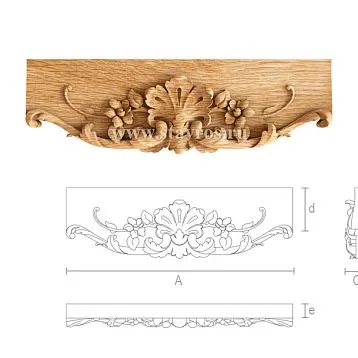
Our factory also produces:


Standards and safety requirements
Installationrailings and balustersare regulated by building codes. Here are the key requirements:
-
Guardrail height from the step surface to the top of the handrail — minimum 900 mm for interior stairs, 1100 mm for exterior stairs and stairs above the first floor
-
Distance between balusters — no more than 150 mm (gap through which a child's head cannot pass)
-
Load on handrail — minimum 30 kg of horizontal force (the handrail should not bend or detach if leaned on)
-
Handrail surface — smooth, free of burrs, chips, sharp edges
Complying with these standards is not bureaucracy, but real safety for your loved ones.
Get Consultation
Preparation stage: calculations, purchasing, tools
Calculation of the number of balusters
First question: how manybalusters to buy? The formula is simple but requires precise measurements.
Step 1: Measure the length of the stair flight along the line where balusters will be installed (usually along the outer or inner edge of the steps).
Step 2: Determine the distance between balusters. Optimal is 120-150 mm clear (gap between balusters). Considering the baluster diameter (typically 40-60 mm), the center-to-center spacing will be 160-210 mm.
Step 3: Divide the flight length by the center-to-center spacing, add one. For example: flight length 3000 mm, spacing 180 mm. 3000÷180=16.6, round to 17, add 1 = 18 balusters.
Nuance: Typically, 1-2 balusters are installed per step. On wide stairs (over 1 meter) — two balusters per step for better rigidity.
Choice of wood species
Wooden balustercan be made from different wood species. The choice depends on budget, interior style, and operating conditions.
Oak — a premium choice. Dense (700 kg/m³), strong, with a pronounced grain. Oak balusters last for decades, do not wear down, withstand intensive loads. Color ranges from light honey to dark brown. More expensive than other species, but the investment pays off in durability.
Beech — the golden mean. Strong, with a fine-pored structure, pinkish hue. Easy to work with, takes stain well. Slightly inferior to oak in stability (more reactive to humidity), but an excellent option for interior stairs.
Ash — light-colored, strong, with contrasting grain. Similar to oak in characteristics, but lighter. Ideal for Scandinavian and modern interiors.
Pine — a budget option. Soft, easy to work with, but less durable. Suitable for cottage stairs, temporary structures, projects with limited budgets.
Required tools
For installingrailings and balusterswill be needed:
Measuring tools:
-
Tape measure (5 meters)
-
Square
-
Level (preferably laser for accuracy)
-
Bevel gauge (adjustable protractor) for determining staircase slope angle
Cutting Tools:
-
Miter saw with rotating table (for precise angled cuts)
-
Hand saw (as a backup option)
-
Jigsaw (for curved cuts)
Drilling tools:
-
Drill or screwdriver
-
Wood drill bits 6, 8, 10, 12 mm diameter
-
Spade bit 20-25 mm diameter (for deep dowel holes)
Auxiliary tools:
-
Chisel
-
Mallet (wooden hammer)
-
Clamps
-
Sandpaper grit 120, 180, 240
Fastening materials:
-
Wooden dowels 8-10 mm diameter
-
Threaded studs M8 or M10
-
Wood screws 4×40, 5×60
-
Wood glue (PVA or polyurethane)
Step-by-step instructions: installing balusters and handrails
Stage 1: Installing support posts
Everything begins with support posts — they define the geometry of the entire structure.
Step 1.1: Marking installation locations
The bottom post is installed at the level of the first step (or on the floor before the staircase). The top one — at the level of the second-floor landing. If the staircase has a turn, an additional post is placed at the turning point.
Mark installation points with a pencil. Use a level to ensure posts will be perfectly vertical.
Step 1.2: Preparing fastener holes
Drill a hole 50-70 mm deep in the base of the post (bottom end) for the threaded stud. Hole diameter should be 1 mm larger than the stud diameter (for M10 stud — 11 mm drill bit).
Drill a corresponding hole of the same depth in the floor or step where the post will stand.
Step 1.3: Installation on stud
Threaded stud is screwed into the floor (into wooden base — directly, into concrete — using an anchor). Protruding part of stud — 80-100 mm.
Place the post over the stud. To seat it tightly, gently tap the top end with a mallet. Check verticality with a level — the post must be perfectly vertical in all planes.
Step 1.4: Securing
Additionally secure the post with screws at an angle through the side surface into the step (concealed mounting) or with visible screws with decorative caps.
Repeat the process for the top and intermediate posts.
Step 2: Determining the angle of inclination and marking the handrail
The angle of inclination of the staircase is critical for the correct cutting of balusters and the handrail.
Step 2.1: Measuring the angle
Stretch a cord between the top point of the lower post and the top point of the upper post. This is the line of the future handrail. Use a bevel gauge to measure the angle of inclination of this line relative to the horizontal.
Standard staircases have an inclination angle of 30-45 degrees. Record the exact value — it will be needed for cutting.
Step 2.2: Calculating the height of balusters
wooden balusteris installed so that the distance from the tread surface to the top of the handrail is 900 mm. However, balusters stand on an inclined line, so their height varies.
The shortest baluster is at the lower post, the longest is at the upper one. The height difference is calculated using the formula: ΔH = L × sin(α), where L is the length of the flight, α is the angle of inclination.
To simplify, you can make a template: take one baluster, install it on the first step, mark a height of 900 mm on it from the tread surface to the intended bottom of the handrail. Cut the top end at an angle equal to the staircase's angle of inclination.
Stage 3: Installing balusters
The most labor-intensive, but also the most crucial stage.
Step 3.1: Marking installation locations on the steps
Determine how many balusters will be on each step (usually 1-2). Mark the installation points with a pencil. If there is one baluster — in the center or closer to the outer edge. If two — symmetrically.
Use a template (a wooden strip with holes at the required distance) for accurate marking.
Step 3.2: Preparing fastener holes
A hole is drilled in the step to a depth of 30-40 mm with a diameter for a dowel (usually 8-10 mm). In the lower end of the baluster — a corresponding hole of the same depth.
Step 3.3: Installation on dowels with glue
A wooden dowel is dipped in wood glue, inserted into the hole in the step. The baluster is placed onto the protruding part of the dowel. With light taps of a mallet, the baluster is seated until there is tight contact with the tread surface.
Important: the baluster must be strictly vertical! Check with a level in two planes (along and across the staircase).
Step 3.4: Additional fixation
For reliability, you can additionally secure the baluster with a screw from below — drill a hole at an angle through the step into the base of the baluster, screw in the screw. The head will remain on the underside of the step and will not be visible from above.
Repeat for all balusters. Allow the glue to dry for at least 4 hours (preferably 24 hours) before installing the handrail.
Step 4: Preparing and installing the handrail
The handrail is the finishing element that unifies the entire structure.
Step 4.1: Measuring the length
Stretch a cord from the top point of the lower post to the top point of the upper post along the handrail installation line. Measure the length. Add 50-100 mm of allowance (it's better to cut off excess than to end up with a short handrail).
Step 4.2: Cutting the ends at an angle
Both endsstair handrailsare cut at the staircase's angle of inclination. Use a miter saw, setting the required angle using the bevel gauge.
If the handrail joins a post — the end must fit tightly against the vertical face of the post. Additional fitting with a chisel may be required.
Step 4.3: Marking Contact Points with Balusters
Place the handrail against the top ends of the installed balusters. Mark the contact points on the underside of the handrail. These will be the fastener holes.
Step 4.4: Drilling Fastener Holes
At each contact point with a baluster, drill a hole 6-8 mm in diameter completely through the handrail (or to a depth of 40-50 mm if concealed fasteners are used).
In the top end of the baluster — a corresponding hole 20-30 mm deep.
Step 4.5: Attaching the Handrail
Option 1 (exposed fasteners): The handrail is laid on the balusters, and screws are driven from below through the holes into the top ends of the balusters. The screw heads remain on the underside of the handrail — not visible from above.
Option 2 (concealed dowel fasteners): Wooden dowels are inserted with glue into the holes, and the handrail is fitted onto the dowels. This method is more aesthetically pleasing but requires greater precision.
Option 3 (fastening with metal connectors): Special furniture connectors are screwed into the end of the baluster and into the handrail, joining them without visible fasteners.
Step 4.6: Joining with Posts
At the points where the handrail contacts the support posts, the fastening is reinforced. Threaded rods screwed from the end of the handrail into the post can be used. Or furniture bolts, countersunk into the handrail and post.
Stage 5: Final Finishing
Installation is complete, but the structure requires final finishing.
Step 5.1: Filling and Sanding
All visible fastener locations (if exposed screws were used) are filled with wood filler matching the material's tone. After drying, sand with 180-240 grit sandpaper.
The entire handrail surface is sanded to perfect smoothness — it should be silky, without the slightest burrs.
Step 5.2: Protective Coating
Wooden itemsrequire protection from moisture, dirt, and mechanical damage. Coating options:
Oil-wax — penetrates the wood structure, highlights the grain, creates a matte surface. Applied with a cloth, rubbed in, excess removed. Two to three coats with 12-hour drying intervals.
Varnish — creates a protective film; available in matte, semi-matte, and glossy. Applied with a brush or sprayer, 2-3 coats with intermediate sanding.
Stain + varnish — if a specific color is needed. Stain is applied first (for coloring), followed by protective varnish after drying.
Pay special attention to the handrail — it comes into contact with hands and requires a maximally smooth and pleasant-to-touch surface.
Typical mistakes and how to avoid them
Error 1: Inaccurate Miter Cut Angle
If balusters and the handrail are cut at an incorrect angle, the structure will be crooked, with unacceptably large gaps between elements.
Solution: Measure the staircase slope angle precisely using a bevel gauge. Make test cuts on scrap material, check the fit. Only after confirming the correct angle, cut the main elements.
Error 2: Balusters Not Vertical
Even a slight tilt of a baluster creates a sense of crookedness in the entire staircase.
Solution: Check the verticality of each baluster with a level during installation. While the glue is not set, the position can be adjusted.
Error 3: Weak Fastening
Saving on fasteners is a safety risk. The handrail must withstand significant loads.
Solution: Use high-quality wood glue, a sufficient number of dowels or screws. Do not rely solely on glue — combine glue with mechanical fasteners.
Error 4: Ignoring wood expansion
Wood is a living material that expands and contracts with changes in humidity. Rigid connections without expansion gaps can lead to cracks.
Solution: Use kiln-dried wood with 8-12% moisture content. It is more stable. Leave minimal gaps (0.5-1 mm) at joints, filled with flexible adhesive.
Error 5: Uneven spacing between balusters
If balusters are installed unevenly, it is noticeable and creates an impression of carelessness.
Solution: Use a template for marking — a strip with holes or marks at precise intervals. Before installing all balusters, mark all points and check for uniformity.
FAQ: answers to frequently asked questions
How long does it take to install balusters and railings?
For a staircase with 12-15 steps — 2-3 days. Day one — installing posts and balusters, day two — mounting the handrail, day three — finishing and coating.
Can balusters be installed on a metal staircase?
Yes, but special fasteners will be required. Typically, flanges are used — metal plates that are bolted to the step, and the baluster is screwed or inserted into them.
Is a sub-rail needed or can balusters be attached directly to the steps?
A sub-rail simplifies installation and improves rigidity, but is not mandatory. Direct attachment to the steps is stronger if done properly.
What distance between balusters is safe for children?
No more than 150 mm clear opening. This ensures a child cannot fit their head between balusters.
Can wooden balusters be painted?
Yes, wood takes paint excellently. Use acrylic or alkyd enamels after priming. But note — paint hides the wood grain.
How to care for wooden railings?
Dry cleaning with a soft cloth, wet cleaning — without aggressive detergents. Renew oil finish every 2-3 years, varnish — when wear appears.
Can balusters made from different wood species be used?
Technically possible, but visually different species have different grains and colors. It's better to paint them a uniform color or select species with similar characteristics.
Do steps need reinforcement before installing balusters?
If steps are thin (less than 40 mm) or made of softwood, it is advisable. You can place a reinforcing strip under the baluster attachment point from beneath the step.
Where to buy quality balusters and railings?
From specialized manufacturers with experience. Company STAVROS producesstaircase componentsfrom solid valuable wood species since 2002.
Can railings be installed alone or is an assistant needed?
Installing posts and balusters can be done alone. For mounting the handrail (especially long ones, over 3 meters), an assistant is advisable — holding and positioning a heavy part alone is difficult.
Conclusion: creating reliability with your own hands with STAVROS
DIY installationbalusters for staircaseandrailings— is a task requiring care, precision, patience. But the result is worth it. You not only save budget (crew work can cost 50-70% of material cost). You create the structure with your own hands, control every stage, are confident in the quality of every connection.
A staircase with properly installedrailings and balustersbecomes safe, reliable, beautiful. It serves for decades, turning into a family heirloom that your children and grandchildren will ascend.
Company STAVROS has been creatingSolid wood productsfor stairs, understanding: these are not just components, but elements of safety, architecture, and home beauty. EachBaluster, eachHandrail, eachPost— is the result of experience, technology, and attention to detail.
STAVROS works with selected kiln-dried wood with a moisture content of 8±2%. This guarantees product stability and minimal deformation after installation. Production is equipped with modern equipment: CNC lathes and milling machines, ensuring perfect geometry and repeatability of elements.
STAVROS offers over 100 modelswooden balusters: from concise turned to luxurious carved, from classic round to modern square. Each model is available in several wood species (oak, beech, ash, pine), with various treatment options (uncoated, oil, varnish, paint).
STAVROS offers not just materials, but comprehensive solutions for creating stairs. The company's designers will help select matching elements —balusters, handrails, posts, Newel posts— to create a unified style from the first to the last step. Technical specialists will advise on installation, recommend optimal fastening solutions, and calculate the exact amount of material.
Choosing STAVROS products for self-installation gives you a quality foundation for your work.Balusters for staircasewith precise geometry, without knots and cracks, perfectly sanded.handrailswith a comfortable profile, smooth surface, ready for installation.postswith verified dimensions, precise mounting points for fasteners.
STAVROS organizes delivery to any region of Russia and CIS. Products are carefully packaged — multilayer protection prevents damage during transportation. You receive materials in perfect condition, ready for installation.
Create stairs with your own hands, relying on STAVROS quality. Let each step lead upward not only physically, but symbolically — toward craftsmanship, confidence, and pride in what you've created with your own hands.balustersandhandrailsfrom STAVROS — your tool for creating safety and beauty.