Article Contents:
- Philosophy of applied decor — beauty through layering
- Types of decorative elements for doors — from linear to three-dimensional
- Moldings — the linear foundation of composition
- Carved overlays — accents and character
- Rosettes — round and oval accents
- Corner elements — finishing of joints
- Planks and trim — minimalist structure
- Materials of decorative elements — wood, MDF, polyurethane
- Solid wood — classic and noble
- MDF with film — affordability and variety
- Polyurethane — lightness and detailing
- Composition design — from concept to drawing
- Door measurement and proportion calculation
- Margins from edges — the rule of air
- Molding width and element scale
- Creating a composition drawing
- Stylistic solutions — from classic to contemporary
- Classical style — symmetry and ornament
- Neoclassical — restrained elegance
- Modern — flowing lines and asymmetry
- Minimalism — geometry and emptiness
- Technology of mounting decor on a door — step by step
- Door preparation
- Composition marking
- Molding preparation
- Gluing moldings
- Appliqué installation
- Joint sealing
- Finishing
- Reinstalling the door
- Common mistakes and how to avoid them
- Ignoring proportions
- Inaccurate cutting of moldings
- Misalignment of central overlays
- Excess glue
- Style mismatch
- STAVROS — a world of decorative elements for those who appreciate details
- Answers to frequently asked questions about door decoration with overlay elements
- How much does it cost to decorate one door with overlay elements?
- Can metal doors be decorated?
- How long does it take to decorate one door?
- Is it necessary to remove the door for decoration?
- How to match door decor with architraves?
- Can doors with glazing be decorated?
- Is it necessary to treat the decor with protective compounds?
- What to do if an element comes unglued over time?
- Can panels be created on a double-leaf door?
An interior door. A simple panel. A flat surface without a single relief, without a hint of character. It simply exists — separates rooms, opens, closes. But should a door be inconspicuous? What if you turn it into a focal point without changing the panel itself, without ordering expensive milling, without starting dismantling and remodeling? A decorative panel for an interior door solves this problem radically: overlay elements transform a smooth surface into a paneled structure with classical proportions or into a modern composition with geometric frames. The result is visually indistinguishable from custom-made doors but is achieved at a fraction of the cost and time.
Why does the need for decoration arise in the first place? Standard doors installed by developers solve the minimal task: to close the opening. No aesthetics, no individuality — stamped functionality. Apartment owners face a choice: accept the blandness or invest tens of thousands of rubles in replacing each door. The third way — decorating existing panels with overlay elements — provides a visual transformation without radical financial costs. Moreover, the technology is accessible for DIY implementation: no machines are needed, no carpentry experience is required, just care and an understanding of compositional principles.
In this article, we dive into the world of overlay decor for doors: we analyze types of elements from simple moldings to complex carved compositions, discuss materials and their features, and design various stylistic solutions from classic to minimalist. You will learn how to calculate panel proportions, how to choose overlay sizes for a specific door, how to combine different types of elements into a single composition. We will examine the installation process in detail, typical beginner mistakes, and finishing methods to achieve a professional result. In the end — answers to practical questions and an overview of the capabilities of the company that makes quality decor accessible.


The philosophy of overlay decor — beauty through layering
What is a decorative panel in relation to a door? It is not a solid element that replaces part of the door panel, but a system of overlay parts that create the illusion of a complex structure on a simple base. Moldings form frames that imitate panels. Overlays add relief and ornamentation. Strips create a linear structure. All this is mounted on an existing door without compromising its integrity, without requiring mortises or milling.
The principle works thanks to a feature of human perception: the brain interprets relief as structural complexity without discerning whether this relief is part of a monolithic construction or the result of overlaying elements. A properly designed and executed composition of overlay decor reads as a paneled door — no doubts, no feeling of 'stuck on top.' This requires precision: frame proportions, molding widths, and overlay placement must correspond to classical canons or modern design codes.
The second advantage of overlay decor is reversibility. If the interior style changes after a few years, the decorative elements can be removed, and the door will return to its original appearance. Try doing this with a milled door — impossible. Overlay decor is flexibility, the ability to experiment, to adapt space to changing tastes without radical investments.


Types of decorative elements for doors — from linear to three-dimensional
Decor for interior doors includes various elements, each of which plays a specific role in the composition.
Our factory also produces:
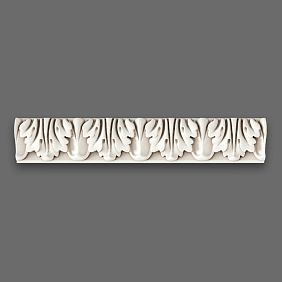


Moldings — the linear foundation of the composition
Moldings — profiled linear products that form boundaries and frames. For door decor, moldings with widths from 15 to 50 mm are used. Narrow (15–25 mm) are suitable for delicate compositions where lightness is important. Medium (25–35 mm) are universal, work on most standard doors. Wide (40–50 mm) are used on large double-leaf doors or when a monumental effect is needed.
The molding profile determines the style: smooth convex or concave profiles without ornamentation suit modern interiors, profiles with classical motifs (beads, ovolos, flutes) — for traditional ones.door framingWorking with moldings creates a clear geometric structure, inside which additional elements — overlays, rosettes, or simply contrasting paint — can be placed.
Moldings are cut at a 45° angle to create rectangular or square frames. Cutting precision is critical: even a millimeter deviation creates a noticeable gap in the corner. A quality joint — when two strips meet so tightly that the connection line is discernible only upon close inspection — is a sign of craftsmanship.
Get Consultation
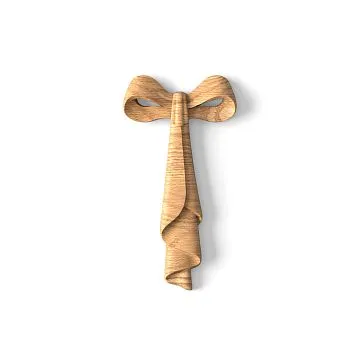
Carved overlays — accents and character
Carved overlay N-006and similar elements — these are three-dimensional parts with ornamental carving, placed inside molding frames, in panel corners, at the center of sections. They add artistry to the composition, turning simple frame geometry into exquisite decor.
Overlay sizes range from compact corner elements 40×40 mm to large central panels 200×300 mm. For a standard interior door with panels measuring 400×600 mm, central overlays 80–120 mm on the longer side are suitable. An overlay that is too small will get lost, while one that is too large will appear bulky.
Overlay ornamentation is diverse: botanical motifs (leaves, grapevines, floral bouquets), geometric patterns (rosettes with symmetrical rays, interlaces), classical cartouches (shields with scrollwork along the edges). The choice of ornament is dictated by the interior style: for classic interiors — traditional botanical or baroque motifs; for modern spaces — geometric forms with clean lines.
Rosettes — round and oval accents
Wooden sockets— round or oval overlays with radial ornamentation. They are used as central elements in square or vertically oriented rectangular panels. The diameter of rosettes for door decoration ranges from 60 to 150 mm. Small rosettes (60–80 mm) are suitable for narrow upper door sections, medium ones (90–120 mm) — for main panels, and large ones (130–150 mm) — for wide double doors.
The rosette is placed exactly in the center of the panel — this requires careful marking. Even a centimeter offset disrupts symmetry, making the composition look sloppy. For precise installation, use the diagonal intersection method: draw diagonals inside the panel; the intersection point is the geometric center where the rosette's center should be located.
Corner elements — finishing the joints
Corner overlays are placed at the corners of molding frames. They serve two functions: decorative (adding ornamentation) and masking (concealing the joint of two moldings cut at a 45° angle). The size of the corner overlay corresponds to the width of the molding or slightly exceeds it: for a 30 mm molding, corner elements of 35×35 mm or 40×40 mm are suitable.
The ornament of the corner element should harmonize with the central overlays. If the center of the panel is adorned with a botanical overlay featuring acanthus leaves, it is logical to decorate the corners with corner elements featuring similar leaves, arranged diagonally. Stylistic unity is critical for the integrity of the composition.
Strips and moldings — minimalist structure
For modern interiors where classical ornamentation is excessive, simplewooden strips for framing— smooth rectangular-section slats without carving or relief. They create a strict geometric grid on the door: horizontal and vertical lines divide the surface into sections, forming a minimalist yet expressive pattern.
The thickness of strips for minimalist decor is 8–15 mm, width — 20–40 mm. Thinner ones appear fragile, thicker ones weigh down the composition. Strips are mounted on edge, creating a slight offset from the door surface — this casts a shadow that emphasizes the structure.
Materials for decorative elements — wood, MDF, polyurethane
The choice of material affects appearance, tactile feel, durability, and cost of the decor.
Solid wood — classic and noble
Decorative solid wood overlays— oak or beech — is a premium choice. Natural wood has a unique texture that cannot be imitated. Each element is unique: annual rings, medullary rays (characteristic of oak), natural shade variations create a living, organic surface.
Oak — density 700 kg/m³, high hardness, expressive texture with a characteristic pattern. Color ranges from light beige to dark brown depending on drying and processing methods. Oak is stable, does not warp from humidity, and is resistant to mechanical impact. Cost is high but justified by durability and aesthetics.
Beech — density 650 kg/m³, fine-pored, uniform texture, pinkish-beige color. Beech is easier to stain than oak, making it versatile for various color solutions. Cost is 30–40% lower than oak products, with consistently high quality.
Wooden elements require finishing: varnish (creates a protective film, emphasizes texture), oil (penetrates the wood, imparts a matte finish and tactile warmth), wax (protects, adds a slight sheen). Without a protective coating, wood darkens, gets dirty, and loses its appearance.
MDF with laminate — affordability and variety
MDF overlays — pressed wood fiberboard covered with a decorative laminate imitating wood or painted. The thickness of MDF for door overlays is 6–10 mm, which is sufficient for creating relief but lighter than solid wood.
Advantages of MDF: dimensional stability (does not shrink or swell), affordable price (2–3 times lower than solid wood), wide color range of laminates (from imitation of exotic species to solid bright colors). Disadvantages: lack of natural texture (laminate is a print, not living wood), lower durability (laminate may peel at the edges over time, especially in humid environments).
MDF elements are suitable for budget door decoration when savings are important, or for temporary solutions. They are also appropriate in children's rooms where the risk of damage is higher, and replacing elements should not be financially burdensome.
Polyurethane — lightness and detail
Polyurethane moldings and overlays — synthetic products made by casting. Polyurethane reproduces the finest carving details with precision unattainable in woodworking. Density 350–450 kg/m³, weight is 2–3 times less than wooden counterparts.
For door decor, the lightness of polyurethane is an advantage: overlay elements do not overload the surface, eliminating the risk of sagging. Installation with adhesive, without additional mechanical fasteners, is usually sufficient. Polyurethane is dimensionally stable, does not react to humidity, and is suitable for bathrooms and kitchens where wooden decor is problematic.
Visually, polyurethane after high-quality painting can be almost indistinguishable from wood, especially in classic white or cream interiors. However, for natural textured solutions (varnished wood with visible annual rings), polyurethane is not suitable — texture imitation is unconvincing.
Designing the composition — from concept to drawing
Before purchasing materials and picking up tools, you need to design the composition. Haphazardly gluing elements without a preliminary plan will lead to disharmony.
Door measurement and proportion calculation
Measure the door leaf: height (usually 2000 mm for standard apartments), width (600, 700, 800, 900 mm depending on the opening), thickness (usually 35–40 mm). Pay attention to the location of the handle and lock — they should be integrated into the composition, not conflict with it.
A classic panel door is divided into several sections: two, three, or four. Two-section scheme: the upper panel is smaller (30–35% of the door height), the lower one is larger (65–70%). Three-section: small upper (25%), middle (35%), lower (40%). Four-section: two small ones on top, two large ones on the bottom, arranged in pairs horizontally.
For a door with a height of 2000 mm and a width of 800 mm, a two-section scheme yields panels: upper 600×350 mm, lower 600×1200 mm (approximately, accounting for edge offsets and molding width). Four-section: four panels of 350×450 mm each (two on top, two on the bottom).
Edge offsets — the rule of air
Molding frames should not fit tightly to the door edges. An offset from the leaf edges to the outer boundary of the decoration is necessary: side offsets 50–70 mm, top and bottom 60–80 mm. These zones create visual breathing space; without them, the door looks overloaded.
Offset from the handle: decorative elements should not be placed directly adjacent to the keyhole or handle plate. Minimum distance — 30 mm. If the handle is positioned such that a panel falls exactly on it, the composition needs to be adapted: shift the section boundaries or use an asymmetrical scheme.
Molding width and element scale
Molding width is determined by the door and panel sizes. For a standard 2000×800 mm door with 350×450 mm panels, an optimal molding width is 25–30 mm. Narrower (15–20 mm) looks insufficiently expressive, wider (40–50 mm) consumes panel area, making it disproportionately small.
The size of central overlays (rosettes or decorative panels) depends on the panel area. For a 350×450 mm panel, a central overlay of 80–100 mm along the longer side is suitable. The overlay should occupy 20–30% of the panel area — more creates a feeling of tightness, less gets lost.
Corner overlays (if used) should correspond to the molding width: for 30 mm molding — corner elements 35×35 or 40×40 mm. They should not protrude beyond the outer boundary of the molding but may slightly overlap onto the inner part of the panel.
Creating a composition drawing
Draw the door on paper at a scale of 1:10 (a 2000×800 mm door on paper will be 200×80 mm). Apply edge offsets, mark panel boundaries, draw molding frames. Place central overlays, corner elements. Look at the drawing from a distance: is the composition balanced? Is there any overload? Is symmetry maintained?
If the composition looks unconvincing on paper, it will be even worse on a real door. Don't skimp on design time — redoing already glued elements is difficult and expensive.
Stylistic solutions — from classic to contemporary
A decorative panel for a door can be executed in various styles, each with its own visual codes.
Classic style — symmetry and ornament
A classic door features symmetry, clear proportions, and ornamental decor. It has four panels arranged in pairs (two at the top, two at the bottom), framed by profiled moldings with fluting or beads. At the center of each panel is a carved overlay with a floral pattern or a rosette. In the corners of the panels are corner elements with leaves or scrolls.
Material — solid oak or beech, finished with natural varnish emphasizing the grain, or painted in noble tones (ivory, light gray, beige) with patination (dark paint in the recesses of the relief, creating an aged effect).Interior Door DecorClassic style requires meticulous execution: any asymmetry, uneven joints, misaligned overlays ruin the impression.
Neoclassical — restrained elegance
The neoclassical approach simplifies classicism while preserving its essence. Moldings are thinner (20–25 mm), the profile is more laconic (simple convexity without complex ornament). Panels are larger, fewer — two or three on a door. Central overlays are replaced with simple geometric rosettes or absent altogether, the panel is filled with contrasting paint.
Color palette — neutral: white, gray, beige. Contrast is possible: a dark door (graphite, dark blue) with light moldings or vice versa. Patination is minimal or absent. Neoclassicism suits modern apartments where one desires classical elegance without excessive decorativeness.
Art Nouveau — flowing lines and asymmetry
Art Nouveau (or Art Nouveau) — a style dominated by smooth, flowing lines, plant motifs, asymmetry.a decorative elementA decorative panel for a door in the Art Nouveau style is not rectangular frames, but curved molding lines forming organic shapes (ovals, drops, waves). Overlays with plant motifs — lilies, irises, grapevines — are placed asymmetrically, creating a sense of growth, movement.
Implementing Art Nouveau decor is more complex than classic: curved moldings require special processing (flexible polyurethane or wooden, soaked and bent according to a template). Asymmetry requires a developed compositional sense — it's easy to slip into chaos. But the result is unique: the door becomes a work of decorative art.
Minimalism — geometry and emptiness
Minimalist door decor is not ornamentation, but structuring. Simple smooth slats form a strict grid: three or four horizontal lines dividing the door into sections. No overlays, no ornament — only pure geometry.
Color is monochrome: the door and slats are the same color (white, gray, black) or contrasting (black slats on a white door). Material — smooth MDF or polyurethane slats, painted with matte paint. Slat width — 20–30 mm, height (offset from the door surface) — 5–10 mm, creating a subtle shadow.
Minimalism demands perfect execution quality: lines must be absolutely straight, distances between them equal, joints invisible. Any curvature, unevenness, or asymmetry in minimalism immediately catches the eye.
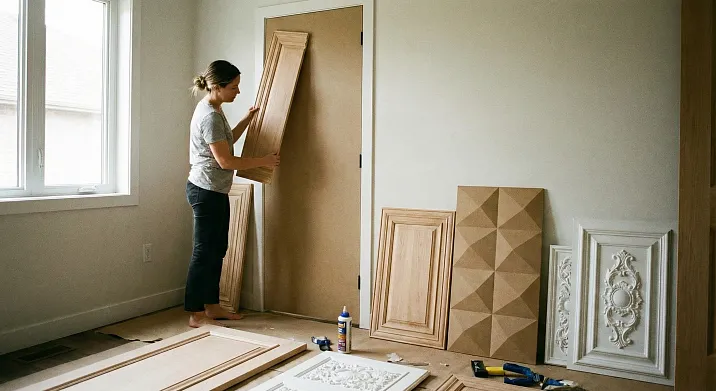
Door decoration installation technology — step by step
Theory without practice is dead. Let's examine a specific sequence of actions for creating classic four-panel decoration on a smooth door.
Door preparation
Remove the door from its hinges, lay it horizontally on sawhorses or a table. Dismantle the handle, lock plate, hinges (if they are surface-mounted). Clean the surface of dust, grease, and dirt. If the door is coated with glossy paint or laminate, lightly treat the surface with 150-grit sandpaper — this will improve adhesive bonding.
Check the door's flatness with a long ruler or level. If there are significant uneven areas (more than 2–3 mm), level them with wood filler. An uneven surface will cause the moldings not to fit tightly, leaving gaps.
Composition Marking
Apply pencil markings using a long ruler and square. Mark the indents from the door edges (60 mm on the sides, 70 mm at the top and bottom). Divide the remaining space into four sections: two at the top, two at the bottom. Between sections — a gap equal to double the molding width (if the molding is 30 mm, the gap is 60 mm — 30 mm of molding from each side of the boundary).
Check the markings: all rectangles must be strictly rectangular (90° angles), opposite sides equal, left and right halves of the door mirror-symmetrical. Measure the diagonals of each rectangle — if the diagonals are equal, the rectangle is correct.
Molding preparation
Calculate the length of each molding segment. For one rectangular panel, four segments are needed: two vertical and two horizontal. Ends are cut at a 45° angle for corner joining.
Cut the moldings using a miter saw or manual miter box. Check the fit 'dry': lay out the four segments on the door according to the markings, ensure the corners meet without gaps. If there are gaps — adjust the cut. Don't be lazy to achieve a tight fit — this is the foundation of a quality result.
Gluing the moldings
Apply glue to the back of the molding. For wooden elements — woodworking PVA or acrylic mounting adhesive; for polyurethane — polyurethane or acrylic mounting adhesive. Apply glue in a thin bead or dots spaced 5–8 cm apart.
Place the molding on the door exactly according to the markings, press along its entire length. For long moldings, use an assistant or temporary fixation with painter's tape. Immediately wipe away any squeezed-out glue with a damp cloth. Let the adhesive set (2–4 hours depending on the glue type) before moving to the next elements.
Glue all moldings for all four panels. Work sequentially, don't rush. Quality is more important than speed.
Appliqué Installation
After the glue has completely dried (24 hours), install the center overlays and corner elements. Determine the center of each panel (intersection of diagonals), apply glue to the back of the overlay in dots (4–6 dots for an element sized 80×100 mm), place it at the panel center, press for 30–60 seconds.
Corner elements are placed so their center aligns with the corner of the molding frame. Apply glue in dots, press the element. For lightweight polyurethane overlays, glue is sufficient; for heavy wooden ones, you can add one finishing nail in an inconspicuous spot (in a relief recess), which is later filled with putty.
Joint sealing
24 hours after installing all elements, fill the joints between moldings with acrylic sealant. Use white sealant (or matching the element color if they will be painted a different color). Apply a thin line of sealant into the joint, smooth with a wet finger or rubber spatula. Remove excess immediately with a damp cloth.
Sealing hides micro-gaps that cannot be eliminated by perfect fitting, creating a smooth transition between elements. Properly applied sealant is invisible — the joint looks like a monolithic line.
Final finishing
If the elements are wooden and a natural finish is planned (varnish, oil), sand the surface with fine sandpaper (220–320 grit), remove dust. Apply stain (if color change is needed), let dry 4–6 hours. Apply varnish or oil in 2–3 thin coats with intermediate drying of 4–6 hours.
If the elements are to be painted (MDF, polyurethane, paintable wood), prime with acrylic primer, let dry 2–4 hours. Apply paint in 2–3 coats with a brush or velour roller. First coat — base, second and third — covering coats. Drying between coats — 4–6 hours.
Reinstalling the door
After the finish coating has completely dried (12–24 hours), reinstall the hardware (handle, lock), hang the door on the hinges. Adjust the hinges so the door closes tightly without sticking. Done — the smooth door has been transformed into a paneled one.
Common mistakes and how to avoid them
Even with a detailed guide, beginners make mistakes. Knowing typical slip-ups helps avoid them.
Ignoring proportions
The desire to maximally fill the door with decoration leads to overload: too many panels, too small indents from edges, overly large overlays. Result — visual chaos, the door looks tasteless.
Solution: follow the 'less is more' rule. Two or three harmonious panels are better than six cramped ones. Indents from edges of at least 50 mm are mandatory. Overlays should not occupy more than 30% of the panel area.
Inaccurate molding cutting
A 45° joint requires precision. A deviation of 1–2° creates a gap in the corner. Causes: dull saw blade, incorrect angle setting, workpiece shifting during cutting.
Solution: use a sharp blade, carefully set the angle, securely fix the workpiece. Check the fit 'dry' before gluing. If a gap still forms, don't try to fill it with a thick layer of sealant — recut the element.
Misalignment of central overlays
An overlay placed off-center on a panel disrupts symmetry. Even a 5–10 mm offset is noticeable and jarring to the eye.
Solution: carefully mark the center (intersection of the panel's diagonals) using a pencil and ruler. Before gluing, dry-fit the overlay to ensure it is perfectly centered.
Excess glue
Too much glue squeezes out when pressed and smears across the surface. Dried glue creates unsightly stains.
Solution: apply glue moderately. Immediately after pressing the element, wipe away any squeezed-out glue with a damp cloth. If glue has already dried, carefully scrape it off with a knife without damaging the surface.
Style mismatch
Mixing elements of different styles (Baroque overlays with modern minimalist moldings) creates dissonance.
Solution: choose elements of the same style. If the moldings are classic profiled, the overlays should also be classic (floral ornaments, rosettes). For a modern style, use clean, simple forms.
STAVROS — a world of decorative elements for those who appreciate details
When it comes to quality decor that can transform an interior, the name STAVROS is synonymous with reliability and aesthetic perfection. The company specializes in the production and supply ofdecorative elements made of wood and polyurethane, each of which undergoes strict quality control and meets high standards.
The STAVROS catalog includes hundreds of SKUs for moldings, overlays, rosettes, and millwork.Carved overlays made from solid oak and beechare crafted with jeweler-like detail: every leaf, every curl of the ornament is worked so that the carving's structure is visible, and the hand of the master is felt. The size range—from compact 30×30 mm corner elements to large 300×500 mm panels—allows you to select decor for any task.
STAVROS polyurethane moldings are made from European raw materials with a density of 380–420 kg/m³. Geometric precision—deviations of no more than 0.3 mm per meter of length—ensures tight, gap-free joints. The relief detailing reproduces the finest elements of the ornament, creating the impression of handcrafted work.
STAVROS wooden millwork—strips, glazing bars, profiles—is made from dry wood (8–10% moisture content), preventing deformation after installation. Surface treatment—sanded to smoothness—allows for immediate finishing without additional preparation.
STAVROS consultants will help you select elements to match your style, suggest ready-made compositional solutions, and calculate the required amount of materials. You will receive a specification: which moldings, which overlays, how many linear meters, and what additional materials are needed. This saves time and money—no need to guess if there will be enough material or if there will be leftovers.
STAVROS designers (if needed) will develop a custom decor project with 3D visualization. You will see how the door will look after decoration, can make adjustments, and try alternative options. This is especially valuable for complex compositions where a mistake in proportions is costly.
Delivery of STAVROS products is organized to any region. Wooden elements are packaged in protective film and corrugated cardboard to prevent damage during transport. For major cities, delivery by company transport with precise timelines is possible.
STAVROS pricing policy combines premium quality and reasonable prices. In-house production of wooden elements and direct contracts with European polyurethane suppliers allow for competitive pricing without compromising quality.
STAVROS showrooms in Moscow and St. Petersburg are spaces where you can see the products in person, appreciate the carving detail, and select element combinations. The exhibition includes samples of all main profiles, collections of overlays and rosettes, and fragments of decorated doors.
The STAVROS online catalog contains detailed information about each product: high-resolution photos, precise dimensions, technical specifications, and application recommendations. A convenient filter system allows you to select elements by material, size, and style.
Choosing STAVROS means choosing a company for which every detail matters—from the precision of a molding's profile to the quality of packaging. A company that understands: a door is not just an opening; it is an interior element that shapes the impression of a space. With STAVROS elements, every door can become a work of decorative art.
Answers to frequently asked questions about door decoration with overlay elements
How much does it cost to decorate one door with overlay elements?
The cost depends on the complexity of the composition and materials. A minimal solution (four simple frames made of polyurethane molding) costs 1,500–3,000 rubles for materials. A mid-range option (wooden moldings with central overlays and corner elements) costs 5,000–8,000 rubles. A premium option (complex carved composition made of solid oak) costs 12,000–20,000 rubles. This is still 2–3 times cheaper than replacing the door with a paneled one.
Can metal doors be decorated?
Yes, but the technology differs. Metal surfaces are smooth, and glue adheres less effectively. Before installation, degrease the surface with mineral spirits, use a polymer adhesive (MS-polymer or two-component polyurethane) that ensures a strong bond with metal. For added security, additionally fasten the elements with countersunk-head screws in inconspicuous places.
How long does it take to decorate one door?
For an experienced person: preparation and marking — 40 minutes, preparation and cutting of moldings — 1.5 hours, gluing moldings and overlays — 2 hours, sealing joints — 30 minutes. Total: 4.5–5 hours of pure time plus time for glue drying (24 hours) and finishing (12–24 hours). For a beginner, the process will take 1.5–2 times longer — don't rush, quality is more important than speed.
Is it necessary to remove the door for decoration?
Highly recommended. Working with a door lying horizontally is much more convenient: glue doesn't drip, elements don't shift under their own weight, and it's easier to control quality. Removing the door is not difficult (a screwdriver is needed), and the gain in quality is significant. If working with an installed door, use painter's tape to secure it while the glue sets.
How to combine door decor with trim?
The style and width of moldings on the door should match the trim. If the trim is simple and flat, keep the moldings simple too. If the trim is profiled, choose moldings with a similar profile. Color — identical or contrasting (white moldings on a dark door, dark trim). Imbalance (richly decorated trim and primitive moldings or vice versa) looks jarring.
Can doors with glazing be decorated?
Yes, but the composition needs to be adapted. Frame the glass insert with molding around the perimeter, gluing it to the wooden part of the door right up against the glass. Decorate the remaining solid areas of the door with panels. Moldings are not glued directly to the glass itself — there is no reliable adhesion. Glass can be decorated using other methods: sandblasted patterns, film decor.
Is it necessary to treat the decor with protective compounds?
Wooden elements definitely require a finish — varnish, oil, or paint. This protects the wood from moisture, dirt, mechanical damage, and extends its service life. Polyurethane elements are stable without coating, but painting is recommended — it protects against yellowing from UV radiation and allows you to create the desired color.
What to do if an element comes unglued over time?
The cause is poor-quality glue, poor surface preparation, or mechanical impact. Remove the unglued element, clean the back side and the door of old glue residue with sandpaper or a scraper. Reapply fresh, high-quality glue, press it down, and secure it with painter's tape while it sets. For added security, add a finishing nail in an inconspicuous spot.
Can panels be created on a double door?
Yes, the principle is the same, but the composition is adapted to the larger area. A double door 1400–1600 mm wide allows for more extensive decor: three to four panels on each leaf, large central overlays, complex carved compositions. It's important to maintain symmetry between the leaves — the left and right should be mirror images.