


Article Contents:
- Condition Analysis: What's Easier to Replace Than Restore
- Why Targeted Changes Work Better Than a Complete Overhaul
- The Pareto Principle in Interior Design
- What to Keep and What to Remove Without Regret
- The Magic of Horizontal and Vertical Lines
- How Wall Molding Finishing Works
- Practical Molding Placement Schemes
- Which Moldings to Choose for a Refresh Without Renovation
- Molding Installation: Key Considerations
- Why Furniture Handles Are the Most Underrated Interior Element
- Wood as the Perfect Material for Furniture Hardware
- How to Properly Match Handles to Existing Furniture
- Replacement Process: Easier Than It Seems
- Not Just Handles: What Else Can Be Updated in Furniture Without Replacement
- The Problem of Open Layouts and Monotonous Walls
- What Decorative Slats Are and How They Work
- Where to Use Wooden Slats for Zoning
- Technical Aspects of Slat Structure Installation
- Slats and Light: A Play That Creates Atmosphere
- The Underrated Role of Baseboards in Interior Design
- Which Baseboard to Choose for a Refresh
- Baseboard Color: Match or Contrast
- High Baseboard Installation: Nuances
- Textiles: The Fastest Way to Change the Mood
- Lighting: Directing the Space
- Wall Decor: Paintings, Mirrors, Panels
- Principle of a Unified Leitmotif
- Step-by-Step Room Update Plan
- First Mistake: Skimping on Materials
- Second Mistake: Overdoing the Decor
- Mistake Three: Style Mismatch
- Fourth Mistake: Ignoring Proportions
- What's Included in the Cost of an Update Without Renovation
- Where You Can Save and Where You Shouldn't
- First Example: Neoclassical Living Room
- Second Example: Scandinavian Bedroom
- Third Example: Studio with Zoning
- Plastic vs. Wood: An Honest Comparison
- Eco-Friendliness as a Modern Value
- How to Change a Room's Mood from Season to Season
- Inspiration Idea: 'Capsule Interior'
- Can Moldings Be Glued to Wallpaper?
- Which Wood Species is Best to Choose for Furniture Handles?
- Do Wooden Slats Need to Be Varnished?
- How High Should a Baseboard Be?
- Can Slats Be Used in a Bathroom?
- How to care for wooden interior elements?
- How Long Does It Take to Update One Room?
- Can All This Be Done Independently, Without Experience?
- How to Choose an Update Style If I Don't Understand Design?
- Can you combine wooden and polyurethane moldings?
That familiar feeling—you walk into your own apartment, look around, and realize the space around you has long stopped bringing joy. The wallpaper isn't peeling, the furniture is intact, the floor doesn't creak, but a sense of weariness lingers in every corner. The interior seems frozen in yesterday, and you catch yourself thinking: it's time for a change. But as soon as you imagine a major renovation—moving out furniture, living in dust for weeks, spending time and nerves—the enthusiasm evaporates. Sound familiar?
What if I told you that a major renovation is completely unnecessary? That there's a whole arsenal of techniques capable of transforming a room beyond recognition—without dirt, without construction crews, and without astronomical budgets? That's exactly what we'll talk about in this article: how to give your home a second life using targeted, yet surprisingly effective solutions. We'll discuss smartwall finishing with moldings, replacing small details with expressive elements made from natural materials, zoning with decorative slats, and those finishing touches that turn a standard apartment into a space with character.
Get comfortable. Now we'll break down each stage of the update step by step, which you can implement yourself or with minimal help from a professional. Ready? Then let's start with the most important thing—an honest analysis of what you have.


Condition Analysis: What's Easier to Replace Than Restore


Why Targeted Changes Work Better Than a Total Overhaul
There's a common misconception: if you want change in your interior, you need to tear everything down to the foundation and start from scratch. This mindset is a legacy of Soviet times, when the concept of a 'European-style renovation' implied the complete liquidation of the previous setup. But today, design thinking has advanced far ahead. Professionals know: often, one or two precise accents change the perception of space much more strongly than a complete wallpaper change.
Before tackling anything, conduct a room audit. Walk through it slowly, carefully, as if seeing it for the first time. Ask yourself a few questions. What condition are the walls in? If the coating is even, without cracks or stains, there's no point in stripping it. But adding decorative elements on top of it—moldings, cornices, slats—means breathing a completely new sound into the wall. What about the furniture? If the frame is sturdy and the fronts are clean, replacing an entire wardrobe or chest of drawers is wasteful. But replacing the hardware, those very handles we touch every day, can create the illusion of completely new furniture. What about the floor? If the flooring is fine, but old baseboards give away the age of the renovation—replace them. A tall, massive wooden or MDF baseboard instantly elevates the interior to a different visual price category.
Our factory also produces:


The Pareto Principle in Interior Design
The '80/20' principle fits perfectly with the task of updating a living space. Twenty percent of the effort yields eighty percent of the result. You don't need to redo everything: just identify those twenty percent of elements that shape the overall impression. Typically, these are:
- Walls—their area occupies the largest part of the visual field.
- Furniture hardware—small details that catch the eye and are felt tactilely every day.
- Baseboards—the line that 'frames' the room, setting the boundary between floor and wall.
- Decorative vertical and horizontal elements—slats, moldings, cornices, rosettes.
We'll focus on these four positions. Each requires minimal investment compared to a major renovation but delivers a maximally noticeable visual effect.
Get Consultation
What to Keep and What to Remove Without Regret
Let's be honest. Some things in an interior cannot be refined. Plastic baseboards that have yellowed over time, cheap furniture handles made of chrome-plated metal, smooth walls without a hint of architectural detail—all of this is not restored but replaced. And replacement here is not destruction but creation.
At the same time, there are things worth keeping. Good flooring, even if it's not the latest fashion. Quality furniture, even with outdated front designs. Even walls painted a neutral color or covered with plain wallpaper. All of this is the perfect base for transformation.
Now that we've decided on the strategy, let's move on to specific steps. And the first one is working with the walls.
Walls Anew: How Moldings Change the Perception of Space
The Magic of Horizontal and Vertical Lines
Have you ever wondered why European interiors, which we see in magazine photos, look so expensive and noble? The secret often lies not in expensive materials or square footage, but in details. Moldings—thin or massive profiled strips, glued or nailed to the wall surface—create that very architectural depth that distinguishes a thoughtful interior from an empty box.
There are manydecorative wall claddingoptions, but moldings hold a special place among them. They suit almost any style—from classic to neoclassical, from Scandinavian minimalism to Art Deco. They don't require removing the existing coating. They are easily mounted with glue or small nails. And, most importantly, they instantly transform a flat, boring wall into an element of architectural design.
How Wall Finishing with Moldings Works
Let's figure out exactly how a thin wooden or polyurethane strip can change the appearance of a room so dramatically. It's about several visual principles.
First, moldings create chiaroscuro. Even with the most even lighting, a profiled surface catches light differently than a smooth plane. Thin stripes of shadow appear, giving the wall volume and texture. The room starts to look more complex, multi-layered, more interesting.
Second, moldings structure space. Horizontal lines visually widen the wall, vertical lines—raise the ceiling. Frame compositions made of moldings break up a monotonous surface into sections, creating the effect of classic paneling. This is a technique that has been used for centuries in palace interiors and is now accessible to everyone.
Third, moldings set the stylistic direction. Strict rectangular profiles lean towards minimalism and modern classic. Profiles with floral ornamentation—towards traditional classic and Baroque. Simple rounded forms—towards Scandinavian style. You can learn more about the variety of interior moldings and profiles, their types and applications in the article aboutelegant wall and ceiling finishes.
Practical molding placement schemes
There are several classic schemes that have stood the test of time and suit most rooms.
The first scheme is the frame scheme. Rectangular frames are formed on the wall using moldings, arranged symmetrically. The distance between the frames and from the frames to the edge of the wall should be equal or proportional. This scheme is ideal for living rooms and bedrooms, giving the walls a French chic.
The second scheme is horizontal division. The wall is divided by molding into two or three horizontal zones. The lower part can be painted a darker color or covered with different wallpaper, while the upper part is left light. This is a technique that came from English interiors and looks especially good in hallways, corridors, and dining rooms.
The third scheme is the accent wall. Moldings are placed only on one wall, which becomes the main visual center of the room. This option is suitable for minimalist interiors where excess decor is undesirable, but you want to create a focal point.
The fourth scheme is the perimeter scheme. The molding runs along the perimeter of the wall at a certain height, forming a single line. This is the simplest option, yet it significantly enriches a flat surface.
Which moldings to choose for an update without renovation
For the task of quick transformation, moldings made from several materials are most suitable. Polyurethane ones are lightweight, inexpensive, easy to cut and glue, but have a limited lifespan and can look cheap upon close inspection. Plaster ones are the classic option, heavy, fragile, requiring careful installation, but providing the unique texture of a natural material. Wooden ones are the most noble option, especially when it comes to solid wood products.
Wooden moldings have a number of undeniable advantages. They are eco-friendly, durable, pleasant to the touch, take paint and stain excellently, and their natural texture creates that very atmosphere of authenticity that cannot be imitated with plastic. If you want the update to look not like a cosmetic cover-up, but like a deliberate design decision, choose natural wood.
Molding installation: what's important to consider
The process of installing moldings on existing walls does not require special skills. You will need: the moldings themselves, mounting adhesive (or 'liquid nails'), a miter box for cutting 45-degree angles, a tape measure, a pencil, a level. The sequence of actions is simple. First, mark the wall — measure distances, draw lines. Then cut the moldings to size, mitering the corners. Next, apply adhesive and press the element to the wall. After the adhesive dries, the joints are filled, and the entire structure is painted to match the wall color or in a contrasting shade.
An important nuance: if you are gluing moldings onto wallpaper, make sure the wallpaper is well adhered to the wall. Moldings create additional load, and if the wallpaper is peeling, the entire structure can fall off. On painted walls, problems usually do not arise.
It is worth noting separately that moldings can be combined with other decorative elements. For example, inside a molding frame you can hang a painting, mirror, or light fixture. You can paste wallpaper with a pattern inside the frame, creating a panel effect. You can use moldings of different widths and profiles to form complex multi-level compositions. The possibilities are limited only by imagination, anddecorative wall finishingin different variations can become a truly exciting creative process.
Furniture upgrade: when one detail changes everything
Why furniture handles are the most underrated element of interior design
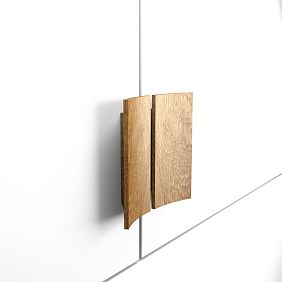
Ask anyone to name three elements that shape the look of a room. Most likely, you will hear: walls, furniture, curtains. Or: color, light, textiles. Few will remember hardware. And yetFurniture Handles— these are the details we physically interact with every day. We open cabinets, pull out drawers, grasp doors. A handle is the point of contact between a person and furniture, and it can tell more about the owner's taste than any other decorative item.
Standard handles that come with mass-produced furniture are typically bland chrome or nickel-plated brackets. They carry no aesthetic weight, add no character, and are not memorable. But replace them with designer wooden handles — and the furniture transforms. An IKEA dresser starts to look like a custom piece. Kitchen fronts acquire warmth and nobility. A bedroom wardrobe ceases to be just a functional box and becomes part of the interior story.
Wood as the perfect material for furniture hardware
Why wood specifically? Because this material carries a tactile warmth that cannot be reproduced in metal or plastic. When you grasp a wooden handle, your palm feels a living, warm, pleasant-to-touch object. This creates an elusive but important sense of comfort. You are touching not cold metal, but a natural material that breathes, that has its own texture, its own color, its own character.
Wooden handles can come in a wide variety of shapes and sizes. Concise cylindrical ones — for minimalism and Scandinavian style. Carved ones with floral patterns — for classic and Provence styles. Rough, 'craft' ones — for loft and rustic styles. Streamlined ones with soft lines — for contemporary interiors. The catalogfurniture handlesof solid wood demonstrates this diversity: from strict geometric solutions to elegant forms with detailed craftsmanship.
How to correctly choose handles for existing furniture
Choosing furniture handles is a matter not only of taste but also of technique. Pay attention to several parameters.
Center-to-center distance. If you are replacing bar handles (those that attach with two screws), measure the distance between the holes. The new handles must have the same center-to-center distance, otherwise you will have to drill new holes and fill the old ones. If you have knob handles (on one screw), the task is simplified — any knob with a suitable thread diameter will work.
Scale. Handles should be proportional to the front. A huge handle on a small drawer will look absurd, and a tiny knob on a large door will get lost. A general rule: the length of a bar handle should be about one-third the width of the front. For knobs — a diameter of at least 30 mm on a standard front.
Stylistic unity. If the interior leans towards classic, choose handles with pronounced profiling, hinting at traditional forms. For modern styles — clean lines, smooth surfaces, minimal decor. For eclectic styles — you can boldly experiment, combining different shapes and textures.
Finish. Wooden handles can be coated with varnish (matte or glossy), oil, wax, or stain. Varnish provides protection and shine, oil and wax provide a natural matte surface, stain offers the possibility to change the wood color while preserving the texture. The choice of finish depends on the effect you want to achieve and the conditions in which the handles will be used. In the kitchen, where there is grease and moisture, it is better to prefer a varnished finish. In the bedroom or living room — oil or wax for the most natural feel.
Replacement process: easier than it seems
Replacing furniture handles is one of the simplest operations in interior updating. You'll only need a Phillips screwdriver (or a power drill) and a few minutes for each handle. Unscrew the old one — screw in the new one. If the center-to-center distance matches, the process literally takes seconds.
If you decide to switch from push-button handles to pull handles or vice versa, it will require a bit more effort. You'll need to carefully fill the extra holes with wood putty, wait for it to dry, sand it, and if necessary, touch up the front panel. But even this procedure won't take more than a couple of hours for all the furniture in the room.
The result, however, will exceed expectations. A room where all the furniture has uniform wooden handles in style looks cohesive, thoughtful, and expensive. This is exactly the case where minimal costs yield maximum effect.
Not just handles: what else can be updated in furniture without replacement
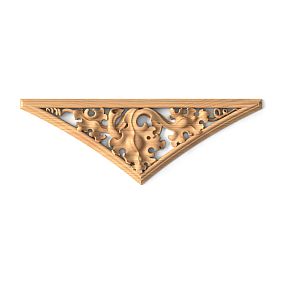
Since we're talking about furniture upgrades, it's worth mentioning other low-cost techniques. Replacing legs — many mass-produced dressers and cabinets stand on simple plastic supports, which can be replaced with turned wooden legs, immediately adding lightness and elegance to the piece. Installing decorative overlays on fronts — carved or profiled elements that are glued to the front surface of a door or drawer. These solid wood elements create the feeling of custom-made furniture, although essentially you've just added decor to an existing frame.
Decorative elements made of natural wood — capitals, rosettes, corners, ornaments — deserve special attention. They can be used not only on furniture but also on walls, doorways, and fireplace portals. They allow you to create accents, add a handmade feel, and create that very sense of a 'sophisticated' interior, which is so valued in design. The company STAVROS offers a wide range of such products, made from solid wood with high precision and attention to detail.
Zoning without construction: decorative slats as a spatial tool
The problem of open floor plans and monotonous walls
Modern apartments are increasingly built with open floor plans. The kitchen flows into the living room, the living room into the dining room, and sometimes into the work area. This looks good on paper, but in practice creates a problem: the lack of clear boundaries between functional zones. The space begins to look amorphous, blurred, and lacking structure.
The traditional solution is to build a partition. But that's construction: dust, noise, permits, loss of square meters. There is a much more elegant way — to use decorative slats.Wooden plank— is a simple but incredibly expressive element that allows you to visually divide space without creating physical barriers.
What are decorative slats and how do they work
Decorative slats are vertical (less often horizontal) strips made of wood or MDF, installed at a certain distance from each other. They can be fixed from floor to ceiling, forming an openwork partition, or mounted on a wall as an accent panel.
The principle of slat operation is based on the interplay of transparency and rhythm. Unlike a solid wall, a slatted partition allows light and air to pass through. You see the space behind it, but the rhythmic alternation of slats and gaps creates a sense of boundary. The eye perceives the slatted structure as a divider, but not as a barrier. This is the perfect compromise between openness and privacy.
Additionally, vertical slats visually elongate a room in height. If the ceilings in your apartment are standard — 2.5–2.7 meters — a slatted structure from floor to ceiling will create the illusion of a higher space. This is especially valuable in typical apartments where every centimeter of height counts.
Where to use wooden slats for zoning
There are many application options, and each solves a specific interior task.
Entryway zone. If the entryway is not separated from the living room by a wall (which is often the case in studios and remodeled apartments), a slatted partition will mark the entrance area without blocking the view or 'eating up' space. You can hang hooks for clothes on it, attach a shelf for keys — and get a full-fledged entryway without a single square meter of wall.
Kitchen-living room. Slats between the kitchen and living areas are a classic technique that solves two problems at once. Visual separation of functional spaces and partial protection of the living room from kitchen odors (provided the slats are installed densely enough). A bar counter or console table can be attached to the slatted partition — providing an additional work surface.
Sleeping area in a studio. If you live in a studio apartment and want to separate the sleeping area from the rest of the space, a slatted partition is an ideal solution. It will create a sense of privacy but won't turn the studio into a cramped box. Moreover, natural light will penetrate through the gaps between the slats.
Home office. Remote work has become the norm, and many set up a workspace right in the living room or bedroom. A slatted structure allows you to highlight the work area, creating a psychological boundary between 'work' and 'rest.' This is important not only for visual perception but also for mental switching.
Accent wall.wooden planklooks magnificent not only as a partition but also as wall decor. Slats mounted on the wall behind the headboard, behind the TV in the living room, or in an entryway niche create a powerful visual accent. The rhythmic pattern of vertical lines attracts the eye, sets the mood, and adds volume to the space.
Technical aspects of installing slatted structures
Installing decorative slats is not a complicated process, but it requires care and precision. Key parameters to determine before starting work:
Slat spacing — the distance between the strips. The smaller the spacing, the denser and more 'closed' the structure will be. For zoning, spacing from 30 to 80 mm is typically used. For an accent wall — from 15 to 40 mm. The choice depends on the desired degree of transparency and stylistic effect.
Slat width and thickness. Standard parameters — width 20–40 mm, thickness 20–30 mm. More massive slats (50–60 mm) are suitable for loft interiors and spaces with high ceilings. Thin slats (15–20 mm) — for refined, 'airy' structures in Scandinavian or Japanese minimalist style.
Mounting method. The battens can be attached directly to the wall (when creating an accent wall) or to horizontal guides—the top and bottom beams, which in turn are fixed to the floor and ceiling (when building a partition). The second option is preferable as it allows for easy dismantling of the structure if necessary.
Finishing treatment. Wooden slats are treated with a protective coating before installation: varnish, oil, stain, or paint. The choice of finish depends on the interior style and your preferences. The natural wood tone adds warmth and coziness. White or gray paint fits into Scandinavian and neoclassical interiors. Dark stain adds drama and depth.
Reiki and Light: A Game That Creates Atmosphere
It's worth mentioning separately the interaction of slatted structures with lighting. If you place a light source behind a slatted partition or an accent wall made of slats, a 'light ridge' effect will occur—light will penetrate through the gaps, creating a striped pattern of light and shadow on the opposite wall or floor. This technique looks incredibly impressive, especially in the evening. You can use an LED strip installed behind the slats or spotlights directed along the structure. The result is a space that literally breathes light.
To enhance the effect, you can use wooden slats with a pronounced texture—oak, ash, walnut. The light emphasizes the wood grain, making each plank unique. This is something that cannot be achieved with plastic or aluminum imitations.
Finishing touches: baseboards that frame the space
The Underrated Role of Baseboards in Interior Design
The baseboard is an element that is often considered last. It is installed after laying the floor and finishing the walls, often from the remaining budget, choosing the cheapest option. A plastic baseboard 50–60 mm high, assembled from several sections with end caps and corner pieces—that's the typical picture. It fulfills its function: it covers the gap between the floor and the wall. But aesthetically—it's a disaster. Plastic fades, yellows over time, end caps fall out, and the thin, low profile emphasizes the modesty of the setting.
Meanwhile, it is the baseboard that forms the 'frame' of the room. Remember: a painting without a frame looks unfinished. In exactly the same way, a room without an expressive baseboard looks 'bare.' A tall, solid wood or MDF baseboard is that very frame that gives the space completeness and substance.
Which Baseboard to Choose for an Update
Solid wood baseboard is a premium option. It is durable, beautiful, eco-friendly, and pleasant to the touch. The profile can be straight, beveled, or profiled (with a shaped top edge). Height—from 80 to 150 mm and above. The taller the baseboard, the more solid the room looks. The optimal height for a standard apartment with 2.7 m ceilings is 100–120 mm. For rooms with high ceilings—150 mm and more.
MDF baseboard is a more affordable alternative. It is covered with a film or veneer and can be painted any color. MDF profiles can be very diverse—from minimalist to complexly profiled. They are lighter than wooden ones, easier to install, and yet look quite decent.
The main rule when choosing a baseboard is that it should be tall enough and have a pronounced profile. A thin, flat baseboard is a visual zero. It adds nothing. But a massive profile 100 mm or taller instantly gives the room an architectural sound.
Baseboard Color: Matching or Contrasting
The classic approach is a baseboard that matches the wall color. This visually raises the ceiling, as the boundary between the wall and floor becomes unnoticeable. The wall 'continues' all the way to the floor, and the room appears taller.
The second option is a baseboard that matches the floor color. This visually expands the floor, making its area more tangible. Suitable for small rooms where you want to create a sense of spaciousness at floor level.
The third option is a contrasting baseboard. A white baseboard on a dark floor with gray walls. Or a dark baseboard on a light floor with light walls. Contrast creates graphic quality, clarity of lines, 'outlines' the geometry of the room. This technique is especially good in modern interiors where purity of form is valued.
The fourth option is a baseboard in the natural color of wood. It may not match either the floor or the walls, but it can echo other wooden elements in the room—furniture handles, slats, moldings, picture frames. This creates a unified 'wooden' leitmotif that ties the interior together.
Installing a Tall Baseboard: Nuances
Replacing plastic baseboards with tall wooden or MDF ones is a process slightly more labor-intensive than replacing handles, but still far from a major renovation.
Removing the old baseboard takes just minutes—plastic simply snaps off the clips or is unscrewed. Next, you need to prepare the wall: if traces are found behind the old baseboard, they need to be filled with putty or painted over. However, the tall new baseboard will likely cover all imperfections.
Wooden baseboard is attached with glue, screws, or finishing nails. Glue is the cleanest method but requires a perfectly even wall. Screws are a reliable option, but the heads need to be countersunk and filled with putty. Finishing nails are a compromise: thin nails are driven into the baseboard and become invisible after painting.
Corners are the most difficult part. Internal and external corners are cut at a 45-degree angle using a miter box or miter saw. Precision is key here: gaps in the corners are immediately noticeable. If you are not confident in your skills, it's better to entrust this work to a professional.
After installation, the baseboard is painted or varnished if necessary. The joint between the baseboard and the wall can be sealed with acrylic sealant to prevent gaps.
Additional Update Techniques: Textiles, Light, and Decor
Textiles: The Fastest Way to Change the Mood
So far, we've talked about elements that require at least minimal installation. But there are things that change in seconds and yet radically influence the perception of a room. We're talking about textiles. Curtains, pillows, bedspreads, rugs—all of these can be replaced in one trip to the store.
But it's important to understand: textiles work in conjunction with the 'architectural' part of the interior. If you've installed moldings, replaced handles with wooden ones, installed slats and tall baseboards—the textiles should match this new level. Roughly speaking, if you've created a frame, you need a worthy picture inside.
For classic interiors with moldings, curtains made of dense fabrics—linen, velvet, jacquard—are suitable. For Scandinavian interiors with slats—light cotton or linen curtains in natural shades. For modern interiors—Roman shades, roller blinds, or simple straight panels without valances and tiebacks.
Light: Directing the Space
Lighting is the second powerful tool that doesn't require construction work. Replacing a chandelier, adding sconces, table lamps, or floor lamps changes the atmosphere of a room just as radically as repainting the walls.
The key principle: there should be at least three light sources at different levels in one room. Overhead light (chandelier or recessed lights), mid-level light (sconces, pendants, table lamps), and low-level light (floor lamps, floor lights, furniture lighting). This creates volume and depth. A single central chandelier illuminates the room evenly but flatly. Multiple sources create shadows, accents, zones.
If you've installed a slatted structure, be sure to add lighting to it. As we've already mentioned, light behind the slats creates a mesmerizing effect. This could be a warm white LED strip (color temperature 2700–3000K) hidden behind the top rail. It will illuminate the slats from top to bottom, reveal the wood texture, and create a soft diffused glow.
Wall decor: paintings, mirrors, panels
When walls are enriched with moldings, they themselves become decor. But that doesn't mean you can't place anything on them. On the contrary, molding frames seem to 'invite' you to place a painting, poster, photograph, or mirror inside them. A molding frame and the artwork within it is a classic combination, tested over centuries.
Mirrors deserve special mention. A large mirror on the wall visually doubles the space, adds light, and creates a sense of depth. If you place a mirror inside a molding frame opposite a window, the room will become significantly brighter due to reflected natural light.
Decorative wooden panels are another option that harmoniously complements an interior with wooden elements. Carved panels, wall compositions made of solid wood, decorative rosettes, and ornaments—all of this creates a unified visual language where wood is the main material.
Holistic approach: how to combine all renovation elements
The principle of a unified leitmotif
The most common mistake when updating an interior is chaos. A person gets excited about an idea, buys trendy handles, installs slats, glues moldings—but each element exists on its own, without connection to the others. The result is visual noise instead of harmony.
To avoid this, before starting the update, determine the leitmotif—the unifying idea that will link all elements together. This could be a material (wood), a color (natural warm tones), a style (neoclassical), or a mood (warm minimalism).
If the leitmotif is wood, then the moldings, slats, baseboards, and handles should be made from the same species or at least wood of the same tone. Oak handles won't go with pine slats if the oak tone is warm golden and the pine is cold yellowish. But if everything is made, for example, from oak with a natural oil finish—the interior will become monolithic, like a well-played orchestra.
If the leitmotif is color, then all decorative elements are painted in one tone. White moldings, white slats, white baseboard—that's pure neoclassicism. Gray elements—Scandinavian style. Dark green or dark blue—English classic.
If the leitmotif is style, then each element is selected based on stylistic features. For Art Deco—moldings with geometric patterns, metal handles, lacquered surfaces. For Provence—slats with an aged surface, wrought iron handles (though wooden ones with a vintage imitation will also work), baseboard with a shaped profile.
Step-by-step plan for updating a room
Let's put it all together and create a specific action plan.
Step one: inventory. Assess the condition of the walls, furniture, floor, baseboards. Determine what stays, what gets replaced, what gets added.
Step two: concept. Choose a leitmotif: material, color, style. Determine which elements you'll use: moldings, slats, handles, baseboards—all together or partially.
Step three: element selection. Choose specific products, paying attention to compatibility in color, material, and style. Order everything at once to compare and ensure harmony.
Step four: preparation. Clear the walls of excess decor. Remove old baseboards. Mark the walls for moldings and slats.
Step five: molding installation. Start with them, as moldings are installed first (they are closest to the wall). Paint or prepare the moldings before installation—it's easier than painting on the wall.
Step six: slat installation. If you're installing a slatted partition or accent wall, do this after the moldings. Slats are mounted on rails that have been pre-treated with a finish.
Step seven: baseboard replacement. Install new baseboards, fitting them to the moldings (if the moldings go down to the floor). Seal the joints.
Step eight: handle replacement. This is the fastest stage. Unscrew the old ones, screw in the new ones. Enjoy the result.
Step nine: textiles and lighting. Hang new curtains, place lamps, arrange pillows. This is the final chord that will 'bring the room to life.'
Step ten: step back and look. Seriously—give yourself a minute to just stand at the room's threshold and see the result with fresh eyes. Most likely, you won't recognize your own home.
Typical mistakes when updating an interior without renovation
Mistake one: skimping on materials
The temptation to buy the cheapest moldings or plastic slats instead of wooden ones is great. But this is exactly where saving money backfires. Cheap material looks cheap—that's an axiom. A polystyrene molding, even well-installed, reveals its nature upon closer inspection. A plastic slat has neither the texture nor the warmth of wood. The result of such an update is visual inconsistency: you seemed to try, but it still looks poor.
Investing in quality materials is an investment in a long-term result. Wooden moldings and slats last for decades without losing their appearance. They are easily restored—just lightly sand and renew the finish. They don't fade, yellow, or warp. And the feeling of natural material in the interior creates that very 'expensive' effect that is impossible to achieve with plastic.
Mistake two: overdoing the decor
When a person discovers the world of moldings, slats, and decorative elements, the temptation arises to use everything at once. Moldings on all four walls, slats in every corner, rosettes on the ceiling, overlays on furniture—and suddenly the room looks not like a stylish space, but like an exhibition hall.
Remember the rule: less is more. Choose one or two key techniques and implement them well. Molding on one accent wall, slats in the zoning area, handles on the main furniture, high baseboards around the perimeter. This is enough for a complete transformation without overloading the space.
Mistake three: mismatched styles
Carved Baroque-style wooden handles on minimalist IKEA furniture. Classic molding with plasterwork on a wall next to a minimalist-style slatted partition. A high profiled baseboard in a room with a drywall suspended ceiling. All of these are examples of stylistic conflict that kills interior harmony.
The solution is simple: determine the style in advance and select all elements within its framework. If unsure, choose neutral forms. Simple rectangular molding without ornament, a smooth wooden handle, a slat with straight edges, a baseboard with a straight profile—these elements fit almost any style and don't create conflicts.
Mistake four: ignoring proportions
Molding too small for a large wall—gets lost and looks pitiful. Handles too large for small drawers.
Proportions are the foundation of any design. Before ordering elements, make a simple sketch or at least mark the future contours of the molding on the wall with painter's tape. Hold the handle against the front and assess the scale. Measure the ceiling height and relate it to the baseboard height. Ten minutes spent checking proportions will save you from costly mistakes.
Update budget: real numbers
What's included in the cost of an update without renovation
Let's calculate an approximate budget for updating one room with an area of 18–20 square meters.
Molding for an accent wall (approximately 12–15 linear meters)—cost depends on material and manufacturer. Solid wood molding is more expensive than polyurethane, but lasts significantly longer and looks incomparably better.
Decorative slats for zoning or an accent wall (10–15 pieces)—cost depends on wood species, size, and quality of finish. Solid wood slats with factory finishing are the optimal choice for price-to-quality ratio.
Furniture handles (8–12 pieces for a dresser, wardrobe, cabinets, etc.)—wooden designer handles cost noticeably more than mass-produced plastic ones, but we're talking about individual pieces where each item is a complete artistic product.
Baseboards (room perimeter, approximately 16–18 linear meters)—high wooden or MDF baseboard is more expensive than plastic, but the visual effect is incomparable.
Consumables (glue, putty, paint, sealant, fasteners)—a relatively small expense item.
Master's labor (if you're not doing everything yourself)—depends on region and complexity.
In total, updating one room across all four items (molding, slats, handles, baseboards) costs several times less than a full renovation. Meanwhile, the visual effect is comparable. You get a 'new' room without a single day of construction dust.
Where you can save and where you can't
You can save on volume: you don't have to decorate all walls, one or two are enough. You don't have to replace handles on all furniture—start with the most noticeable pieces. You don't have to install slats from floor to ceiling—sometimes a small accent panel is enough.
You cannot save on the quality of the elements themselves. Cheap molding made of brittle foam is money down the drain. Plastic slats are a visual failure. A Chinese handle made of pressed sawdust is a disappointment in six months. It's better to do less, but with good material, than a lot—but with junk.
Inspiring examples: what it looks like in practice
Example one: neoclassical living room
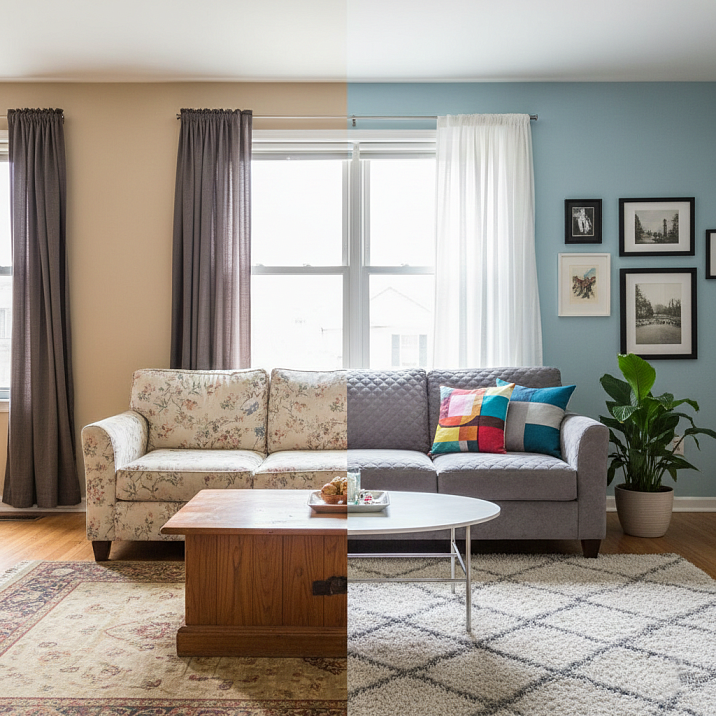
Imagine a room with white walls and light laminate flooring. Before the update—just a white box. After the update: on the main wall (behind the sofa) classic molding is installed, forming three symmetrical frames. Inside the central frame—a painting in a thin wooden frame. The baseboard is replaced with a high (120 mm) white MDF one with a profiled top edge. On the dresser opposite the sofa—new furniture handles made of solid oak, coated with matte varnish. Curtains—dense gray linen floor-length. A floor lamp with a fabric shade in the corner. The room looks like an illustration from an interior magazine, but nothing besides the listed items was changed. Walls, floor, furniture—everything remained the same.
Example two: Scandinavian bedroom
Bedroom with gray-blue walls and light parquet. Before the update—simple, clean, but bland. After the update: behind the bed headboard—an accent wall of vertical wooden slats in a natural light shade. The slats are mounted with a 30 mm gap, behind them a warm white LED strip is hidden, creating soft lighting in the evenings. The bedside tables got newFurniture Handles—simple wooden ash knobs, coated with natural oil. Baseboard—high, made of MDF, painted the color of the walls (gray-blue). Bedspread—textured oatmeal-colored cotton. The room became warm, cozy, 'hugging'—and all this without a single stroke of plaster.
Example three: studio with zoning
A 35-square-meter studio apartment. Kitchen, living room, and sleeping area in one space. Before the update—just a large room with furniture. After the update: between the kitchen and living room, a slatted partition is installed made ofRK-001 lies in its natural origin. Oak and beech, used to manufacture the ruler, are environmentally friendly and renewable resources. This makes the ruler safe for health and suitable for use in residential and public spaces, creating a healthy microclimate.—ten slats 40 mm wide with a 50 mm gap, from floor to ceiling. The sleeping area is separated by a similar structure, but with a tighter gap (30 mm) for more privacy. On the kitchen fronts—new wooden bracket handles. In the living area—on the wall behind the TV, horizontal molding visually widens the wall. Baseboard throughout the apartment—unified, high, white. Result: three clearly defined zones in one space, without a single brick or drywall partition.
Why natural materials are the key to a long-lasting result
Plastic vs. Wood: An Honest Comparison
We live in an era of imitations. Wood-look film on furniture. Stone-look plastic on windowsills. Parquet-look laminate on the floor. All of this creates the illusion of natural materials, but the illusion dissipates as soon as you touch the surface.
Wood is a material that speaks to us on a subconscious level. Millennia of evolution have taught humans to value natural textures—they are associated with safety, warmth, and home. When you enter a room where the walls are adorned with wooden moldings, the furniture has wooden handles, and solid wood slats softly filter the light—you feel the difference. It's not a logical conclusion, but an intuitive sensation. The space seems more 'real,' more 'alive.'
Moreover, wood ages beautifully. Over the years, it develops a patina, slightly changes its shade, but does not lose its appeal. Plastic, on the other hand, ages ugly: it yellows, cracks, fades. By choosing natural materials to update your interior, you are investing not only in today's result but also in long-term beauty.
Eco-friendliness as a Modern Value
Another argument in favor of wood is eco-friendliness. Wooden products do not emit harmful substances, do not accumulate static electricity, and do not provoke allergic reactions. In a child's room, bedroom, living room—wood creates a healthy microclimate everywhere.
Modern consumers are increasingly conscious in their choice of materials. The question 'What is this made of?' is being asked more and more often. And the answer 'made of solid natural wood' always inspires trust and respect—both for the manufacturer and for the homeowner.
Seasonal Updates: An Interior That Lives
How to Change a Room's Mood from Season to Season
One of the main advantages of targeted updates is their reversibility and flexibility. Moldings, slats, and baseboards are the 'framework' that remains constant. But the 'content' can be changed with each season.
In spring and summer—light cotton curtains, bright pillows, fresh flowers in vases, light-colored bedspreads. The room breathes freshness and air.
In autumn—warm textiles in ochre, terracotta, mustard tones. Woolen blankets, candles, dried flowers. The room becomes a cozy cocoon.
In winter—deep colors (burgundy, emerald, dark blue), soft velvet pillows, garlands of warm light. The room transforms into a festive space.
Wooden elements—moldings, slats, handles, baseboards—serve as a neutral backdrop for any seasonal mood. They pair equally well with summer freshness and winter warmth. This is the 'skeleton' of the interior, on which you 'dress' different 'outfits' depending on the time of year and mood.
An Idea for Inspiration: The 'Capsule Interior'
Similar to a capsule wardrobe (a set of basic items that are easy to combine), you can create a 'capsule interior.' The base—neutral walls, quality flooring, wooden decorative elements. The variables—textiles, decor, accessories. Two or three sets of curtains, pillows, and bedspreads—and you have three different rooms in one. Sounds tempting, doesn't it?
Frequently Asked Questions
Can you glue moldings onto wallpaper?
Yes, you can, if the wallpaper is dense and well-adhered to the wall. Vinyl and non-woven wallpapers usually support the weight of a molding. But if the wallpaper is paper, thin, or peeling in places, it's better to re-adhere it first or remove the covering at the installation site, gluing the element directly onto the plaster.
Which wood species is best to choose for furniture handles?
Oak, ash, beech—are the most popular species for hardware. They are strong, wear-resistant, and have a beautiful texture. For budget solutions, birch is suitable—it is easy to work with and takes stain and paint well. Coniferous species (pine, spruce) are less suitable for handles due to their softness but can be used in decorative items.
Do wooden slats need to be varnished?
Not necessarily. Varnish provides protection and shine but deprives the surface of its natural matte finish. For living spaces, you can use oil or wax—they protect the wood from dirt while preserving its natural texture. For wet rooms (bathroom, kitchen), varnish is preferable.
How high should a baseboard be?
For rooms with ceilings 2.5–2.7 m high, the optimal baseboard height is 80–120 mm. For ceilings 3 m and higher—120–200 mm. A baseboard that is too high in a low room visually 'presses down,' while one that is too low in a high room gets lost.
Can slats be used in a bathroom?
Yes, but with caveats. Wood in a humid environment requires thorough protection. It is necessary to use moisture-resistant species (teak, larch, thermally treated wood) and apply multiple coats of yacht varnish or special oil. Alternatively, use slats made of moisture-resistant MDF. Without proper protection, wood in a damp room will deform, swell, and can become a breeding ground for mold.
How to care for wooden interior elements?
Wooden moldings, slats, handles, and baseboards do not require complex care. It is enough to regularly wipe them free of dust with a dry or slightly damp cloth. Once a year, you can refresh the oil coating (if oil was used) or apply a thin layer of wax. Varnished surfaces do not require coating renewal, only periodic cleaning.
How long does it take to update one room?
For an average room size (18–20 sq. m) and performing all four types of work (moldings, slats, handles, baseboards)—from 2 to 5 days, depending on complexity and your experience. Replacing handles takes a couple of hours. Installing moldings—one to two days (accounting for glue drying and painting). Installing slats—one day. Replacing baseboards—one day. If you hire a professional, the timeline can be even shorter.
Can all this be done independently, without experience?
Replacing handles and baseboards - certainly. Installing moldings - provided you are careful and precise with marking. Installing a slatted partition - if you have basic woodworking skills and experience with power tools. Complex elements (mitering molding corners, attaching slats to the ceiling) are better entrusted to a professional if you are not confident in your abilities.
How to choose a style for the update if I don't understand design?
Start simple: figure out what you like. Collect photos of interiors that evoke positive emotions in you (online, in magazines, on social media). Pay attention to common features: which colors predominate, which shapes, which materials. That is your style. Next, select elements that correspond to these visual preferences.
Can wooden and polyurethane moldings be combined?
Technically - yes. But visually, this is a risky technique. Wood and polyurethane have different textures, different light responses, different tactile sensations. If all elements are painted the same color, the difference is less noticeable. But if the surfaces are left natural or coated with clear varnish, the mismatch of materials will be glaring. It's better to use one material for all decorative elements.
Conclusion: A budget-friendly path to a new space
We have gone the whole way - from analyzing the room's condition to specific update techniques and practical recommendations. And the main conclusion we want to convey is simple: to live in a beautiful, stylish, well-thought-out interior, you don't need to undertake a major renovation. You don't need to tear down walls, pour floors, or relocate utilities. It's enough to see the potential in what already exists and add precise, well-considered touches.
Wall finishing with moldingstransforms an empty plane into an architectural element. WoodenFurniture Handlesadd character and warmth to mass-produced furniture.Wooden plankzones the space without a single brick. A tall baseboard frames the room, giving it completeness and solidity. All together - this is not a cosmetic cover-up, but a full-fledged designer transformation.
The company STAVROS is one of those manufacturers that understands this philosophy of transformation. Working with solid natural wood, STAVROS creates elements that carry not just function, but aesthetic value. Every handle, every molding, every slat is a product designed with attention to form, proportions, and texture. STAVROS offers a wide catalog of products - from furniture hardware to decorative profiles - which allows you to select elements for any style and any task. By using STAVROS products, you get a guarantee of natural material, high-quality processing, and long-lasting results.
Your home deserves a second life. And that life doesn't start with a sledgehammer and a bag of plaster, but with one wooden handle, one elegant molding, one slat pierced with light. Start small - and you will be surprised how far that small thing can take you.


